XBLAH's Modding Tool: Difference between revisions
mNo edit summary |
No edit summary |
||
| (109 intermediate revisions by 13 users not shown) | |||
| Line 1: | Line 1: | ||
{{ | {{GoldSrc topicon}} | ||
{{Source topicon}} | |||
{{Source 2 topicon}} | |||
{{ | {{LanguageBar}} | ||
<span style="color:white; font-weight:bold"> {{For|about=the tool|documentation for XBLAH's Modding Tool|[[XBLAH's Modding Tool/Docs|XBLAH's Modding Tool Documentation]]|}} </span> | |||
{{ | {{SoftwareBox | ||
<!-- Basic info --> | |||
| title = XBLAH's Modding Tool Details | |||
| image = Software Cover - XBLAH's Modding Tool.jpg | |||
<!-- Details --> | |||
| initial_release = Jan 11, 2020 | |||
| stable_release = Jan 13, 2024 | |||
| written_in = csharp | |||
| distribution = Commercial software | |||
| type = Mod tool • Map compiler • Map tool • Model compiler • Model tool • Texture tool • Sound tool • VPK tool | |||
= | <!-- Operating system(s)--> | ||
| windows = 1 | |||
<!-- Target engine(s)--> | |||
| goldsrc = 1 | |||
| source = 1 | |||
| source2 = 1 | |||
}} | |||
[[ | {{Xblahmt|4}} is an Integrated Development Environment written by '''[[User:XBLAH|XBLAH]]''' to improve {{Valve|4.1|addtext=-games}} modders productivity and quality of life. | ||
The IDE includes features like mod creation, map editing, compiling and decompiling, model compiling, editing and decompiling, material editing, soundscape editing, vpk packing and unpacking and general scripting and automation. | |||
{{notice|As of December 2023, with version 2.0 or newer, XBLAH's Modding Tool is available in two editions: the Essentials Edition, free of charge, and the Advanced Edition, which requires a [https://www.patreon.com/xblah Patreon subscription].}} | |||
__TOC__ | |||
= Features = | |||
[[File:XBLAH's Modding Tool - Welcome Tab - v2.2.0.png|thumb|480px|{{xblahmt|4}} - Welcome Tab]] | |||
{{Xblahmt|4}} is organized in different dashboards depending on which role you have in the mod development. There are dashboards available for mod leaders, level designers, material designers, model designers, sound designers, programmers, animators, and particle designers, each one with a specialized toolset in that field. | |||
{{notice|The Essentials Edition contains only the Modding Dashboard and part of Level Design Dashboard. The Advanced Edition contains the complete toolset.}} | |||
== Game == | |||
== | |||
{{ | ;Create a mod | ||
:[[Create a Mod|Creating a bare-bones mod]] usually requires more than just creating a [[liblist.gam]] or a [[gameinfo.txt]]. Mods based on {{gldsrc|4}} and {{source|4}} games can be created with the {{Xblahmt|4}} using an intuitive interface, that creates all the required files and directories. {{mapbase|4}} mods are also supported. ([[XBLAH's_Modding_Tool/Docs/Game/New Mod|See documentation]]). | |||
;Refresh Mods | |||
:In case you manually added or modified any mods for the current game, you can refresh the mod listing. ([[XBLAH's_Modding_Tool/Docs/Game/Refresh Mods|See documentation]]) | |||
<gallery mode=nolines widths=384px heights=288px> | |||
Image:XBLAH's Modding Tool - Create a mod v1.17.0.png|Creating a mod | |||
< | </gallery> | ||
== Modding == | == Modding == | ||
;Run a Mod | |||
:You can run mods straight from {{Xblahmt|4}}, without having to restart Steam when you create or install a new mod. {{Xblahmt|4}} supports lots of different run modes. It contains basic presets for each game, and you can add new ones. ([[XBLAH's_Modding_Tool/Docs/Mod/Run|See documentation]]) | |||
;Open the Mod Folder | |||
:{{Xblahmt|4}} provides a shortcut to the selected mod folder, proving itself useful in case you need to modify any files manually. ([[XBLAH's_Modding_Tool/Docs/Mod/Open_Mod_Folder|See documentation]]) | |||
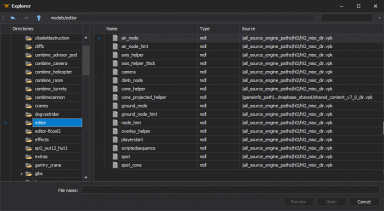
;File Explorer | |||
This can be accessed | :All the files mounted into the game info can be previewed with {{Xblahmt|4}} in the File Explorer. The File Explorer replaces the [[GCFScape]] as the ultimate file browsing tool, since it will mount all the VPKs and loose files according to the game info, to show the modder a comprehensive list of files. This relieves the modder of having to browse vpks individually, and the integrated features of the tool usually dismisses the necessity of extracting the files from the vpks, since they can be accessed natively by double-clicking the file (or right-clicking for more options). ([[XBLAH's_Modding_Tool/Docs/Mod/File_Explorer|See documentation]]) | ||
;Deleting a Mod | |||
:You can delete the selected mod in case you don't want to work with it or have it anymore. ([[XBLAH's_Modding_Tool/Docs/Mod/Delete_Mod|See documentation]]) | |||
<gallery mode=nolines widths=384px heights=288px> | |||
Image:XBLAH's_Modding_Tool_-_Modding_-_Run_-_Expert_Mode.png|Running a Mod | |||
Image:XBLAH's Modding Tool - Modding - File explorer.png|File Explorer | |||
</gallery> | |||
=== Mod Configuration === | |||
;Game Info | |||
:The mod information can be edited with {{Xblahmt|4}} through a comprehensive UI without requiring the modder to mess with text files. It includes all the major keys of {{gldsrc|4}} and {{source|4}}. ([[XBLAH's_Modding_Tool/Docs/Mod/Game_Info|See documentation]]) | |||
;Mounting Game Assets | |||
:The mod mounted content can be edited with {{Xblahmt|4}}, pointing to directories and [[VPK|VPKs]] in the desired order, without the risk of messing the [[Gameinfo.txt|game info]]. ([[XBLAH's_Modding_Tool/Docs/Mod/Content_Mount|See documentation]]) | |||
;Managing Chapters | |||
:Chapters for single-player games can be created with {{Xblahmt|4}} through an UI. The modder can easily create new chapters, select the chapter images, chapter background images, the first map of the chapter, the background map, and the tool will do the dirty work of creating the required vtfs, vmts and scripts. It gives the option to automatically blur the background images, so the modder can just take a screenshot of the background map and the tool will apply the usual blur. This replaces the need of saving [[VTF|VTFs]], creating chapter images with weird proportions, and so on. ([[XBLAH's_Modding_Tool/Docs/Mod/Chapters|See documentation]]) | |||
;Starting maps | |||
:For {{gldsrc|4}} games, you can set the map that will be run when you start a new game and the map that will run when you start the training section. ([[XBLAH's_Modding_Tool/Docs/Mod/Starting_Maps|See documentation]]) | |||
[[ | ;Menu Items | ||
:Main menu items can be added, modified or removed with {{Xblahmt|4}} based on a provided list of options. ([[XBLAH's_Modding_Tool/Docs/Mod/Menu_Items|See documentation]]) | |||
---- | <gallery mode=nolines widths=384px heights=288px> | ||
Image:XBLAH's Modding Tool - Game Info v1.17.png|Game Info | |||
Image:XBLAH's Modding Tool - Content Mount v1.17.png|Mounting content | |||
Image:XBLAH's Modding Tool - Chapters v1.17.0.png|Single-player Chapters | |||
Image:XBLAH's Modding Tool - Starting maps v1.17.png|Starting Maps | |||
Image:XBLAH's Modding Tool - Menu Items v1.17.png|Game Menu Editor | |||
</gallery> | |||
=== File Management === | |||
;Packing Files Manually | |||
:Instead of distributing loose files, you can select the files you want and pack them into a [[VPK]]. The selected files will be automatically deleted after they are packed into the [[VPK]], cleaning up your mod folder. The [[VPK]] will be saved under {{path|MOD_NAME/custom/}}. ([[XBLAH's_Modding_Tool/Docs/Mod/Pack_Files_Manually|See documentation]]) | |||
;Pack Subdirectory under {{path|MOD_NAME/custom/}} | |||
:Instead of manually packing files into a [[VPK]], you can select a folder under the {{path|MOD_NAME/custom/}} directory and it will convert all the Unpacked Files into a single [[VPK]]. You will have the option to delete the Unpacked Files. ([[XBLAH's_Modding_Tool/Docs/Mod/Pack_Files_Manually|See documentation]]) | |||
;Unpacking Files | |||
:You can quickly convert mounted [[VPK|VPKs]] into Unpacked Files, to help during the modding process. All the files in the [[VPK]] will be extracted to the mod folder, and you will have the option to delete the [[VPK]]. ([[XBLAH's_Modding_Tool/Docs/Mod/Pack_Files_Manually|See documentation]]) | |||
;Clean Temporary Files | |||
:Before shipping the mod, the {{Xblahmt|4}} provides the modder with a list of unnecessary files, which can be removed with the push of a button. ([[XBLAH's_Modding_Tool/Docs/Mod/Clean_Files|See documentation]]) | |||
;Remove Duplicates | |||
:The tool will list all the files that have the same name, relative directory and content and are mounted at least twice, and will give you the option to delete the extra Unpacked Files with a single button click. ([[XBLAH's_Modding_Tool/Docs/Mod/Remove_Duplicates|See documentation]]) | |||
<gallery mode=nolines widths=384px heights=288px> | |||
Image:XBLAH's Modding Tool - Clean Files v1.17.png|Cleaning Files | |||
Image:XBLAH's_Modding_Tool_-_Pack_Files_Manually_v1.17.png|Packing Files Manually | |||
Image:XBLAH's_Modding_Tool_-_Pack_Custom_Folder_v1.17.png|Pack Subdirectory under {{path|MOD_NAME/custom/}} | |||
Image:XBLAH's Modding Tool - Unpack Files v1.17.png|Unpacking Files | |||
</gallery> | |||
== Animations == | |||
==== | |||
;Scene Editor | |||
The Source Choreography Editor will be automatically configured if ran through the {{Xblahmt|4}}, patching the missing icons. For compatible games, Scene Maker will be installed and run instead. ([[XBLAH's_Modding_Tool/Docs/Animations/Scene_Editor|See documentation]]) | |||
= | {{note|Scene Maker is developed by [[User:Cvoxalury|Cvoxalury]], is available for free and can be downloaded [[https://drive.google.com/file/d/1UBUN3ks5f_1_g8ecAXQpL_mC55-57jQp/view?usp=share_link here]]. Access to {{xblahmt|4}} is not required to download or run Scene Maker.}} | ||
=== | <gallery mode=nolines widths=384px heights=288px> | ||
Image:XBLAH's Modding Tool v1.17 - Scene maker.png|Scene Maker | |||
</gallery> | |||
< | |||
== Maps == | == Maps == | ||
;Map Editor: | |||
:{{hammer3|4}} and {{hammer|4}}will be automatically configured if ran through the {{Xblahmt|4}}. {{jack|4}} will be installed and configured for compatible {{gldsrc|4}} games. {{hammerpp|4}} will be installed and configured for compatible {{source|4}} games. ([[XBLAH's_Modding_Tool/Docs/Maps/Map_Editor|See documentation]]) | |||
;Compile Maps | |||
:Maps for {{source|4}} can be compiled through the tool. The tool will list and explain the most common options for compiling, making it as intuitive as possible. ([[XBLAH's_Modding_Tool/Docs/Maps/Compile|See documentation]]) | |||
;Decompile Maps | |||
:Compiled maps for {{gldsrc|4}} and {{source|4}} can be decompiled through the tool. The tool will list all the mounted maps, both the loose files and the ones inside the [[VPK|VPKs]]. You will be able to decompile the maps without having to extract them beforehand. ([[XBLAH's_Modding_Tool/Docs/Maps/Decompile|See documentation]]) | |||
;Open the Prefabs Folder | |||
:{{Xblahmt|4}} provides a shortcut to the selected game's Prefabs folder, proving itself useful in case you need to modify any files manually. ([[XBLAH's_Modding_Tool/Docs/Maps/Open_Prefabs_Folder|See documentation]]) | |||
;Extract Used Assets | |||
= | :You can select {{Path||vmf|icon=file}} in {{Xblahmt|4}} and it will list you all the required assets for the selected files, showing you to which pack or loose folder they belong, and giving you the option to copy what you want to a separate folder under {{path|MOD_NAME/custom/}}. By default, it will select all the files not located inside {{Path||vpk|icon=file}}, but you can extract the files from the {{Path||vpk|icon=file}} on the go, if you want to, in case you are using assets from games not everyone own. ([[XBLAH's_Modding_Tool/Docs/Mod/Extract_Used_Assets|See documentation]]) | ||
;Building Generator | |||
:{{Xblahmt|4}} comes with a Building Generator for Source. The tool includes some example files, and users can create their own templates. ([[XBLAH's_Modding_Tool/Docs/Maps/Building_Generator|See documentation]]) | |||
<gallery mode=nolines widths=384px heights=288px> | |||
Image:XBLAH's Modding Tool v1.17 - Hammer++.png|Map Editor | |||
Image:XBLAH's Modding Tool - Compile Maps v1.17.png|Compiling Maps | |||
Image:XBLAH's Modding Tool - Maps - Decompile.png|Decompile Maps | |||
Image:XBLAH's_Modding_Tool_-_Assets_Copier_v1.17.png|Extract Used Assets | |||
Image:XBLAH's Modding Tool - Building Generator v1.17.png|Building Generator | |||
</gallery> | |||
== Materials == | |||
;Material Editor | |||
:{{Xblahmt|4}} can be used to create {{Path||vtf}} and {{Path||vmt|icon=file}} files. It can also be used to generate [[Bump_map|normal maps]]. ([[XBLAH's_Modding_Tool/Docs/Materials/Material_Editor|See documentation]]) | |||
[[ | ;WAD Editor | ||
:{{Xblahmt|4}} can view, edit and create {{Path|WAD|icon=file}} files. ([[XBLAH's_Modding_Tool/Docs/Materials/WAD_Editor|See documentation]]) | |||
;Details Editor | |||
:The detail props files {{Path|details|vbsp|icon=file}} can be created or edited using the {{Xblahmt|4}}. The editor shows a preview of the detail props, showing both sprites and props, and is integrated with the File Explorer to make it really easy to create new detail props. ([[XBLAH's_Modding_Tool/Docs/Materials/Details_Editor|See documentation]]) | |||
;Skybox Editor | |||
:Skyboxes can be created straight from image files with the {{Xblahmt|4}} using an intuitive interface, that creates all the required vtfs and vmts. All you have to do is select each cubemap face, preview it, and save. It has a built in 3D previewer to check if the skybox is seamless, and supports the regular square skyboxes and the clamped ones. It will also give you the ideal settings for {{ent|light_environment}}, {{ent|env_sun}} and {{ent|env_fog_controller}} for each sky. ([[XBLAH's_Modding_Tool/Docs/Materials/Skybox_Editor|See documentation]]) | |||
;Extract Used Assets | |||
:You can select [[VMT|VMTs]] in {{Xblahmt|4}} and it will list you all the required assets for the selected files, showing you to which pack or loose folder they belong, and giving you the option to copy what you want to a separate folder under {{path|MOD_NAME/custom/}}. By default, it will select all the files not located inside [[VPK|VPKs]], but you can extract the files from the [[VPK|VPKs]] on the go, if you want to, in case you are using assets from games not everyone own. ([[XBLAH's_Modding_Tool/Docs/Mod/Extract_Used_Assets|See documentation]]) | |||
<gallery mode=nolines widths=384px heights=288px> | |||
Image:XBLAH's Modding Tool v1.18.1.1 - Material Editor.png|Material Editor | |||
Image:XBLAH's Modding Tool - WAD Editor v1.15.png.png|WAD Editor | |||
Image:XBLAH's Modding Tool - Detail Editor v1.18.1.png|Details Editor | |||
Image:XBLAH's Modding Tool - Skybox Editor v1.17.png|Skybox Editor | |||
</gallery> | |||
== Models == | == Models == | ||
;Decompile Models | |||
:Compiled models for {{gldsrc|4}} and {{source|4}} can be decompiled through the {{Xblahmt|4}}. The tool will list all the mounted models, both the loose files and the ones inside the [[VPK|VPKs]]. You will be able to decompile the models without having to extract them beforehand. ([[XBLAH's_Modding_Tool/Docs/Models/Decompile|See documentation]]) | |||
;Extract Used Assets | |||
:You can select [[MDL|MDLs]] in {{Xblahmt|4}} and it will list you all the required assets for the selected files, showing you to which pack or loose folder they belong, and giving you the option to copy what you want to a separate folder under {{path|MOD_NAME/custom/}}. By default, it will select all the files not located inside [[VPK|VPKs]], but you can extract the files from the [[VPK|VPKs]] on the go, if you want to, in case you are using assets from games not everyone own. ([[XBLAH's_Modding_Tool/Docs/Mod/Extract_Used_Assets|See documentation]]) | |||
[[ | |||
<gallery mode=nolines widths=384px heights=288px> | |||
Image:XBLAH's Modding Tool - Decompile Models.png|Decompiling a Model | |||
</gallery> | |||
< | |||
== Particles == | == Particles == | ||
;Generate the Particle Manifest | |||
:A [[Particles_manifest.txt|manifest file]] is required for rendering particles in-game. The [[Particles_manifest.txt|Particle Manifest]] file can be generated automatically with {{Xblahmt|4}}, based on all the particle files mounted in the mod. ([[XBLAH's_Modding_Tool/Docs/Particles/Generate_Particle_Manifest|See documentation]]) | |||
;PCF Version Converter | |||
:Generated [[PCF|particle files]] will have different formats depending on the base game. These files can be converted to a compatible file format with {{xblahmt|4}}. ([[XBLAH's_Modding_Tool/Docs/Particles/Version Converter|See documentation]]) | |||
=== | <gallery mode=nolines widths=384px heights=288px> | ||
Image:XBLAH's Modding Tool - PCF Version Converter.png|PCF Version Converter | |||
</gallery> | |||
== Scripts == | == Scripts == | ||
;Localization Editor | |||
:[[VGUI_Documentation#Localization|Localization]] strings can be added and edited through an intuitive UI with {{Xblahmt|4}}. ([[XBLAH's_Modding_Tool/Docs/Scripts/Locatization_Editor|See documentation]]) | |||
=== | <gallery mode=nolines widths=384px heights=288px> | ||
Image:XBLAH's Modding Tool - Localization.png|Localization Editor | |||
</gallery> | |||
== Sounds == | == Sounds == | ||
;Soundscape Editor | |||
:[[Soundscape|Soundscapes]] can now be easily created or modified using {{Xblahmt|4}}. The UI provides an intuitive way to create new soundscapes, using the integrated file explorer. This allows the user to browse all the files mounted ({{Path||vpk|icon=file}} and loose files), let the user preview the files individually and let the user preview how the whole soundscape is gonna play in-game. ([[XBLAH's_Modding_Tool/Docs/Sounds/Soundscape_Editor|See documentation]]) | |||
;Generate the Soundscape Manifest | |||
:A manifest file is required for playing [[Soundscape|soundscapes]] in-game. The Soundscape Manifest file can be generated automatically with {{Xblahmt|4}}, based on all the soundscape files mounted in the mod. ([[XBLAH's_Modding_Tool/Docs/Sounds/Generate_Soundscape_Manifest|See documentation]]) | |||
A manifest file is required for playing soundscapes in-game. The Soundscape Manifest file can be generated automatically with {{ | |||
;Generate the Game Sounds Manifest | |||
A manifest file is required for precaching sounds in-game. The Game Sounds Manifest file can be generated automatically with {{ | :A manifest file is required for precaching sounds in-game. The Game Sounds Manifest file can be generated automatically with {{Xblahmt|4}}, based on all the game sound files mounted in the mod. ([[XBLAH's_Modding_Tool/Docs/Sounds/Generate_Game_Sounds_Manifest|See documentation]]) | ||
< | <gallery mode=nolines widths=384px heights=288px> | ||
Image:XBLAH's Modding Tool - Soundscape Editor.png|Soundscape Editor | |||
</gallery> | |||
== Options == | == Options == | ||
;Steam Libraries | |||
:The libraries used by the games and mods in the tool are automatically set if you have a legit Steam installation. Keep in mind the libraries set here are only used by the tool, and the games and mods will still use their gameinfo to mount their contents. ([[XBLAH's_Modding_Tool/Docs/Options/Steam_Libraries|See documentation]]) | |||
;Discord Presence | |||
:By default, the tool lets your Discord friends know what you are working on. If you want privacy, you can set up what is shown on Discord. The options are to show the game and mod you are working on, only the game you currently have selected, or show nothing. ([[XBLAH's_Modding_Tool/Docs/Options/Discord_Presence|See documentation]]) | |||
<gallery mode=nolines widths=384px heights=288px> | |||
Image:XBLAH's Modding Tool - Steam Libraries v1.17.png|Steam Libraries | |||
Image:XBLAH's Modding Tool v1.17 - Discord Presence.png|Discord Presence | |||
</gallery> | |||
= XBLAH's Modding Tool for Teams = | |||
VIP Patrons are eligible to create a team of up to 10 members to use the {{Xblahmt|4}}. Additional members can be added by increasing the pledge by $1/member. | |||
[ | To create a Team, the VIP Patron must [https://xblah.dev/xblah-modding-tool register] using the same email used to pledge on Patreon. The team members must register too, although they are not required to have a Patreon account. The Team Manager then can add the members to the available slots. | ||
= | = External links = | ||
* [https://modding-assets.net/source/tools/modding/xblah-modding-tool/ XBLAH's Modding Tool] page on [https://modding-assets.net Modding Assets.net] | |||
* [https://www.moddb.com/downloads/xblahs-modding-tool ModDB] - Last free version (1.13) | |||
* [https://www.patreon.com/xblah Patreon page] | |||
{{sdktools|1}} | |||
{{goldsrc sdktools}} | |||
{{sdktools|0}} | |||
{{sdktools/source2|0}} | |||
[[Category:Third Party Tools]] | |||
[[Category: Third Party Tools]] | [[Category:Third Party Source Tools]] | ||
[[Category:Third Party GoldSrc Tools]] | |||
[[Category:Non-Steam Applications]] | |||
Latest revision as of 04:56, 3 June 2025

![]() XBLAH's Modding Tool is an Integrated Development Environment written by XBLAH to improve
XBLAH's Modding Tool is an Integrated Development Environment written by XBLAH to improve ![]() Valve-games modders productivity and quality of life.
Valve-games modders productivity and quality of life.
The IDE includes features like mod creation, map editing, compiling and decompiling, model compiling, editing and decompiling, material editing, soundscape editing, vpk packing and unpacking and general scripting and automation.
Features

![]() XBLAH's Modding Tool is organized in different dashboards depending on which role you have in the mod development. There are dashboards available for mod leaders, level designers, material designers, model designers, sound designers, programmers, animators, and particle designers, each one with a specialized toolset in that field.
XBLAH's Modding Tool is organized in different dashboards depending on which role you have in the mod development. There are dashboards available for mod leaders, level designers, material designers, model designers, sound designers, programmers, animators, and particle designers, each one with a specialized toolset in that field.
Game
- Create a mod
- Creating a bare-bones mod usually requires more than just creating a liblist.gam or a gameinfo.txt. Mods based on
 GoldSrc and
  Source games can be created with the
  XBLAH's Modding Tool using an intuitive interface, that creates all the required files and directories.
  Mapbase mods are also supported. (See documentation).
- Refresh Mods
- In case you manually added or modified any mods for the current game, you can refresh the mod listing. (See documentation)
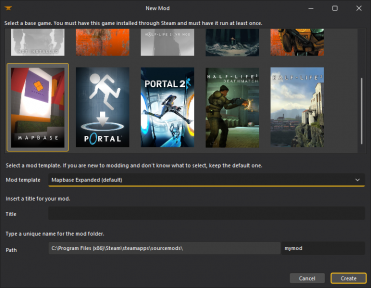
Creating a mod

Modding
- Run a Mod
- You can run mods straight from XBLAH's Modding Tool, without having to restart Steam when you create or install a new mod. XBLAH's Modding Tool supports lots of different run modes. It contains basic presets for each game, and you can add new ones. (See documentation)
- Open the Mod Folder
- XBLAH's Modding Tool provides a shortcut to the selected mod folder, proving itself useful in case you need to modify any files manually. (See documentation)
- File Explorer
- All the files mounted into the game info can be previewed with XBLAH's Modding Tool in the File Explorer. The File Explorer replaces the GCFScape as the ultimate file browsing tool, since it will mount all the VPKs and loose files according to the game info, to show the modder a comprehensive list of files. This relieves the modder of having to browse vpks individually, and the integrated features of the tool usually dismisses the necessity of extracting the files from the vpks, since they can be accessed natively by double-clicking the file (or right-clicking for more options). (See documentation)
- Deleting a Mod
- You can delete the selected mod in case you don't want to work with it or have it anymore. (See documentation)
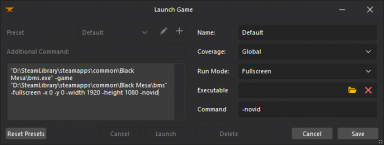
Running a Mod
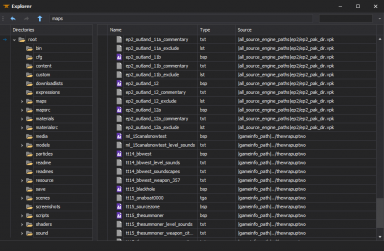
File Explorer


Mod Configuration
- Game Info
- The mod information can be edited with XBLAH's Modding Tool through a comprehensive UI without requiring the modder to mess with text files. It includes all the major keys of GoldSrc and Source. (See documentation)
- Mounting Game Assets
- The mod mounted content can be edited with XBLAH's Modding Tool, pointing to directories and VPKs in the desired order, without the risk of messing the game info. (See documentation)
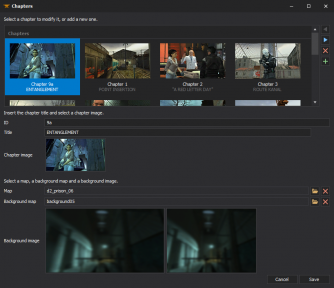
- Managing Chapters
- Chapters for single-player games can be created with XBLAH's Modding Tool through an UI. The modder can easily create new chapters, select the chapter images, chapter background images, the first map of the chapter, the background map, and the tool will do the dirty work of creating the required vtfs, vmts and scripts. It gives the option to automatically blur the background images, so the modder can just take a screenshot of the background map and the tool will apply the usual blur. This replaces the need of saving VTFs, creating chapter images with weird proportions, and so on. (See documentation)
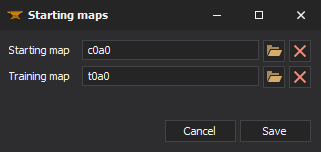
- Starting maps
- For GoldSrc games, you can set the map that will be run when you start a new game and the map that will run when you start the training section. (See documentation)
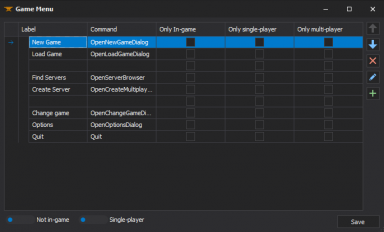
- Menu Items
- Main menu items can be added, modified or removed with XBLAH's Modding Tool based on a provided list of options. (See documentation)
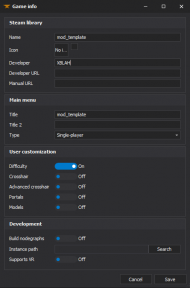
Game Info

Mounting content
Single-player Chapters
Starting Maps
Game Menu Editor


File Management
- Packing Files Manually
- Instead of distributing loose files, you can select the files you want and pack them into a VPK. The selected files will be automatically deleted after they are packed into the VPK, cleaning up your mod folder. The VPK will be saved under

MOD_NAME/custom/. (See documentation)
- Pack Subdirectory under
MOD_NAME/custom/ - Instead of manually packing files into a VPK, you can select a folder under the
MOD_NAME/custom/directory and it will convert all the Unpacked Files into a single VPK. You will have the option to delete the Unpacked Files. (See documentation)
- Unpacking Files
- You can quickly convert mounted VPKs into Unpacked Files, to help during the modding process. All the files in the VPK will be extracted to the mod folder, and you will have the option to delete the VPK. (See documentation)
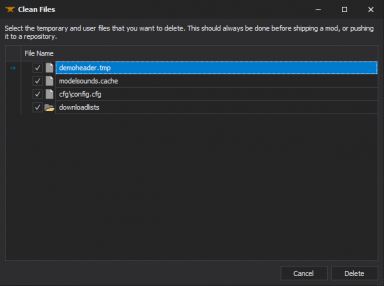
- Clean Temporary Files
- Before shipping the mod, the XBLAH's Modding Tool provides the modder with a list of unnecessary files, which can be removed with the push of a button. (See documentation)
- Remove Duplicates
- The tool will list all the files that have the same name, relative directory and content and are mounted at least twice, and will give you the option to delete the extra Unpacked Files with a single button click. (See documentation)
Cleaning Files
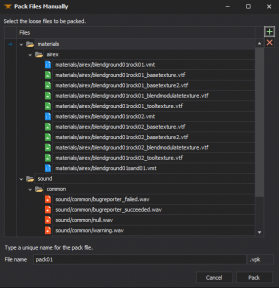
Packing Files Manually
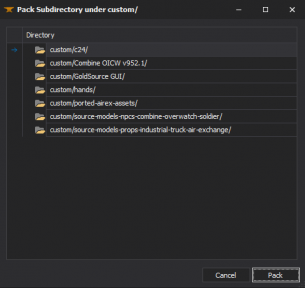
Pack Subdirectory under
MOD_NAME/custom/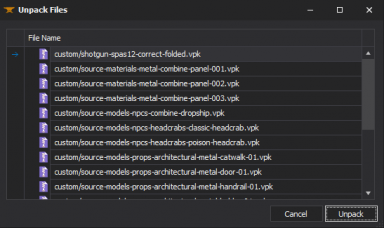
Unpacking Files


Animations
- Scene Editor
The Source Choreography Editor will be automatically configured if ran through the ![]() XBLAH's Modding Tool, patching the missing icons. For compatible games, Scene Maker will be installed and run instead. (See documentation)
XBLAH's Modding Tool, patching the missing icons. For compatible games, Scene Maker will be installed and run instead. (See documentation)
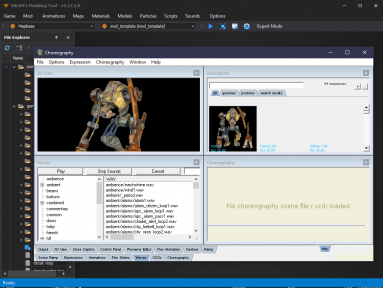
Scene Maker

Maps
- Map Editor
 Hammer 3.x and
  Hammerwill be automatically configured if ran through the XBLAH's Modding Tool.
  J.A.C.K. will be installed and configured for compatible GoldSrc games.
  Hammer++ will be installed and configured for compatible Source games. (See documentation)
- Compile Maps
- Maps for Source can be compiled through the tool. The tool will list and explain the most common options for compiling, making it as intuitive as possible. (See documentation)
- Decompile Maps
- Compiled maps for GoldSrc and Source can be decompiled through the tool. The tool will list all the mounted maps, both the loose files and the ones inside the VPKs. You will be able to decompile the maps without having to extract them beforehand. (See documentation)
- Open the Prefabs Folder
- XBLAH's Modding Tool provides a shortcut to the selected game's Prefabs folder, proving itself useful in case you need to modify any files manually. (See documentation)
- Extract Used Assets
- You can select

.vmfin XBLAH's Modding Tool and it will list you all the required assets for the selected files, showing you to which pack or loose folder they belong, and giving you the option to copy what you want to a separate folder under MOD_NAME/custom/. By default, it will select all the files not located inside.vpk, but you can extract the files from the.vpkon the go, if you want to, in case you are using assets from games not everyone own. (See documentation)
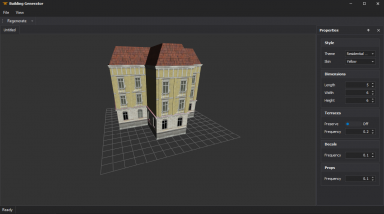
- Building Generator
- XBLAH's Modding Tool comes with a Building Generator for Source. The tool includes some example files, and users can create their own templates. (See documentation)
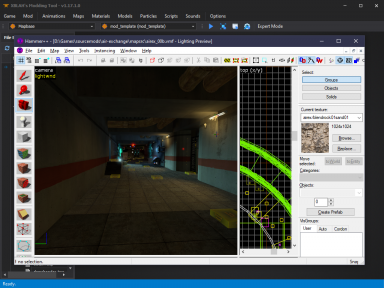
Map Editor
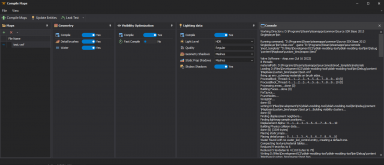
Compiling Maps
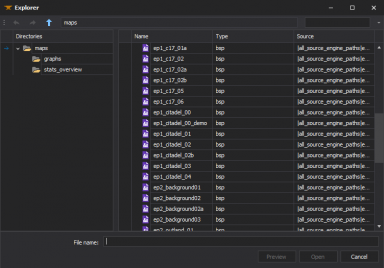
Decompile Maps
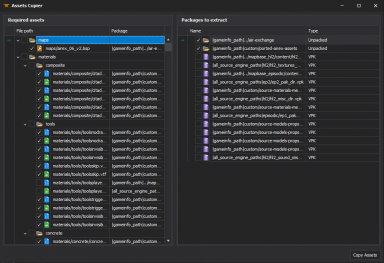
Extract Used Assets
Building Generator


Materials
- Material Editor
- XBLAH's Modding Tool can be used to create

.vtfand.vmtfiles. It can also be used to generate normal maps. (See documentation)
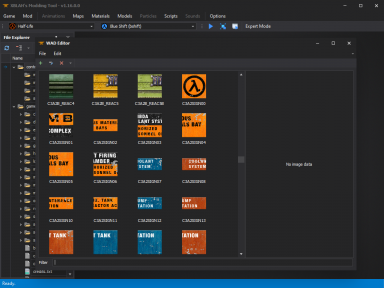
- WAD Editor
- XBLAH's Modding Tool can view, edit and create
WADfiles. (See documentation)
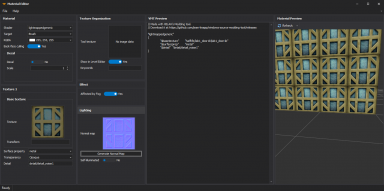
- Details Editor
- The detail props files
details.vbspcan be created or edited using the XBLAH's Modding Tool. The editor shows a preview of the detail props, showing both sprites and props, and is integrated with the File Explorer to make it really easy to create new detail props. (See documentation)
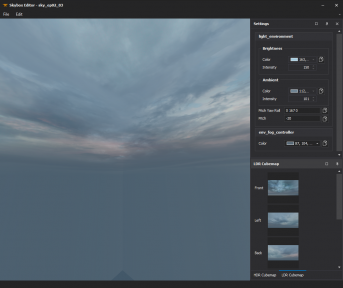
- Skybox Editor
- Skyboxes can be created straight from image files with the XBLAH's Modding Tool using an intuitive interface, that creates all the required vtfs and vmts. All you have to do is select each cubemap face, preview it, and save. It has a built in 3D previewer to check if the skybox is seamless, and supports the regular square skyboxes and the clamped ones. It will also give you the ideal settings for light_environment, env_sun and env_fog_controller for each sky. (See documentation)
- Extract Used Assets
- You can select VMTs in XBLAH's Modding Tool and it will list you all the required assets for the selected files, showing you to which pack or loose folder they belong, and giving you the option to copy what you want to a separate folder under
MOD_NAME/custom/. By default, it will select all the files not located inside VPKs, but you can extract the files from the VPKs on the go, if you want to, in case you are using assets from games not everyone own. (See documentation)
Material Editor
WAD Editor

Details Editor
Skybox Editor


Models
- Decompile Models
- Compiled models for GoldSrc and Source can be decompiled through the XBLAH's Modding Tool. The tool will list all the mounted models, both the loose files and the ones inside the VPKs. You will be able to decompile the models without having to extract them beforehand. (See documentation)
- Extract Used Assets
- You can select MDLs in XBLAH's Modding Tool and it will list you all the required assets for the selected files, showing you to which pack or loose folder they belong, and giving you the option to copy what you want to a separate folder under
MOD_NAME/custom/. By default, it will select all the files not located inside VPKs, but you can extract the files from the VPKs on the go, if you want to, in case you are using assets from games not everyone own. (See documentation)
Decompiling a Model

Particles
- Generate the Particle Manifest
- A manifest file is required for rendering particles in-game. The Particle Manifest file can be generated automatically with XBLAH's Modding Tool, based on all the particle files mounted in the mod. (See documentation)
- PCF Version Converter
- Generated particle files will have different formats depending on the base game. These files can be converted to a compatible file format with XBLAH's Modding Tool. (See documentation)
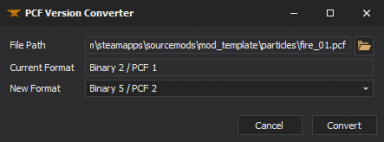
PCF Version Converter

Scripts
- Localization Editor
- Localization strings can be added and edited through an intuitive UI with XBLAH's Modding Tool. (See documentation)
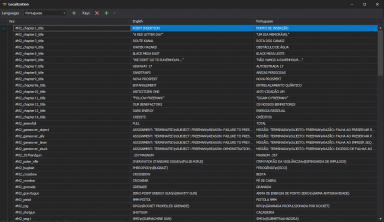
Localization Editor

Sounds
- Soundscape Editor
- Soundscapes can now be easily created or modified using XBLAH's Modding Tool. The UI provides an intuitive way to create new soundscapes, using the integrated file explorer. This allows the user to browse all the files mounted (
.vpkand loose files), let the user preview the files individually and let the user preview how the whole soundscape is gonna play in-game. (See documentation)
- Generate the Soundscape Manifest
- A manifest file is required for playing soundscapes in-game. The Soundscape Manifest file can be generated automatically with XBLAH's Modding Tool, based on all the soundscape files mounted in the mod. (See documentation)
- Generate the Game Sounds Manifest
- A manifest file is required for precaching sounds in-game. The Game Sounds Manifest file can be generated automatically with XBLAH's Modding Tool, based on all the game sound files mounted in the mod. (See documentation)
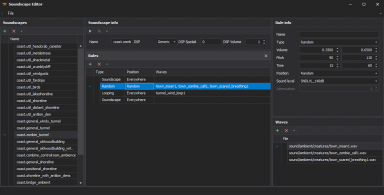
Soundscape Editor

Options
- Steam Libraries
- The libraries used by the games and mods in the tool are automatically set if you have a legit Steam installation. Keep in mind the libraries set here are only used by the tool, and the games and mods will still use their gameinfo to mount their contents. (See documentation)
- Discord Presence
- By default, the tool lets your Discord friends know what you are working on. If you want privacy, you can set up what is shown on Discord. The options are to show the game and mod you are working on, only the game you currently have selected, or show nothing. (See documentation)
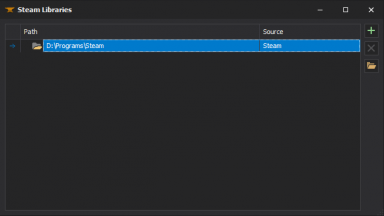
Steam Libraries
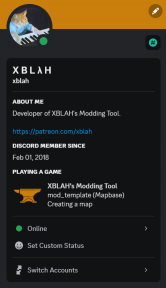
Discord Presence


XBLAH's Modding Tool for Teams
VIP Patrons are eligible to create a team of up to 10 members to use the ![]() XBLAH's Modding Tool. Additional members can be added by increasing the pledge by $1/member.
XBLAH's Modding Tool. Additional members can be added by increasing the pledge by $1/member.
To create a Team, the VIP Patron must register using the same email used to pledge on Patreon. The team members must register too, although they are not required to have a Patreon account. The Team Manager then can add the members to the available slots.
External links
- XBLAH's Modding Tool page on Modding Assets.net
- ModDB - Last free version (1.13)
- Patreon page
| |||||||||||||||||||||||||||||
| |||||||||||||||||||||||||||||||||||
| |||||||||||||||||||||||||||||||||||||||||||||||||||||||||||
| ||||||||||||||||||||||||||||||||||||||||||||||||||