VMPI
VMPI stands for "Valve Message Passing Interface". It was a previously unreleased tool by Valve used for distributed compiles of ![]() Source maps. The tool was quietly released around November of 2007 in an update that also included
Source maps. The tool was quietly released around November of 2007 in an update that also included ![]() Source 2007 tools for mapping. Both the
Source 2007 tools for mapping. Both the ![]() Half-Life 2: Episode One and the
Half-Life 2: Episode One and the ![]() Source 2007 compile tools used VMPI for distributed map compiles, though the latter's tool text help was not updated to show any new commands. Valve seemingly used this tool to compile
Source 2007 compile tools used VMPI for distributed map compiles, though the latter's tool text help was not updated to show any new commands. Valve seemingly used this tool to compile ![]()
![]() Left 4 Dead series maps as well, with mpi launch arguments found in these games
Left 4 Dead series maps as well, with mpi launch arguments found in these games mapautocompile.txt files.
The most accepted reason for Valve not releasing VMPI until late 2007 was because it required a MySQL server for tracking network statistics across the master and worker machines. The VMPI released in 2009 did not require a MySQL server and therefore didn't have a license restriction for using external code and programs.
Both VVIS and VRAD have been improved over the years to better scale across modern high thread count CPU's, while VRAD performance using VMPI has been severely crippled. This tool can be configured to work with modern compile tools, however it will not complete a -final VRAD compile or static prop lighting correctly.
BuildFaceLights and BuildVisLeafs steps are completed. [todo tested in ?]VMPI Usage
VMPI requires that worker machines are manually started in polling mode before the master starts a compile. It also means that a local copy of Steam must be installed on the worker machines and at least one ![]() Source game installed.
Source game installed.
Before you start a VMPI compile, you need to have at least two machines (one master and one worker). The worker machine(s) must also have at least Windows 2000 (or later) installed (Windows 9x-series OSs are not supported).
- To start a master machine in
 Hammer, all you need to do is add the "-mpi" flag to the compile parameters of both VVIS and VRAD. VBSP cannot be run in VMPI mode, as the BSP information must be compiled on the master before being sent to the workers. You will want to add "-low" as well if you plan on using this machine during the compile process.
- Starting a worker machine is somewhat different. First, you need to select the right version of compile tools for the job.
 Source 2006 compile tools are not VMPI compatible with
  Source 2007 tools and vice versa. After you figure that out, open a command console (cmd.exe) and navigate to the directory with the compile tools. You can generally use these shortcuts in the command console to get there quicker:
 Source 2006 via standalone Source SDK app:
cd %steamdir%\common\SourceSDK\bin\ep1\bin
 Source 2007 via standalone Source SDK app:
cd %steamdir%\common\SourceSDK\bin\source2007\bin
 Source 2009 via standalone Source SDK app:
cd %steamdir%\common\SourceSDK\bin\source2009\bin
 Source Multiplayer via standalone Source SDK app:
cd %steamdir%\common\SourceSDK\bin\orangebox\bin
 Source 2013,
  Team Fortress 2 branch,
  Left 4 Dead engine branch and later (SteamPipe):
cd %steamdir%\common\[source-engine game name]\bincd %steamdir%\common\Source SDK Base 2013 Multiplayer\bincd %steamdir%\common\Source SDK Base 2013 Singleplayer\bin
Once you've found the bin folder on your worker machine, look for vrad.exe and vvis.exe. Open them with a batch script or windows shortcut with the following flags:
vvis.exe -mpi_worker <master IP Address>:<port> -mpi_retry
vrad.exe -mpi_worker <master IP Address>:<port> -mpi_retry
-low flag if you plan on using the worker machines for something else during the compile process.
If you get an error about missing gameinfo.txt, add this additional flag to tell it where gameinfo.txt is:
-game "path_to_gameinfo.txt"
Example:
-game "%sourcesdk%\..\half-life 2\hl2"
Optional Commands
There are several additional options you can set on the compile tools which show things like stats and the total work done. Here is a complete list of the VMPI related commands on the compile tools:
- -mpi
Enable VMPI mode on the master machine.
- -mpi_Worker
Used on the worker machine to connect to the master machine. Put the IP Address of the master machine after the command. (Ex: -mpi_worker 192.168.1.100)
- -mpi_Port
Change the default port number to something else. (Ex: -mpi_Port 2946) The default port VMPI uses is 23311. Worker machines ports are defined using -mpi_Worker <master IP address>:<port> instead.
- -mpi_Graphics
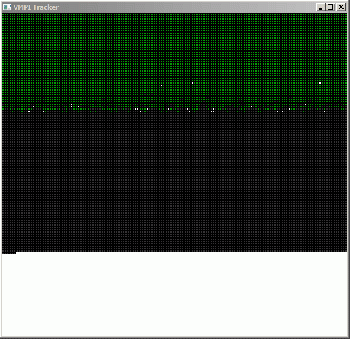
Used on the master machine to show a graphical output of the work that's being done. If you have ever used any hard drive defragmentation utility, this will look similar to that.
- Grey Blocks - Work units not yet sent.
- Green Blocks - Completed work units.
- Light Green Blocks - Work units assigned to master.
- Blue Blocks - Work units assigned to worker machines.
- Red Blocks - Mentioned as "sent work", usually only appears when using the default distributor.
Blue and light green blocks are more specifically single CPUs on a worker and master. If a worker or master has multiple CPUs or CPUs with multiple cores, it will be represented by additional dots. Dual cores will be two, quads will be 4, etc.
Here is an example of 18 processors working on compiling a single map (16 worker CPUs + 2 master.) What's great about the current VMPI is that if you have the correct ports forwarded on your router, you can have machines all over the world help you compile your map. A caveat in this is that both the master and worker machines need decent internet connections with lots of bandwidth, or the workers can time out while downloading resources from the master and slow the compile down.
- -mpi_Retry
Used on a worker machine to keep polling a specified master until the master starts a compile. If not used before a master machine starts a compile, the worker will time out and display an "MPI_Init failed" error.
- -mpi_AutoRestart
Used on a worker machine to auto-restart polling mode after a compile is finished. This command is buggy and doesn't always work, so don't rely on it. Must be used in conjunction with "-mpi_Retry" if you don't want to keep getting the "MPI_Init failed" message.
- -mpi_TrackEvents
Requires administrator privileges. Used on the master machine to enable a debug menu during compiles ("-mpi_Graphics" automatically enables it.) To access the menu, press "D" on the keyboard during a compile. May be buggy
- -mpi_ShowDistributeWorkStats
Shows the statistics of the workers used in the compile and how much work they have completed. Statistics are shown after the compile is completed.
- -mpi_TimingWait
Used on the master to delay the compile until a keystroke is pressed. Useful to let workers connect before the master starts the compile.
- -mpi_WorkerCount
Used on the master to set the maximum amount of workers allowed on the job. Max 32
- -mpi_AutoLocalWorker
Used on the master machine to spawn a local worker on the master machine. Only used for testing.
- -mpi_Local
Similar to -mpi_AutoLocalWorker, but the automatically-spawned worker's console window is hidden.
- -mpi_FileTransmitRate
Throttles the rate at which files can be downloaded from the master machine to any given worker machine.
- -mpi_Verbose
Level of debug output by VMPI. Either 0, 1 or 2.
Over the Internet
If you intend to compile over the internet, you must make sure that the end where the master resides has proper port forwarding through its router (if any exist). The default is port 23311 TCP. If you intend to use a non-standard port, make sure that the port is also forwarded TCP. UDP is not required, and workers do not need their ports forwarded.
- Todo: Explore TCP tunneling to avoid needing to port forward or expose your real IP to workers.
Known Problems and Workarounds
In order to get VMPI working, you must create 2 blank text files in the BIN folder of the master, where VVIS and VRAD are stored, named:
- dependency_info_vvis.txt
- dependency_info_vrad.txt
![]() The compiled bsp will attempt to be loaded directly from the VVIS/VRAD launch arguments, causing your worker machine to crash trying to open an invalid map if not configured correctly. You will need to manually add the name of your map to the launch arguments, or create an external script to do this automatically.
The compiled bsp will attempt to be loaded directly from the VVIS/VRAD launch arguments, causing your worker machine to crash trying to open an invalid map if not configured correctly. You will need to manually add the name of your map to the launch arguments, or create an external script to do this automatically.
- Todo: Confirm in other games, map name seems to get networked correctly outside of TF2
- For VVIS:
vvis.exe -mpi_worker 192.168.0.999 -mpi_retry map_name. - For VRAD:
vrad.exe -mpi_worker 192.168.0.999 map_name -mpi_retry.
You must restart the workers after a LDR compile finishes if you plan on doing an LDR+HDR compile. -mpi_AutoRestart seems to be almost entirely non-functional as well.
SDK Mode Workaround
When attempting to use VMPI in most games besides ![]() , this error will appear:
, this error will appear:
Initializing VMPI...
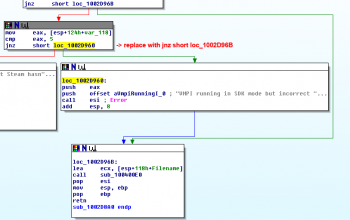
VMPI running in SDK mode but incorrect SDK install detected (error 0).
You can work around this error by either patching the DLL's, or by re-constructing parts of the old orange box filesystem that are required for VMPI to run in SDK mode.
Enabling SDK Mode without DLL patches
VMPI is hard-coded to look for certain file paths and files that were used prior to the SteamPipe update. You can recreate these folders and launch VVIS/VRAD from them to satisfy VMPI. You will need to do this on both the master and worker.
- First, create the following folder:
C:/Program Files (x86)/Steam/steamapps/putwhateverhere/sourcesdk/bin, replace the filepath with your steam install if you have changed it.
putwhateverhere for each game you want to use VMPI with to differentiate between each VMPI setup.- Next, create a junction/symlink from the modern steam filesystem to the newly created orange box filesystem. You will need to do this for every game you want to use VMPI with.
mklink /J "C:/Program Files (x86)/steam/steamapps/putwhateverhere/sourcesdk/bin/orangebox" "C:/Program Files (x86)/steam/steamapps/common/Counter-Strike Global Offensive" - The result should be an orangebox folder junction that simply points to your desired game directory. You can also use ep1 instead of orangebox for the folder name
- Next, create a blank file in your /steam/ folder (not steamapps) called
ClientRegistry.blob.
- Next, create the following filepath:
C:/Program Files (x86)/Steam/steamapps/putwhateverhere/sourcesdk_content/cstrike/mapsrc. You do not need to put any files here.
- Finally, change your compile tool of choice and your worker scripts to launch VVIS/VRAD from the newly created orange box junction, rather than the regular common/Game Name/bin folder.
C:/Program Files (x86)/steam/steamapps/putwhateverhere/sourcesdk/bin/orangebox/bin/vvis.exeDLL Patch
If you have basic knowledge of reverse engineering/DLL patching, you can find the if-statement via cross-referencing the string "VMPI running in SDK mode but incorrect SDK install detected (%n).". Replace the jump to skip the error throwing subroutine, and invert the if-statement that will trigger error code 5. This trick will work for vvis_dll.dll and vrad_dll.dll, however VRAD requires a separate patch to avoid crashing.
Additional SDK specific commands
- -mpi_SDKMode
Force VMPI to run in SDK mode.
- -mpi_CalcShuffleCRC
Calculate a CRC for shuffled work unit arrays in the SDK work unit distributor.
- -mpi_Job_Watch
Automatically launches vmpi_job_watch.exe on the job.
- -mpi_DontSetThreadPriorities
Don't set worker thread priorities to idle.
- -mpi_GroupPackets
Delay and group some of the worker packets instead of sending immediately.
- -mpi_Stats
Enables the use of a database to store compile statistics.
- -mpi_Stats_TextOutput
Enables the workers storing all of their text output into the stats database.
- -mpi_NoScheduler
Warning - this should only be used for testing and with 1 worker!
- -mpi_NoTimeout
Don't timeout VMPI sockets. Used for testing.
- -mpi_NoMasterWorkerThreads
Don't process work units locally (on the master.) Useful if you only want the master to track compiled data instead of processing work units.
- -mpi_UseDefaultDistributor
Use the default work unit distributor. Optimized for high numbers of workers, higher numbers of work units, and lower latency. Note that this will automatically be used in non-SDK distributions.
- -mpi_UseSDKDistributor
Use the SDK work unit distributor. Optimized for low numbers of workers and higher latency. Note that this will automatically be used in SDK distributions. Functionally identical to -mpi_SDKMode
- -mpi_MasterName
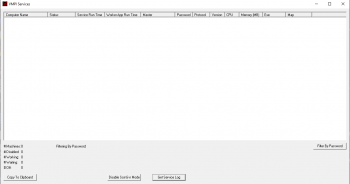
Set the name on the master machine to see who ran a compile job in vmpi_services_watch. vmpi_services_watch was previously unreleased but has since been included in the 2025 SDK update.
- -mpi_file
Additional files the workers should download. Likely irrelevant, as the workers automatically download the required model information for lighting. [confirm]
- -mpi_filebase
Same as -mpi_file but for file-paths instead of individual files.
Performance tips
SDK Distributor Performance Tips
The SDK Distributor is the mode used in most modern ![]() games by default, with the exception of
games by default, with the exception of ![]() .
.
VMPI distributes the workload for VVIS and VRAD across the master and worker CPUs, causing your compile times to only be as fast as the slowest worker in the chain. Improperly configured MPI setups that do not consider this can cause compile times that are Slower than a standard, non-MPI compile.
An example of an incorrect VMPI configuration would be a slow, spare worker computer connected to a fast master computer, in the hopes of simply allocating those extra threads to speed up the compile. This setup will be limited by the slower computer and actually Increase compile times, rather than simply adding the extra processing power to the job and utilizing both CPU's at 100% capacity.
Slow master/fast worker setups will also be bottlenecked, so the optimal VMPI setup is one where all workers, and the master, use the same brand/configuration of CPU (or at the very least, ones with identical performance).
-mpi_NoMasterWorkerThreads has any effect on extreme cases of slow master/fast worker performance. You should probably be doing the entire compile via remote desktop for situations like this thoughSDK Mode Performance Results
The following test was done by compiling a de-compiled CS:GO version of de_cbble. -final VRAD, but no -StaticPropLighting for this compile, as it is not distributed over MPI with this patch.
- Master CPU: i9-9900k. 8 cores, 16 threads
- Worker CPU: Ryzen 7 5800x. 8 cores, 16 threads
| Configuration | Results | Notes |
|---|---|---|
VRAD
|
11:16
|
-final, NO -StaticPropLighting. |
VRAD VMPI REMOTE
|
9:50
|
-final, NO -StaticPropLighting, -mpi_NoMasterWorkerThreads. |
VRAD VMPI
|
7:13
|
-final, NO -StaticPropLighting. |
| Configuration | Results | Notes |
VVIS
|
0:56
|
Areaportals removed due to leaks |
VVIS VMPI REMOTE
|
UNTESTED
|
Did not test full remote VVIS compile. |
VVIS VMPI
|
0:30
|
Areaportals removed due to leaks |
Default Distributor Performance Tips
The -mpi_UseDefaultDistributor flag is intended for the exact opposite use case of SDK Mode. Rather than combining the processing power of a small number of high-power users over the internet, default distribution is meant to send the compile job to a very high number of individual workers over LAN. Valve was using the tool this way.
If you need to use the Default Distributor instead of the SDK Mode distributor (notably for ![]() VMPI), it is best to split VRAD into multiple instances, utilizing a feature called "Multicast mode". If you have a 32 thread worker machine that you want to send the compile job to, this compile will finish significantly faster by using 4 instances of VRAD with 8 threads allocated each, rather than one instance of VRAD with 32 threads.
VMPI), it is best to split VRAD into multiple instances, utilizing a feature called "Multicast mode". If you have a 32 thread worker machine that you want to send the compile job to, this compile will finish significantly faster by using 4 instances of VRAD with 8 threads allocated each, rather than one instance of VRAD with 32 threads.
- Todo: Add default distributor performance results
CreateMulticastListenSocket Failed (The operation completed successfully.). [todo tested in ?](Un)official tools
Batch Compile Tool An older compile tool similar to Compile Pal, however it offers a GUI for configuring VMPI launch parameters and port information.
SENC(Outdated) Provides a GUI for VMPI compiles for Episode 1 and Episode 2 maps. Not recommended and may be entirely non-functional.
SENC workers come with a fake (but not in an illegal sense!) Steam installation, allowing you to run workers on whatever machine you please.
| |||||||||||||||||||||||||||||


