Animated Particles
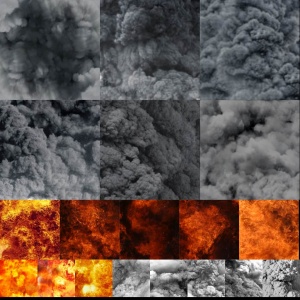
Particles use textures that are compiled into a SpriteCard texture. These sprite card textures are merely a collection of multiple textures at once.
The individual textures on these sprite cards can either be frames that are meant to be one animated particle, or entirely unrelated to each other.
sprite cards are created using mksheet.exe, which is located in the bin folder, along with a MKS text file that defines which textures to use, and whether the sprite card is an animated item, or separate unrelated frames.
The MKS File
The .mks file defines how the sheet is interpreted when the particle is rendered. You can organize materials in to sequences for playback, define the number of frames and their playback rate, and whether a sequence should loop continuously.
Here's an example mks file, listing various possible setups.
// First sequence. Simple looping two frame animation.
sequence 0
loop
frame mymaterial1.tga 1
frame mymaterial2.tga 1

// Second sequence. One single texture. Not animated.
sequence 1
frame mymaterial3.tga 1

// Third sequence. Two images per frame, for multi-texturing.
sequence 2
frame fire_base0.tga fire_additive0.tga 1
frame fire_base1.tga fire_additive1.tga 1

// Fourth sequence. Combines the alpha channels of two frames at a time into the alpha and green channels of a frame for a special shader.
sequence 3
frame frame0.tga{g=a},frame1.tga{a=a} 1
frame frame2.tga{g=a},frame3.tga{a=a} 1- sequence
- Lets Mksheet.exe know the next frames, until the next sequence, all belong together as an animated particle.
- frame
- The name of the texture tga files to be used, followed by the playback rate. A value of 1 tells the renderer to playback this frame for the normal time duration. A value of 0.5 would play the frame for half as long as was specified in the particle definition, and a value of 2 would make the frame render for twice as long.
- loop
- Whether the frames in a sequence should be looped. Not setting this, will cause the particle to play its frames and end on the last frame it has.
Additionally, frames can be packed separately in RGB from Alpha. This takes the alphas from a set of input frames and stores them in the alpha of the output sheet. It takes the RGBs and stores them in the RGB. The interesting thing about this is that each get their own sequences. They also have their frame sizes entirely decoupled, so the RGB's can have 200x200 images while the alpha has 150x150, for example. See Below :
// Sequence that stores separate frame data in the RGB from the alpha
// for dual sequencing combining one set of RGBs and another set of alphas

// Packmode sets mksheet to separate the RGB frames from the Alpha ones.
packmode rgb+a

// First Sequence - Looping Alpha Frames
sequence-a 0
LOOP
frame reframedSmokeSprites170_0033.tga 1
frame reframedSmokeSprites170_0035.tga 1

// Second Sequence - Looping RGB Frames
sequence-rgb 1
LOOP
frame smokeTex0001_341.tga 1
frame smokeTex0002_341.tga 1
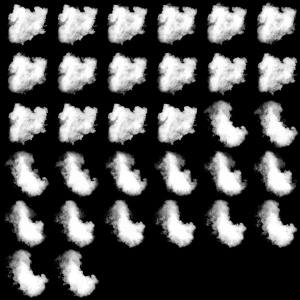
The output from this .mks file can be seen below. The RGB and alpha channels are shown. Note that the individual frame sizes are all non-power-of-two and that they are different between the RGB and Alpha frames.
Notes
- You can use the same image file in multiple sequences (or multiple times within the same sequence) without it being duplicated in the output sheet. Examples where you would want to do this are sequences with different timing, particle sequences, looped and non-looped versions of a sequence, etc.
- To the extent practical, you should combine as many sprite textures into one sheet as possible, and use different sequences for the different particle systems.
Step by Step Tutorial
The following guide has been written, and proven to work for ![]() Left 4 Dead 2. According to some users, this does not work in
Left 4 Dead 2. According to some users, this does not work in ![]() Alien Swarm, but does work in
Alien Swarm, but does work in ![]() Counter-Strike: Source
Counter-Strike: Source
- Create a folder somewhere in MaterialSrc, in which you place the individual tga textures, which will be compiled into a SpriteCard. Something like "MaterialSrc/Particles/Particle_name/"
 Note:The location for these doesn't matter for Mksheet.exe. However, Vtex.exe does require your .sht and compiled .tga files to be somewhere inside the game's "Materialsrc" folder.
So you might aswell just use a subfolder of MaterialSrc for your source files (Blender save file, model, textures, individual renders, ect.) - Inside this folder, create a text file that ends in .mks, instead of .txt. The name of this mks file will be then be re-used for its output .sht and .tga files.
- Set up the .mks the way you want it, as explained previously on the page. Here's an example of a mks which only has static sprites that do not animate:
sequence 0
frame 9mm_0001.tga 1
sequence 1
frame 9mm_0002.tga 1
sequence 2
frame 9mm_0003.tga 1
sequence 3
frame 9mm_0004.tga 1
- Drag and drop the .mks file onto mksheet.exe. This will give you a .sht and a .tga file with the same name as the .mks.
 Tip: If you do not want to keep opening the bin folder to get to mksheet.exe (and later vtex.exe), you can make shortcuts on your desktop and drag your files onto those instead.
 Warning:You should "dilate" the particle texture to prevent the black background texture to bleed through. How to do that is explained further down the page.
 - Drag the .sht or compiled (and dilated) tga file onto vtex.exe, or its shortcut. This will take a while to create up to two vtf files.
The second vtf having a "pwl" extension, which can be deleted. Alternatively, you can check the vtex log and quit after the first "SUCCESS: Vtf file created" message appears.
Vtex will see the folder setup inside "materialsrc" and re-create the same folder path inside of "materials" and place your finished vtf files inside of it. If the .sht/tga were in "MaterialSrc/Particles/Particle_name/", vtex.exe saves the vtf in "Materials/Particles/Particle_name/". - Now you're done, and can create a vmt file for this particle. Here's a basic one for you to copy:
spritecard
{
$basetexture ".../.../..."
$depthblend 0
$blendframes 0
}
Dilating the particle TGA
As explained in the previous warning, not having dilation causes the black background to bleed through on the particle. This may not be an issue if you used packmode rgb+a in the mks.
- Open the tga which mksheet.exe made in an image editing software.
- Copy the tga's alpha channel and use it as a layer mask for the actual texture. Which will get rid of the black background.
- Make a copy of the particle sprite layer and add gaussian blur. Maybe duplicate the blurred version a few times, just to make the blur dilation around the actual particle bigger.
- Put the blurred version beneath the default particle texture, and then add a new solid background color.
If you follow these steps, you got a nicely dilated texture that surely won't bleed any background color. Which is very important for half-translucent particles, like fire or smoke.
Compiling the Sheet
Once the materials are created, move all of your .tga and .mks files to the "Steamapps/common/SourceSDK/bin/orangebox/bin" folder. Inside this directory, create a .bat file, and inside it, write:
mksheet <sheetname>.mks <sheetname>.sht <sheetname>.tga
The tool takes one main parameter and two optional ones. The first is the .mks sheet which will define how the .sht and .tga files are created. The second, optional parameter is the .sht file. Finally, the third optional parameter is the .tga file to create, consisting of all the tga files previously specified. The second and third parameters must bear the name of the final material you wish to create. For example, the build call for the smoke1.vmt material would be:
mksheet smoke1.mks smoke1.sht smoke1.tga
From this, you will get a/some compiled tga files, a .sht file and maybe a blank <sheetname>.file file. feel free to delete the .file file.
Automation in 3ds Max
You can now export rendered sequences directly into Source with Wall Worm. The system allows you to export IFL (Image File List) bitmaps made of TGA bitmaps. Based on the bitmap parameters, the MKS is generated automatically, then sent to mkshheet with the .SHT file and TGA files. See complete documentation at http://dev.wallworm.com/document/187/exporting_animated_particle_textures.html


