XBLAH's Modding Tool
Template:XBLAHs Modding Tool is an Integrated Development Environment written by XBLAH to improve Valve games modders productivity and quality of life.
The IDE includes features like mod creation, map editing, compiling and decompiling, model compiling, editing and decompiling, material editing, soundscape editing, vpk packing and unpacking and general scripting and automation.
Documentation
To begin, select int the toolbar a base game and the mod you want to work on. It will automatically detect all compatible ![]() GoldSrc,
GoldSrc, ![]() Source and
Source and ![]() Source 2 based games you have installed through Steam. Additional libraries may be added manually.
Source 2 based games you have installed through Steam. Additional libraries may be added manually.
Game
New Mod
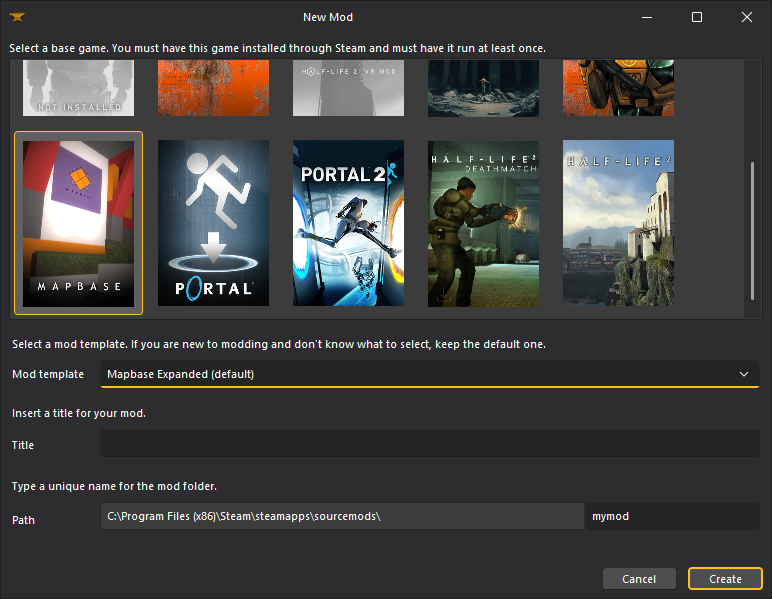
Creating a barebones Source engine mod usually requires more than just creating a gameinfo.txt. Mods based on Half-Life and Half-Life 2 games can be created with the Template:XBLAHs Modding Tool using an intuitive interface, that creates all the required files and directories. Mapbase mods are also supported.
- When creating Half-life 2 mods, it will replace the default font file so all letters are available, since the stock font file only contains the letters that make Half-Life.
- When creating Mapbase mods, it will include Thexa's PBR Shaders by default.
Where to find it
This can be accessed within the tool through Game > New Mod.
How to use it
To create a new mod, select a Base game. Then, select a Mod Template (if you are unsure which to use, choose the default one). Choose a title for the mod. At last, insert the mod folder name. Keep in mind this is not the mod name or title, but rather an unique folder name, with lowercase letters and hyphens. Once everything is set up, click Create and you will have a fully working mod, ready to be expanded.
See more in Create a Mod.
Open Game Folder
Template:XBLAHs Modding Tool provides a shortcut to the selected base game folder, proving itself useful in case you need to modify any files manually.
Where to find it
This can be accessed within the tool through Game > Open Game Folder.
Refresh Mods
In case you manually added or modified any mods for the current game, you can refresh the mod listing.
Where to find it
This can be accessed within the tool Game > Refresh Mods.
Modding
Run
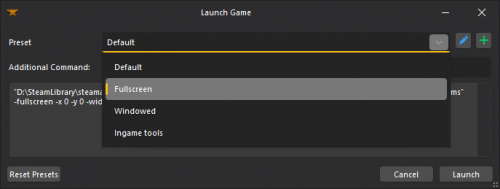
You can run mods straight from Template:XBLAHs Modding Tool, without having to restart Steam when you create or install a new mod. Template:XBLAHs Modding Tool supports lots of different run modes. It contains basic presets for each game, and you can add new ones.
Where to find it
This can be accessed within the tool through Mod > Run or under Run in the toolbar.
How to use it
To run the mod, select a Preset and click OK. Optionally, you can set an Additional Command. Commands starting with - are shortcut parameters, and commands starting with + are console commands. This Additional Command will be appended to the Command of the preset, rather than replacing it.
If you messed up the presets and want a factory reset, you can click the Reset button.
Add a preset
You can create new presets by clicking the ![]() button.
button.
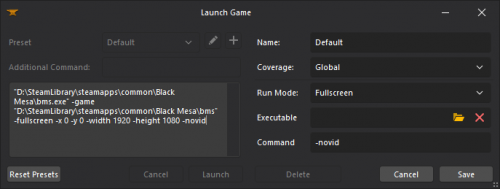
- The Run Mode can either be Fullscreen, Windowed or VR (for compatible games).
- The coverage will tell the tool which games and mods will support. It can be either Global, Current engine only, Current game only or Current mod only.
- You can select an executable path. If none is selected, it will automatically select the game executable. This usually works for compatible games.
- You can optionally set extra commands, so they are called once the game is ran.
Edit a preset
You can also check the preset configurations by clicking the ![]() button.
button.
Remove a preset
You can remove a preset by clicking the ![]() button.
button.
Open Mod Folder
Template:XBLAHs Modding Tool provides a shortcut to the selected mod folder, proving itself useful in case you need to modify any files manually.
Where to find it
This can be accessed within the tool through Mod > Open Mod Folder.
File Explorer
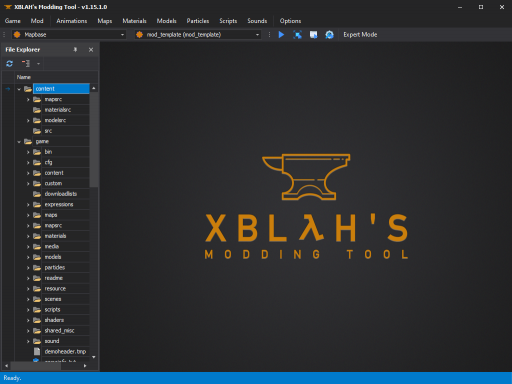
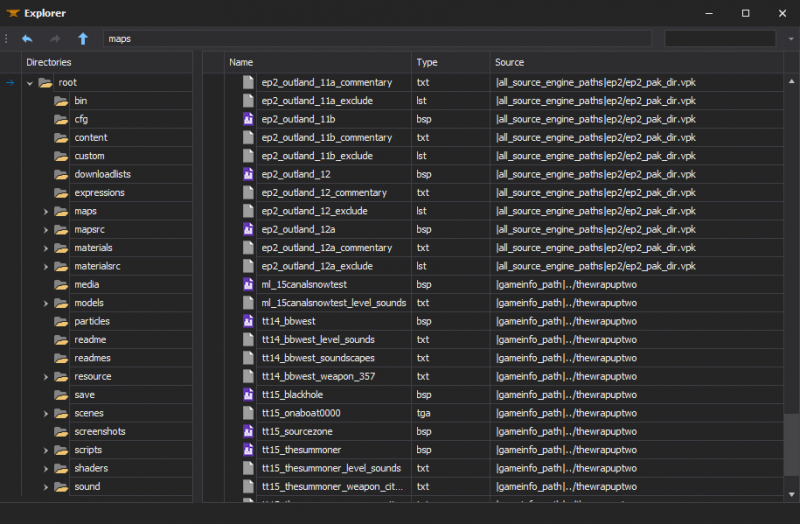
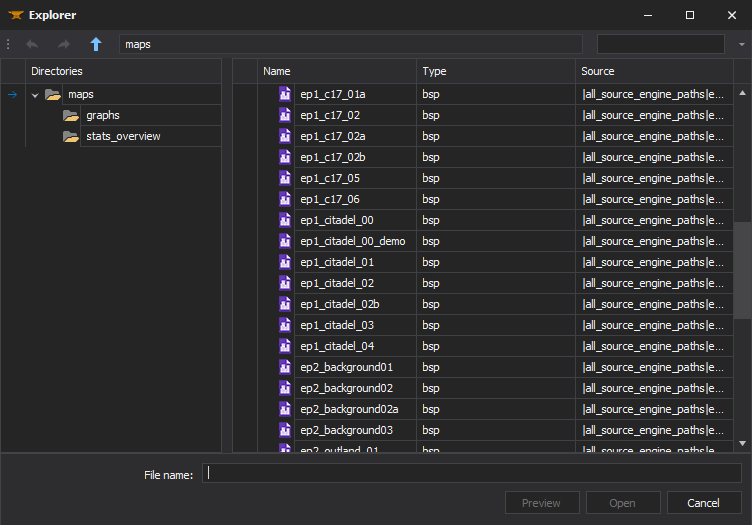
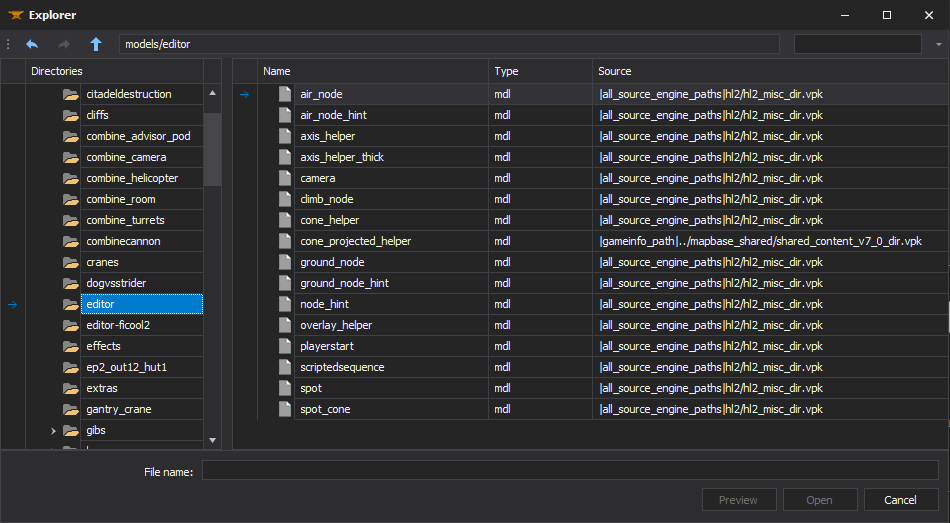
All the files mounted into the game info can be previewed with Template:XBLAHs Modding Tool in the File Explorer. The File Explorer replaces the GCFScape as the ultimate file browsing tool, since it will mount all the VPKs and loose files according to the game info, to show the modder a compreensive list of files. This relieves the modder of having to browse vpks individually, and the integrated features of the tool usually dismisses the necessity of extracting the files from the vpks, since they can be accessed natively by double clicking the file (or right clicking for more options).
Where to find it
This can be accessed within the tool through Mod > File Explorer.
How to use it
The File Explorer contains context menus for each file, targeting them to their respective native editor, if available.
When you don't know where the file is, there is a search field in the top-right corner.
See more in Game Directory.
Extracting files
You can extract multiple files from the mounted VPKs by selecting the files and Right Click > Extract to VPK .
Decompiling maps
You can decompile multiple GoldSrc and Source maps, straight from the VPK or from loose files, by selecting the files and Right Click > Decompile .
Clean Files
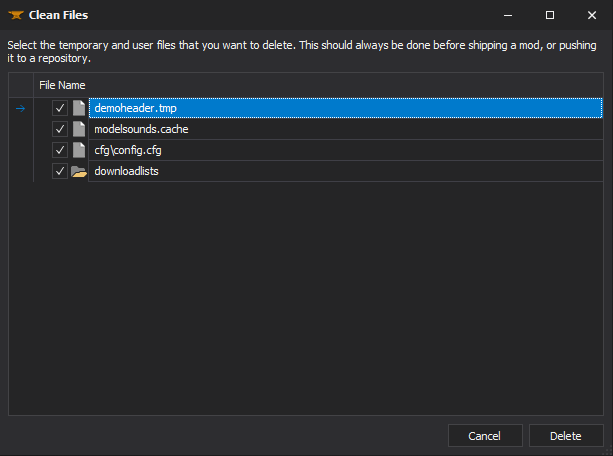
Before shipping the mod, the Template:XBLAHs Modding Tool provides the modder with a list of unnecessary files, which can be removed with the push of a button.
Where to find it
This can be accessed within the tool through Mod > Clean Files.
How to use it
By default it will select all files that should be deleted before publishing the mod. You can manually unselect the files you want to keep.
See more in Pre-publication evaluation#Excess_files.
Game Info
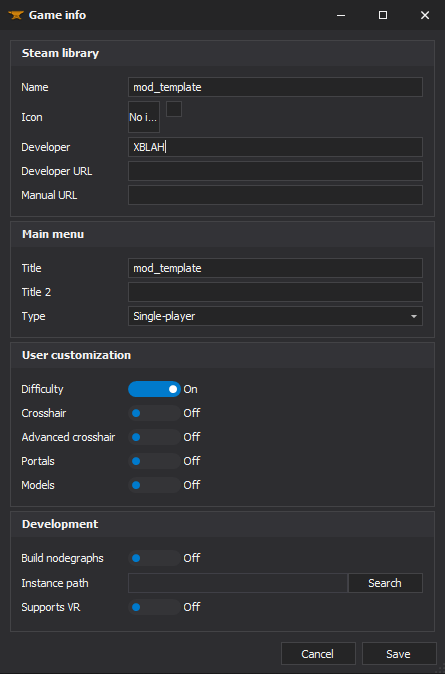
The mod information can be edited with Template:XBLAHs Modding Tool through a comprehensive UI without requiring the modder to mess with text files. It includes all the major keys of Source SDK 2013 Single-player and Source SDK 2013 Multi-player, more than enough for the majority of Source modders.
Where to find it
This can be accessed within the tool through Mod > Game info.
How to use it
See more in Gameinfo.txt.
Steam Library
You can set the mod's name and import an icon from common picture formats, and these will show on the Steam Library.
Content Mount
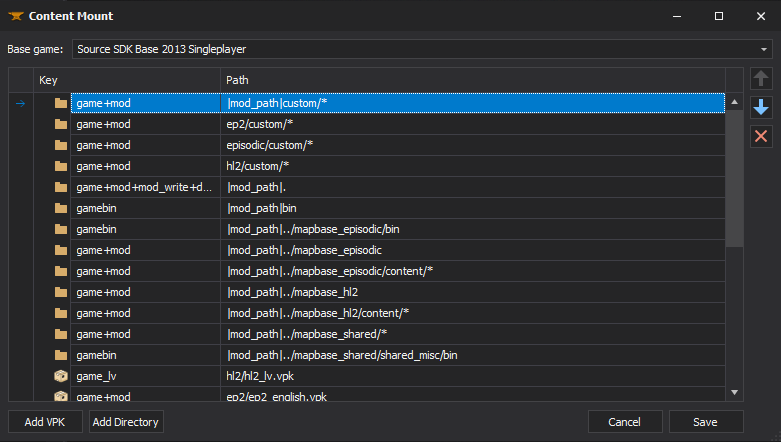
The mod mounted content can be edited with Template:XBLAHs Modding Tool, pointing to directories and vpks in the desired order, without the risk of messing the game info.
Where to find it
This can be accessed within the tool through Mod > Content Mount.
How to use it
See more in Gameinfo.txt.
Chapters
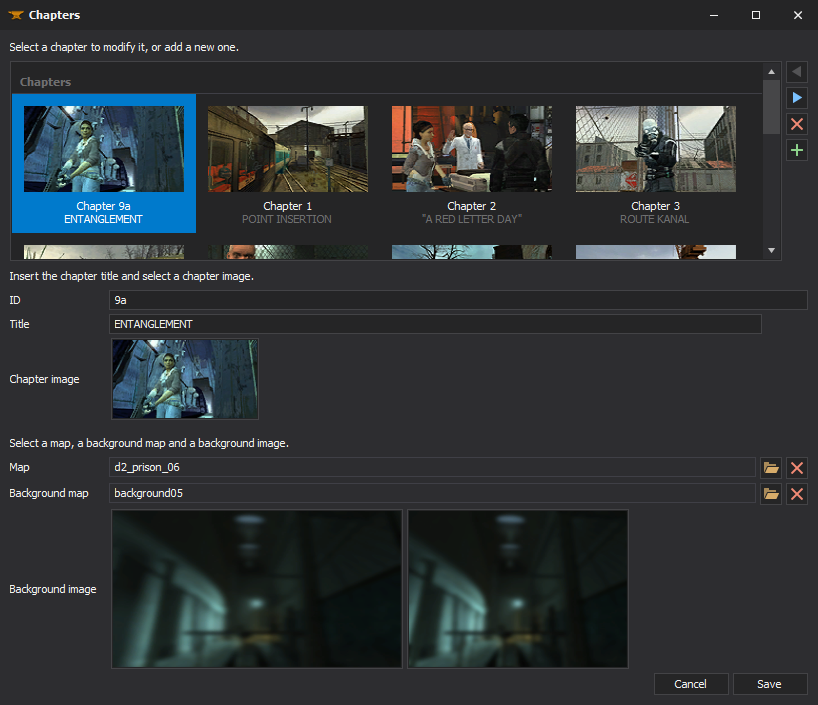
Chapters for single-player games can be created with Template:XBLAHs Modding Tool through an UI. The modder can easily create new chapters, select the chapter images, chapter background images, the first map of the chapter, the background map, and the tool will do the dirty work of creating the required vtfs, vmts and scripts. It gives the option to automatically blur the background images, so the modder can just take a screenshot of the background map and the tool will apply the usual blur. This replaces the need of saving VTFs, creating chapter images with weird proportions, and so on.
Where to find it
This can be accessed within the tool through Mod > Chapters.
How to use it
You can insert a new chapter by clicking ![]() button.
button.
Select a chapter ID (Example 1, 2, 3, or A, B, C, etc) and a chapter title. Right click the picture box next to the Chapter Image label and select a screenshot to show up in the New Menu window. Right click the picture box next to the Chapter Background label and select a screenshot to show up as the menu background (or as the loading screen if a background map is set). Select the map that will load when the user selects that chapter, and, optionally, select a background map.
See more in Adding chapters to your mod and Menu Background Map.
Starting Maps
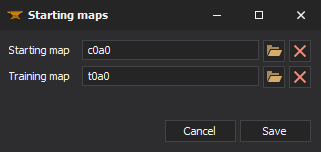
For GoldSrc games, you can set the map that will be run when you start a new game, and the map that will run when you start the training section.
Where to find it
This can be accessed within the tool through Mod > Starting Maps.
Menu Items
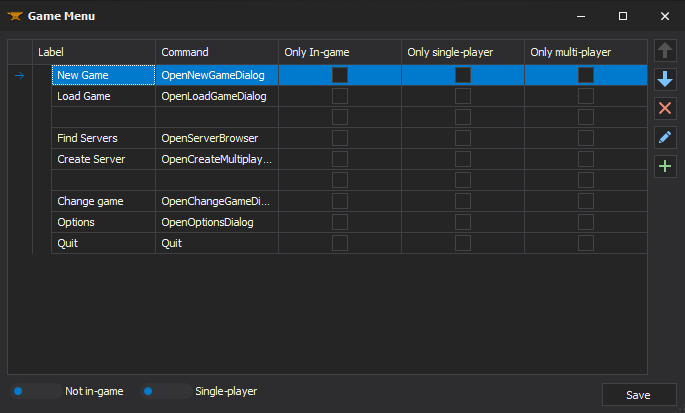
Main menu items can be added, modified or removed with Template:XBLAHs Modding Tool based on a provided list of options.
Where to find it
This can be accessed within the tool through Mod > Menu Items.
How to use it
See more in Manipulating the game menu items.
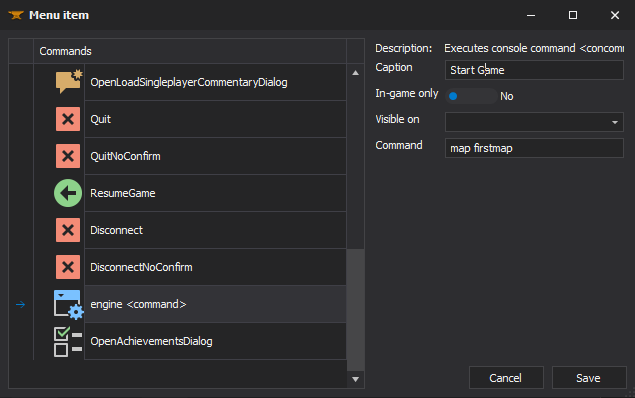
You can add a menu item by clicking on the ![]() button, by selecting the command and choosing a caption. You can also choose whether it should only show when you have a map running.
button, by selecting the command and choosing a caption. You can also choose whether it should only show when you have a map running.
If you select the engine <command>, you can set a command parameter that will be inserted and run through the console when the user clicks the menu item.
You can select an Empty row to add spacing between menu items.
You can edit a menu item by clicking the ![]() button.
button.
You can delete a menu item by selecting the menu item and clicking the ![]() button.
button.
Extract Used Assets
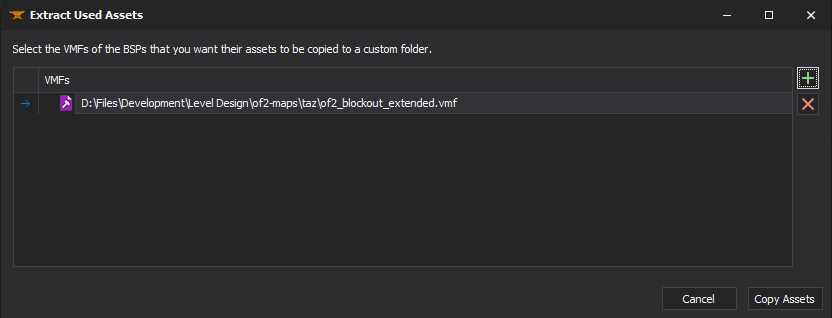
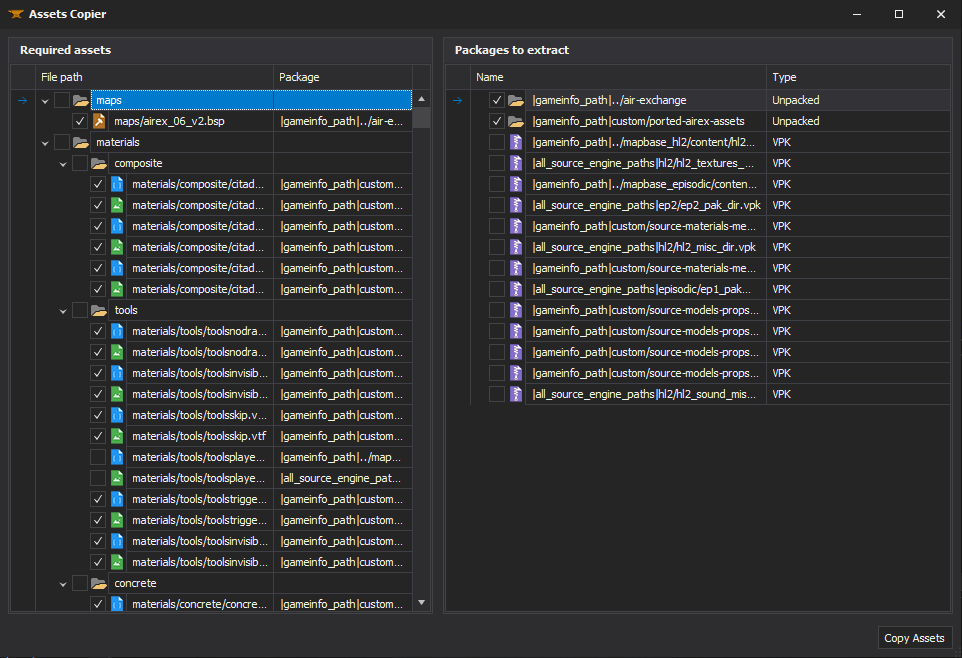
You can select a few VMFs in Template:XBLAHs Modding Tool and it will list you all the required assets, showing you to which pack or loose folder they belong, and giving you an option to copy what you want to a separate folder under /custom/. By default, it will select all the files not located inside VPKs, but you can extract the files from the VPKs on the go, if you want to, in case you are using assets from games not everyone own.
Where to find it
This can be accessed within the tool through Mod > Assets > Extract Used Assets.
How to use it
Currently, it detects the following files:
- Compiled maps
- Materials (and required files)
- Models (and required files)
- Sprites
- Sounds (used by ambient_generic)
- Particles
- Skyboxes
Select the files that you want to be copied to the custom folder. You can select individual files, or you can select a whole package to copy or not to copy the files. For example, you may choose to only extract assets that are inside a VPK, in case you own a game that you are not just players of your mod own too.
When you've selected the files you want to extract, click Copy Assets and the assets will be copied to a new directory under /custom/.
Pack Files Manually
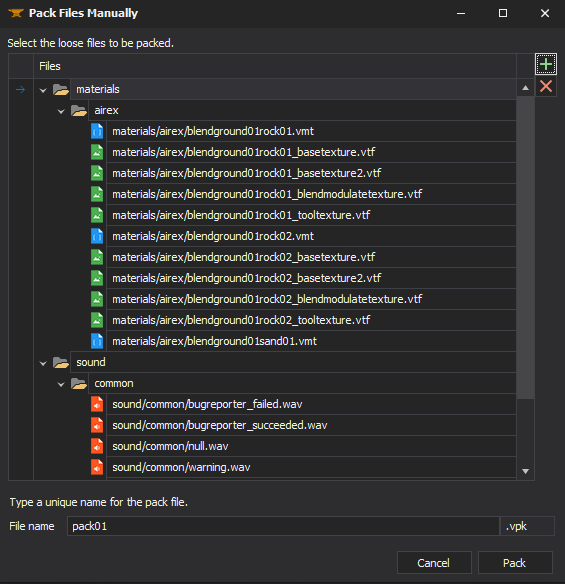
Instead of distributing loose files, you can select the files you want and pack them into a VPK. The selected files will be automatically deleted after they are packed into the VPK, cleaning up your mod folder. The VPK will be saved under /custom/.
Where to find it
This can be accessed within the tool through Mod > Assets > Pack Files Manually.
Pack Subdirectory under /custom/
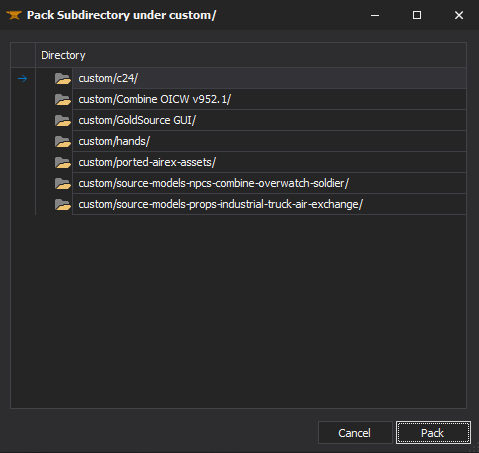
Instead of manually packing files into a VPK, you can select a folder under the Custom directory and it will convert all the Unpacked Files into a single VPK. You will have the option to delete the Unpacked Files.
Where to find it
This can be accessed within the tool through Mod > Assets > Pack Subdirectory under /custom/.
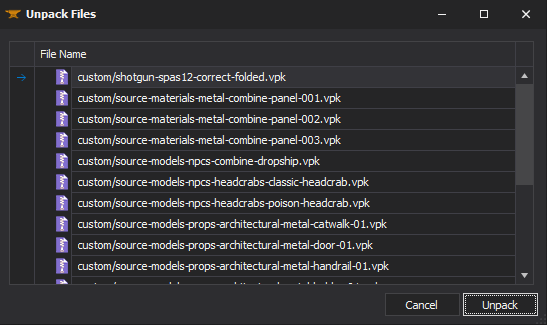
Unpack Files
You can quickly convert mounted VPKs into Unpacked Files, to help during the modding process. All the files in the VPK will be extracted to the mod folder, and you will have the option to delete the VPK.
Where to find it
This can be accessed within the tool through Mod > Assets > Unpack Files.
Remove Duplicates
The tool will list all the files that have the same name, relative directory and content and are mounted at least twice, and will give you the option to delete the extra Unpacked Files with a single button click.
Where to find it
This can be accessed within the tool through Mod > Assets > Remove Duplicates.
Delete Mod
You can delete the selected mod in case you don't want to work with it or have it anymore. Make sure you know what you are doing, as this action cannot be undone.
Where to find it
This can be accessed within the tool through Mod > Delete Mod.
Animations
Choreography Editor
The Source Choreography Editor will be automatically configured if ran through the Template:XBLAHs Modding Tool, patching the missing icons.
Where to find it
This can be accessed within the tool through Animations > Choreography Editor.
Maps
Editor
The level editors will be automatically copied and configured if ran through the Template:XBLAHs Modding Tool.
For Goldsrc games, it will run Jack with the correct configurations, ready for editing and compiling. For Source games, it will run Hammer++ (for compatible branches) or the stock Hammer 4, with Slartibarty's Compile Tools (for compatible branches). It will also run Hammer++ ready to be used with Mapbase, with no special configurations or shortcuts needed.
Where to find it
This can be accessed within the tool through Maps > Editor.
Compile
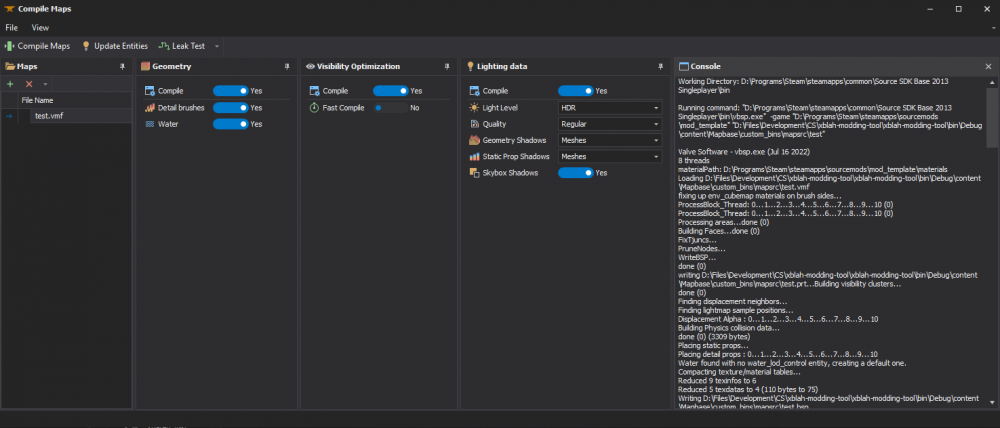
Maps for Source can be compiled through the Template:XBLAHs Modding Tool. The tool will list and explain the most common options for compiling, making it as intuitive as possible.
Where to find it
This can be accessed within the tool through Maps > Compile.
How to use it
Select the maps that you want to compile, select the desired settings and click Compile Maps.
In case you only edited the map entities, you can click Update Entities to compile it faster, keeping the brushes, visibility and lighting data intact.
In case you only want to check if the map is sealed, you can click Leak Test. The tool will alert you if any leaks are found.
Decompile
Compiled maps for Goldsrc and Source can be decompiled through the Template:XBLAHs Modding Tool. The tool will list all the mounted maps, both the loose files and the ones inside the VPKs. You will be able to decompile the maps without having to extract them beforehand. The decompiled maps will be saved under /mapsrc/ as a loose file.
Where to find it
This can be accessed within the tool through Maps > Decompile.
Building Generator
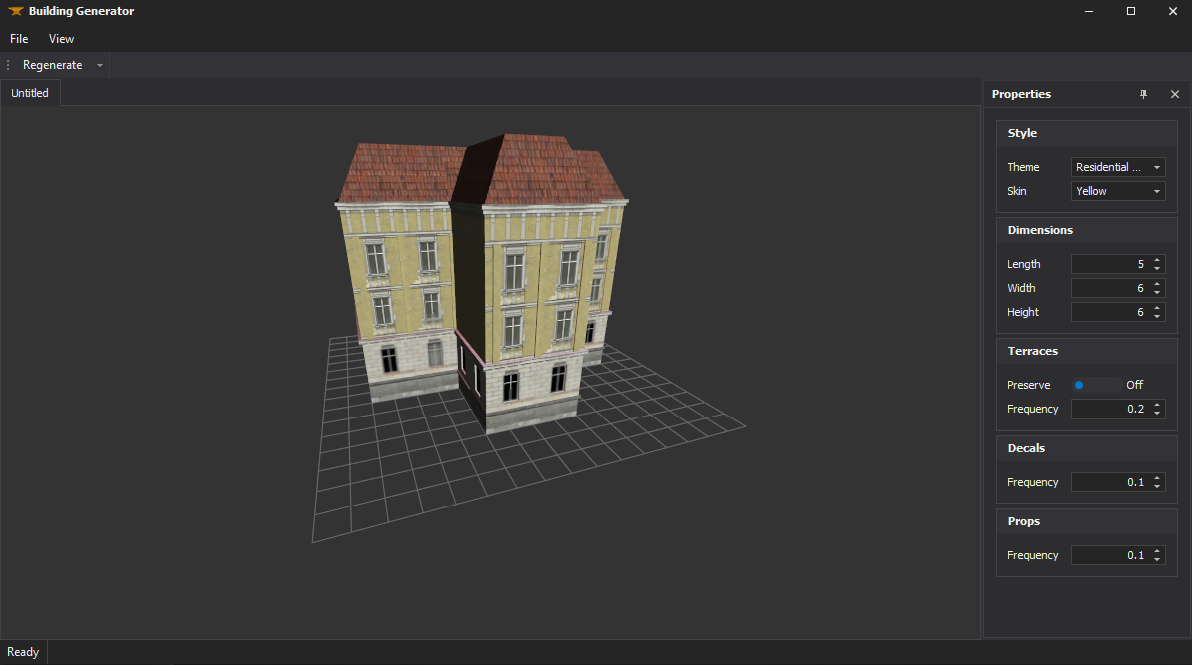
Template:XBLAHs Modding Tool now comes with a Building Generator for Source. The tool includes some example files, and users can create their own templates.
Where to find it
This can be accessed within the tool through Maps > Building Generator.
How to use it
The Building Generator creates buildings out of voxels, using instructions under /scripts/building_generator/themes/ and map data under /prefabs/building_generator.
Themes
Each script file consists of a theme. A theme is made out of pieces
This is an example of a theme file, the DEV Textures theme, included in the tool. You can use it as a base to create new themes.
// Name: DEV Textures
// Author: Jean XBLAH Knapp
//
// Description:	This is a template theme, for feature testing and for reference.
//
// Usage:		Parts files have the following path format:
//				prefabs/[theme_id]/[part_name]_[orientation].vmf
//
//				The available orientations are FT, BK, LF, RT, FT_LF, FT_RT, BK_LF, BK_RT
//				The FT orientation is east in Hammer.
//
//				The default skin is Skin 0
//				If a different skin is selected, whenever Skin 0 is found in the prefabs,
//				it will be replaced by the selected skin

building {
	// Settings
	name		"DEV Textures"
	voxel_size	"128"

	// Skin information
	skins {
		"0" {
			name	"0"
			materials {
				material "DEV/DEV_MEASUREWALL01A"
			}
		}
		"1" {
			name "1"
			materials {
				material "DEV/DEV_MEASUREWALL01D"
			}
		}
	}

	// Floor information
	floors {
		// Used by every floor that does not have custom settings
		"default" {

			// If a part is not found, it will use this one
			default_part	"wall01"

			// Used by FT, BK, LF and RT faces
			default_edge	"window01"

			edges {
				part {
					part_name	"window01"

					// How often this part should be picked. The default is 1.
					// If the frequency is 4, it means it will be picked 4x more often.
					frequency	"4"
				}
				part {
					part_name	"window02"
				}
				part {
					part_name	"window03"
				}
				part {
					part_name	"window04"
				}
			}

			// Used by corner faces
			default_corner	"wall01"
		}

		// The ground floor
		// It equals to using index 0
		"bottom" {

			// The height of the floor is defined by this value times the voxel size.
			// Default value is 1.
			height	"1"

			// If a part is not found, it will use this one
			default_part	"wall01"

			set_pieces {
				part {
					part_name	"door01"
				}
			}
		}

		// The upper floor
		// It equals to using index -1.
		"top" {

			// If a part is not found, it will use this one
			"default_part"	"roof01"
		}

		// Any terrace floor except the roof. If none is set, "top" is used for any terrace
		"terrace" {
			"default_part"	"roof01"
		}
	}
}
Pieces
Each piece is a visgroup of the vmf file under the prefabs dir. The front of the pieces always face east in Hammer. Each piece must have a single info_landmark, that represents the origin (back-right corner) of the piece.
Skins
Themes can have multiple skins.
Open Prefabs folder
There is a handy shortcut to the Game's Prefabs Folder.
Where to find it
This can be accessed within the tool through Maps > Open Prefabs Folder.
Models
Decompile
Compiled models for Goldsrc and Source can be decompiled through the Template:XBLAHs Modding Tool. The tool will list all the mounted models, both the loose files and the ones inside the VPKs. You will be able to decompile the models without having to extract them beforehand. The decompiled models will be saved under content/modelsrc/decompiled as loose files.
Where to find it
This can be accessed within the tool through Models > Decompile.
Materials
Material Editor
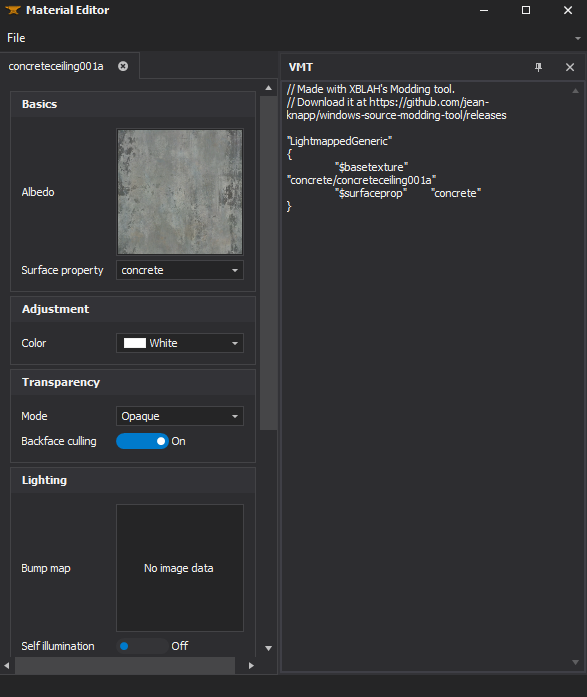
Template:XBLAHs Modding Tool can be used to create some types of materials.
Where to find it
This can be accessed within the tool through Materials > Material Editor.
How to use it
When you are creating the material, the tool will create all the necessary files after the user selects the desired source images, either from a local bitmap resource or from a mounted vtf.
Skybox Editor
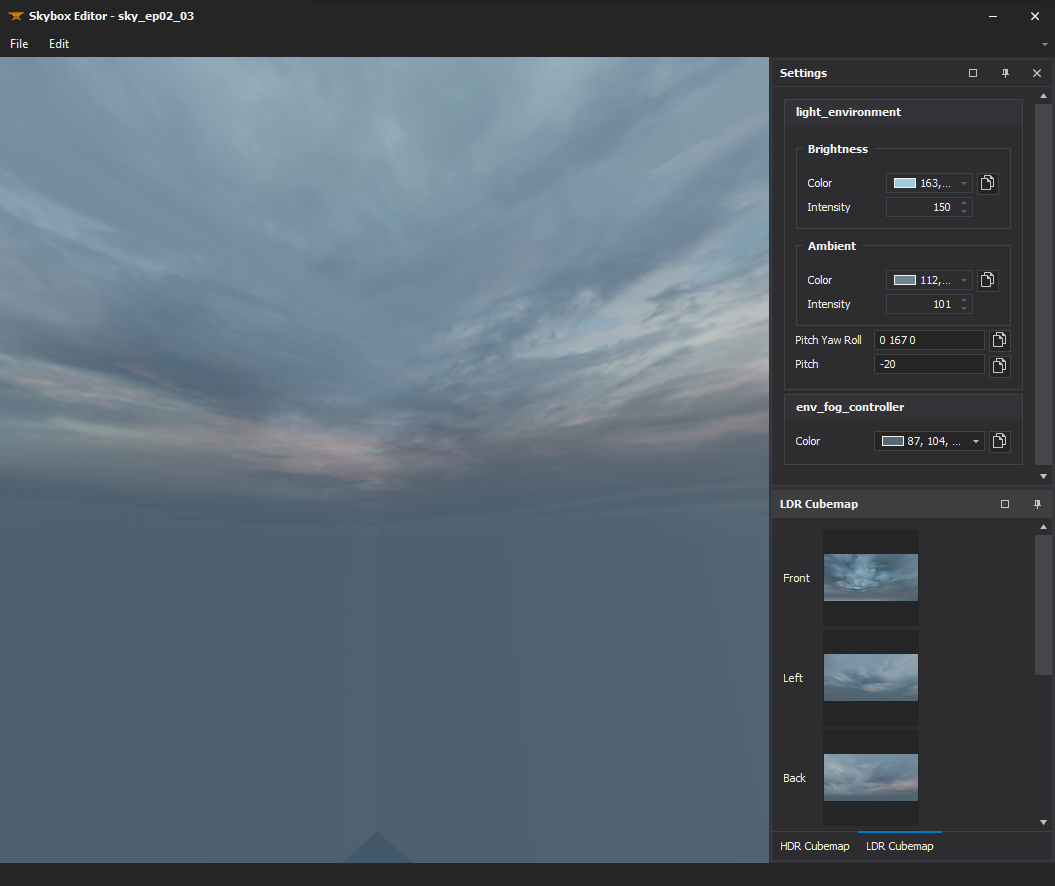
Skyboxes can be created straight from image files with the Template:XBLAHs Modding Tool using an intuitive interface, that creates all the required vtfs and vmts. All you have to do is select each cubemap face, preview it, and save. It has a built in 3D previewer to check if the skybox is seamless, and supports the regular square skyboxes and the clamped ones.
Where to find it
This can be accessed within the tool through Materials > Skybox Editor.
How to use it
You can create a new sky through File > New. Load each individual SDR and/or HDR face in their respective Cubemap toolbox. You can preview how the faces align and rotate the skybox using your cursor.
The Skybox Editor also provides ideal brightness, ambient, sun and fog configurations, that can be copied to the clipboard already in Hammer's property format.
See more in Skybox (2D).
Details Editor
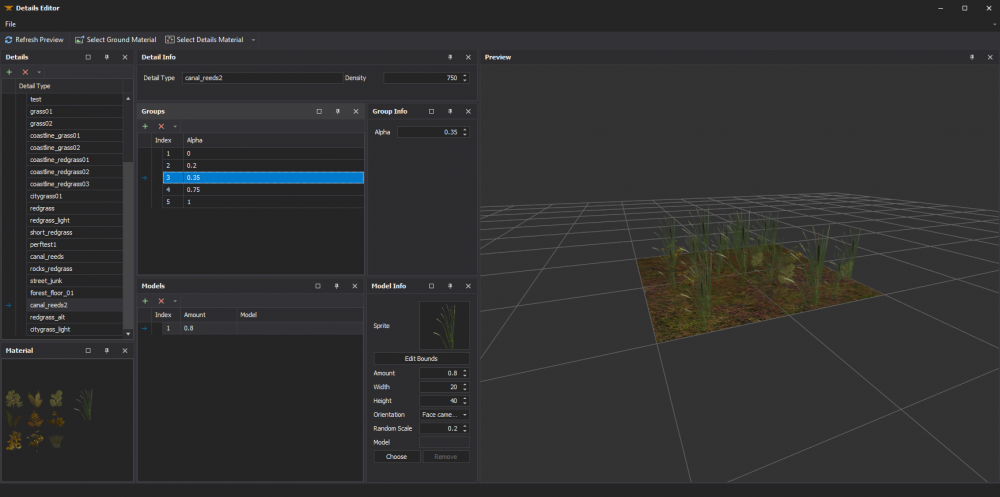
The detail props files (.vbsp) can now be created or edited using the Template:XBLAHs Modding Tool. The editor shows a preview of the detail props, showing both sprites and props, and is integrated with the File Explorer to make it really easy to create new detail props.
Where to find it
This can be accessed within the tool through Materials > Detail Editor.
Particles
Generate Manifest
A manifest file is required for rendering particles in-game. The Particle Manifest file can be generated automatically with Template:XBLAHs Modding Tool, based on all the particle files mounted in the mod.
Where to find it
This can be accessed within the tool through Particles > Generate Manifest.
Scripts
Localization
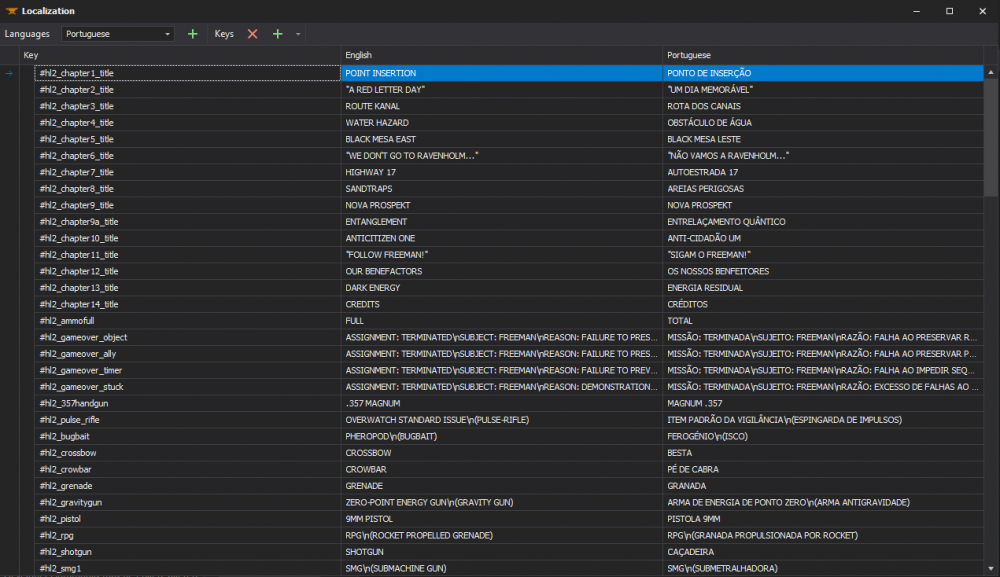
Localization strings can be added and edited through an intuitive UI with Template:XBLAHs Modding Tool.
Where to find it
This can be accessed within the tool through Scripts > Localization.
How to use it
In the toolbar, select the language you want to modify.
See more in VGUI_Documentation#Localization.
Languages
You can add a new language by clicking the ![]() button. When you add a new language, it will copy over the values of the English language. Use language names compatible with Valve's titles.
button. When you add a new language, it will copy over the values of the English language. Use language names compatible with Valve's titles.
Keys
The keys can be edited in any language by renaming it in the first column. Changes to one language will be applied to all languages. The values can be edited in the third column. The second column will always show the value in the English language. Notice: If you need to modify the value of a key in the English language, just edit the third column and the second column value will be updated automatically.
You can add new keys by clicking the ![]() . The new key will be added to all languages.
. The new key will be added to all languages.
Keys can be removed by clicking the ![]() button. The key will be removed from all languages.
button. The key will be removed from all languages.
Sounds
Soundscape Editor
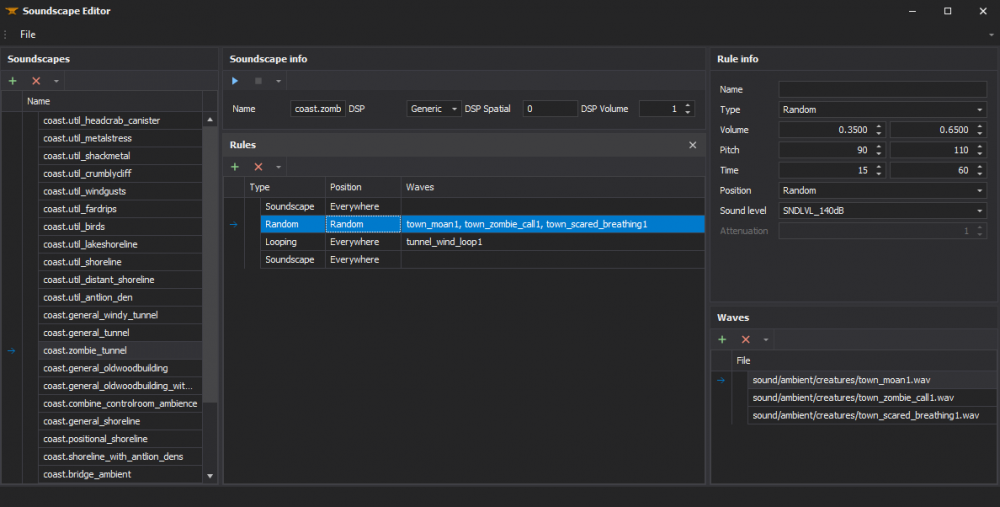
Soundscapes can now be easily created or modified using Template:XBLAHs Modding Tool. The UI provides an intuitive way to create new soundscapes, using the integrated file explorer. This allows the user to browse all the files mounted (VPKs and loose files), let the user preview the files individually and let the user preview how the whole soundscape is gonna play in-game.
Where to find it
This can be accessed within the tool through Sounds > Soundscape Editor.
How to use it
See more in Soundscape.
Generate Soundscape Manifest
A manifest file is required for playing soundscapes in-game. The Soundscape Manifest file can be generated automatically with Template:XBLAHs Modding Tool, based on all the soundscape files mounted in the mod.
Where to find it
This can be accessed within the tool through Sounds > Generate Soundscape Manifest.
Generate Game Sounds Manifest
A manifest file is required for precaching sounds in-game. The Game Sounds Manifest file can be generated automatically with Template:XBLAHs Modding Tool, based on all the game sound files mounted in the mod.
Where to find it
This can be accessed within the tool through Sounds > Generate Game Sounds Manifest.
Options
Steam Libraries
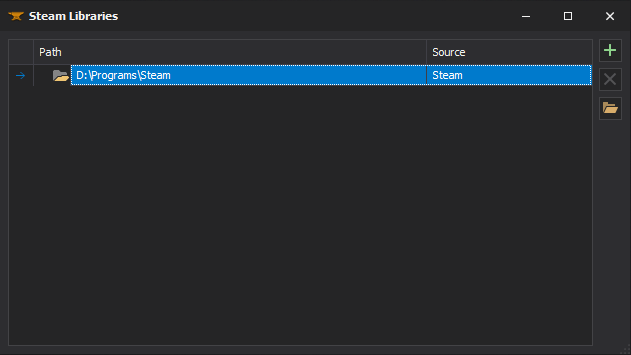
The libraries used by the games and mods in the tool are automatically set if you have a legit Steam installation. Keep in mind the libraries set here are only used by the tool, and the games and mods will still use their gameinfo to mount their contents.
Where to find it
You can manually add or remove the libraries used by the tool through Options > Steam Libraries
Add a library
You can add a library manually by clicking on the ![]() button, and selecting a directory that contains a SteamApps folder. This is particularly useful when you don't have a proper Steam installation but you still want to create mods. To get the tool working, insert your games inside a SteamApps folder, and then select the parent directory if this SteamApps folder as the library.
button, and selecting a directory that contains a SteamApps folder. This is particularly useful when you don't have a proper Steam installation but you still want to create mods. To get the tool working, insert your games inside a SteamApps folder, and then select the parent directory if this SteamApps folder as the library.
Delete a library
You can delete a manual library by selecting the library and clicking the ![]() button.
button.
Browse a library
You can open the library directory by clicking the ![]() button.
button.
External links
| |||||||||||||||||||||||||||||||||||||||||||||||||||||||||||
