Pre-publication evaluation
Mods
Essentials
- Confirm that the mod has been built under Release rather than Debug.
- Read Steam 3rd Party Mod Support.
- Read Customizing Options: Keyboard.
- Confirm that a
maplist.txtfile to base the shared soundcache is made and that a shared soundcache manifest is built. - Delete excess files.
- Confirm that the files required for each map are in their places.
- Implementation for all functionalities desired to be in this release is completed.
- Do not distribute source folders and their containing files (mapsrc, materialsrc, modelsrc) if your map is closed-source.
Multiplayer essentials
- Create a
mapcycle.txt, referenced by the default value of the mapcyclefile ConVar. - Design a default MOTD, or Message of the Day, for the mod in
motd.txt.
Excess files
If one of the following files or directories exist, deletion would make the mod's installation tidier.
albedo.tgademoheader.tmpstats.txttextwindow_temp.htmlcfg\banned_user.cfgcfg\banned_ip.cfgcfg\config.cfg Note:You should be shipping
 config_default.cfg.cfg\pet.txtscripts\kb_def.lst(See Customizing Options: Keyboard)scripts\settings.scr Note:This should be placed in the
 cfgfolder.bin\client.pdbbin\server.pdb- Any *.db files that may have collected from image preview resources
models/.../*.xbox.vtxmodels/.../*.xbox.vtxSAVEdirectoryexpressionsdirectoryscreenshotsdirectoryreslistsdirectorymaterials/mapsdirectorymaterials/tempdirectorysound/tempdirectory
Rebuildable files
These files should not be distributed in the release but will need to be rebuilt by the client.
scene.cacheandmodelsounds.cachemaps/soundcache/*.cache Warning:Do not delete the
 .manifestsDownloadListsdirectory
Cleaning the mod folder with XBLAH's Modding Tool
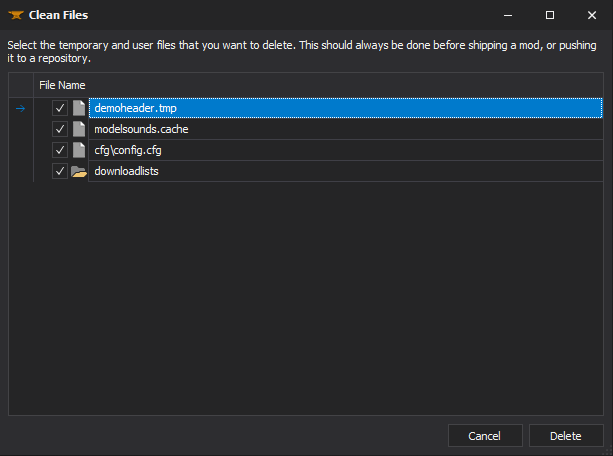
Before shipping the mod, the ![]() XBLAH's Modding Tool provides the modder with a list of unnecessary files, which can be removed with the push of a button.
XBLAH's Modding Tool provides the modder with a list of unnecessary files, which can be removed with the push of a button.
Where to find it
This can be accessed within the tool through Mod > Clean Files.
How to use it
By default it will select all files that should be deleted before publishing the mod. You can manually unselect the files you want to keep.
Refining
- Read VGUI2 Programming Best Practices.
- Encrypt weapon scripts using vice.
- Add documentation on mod-specific console commands and console variables.
- Include an icon for the mod if desired in
resource\game.ico. - Include the FGD for third-party mod mappers.
- Compile your DLL's in Release Mode, also don't forget to start Optimizing DLLs for that extra speed.
- Encrypt
bin\client.dllwith UPX
UPX
Maps
Final compile
- Examine the compile log to ensure there are no compile errors, you could also use the Interlopers Compile Checker.
- When you load the map into the game, check the console to ensure there are no errors or warnings.
- Make sure you have compiled the map with Normal VIS and
-finalRAD (switch to expert compile mode and use the 'Final' preset if you don't know how to use parameters). Do not release a map compiled with Fast VIS or RAD! - Remember to run the buildcubemaps command in the console twice before releasing your finished product, once with HDR enabled and once without, or specular reflections will not work properly. Todo: State or link to how you would do this.
Distributing custom content
If you have custom models, sounds, textures, or materials, you must either:
- Bundle them into the map BSP file (using Bspzip, PackBSP, Map Analyst, Pakrat, Compile Pal, etc.). See
Using Bspzip to Embed Custom Content, or
- Add a ".res" Map Resource File to your map release to let the server know there's files that should accompany the BSP when it's downloaded.
If you don't do this, then anyone downloading the map through a server whilst playing will not get your custom content.
Game specific considerations
Counter-Strike: Source
- Create a ".txt" file with the same name as the map. This text will be displayed to players when the map starts. Lines are wrapped.
- Edit the bot Navigation Mesh so bots will behave more intelligently in your map.
- Create a level overview material.
- Run the map with only bots playing, 10 a side, and see whether either side has an outright advantage. There is no substitute for human players, but bots will typically show up the obvious design flaws in a map (poorly positioned meeting points, not enough entrances/exits in critical areas, and so on)
Day of Defeat: Source
- Create a ".txt" file with the same name as the map. This text will be displayed to players when the map starts. Lines are wrapped.
- Create a level overview material.
The Ship
- Create a 1024x1024 material (resized from 1280x1024) vgui/map_backgrounds/map_background_<map>
- Create a 256x128 material vgui/map_previews/map_preview_<map>
- See The Ship: Creating a Deckplan
Team Fortress 2
- You should consider creating map pictures/mission briefing for the mission briefing. See TF2/Modifying the Mission Briefing
- Create a Maplist Thumbnails image.
