Level Transitions
| Abstract Mapping series Discuss your thoughts - Help us develop the articles or ideas you want |
|---|
|
Ammunition | List of HL2 Animals and Creatures | Mapping with Antlions | Beams and Lasers | Cables and Ropes | Moving Clouds | Color Theory in Level Design | Combat | Combine | Compression (Source 1) | Doors | Dust, Fog, & Smoke | Elevators | Level Transitions | Environmental Lighting, Sun, Weather, & Outdoors | Explosions | Fire | Half-Life 2 Foliage | Glass & Windows | Headcrab | Health | Ladders | Lighting | Optimization (level design) | Physics | Retinal scanners | Sound and Music | Special effects | Terrain | Trains | Turrets | Water | Weapons | Zombie |
Level Transitions allow you transfer the player from one map to another, essentially making two separate levels seem like one larger map.
A level transition can be one way or two way:
- A two way level transition allows a player to travel back and forth between two connected maps.
- One way level transitions prevent the player from traveling back to previously explored areas after being completed. An obstacle or chain of events makes a previous area inaccessible.
A level transition can be seamless or displacing:
- Seamless transitions give the impression that the player stays in the same location as before the transition. For that, the two maps have an area in common, with the intention of being the same, for example a door or hallway connecting two rooms.
- Displacement transitions give the impression that the player has moved, for example by a portal connecting two worlds or the player is knocked unconscious and wakes up in a new area.
Why change levels?
The Source Engine, while expansive, has limits as to the the amount data that can be processed. Breaking up levels also helps split up the work load and compile times during the design process.
Seamless Transitions
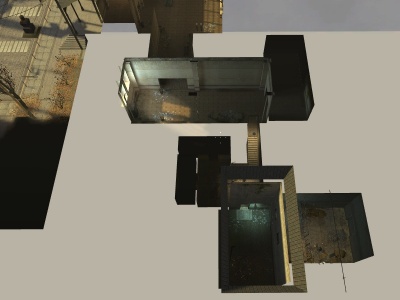
Example of a seamless transition in-game
To create a seamless transition, parts of one level are included inside the next level being loaded. The exception being "teleportation" style transitions, where the players are transported into an entirely new world or environment. Below is an example from ![]() Half-Life 2's d1_trainstation_01, the first level of the game.
Half-Life 2's d1_trainstation_01, the first level of the game.
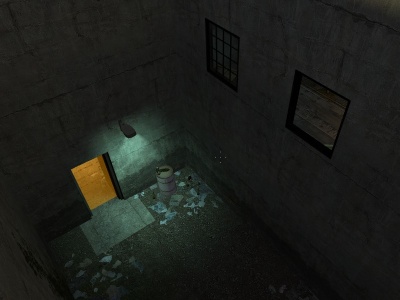
The trigger_changelevel in the doorway loads the next map.
The map actually ends at the staircase just beyond the door in the first picture. Most of the level lies on the right of the picture here.
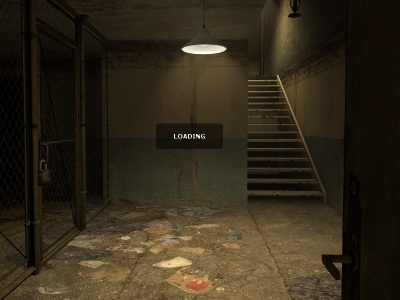
Once the player touches the changelevel, they're greeted by a loading, the next map is loaded over the current map.
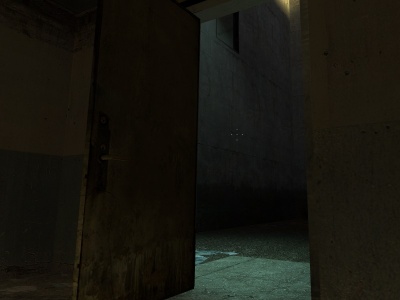
Now the player is in an entirely new map, but from the other side of the door, it appears the old level is still there.
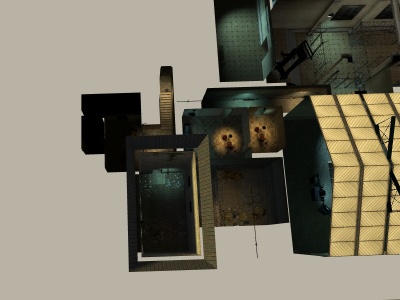
However, if you zoom out, you can see that a new level was loaded and the original level was almost entirely removed. There is no longer the any parts of the level that were in the right on the second screenshot, but an entirely new area in the upper left.


Creating a seamless transition
- First, have the exact same brushes and entities in the visible area. This will make the level change seamless. You can use copy and paste in Hammer.
- Next, in both levels, place an info_landmark in the exact same location relative to the map. Name these the same in both maps, such as level01 (can be changed).
 Warning:If this is not done, you will be teleported near 0, 0, 0 on map change.
 - Next, create a trigger_changelevel in both levels. This can be named anything. Link them to the name the info_landmark in both maps share, inside the properties panel. Set the new map name to either the previous or next level, depending on which level the trigger_changelevel is located within. Warning:Do not have these in the same relative area. This will create a looping effect, and when you get into one level you immediately are teleported back.
- Finally, you can (but needn't) create a trigger_transition in both levels. This will be the area where props will be taken between levels. These should be named the same as the info_landmarks.
Displacement Transition
Creating a displacement transition
There are 4 different methods:
- Mimicking the method above, but without the seamless transition.
- Triggering the trigger with logic.
- point_changelevel (only in
 )
) - info_changelevel (only in

 )
)
Method 1
Follow the steps for a seamless transition, but do not include the same level geometry. You can disable the trigger_changelevel to the previous level if required.
Method 2
To start, you must have:
- An info_landmark in each level
- A trigger_changelevel in each level
- A trigger_transition in each level (Optional)
First, create a small brush with the trigger texture in the first level. This will be the trigger_changelevel. Set the new map name to the second map. Set the landmark name to the name of the landmark. Then, create a landmark somewhere. This may take some trial and error to figure out where this should be best placed as to not cause issues with changing level into a wall in level 2. Next, if you want props to carry over, create a trigger_transition and call it the same name as the info_landmark. This volume is where any entities will transfer over to the next level. You can then create a logic_relay pointing at your trigger_changelevel. Set the Target Input to ChangeLevel. You can put this somewhere where the player cannot contact it. Within the second level, add the info_landmark (named the same as the previous one). You will have to create a second trigger_changelevel in the second map, but this can be disabled and out of the player's reach. Set the new map name to the first map. Set the landmark name to the name of the landmark.
Method 3
(![]() Only)
To start you must have:
Only)
To start you must have:
Add the point_changelevel, and create an input with the input set to ChangeLevel, with the parameter as the map name. Nothing else is required for a simple transition that doesn't retain player offset, physics objects, or global states.
If you want the player's position relative to a landmark to still be retained with this method, you need the following additional entities:
Place the info_landmark_exit in the map that is being transitioned from, and the info_landmark_entry at the same position in the room within the next map. The trigger_transition should cover any areas which are reachable from the location of the level transition, and limits which physics objects are brought to the next map. Unlike trigger_changelevel, none of these entities need to be named.
Portal 2 does not support two-way transitions (either with this entity or trigger_changelevel, which still exists), so you should typically not bother adding entities for a reverse-transition.
Method 4
(![]()
![]() Only)
To start you must have:
Only)
To start you must have:
First, create an info_landmark in both levels. Set it to the same name in both levels. Finally, Create an info_changelevel brush over the saferoom. Set the new map name to the next map. Set the landmark name keyvalue to the name of the landmark.
See also
- trigger_changelevel
- info_landmark
- trigger_transition
- point_changelevel (only in )
- info_changelevel (only in )