WiseLaser: Difference between revisions
Plykkegaard (talk | contribs) (→Moving Laser: change to use templates for entity description) |
m (→See also) |
||
| (19 intermediate revisions by 7 users not shown) | |||
| Line 1: | Line 1: | ||
{{SDKNuts Tutorials}} | |||
[[ | {{wisemxport|[[User:Plykkegaard|Peter [AGHL]]] 14:20, 14 Feb 2008 (PST)}} | ||
In | In this tutorial, we will approach basic aspects of using lasers in level design. | ||
==Moving Laser== | |||
[[File:wiseLaser01.jpg|thumb|150px|right|Moving laser]] | |||
The image to the right shows a laser that travels back and forth from both ends of a tunnel, and will kill the player if touched. The height of the tunnel is big enough for the player to be able to jump over the laser. The player can not go under the laser at this height however. | |||
There are several ways to create an effect like this, the settings and methods that is used in this tutorial can easily be changed to your liking. Notice the sprite placed on each side for a burning hot effect. | There are several ways to create an effect like this, the settings and methods that is used in this tutorial can easily be changed to your liking. Notice the sprite placed on each side for a burning hot effect. | ||
There's a secondary ambient effect used in this tutorial, not related to the laser: a water puddle was created on the floor, and it will make a splash sound. | |||
An <code>[[env_beam]]</code> is used on each side of the tunnel to create the moving laser: | |||
<div style="position: relative;float: Left;width: 80%;padding: 0px;"> | |||
{{entity-kvalue-start|[[env_beam]]}} | {{entity-kvalue-start|[[env_beam]]}} | ||
{{entity-kvalue|Parent|Beam01train|Right side parent equals Beam02train}} | {{entity-kvalue|Parent|Beam01train|Right side parent equals Beam02train}} | ||
| Line 23: | Line 30: | ||
{{entity-kvalue|Touch Type|Not a tripwire|}} | {{entity-kvalue|Touch Type|Not a tripwire|}} | ||
{{entity-kvalue-end}} | {{entity-kvalue-end}} | ||
</div> | |||
{{entity-flag-start}} | {{entity-flag-start}} | ||
{{entity-flag|Start|on|}} | {{entity-flag|Start|on|}} | ||
{{entity-flag-end}} | {{entity-flag-end}} | ||
=== Setup in Hammer === | ===Setup in Hammer=== | ||
[[ | [[File:wiseLaser02.png|thumb|150px|right|Setup in Hammer]] | ||
To the right there's a shot from Hammer of the left side [[env_sprite]], | To the right there's a shot from [[Hammer]] of the left side [[env_sprite]], <code>env_beam</code>, [[func_tracktrain]] and first [[path_track]]. | ||
{{Note|The left and right sides are identical except for entity names.}} | {{Note|The left and right sides are identical except for entity names.}} | ||
Objects used | Objects used | ||
* Transparent = | * Transparent = <code>func_tracktrain</code> | ||
* Purple = | * Purple = <code>env_beam</code> | ||
* Green = | * Green = <code>env_sprite</code> | ||
* Red = | * Red = <code>path_track</code> | ||
By looking at the image you can see the env_sprite is parented to the env_beam. | By looking at the image you can see the <code>env_sprite</code> is parented to the <code>env_beam</code>. | ||
The | The <code>env_beam</code> is parented to the invisible <code>func_tracktrain</code>. | ||
Our first | Our first <code>path_track</code>, the starting point, is nestled right in there with the other entities. | ||
These are the settings for each | ====env_sprite==== | ||
These are the settings for each <code>env_sprite</code>, which are only used for a slight effect. | |||
{{entity-kvalue-start|[[env_sprite]]}} | {{entity-kvalue-start|[[env_sprite]]}} | ||
{{entity-kvalue|Parent|Beam01|Beam02 for | {{entity-kvalue|Parent|Beam01|Beam02 for right side}} | ||
{{entity-kvalue|Render FX|Normal|}} | {{entity-kvalue|Render FX|Normal|}} | ||
{{entity-kvalue|Render Mode|Additive|}} | {{entity-kvalue|Render Mode|Additive|}} | ||
| Line 58: | Line 66: | ||
{{entity-kvalue|Scale|0.2|}} | {{entity-kvalue|Scale|0.2|}} | ||
{{entity-kvalue|Size of Glow|2.0|}} | {{entity-kvalue|Size of Glow|2.0|}} | ||
{{entity-kvalue-end}} | |||
{{entity-flag-start}} | {{entity-flag-start}} | ||
| Line 63: | Line 72: | ||
{{entity-flag-end}} | {{entity-flag-end}} | ||
Settings for each | ====func_tracktrain==== | ||
Settings for each <code>func_tracktrain</code>: | |||
{{entity-kvalue-start|[[func_tracktrain]]}} | {{entity-kvalue-start|[[func_tracktrain]]}} | ||
{{entity-kvalue|Name|Beam01train|Beam02train for the | {{entity-kvalue|Name|Beam01train|Beam02train for the right side}} | ||
{{entity-kvalue|Disable receiving shadows|Yes|}} | {{entity-kvalue|Disable receiving shadows|Yes|}} | ||
{{entity-kvalue|Disable Shadows|Yes|}} | {{entity-kvalue|Disable Shadows|Yes|}} | ||
{{entity-kvalue|First Stop Target|Beam01path01|Beam02path01 for the | {{entity-kvalue|First Stop Target|Beam01path01|Beam02path01 for the right side}} | ||
{{entity-kvalue|Max speed|60|}} | {{entity-kvalue|Max speed|60|}} | ||
{{entity-kvalue|Initial Speed|60|}} | {{entity-kvalue|Initial Speed|60|}} | ||
| Line 79: | Line 89: | ||
{{entity-kvalue|Move sound|d3_citadel.weapon_zapper_beam_loop1|Left side only}} | {{entity-kvalue|Move sound|d3_citadel.weapon_zapper_beam_loop1|Left side only}} | ||
{{entity-kvalue|Volume|2|}} | {{entity-kvalue|Volume|2|}} | ||
{{entity-kvalue-end}} | |||
{{entity-flag-start}} | {{entity-flag-start}} | ||
| Line 87: | Line 98: | ||
{{entity-flag-end}} | {{entity-flag-end}} | ||
=== | [[File:wiseLaser03.png|thumb|150px|right|Setup in Hammer]] | ||
====path_track==== | |||
Notice, in the image to the right, that there are only 4 <code>path_track</code> entities: two on each side, for each <code>func_tracktrain</code>. | |||
On the left side the first <code>path_track</code> references the second <code>path_track</code> which in turn references the first <code>path_track</code>, which causes the lasers on each side to go in a loop, back and forth. | |||
By adding more of these <code>path_track</code>'s you could cause the laser to travel in a zigzag pattern. You could also attach multiple lasers to each side, for a double effect as an example. You are free to change the visual effect of the laser, its speed and the tiny sprite to your liking. | |||
{{Tip|The reason an <code>env_beam</code> was used on each side rather than only on one side is that the laser effect appears to be much better. However, you can experiment with this.}} | |||
Settings for first <code>path_track</code> on the left side: | |||
<div style="position: relative;float: Left;width: 100%;padding: 0px;"> | |||
{{entity-kvalue-start|[[path_track]]}} | |||
{{entity-kvalue|Name|Beam01path01|Beam02path01 on the Right side}} | |||
{{entity-kvalue|Name|Beam01path02|Beam02path02 on the Right side}} | |||
{{entity-kvalue-end}} | |||
==Water puddle== | |||
[[File:wiseLaser04.jpg|thumb|150px|right|Water Puddle]] | |||
[[ | The water puddle effect is done with an [[info_overlay]]. One can place an [[env_cubemap]] over this, an [[ambient_generic]] for the sound and a [[trigger_multiple]] to play the sound when the player steps there. | ||
===Setup in Hammer=== | |||
====info_overlay==== | |||
<div style="float: Left;width: 80%;padding: 0px;"> | |||
{{entity-kvalue-start|[[info_overlay]]}} | |||
{{entity-kvalue|Material|decals/decalborealispuddle001a|}} | |||
{{entity-kvalue-end}} | |||
====ambient_generic==== | |||
{{entity-kvalue-start|[[ambient_generic]]}} | |||
{{entity-kvalue|Name|WaterSound|}} | |||
{{entity-kvalue|Sound name|Water.StepLeft|}} | |||
{{entity-kvalue|Volume|4|}} | |||
{{entity-kvalue-end}} | |||
{{entity-flag-start}} | |||
{{entity-flag|Start Silent|on|}} | |||
{{entity-flag|Is NOT Looped|on|}} | |||
{{entity-flag-end}} | |||
====trigger_multiple==== | |||
{{entity-kvalue-start|[[trigger_multiple]]}} | |||
{{entity-kvalue|Start disabled|No|}} | |||
{{entity-kvalue|Delay before reset|1|}} | |||
{{entity-kvalue-end}}</div> | |||
{{entity-flag-start}} | |||
{{entity-flag|Clients|on|}} | |||
{{entity-flag|Everything|on|}} | |||
{{entity-flag-end}} | |||
</div> | |||
{{entity-output-start}} | |||
{{entity-output||OnStartTouch|WaterSound|PlaySound||||}} | |||
{{entity-output-end}} | |||
==Laser turning a corner== | |||
[[File:wiseLaser05.jpg|thumb|150px|right|Laser turning a corner]] | |||
The | The trick to making the laser turn a corner is to stop the inside train until the outside train catches up. | ||
Take a look at the Outputs for the <code>path_tracks</code> in the corner, should be straight-forward. | |||
The | The next step is to make the laser teleport to the first <code>path_track</code> so it can start over. | ||
To do that just check the flag ''Teleport'' to this <code>path_track</code>, in both of the first ones. | |||
The download for this tutorial contains two [[VMF|vmf]] projects. | |||
In the second example the laser turns a corner and travels down another tunnel. Notice that no sprites were used in the second example, since it looked better without them. | |||
== See also == | |||
* [https://cdn.discordapp.com/attachments/434089157875466242/457837714763677726/wiseLaser.zip Example VMFs backup] | |||
* | |||
[[Category:Level Design | [[Category:Level Design]] | ||
Latest revision as of 10:29, 4 August 2024
This tutorial was originally created by wisemx. It was originally posted on SDKnuts.net.
In this tutorial, we will approach basic aspects of using lasers in level design.
Moving Laser
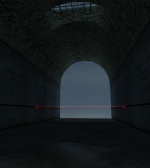
The image to the right shows a laser that travels back and forth from both ends of a tunnel, and will kill the player if touched. The height of the tunnel is big enough for the player to be able to jump over the laser. The player can not go under the laser at this height however.
There are several ways to create an effect like this, the settings and methods that is used in this tutorial can easily be changed to your liking. Notice the sprite placed on each side for a burning hot effect.
There's a secondary ambient effect used in this tutorial, not related to the laser: a water puddle was created on the floor, and it will make a splash sound.
An env_beam is used on each side of the tunnel to create the moving laser:
| Class: env_beam | ||
| Keyvalues | Comments | |
| Parent | Beam01train | Right side parent equals Beam02train |
| Brightness | 75 | |
| Beam Color | 255 0 0 | |
| Life | 0 | (Infinite) |
| Width of Beam | 0.7 | |
| Noise | 0 | |
| Sprite name | sprites/laserbeam.spr | |
| Texture scroll rate | 40 | |
| Damage | 1000 | |
| Start Entity | Beam01 | Beam02 for the right side |
| Ending Entity | Beam02 | Beam01 for the right side |
| Touch Type | Not a tripwire | |
| Flag | ||||
| Start | ||||
Setup in Hammer
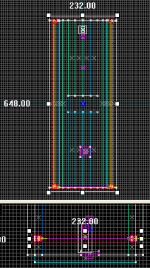
To the right there's a shot from Hammer of the left side env_sprite, env_beam, func_tracktrain and first path_track.
Objects used
- Transparent =
func_tracktrain - Purple =
env_beam - Green =
env_sprite - Red =
path_track
By looking at the image you can see the env_sprite is parented to the env_beam.
The env_beam is parented to the invisible func_tracktrain.
Our first path_track, the starting point, is nestled right in there with the other entities.
env_sprite
These are the settings for each env_sprite, which are only used for a slight effect.
| Class: env_sprite | ||
| Keyvalues | Comments | |
| Parent | Beam01 | Beam02 for right side |
| Render FX | Normal | |
| Render Mode | Additive | |
| FX Amount | 150 | |
| FX Color | 255 0 0 | |
| Disable receiving shadows | Yes | |
| Frame rate | 10.0 | |
| Sprite name | materials/sprites/glow03.vmt | |
| Scale | 0.2 | |
| Size of Glow | 2.0 | |
| Flag | ||||
| Start | ||||
func_tracktrain
Settings for each func_tracktrain:
| Class: func_tracktrain | ||
| Keyvalues | Comments | |
| Name | Beam01train | Beam02train for the right side |
| Disable receiving shadows | Yes | |
| Disable Shadows | Yes | |
| First Stop Target | Beam01path01 | Beam02path01 for the right side |
| Max speed | 60 | |
| Initial Speed | 60 | |
| Change Velocity | Instantaneously | |
| Change Angles | Near path_tracks | |
| Distance between the wheels | 10 | |
| Height above the track | 0 | |
| Bank angle on turns | 0 | |
| Move sound | d3_citadel.weapon_zapper_beam_loop1 | Left side only |
| Volume | 2 | |
| Flag | ||||
| No User Control | ||||
| Passable | ||||
| Fixed Orientation | ||||
| Is unblockable by Player | ||||
path_track
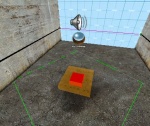
Notice, in the image to the right, that there are only 4 path_track entities: two on each side, for each func_tracktrain.
On the left side the first path_track references the second path_track which in turn references the first path_track, which causes the lasers on each side to go in a loop, back and forth.
By adding more of these path_track's you could cause the laser to travel in a zigzag pattern. You could also attach multiple lasers to each side, for a double effect as an example. You are free to change the visual effect of the laser, its speed and the tiny sprite to your liking.
env_beam was used on each side rather than only on one side is that the laser effect appears to be much better. However, you can experiment with this.Settings for first path_track on the left side:
| Class: path_track | ||
| Keyvalues | Comments | |
| Name | Beam01path01 | Beam02path01 on the Right side |
| Name | Beam01path02 | Beam02path02 on the Right side |
Water puddle
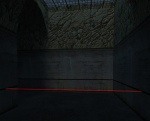
The water puddle effect is done with an info_overlay. One can place an env_cubemap over this, an ambient_generic for the sound and a trigger_multiple to play the sound when the player steps there.
Setup in Hammer
info_overlay
| Class: info_overlay | ||
| Keyvalues | Comments | |
| Material | decals/decalborealispuddle001a | |
ambient_generic
| Class: ambient_generic | ||
| Keyvalues | Comments | |
| Name | WaterSound | |
| Sound name | Water.StepLeft | |
| Volume | 4 | |
| Flag | ||||
| Start Silent | ||||
| Is NOT Looped | ||||
trigger_multiple
| Class: trigger_multiple | ||
| Keyvalues | Comments | |
| Start disabled | No | |
| Delay before reset | 1 | |
| Flag | ||||
| Clients | ||||
| Everything | ||||
| My output | Target entity | Target input | Parameter | Delay | Only once | Comments | ||
| OnStartTouch | WaterSound | PlaySound | ||||||
Laser turning a corner
The trick to making the laser turn a corner is to stop the inside train until the outside train catches up.
Take a look at the Outputs for the path_tracks in the corner, should be straight-forward.
The next step is to make the laser teleport to the first path_track so it can start over.
To do that just check the flag Teleport to this path_track, in both of the first ones.
The download for this tutorial contains two vmf projects. In the second example the laser turns a corner and travels down another tunnel. Notice that no sprites were used in the second example, since it looked better without them.


