WiseOneWayGlass: Difference between revisions
Plykkegaard (talk | contribs) m (→Creating glass: missed a link) |
mNo edit summary |
||
| (6 intermediate revisions by 4 users not shown) | |||
| Line 1: | Line 1: | ||
== Creating glass | {{DISPLAYTITLE:WiseOneWayGlass: Creating One-way Glass}} | ||
{{SDKNuts Tutorials}} | |||
{{wisemxport|[[User:Plykkegaard|Peter [AGHL]]] 13:27, 12 Feb 2008 (PST)}} | |||
==Introduction== | |||
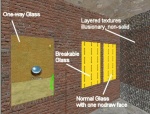
Creating glass for {{src|4}} is a simple matter of properly texturing brushes. In this sample room I’ve created there are three windows. There is also an illusionary wall with layered textures. | |||
[[File:wiseOnewayGlass01.jpg|thumb|150px|right|The three windows]] | |||
==Creation== | |||
The first window is a typical one-way glass. | |||
*On one face it’s textured with <code>glass\glasswindow070a</code> | |||
*On the opposite face it’s textured with the same brick texture I used on the walls: <code>brick\brickwall003a</code> | |||
{{Tip|You could also texture it with any opaque glass texture.}} | |||
The first window is a typical | |||
* On one face it’s textured with glass/ | |||
* On the opposite face it’s textured with the same brick texture I used on the walls: brick/ | |||
{{Tip|You could also texture it with any | |||
To browse for these textures: | To browse for these textures: | ||
* Click the | *Click the [[Toggle Texture tool]], or press {{key|Shift|A}}. | ||
* Now click the '''Browse''' button. | *Now click the '''Browse''' button. | ||
* In the lower '''Filter''' area enter filter words like | *In the lower '''Filter''' area enter filter words like “glass”, “wall”, etc. | ||
* Double-click on the texture you want to use. | *Double-click on the texture you want to use. | ||
* Now with the | *Now with the [[Face Edit tool]] still open, right-click on any brush face to texture it. (left-click selects faces) | ||
All other faces of these Glass brushes will be textured with <code>tools\toolsnodraw</code>]]. | |||
All other faces of these Glass brushes will be textured with | |||
To illustrate what you can achieve I’ve created 4 different types of see-thru areas. | To illustrate what you can achieve I’ve created 4 different types of see-thru areas. | ||
Starting from the left: | Starting from the left: | ||
* Typical | *Typical one-way glass. | ||
* Breakable Glass made with | *Breakable Glass made with {{ent|func_breakable_surf}} (more on that soon). | ||
* Normal brush with '''nodraw''' on one face and a | *Normal brush with '''nodraw''' on one face and a glass texture on the opposite face. | ||
* Layered textures created with | *Layered textures created with {{ent|func_illusionary}} entities. | ||
[[ | [[File:wiseOnewayGlass02.jpg|thumb|150px|right|Blends in with the wall]] | ||
The one-way glass is created with a normal brush that has any opaque textured face opposite a glass textured face. In this example I’ve used a brick texture and opposite that a glass texture. The Breakable glass is created by turning a normal brush into <code>func_breakable_surf</code>. Do that by selecting the brush and pressing {{key|Ctrl|T}}, choose <code>func_breakable_surf</code>, and finally click '''Apply'''. | |||
The | |||
The properties for our breakable window are: | |||
*'''Prop Data''': Glass.Window | |||
*'''Health''': 80 | |||
*'''Material Type''': Glass | |||
*'''Fragility''': 50 | |||
*'''Surface Type''': Glass | |||
*'''This Breakable glass is 1.0 units thick.''' | |||
:Don’t make them thinner than 0.5 units thick and don’t make them too thick. | |||
:Breakable glass gets textured on only one face, all other faces will be textured with nodraw, the easiest way to do that is create them entirely with nodraw and then use the Face Edit tool to apply the breakable glass texture. | |||
The | The texture to use on that face is: <code>glass\glasswindowbreak070a</code> (Don’t use the b version.) | ||
Notice the normal world brush with nodraw on the face opposite the glass face. When you compile this type of glass it will look like normal unbreakable glass on one side but on the other side it will be clear, however, it will block objects. | |||
[[File:wiseOnewayGlass03.jpg|thumb|150px|right|The three windows]] | |||
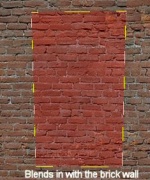
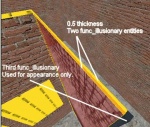
The texture | The last example is our layered texture, created with <code>func_illusionary</code> entities. The first brush is only textured on the outside face; <code>metal\metalfence004a</code> The next brush is textured on two faces; <code>metal\metalgrate013a</code> and <code>brick\brickwall003a</code>. All other faces are textured with nodraw. | ||
[[ | To create brushes that are 0.5 units thick use the [[Hammer_Transform_Dialog|Transform tool]] | ||
With the methods illustrated here, you can create any type of one-way glass you need. | |||
{{Note|The player, and objects, can pass right through the illusionary wall.}} | |||
Keep in mind that while the nodraw texture doesn’t show it was invaluable in creating these effects. | |||
Keep in mind that while the | |||
{|border="0" align="left" style="background:transparent" cellpadding="0" cellspacing="0" | {|border="0" align="left" style="background:transparent" cellpadding="0" cellspacing="0" | ||
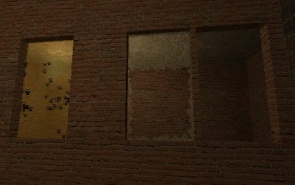
|+ Here are some shots of the effects in the game: | |+ Here are some shots of the effects in the game: | ||
|- | |- | ||
|valign="top"|[[ | |valign="top"|[[File:wiseOnewayGlass04.jpg|right|thumb|295px]] | ||
| | | | ||
|valign="top"|[[ | |valign="top"|[[File:wiseOnewayGlass05.jpg|right|thumb|200px]] | ||
| | | | ||
|valign="top"|[[ | |valign="top"|[[File:wiseOnewayGlass06.jpg|right|thumb|195px]] | ||
|}{{clr}} | |}{{clr}} | ||
== | ==See also== | ||
*[http://type3studios.com/downloads/tutorials/SdkNutsTutorials/wiseOneWayGlass.zip Example VMF] | |||
* [http://type3studios.com/downloads/tutorials/SdkNutsTutorials/wiseOneWayGlass.zip | *[https://cdn.discordapp.com/attachments/434089157875466242/461479903875825664/wiseOneWayGlass.zip Example VMF backup] | ||
* | *[[Applying Materials]] | ||
[[Category:Level Design]] | |||
* | |||
[[Category:Level Design | |||
Latest revision as of 07:51, 16 April 2024
This tutorial was originally created by wisemx. It was originally posted on SDKnuts.net.
Introduction
Creating glass for ![]() Source is a simple matter of properly texturing brushes. In this sample room I’ve created there are three windows. There is also an illusionary wall with layered textures.
Source is a simple matter of properly texturing brushes. In this sample room I’ve created there are three windows. There is also an illusionary wall with layered textures.
Creation
The first window is a typical one-way glass.
- On one face it’s textured with
glass\glasswindow070a - On the opposite face it’s textured with the same brick texture I used on the walls:
brick\brickwall003a
To browse for these textures:
- Click the Toggle Texture tool, or press ⇧ Shift+A.
- Now click the Browse button.
- In the lower Filter area enter filter words like “glass”, “wall”, etc.
- Double-click on the texture you want to use.
- Now with the Face Edit tool still open, right-click on any brush face to texture it. (left-click selects faces)
All other faces of these Glass brushes will be textured with tools\toolsnodraw]].
To illustrate what you can achieve I’ve created 4 different types of see-thru areas.
Starting from the left:
- Typical one-way glass.
- Breakable Glass made with func_breakable_surf (more on that soon).
- Normal brush with nodraw on one face and a glass texture on the opposite face.
- Layered textures created with func_illusionary entities.
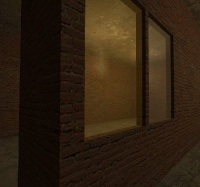
The one-way glass is created with a normal brush that has any opaque textured face opposite a glass textured face. In this example I’ve used a brick texture and opposite that a glass texture. The Breakable glass is created by turning a normal brush into func_breakable_surf. Do that by selecting the brush and pressing Ctrl+T, choose func_breakable_surf, and finally click Apply.
The properties for our breakable window are:
- Prop Data: Glass.Window
- Health: 80
- Material Type: Glass
- Fragility: 50
- Surface Type: Glass
- This Breakable glass is 1.0 units thick.
- Don’t make them thinner than 0.5 units thick and don’t make them too thick.
- Breakable glass gets textured on only one face, all other faces will be textured with nodraw, the easiest way to do that is create them entirely with nodraw and then use the Face Edit tool to apply the breakable glass texture.
The texture to use on that face is: glass\glasswindowbreak070a (Don’t use the b version.)
Notice the normal world brush with nodraw on the face opposite the glass face. When you compile this type of glass it will look like normal unbreakable glass on one side but on the other side it will be clear, however, it will block objects.
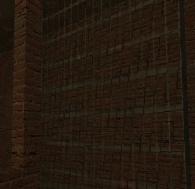
The last example is our layered texture, created with func_illusionary entities. The first brush is only textured on the outside face; metal\metalfence004a The next brush is textured on two faces; metal\metalgrate013a and brick\brickwall003a. All other faces are textured with nodraw.
To create brushes that are 0.5 units thick use the Transform tool
With the methods illustrated here, you can create any type of one-way glass you need.
Keep in mind that while the nodraw texture doesn’t show it was invaluable in creating these effects.
