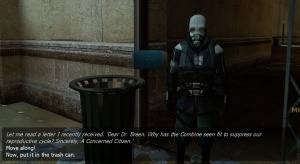
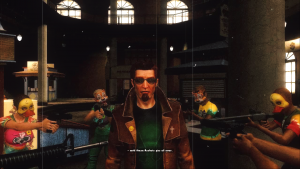
Closed Captions

Closed captions, or Subtitles, are text descriptions that accompany sound and dialogue. They cue players who can't hear what's going on to what people are saying, and to a certain extent what's happening around them. It can be also used for translation and/or localization. With a bit of ingenuity they can also be used to display dialogue that has not been recorded yet.
Subtitling or full closed captions can be enabled in the Source engine in Options > Audio.
Closed captions are available for sounds defined either in soundscripts or in scripts\sentences.txt
Editing closed captions
Closed captions are stored in closecaption_%language%.dat (e.g. closecaption_english.dat) in ![]()
(game dir)\resource\. A DAT file is binary file compiled from a corresponding TXT file by the ![]()
captioncompiler.exe tool.
Although the engine (in all games since ![]() ) does not read from the text file, Valve provided their originals for use by modders. You can find them in your
) does not read from the text file, Valve provided their originals for use by modders. You can find them in your ![]()
\resource folder or possibly in the VPKs.
The format of the text file is:
lang
{
	Language "English" //(or "Spanish", "French", etc)
	Tokens
	{
		// Captions defined here.
		nameofsound	"This is the caption."

		barn.chatter	"We're picking up radio chatter. They're looking for your car."
		// etc...
	}
}
- The text file must be saved in either the UCS-2 Little Endian or the UTF-16 Little Endian format.
- The name of the sound must be something defined in your soundscripts, not a raw filename.
- Remember to wrap "quote marks" around any block of data containing whitespace.
 Warning:In Source 2006 or earlier, having more than 2048 characters in a caption will cause the game to crash on startup.
Example for sentences.txt:
nameofsound soundfile {captioncodehere closecaption nameofsound}

BA_LATE barney/c1a0_ba_late {Len 2.33 closecaption BA_LATE}
Caption codes
<sfx>- Marks a line as a sound effect that will only be displayed with full closed captioning. If the user has cc_subtitles set to "1", it will not display these lines.
<clr:255,255,255>- Sets the color of the caption using RGB color; 0 is no color, 255 is full color. For example, ;
<clr:255,255,255>would be white. <playerclr:255,176,0:255,255,255>- Sets the RGB color of the caption depending on whether it is coming from the player/client or not. The first color is for when the sound is emitted by the player and the second color is for when it is emitted by anything or anyone else, separated by colon. For example,
<playerclr:255,176,0:255,255,255>would be orange when the sound is emitted by the player or their equipment and white when emitted by anything else. <B>- Bolds all text following the tag.
<I>- Italics text following the tag.
 Note:
Note:<B>and<I>can both be undone in the same line. "This is <B>bold text!<B> This is unbold." would look like this: This is bold text! This is unbold. Bug:Broken in Half-Life 2 since 20th Anniversary Update, due to the new "GorDIN" font not supporting italics text.
 <norepeat:15>- Controls how often a line can be repeated. If set to 15, this line won't be repeated in the next 15 seconds.
<len:5>- Overrides how long the line will display. For example,
<len:5>will make the caption stay on the screen for 5 seconds. Without this, they stay for the duration of the sound + the time stored in thecc_linger_timeconvar. <cr>- Manually adds a new line (carriage return) for any further text in the caption.
- For example, "Occupation:<cr>Subtitles" =
Occupation:Subtitles<delay:2>- Sets a delay in between caption text, automatically adding a new line clearing all formatting. For example, with
"<i><clr:255,176,0>HEV enabled.<delay:3>Your HEV was enabled.", "HEV enabled" will appear in italics and an orange color. 3 seconds later, "Your HEV was enabled" will emerge below it without any formatting from the previous line. The new line will always be directly below the previous one even if there are other captions below it.
Compiling
The captions must be compiled with captioncompiler.exe. Since the caption file must be dragged from the mod resource directory in order to produce the .dat file. e.g. C:\Program Files\Steam\steamapps\SourceMods\[mod name]\resource\, this process will become slightly easier if you create a batch command file in the resource folder. Copy the following code into a text file and save it as a .bat file in the resources folder:
"C:\Program Files (x86)\Steam\steamapps\common\Half-Life 2\bin\captioncompiler.exe" %1
pause
-game "path to mod folder" parameter to override the global vproject value. Place it after %1, leaving a space. This saves you from having to launch the SDK and change it there.C:\.Drag your caption .txt files onto the Batch file to use it as you would the .exe itself.
Playing sounds in your map with closed captions
Sometimes, you may want to play a sound with closed captions (or subtitles, really) when the player activates a trigger. Unfortunately, ambient_generic's "Play Everywhere" flag is broken for soundscripts, and subtitles only work on soundscripts and in sentences.txt (except for commentary nodes, see here). Hence you'll have to do a bit of a hack: use point_clientcommand to execute three commands:
play path/to/sound/filecc_linger_time X, where X is a manually-tweaked valuecc_emit commentaryFileName, where commentaryFileName is a key from the closed captions text file.
Make sure both closecaption and cc_subtitles are set to 1.
Captions without sounds
Recording dialogue is a very resource-expensive process. If, once dialogue has been recorded, you decide you want to change something, making those changes can prove very costly, so final dialogue recording is often best done as one of the final stages in a project.
However, while creating choreographed scenes, it is highly desirable to have the dialogue available as early as possible. One way around this conflict is for the developer to record their own placeholder audio, but even this can take up significant amounts of time. A cheaper way of creating placeholder dialogue is to use closed captions without any attached dialogue.
There are three steps involved in accomplishing this:
- 1. Creating the captions
- Sound tokens (e.g.
barn.chatterabove) can have closed captions attached without corresponding entries in the sound manifest. To create new closed captions, simply add new entries to the closecaption_english.txt (or other language file), as described above. - 2. Adding the captions in Faceposer
- In Faceposer, dialogue-free closed captions are added in the same way normal dialogue is added (right-click on the timeline and choose
WAV File...). However, because the closed caption tokens are not in the sound manifest, they will not appear on the list of available sounds. Instead, simply refer to the entries you added in step 1 and type the token name manually into theSoundtextbox. - 3. Setting the length of caption appearance time
- Once the first two steps are complete, your scenes will display the closed captions when they are played in game (as long as closed captions are turned on in the game options, of course). However, because there is no associated sound file, the event has no length. This means that the closed captions will leave the screen almost as soon as they are displayed, leaving a player little time to read them. While this is acceptable for captions comprised of one or two words, some more work is required to keep longer captions up on screen for a sufficient amount of time.
Faceposer doesn't support editing the length of WAV file events, but they can be edited through manual editing of the .vcd file. Open the .vcd in Notepad and find the speak event you wish to change the length of. A search for the name of the speak event will take you to the right place in the file.
There you will find an entry like this one:
event speak "Test"
{
	time 1.000000 -1.000000
	param "test.test"
	fixedlength
	cctype "cc_master"
	cctoken ""
}
The time line denotes the start and end time of the event. The end time is set to -1.000000 because the speak event currently has no length. Edit this number to be the time (in seconds, on the timeline) when you wish the closed caption to end and save the file.
Obviously the desired length of time that a caption appears for will differ depending on the length of text. In general, when trying to decide how long text should appear on screen for, a good first estimate can often be achieved by timing yourself reading the text aloud and then doubling that number, to account for its unfamiliarity to fresh eyes.
closecaption 1 on map load. This will ensure that you don't need to remind anyone using your mod (e.g. other team members) to turn on their captions..vcd's before manually editing them, and keep regular backups of your .vcd's, lest Faceposer undo those edits suddenly.Captions for BINK videos

With the release of ![]() Left 4 Dead, it is now possible to put subtitles on Bink-based videos. A similar implementation of this feature was also used in
Left 4 Dead, it is now possible to put subtitles on Bink-based videos. A similar implementation of this feature was also used in ![]() Postal III, a Source 2009 game, but it's by default only available in the German language (and Brazilian language for the Zoom Platform) by default, and only displays if the game language was set to any language that has a subtitles file. It uses the
Postal III, a Source 2009 game, but it's by default only available in the German language (and Brazilian language for the Zoom Platform) by default, and only displays if the game language was set to any language that has a subtitles file. It uses the .srt subtitle file format and the subtitles can be located in ![]()
...\p3\media\subtitles folder. Subtitles for other languages can be added by editing the .srt files, using any text editor (Notepad on Windows, Notepad++), or Subtitle Edit.
Notes
In ![]() Left 4 Dead 2 and later games, Valve uses subtitles_language for the subtitles instead of keeping them in the closecaption_language files with the "hearing impaired" captions. The probable reasoning for this is because "closed captions" is for the hearing impaired, and for convenience. "Subtitles" is a more accepted term to use for this entity's purpose. Though, the sounds can still be marked as <sfx>.
Left 4 Dead 2 and later games, Valve uses subtitles_language for the subtitles instead of keeping them in the closecaption_language files with the "hearing impaired" captions. The probable reasoning for this is because "closed captions" is for the hearing impaired, and for convenience. "Subtitles" is a more accepted term to use for this entity's purpose. Though, the sounds can still be marked as <sfx>.
As of Steam Deck updates in ![]() Half-Life 2 and
Half-Life 2 and ![]() Portal along with
Portal along with ![]() Left 4 Dead 2, the subtitle font is now anti-aliased.
Left 4 Dead 2, the subtitle font is now anti-aliased.
See also
- Other FacePoser Tools
- Closed caption related console commands are prefixed with
cc_. See Console Command List for a full list. - source-caption-compiler (JavaScript library for Source caption compilation, alternative to captioncompiler.exe)
| |||||||||||||||||||||||||||||