WiseClipPlane: Clipping Tool
This tutorial was originally created by wisemx. It was originally posted on SDKnuts.net.
If you’ve been searching then no doubt you’ve seen optimization tutorials that beg you to use the Clipping tool to create your brush effects rather than using the Carve tool. The Clipping tool is invaluable for you artists and perfectionists.
Valve obviously has some very talented developers who are wizards with the Clipping tool. A good example is the hole in the pavement Gordon drops through as he leaves Barney and Dog for the last time in HL2. In that example the easy way to make the hole would be with the Carve tool but it would have created a mess with the brushes that add-up to be the pavement.
If you’ve worked with clay, or have watched someone work with clay, using the Clipping tool is a lot like shaving off clay. Little by little or all at once we can shave off a corner or an entire section.
Let’s make a basic clip:
- On the right-side toolbar browse for, and select, the nodraw texture. (Double-click to select a texture in the Textures dialog.)
- Create a brush. A simple block of any size, just for practice.
- Click the Left Grid bracket button to make your 2D grid smaller, more detailed. My suggestion is to make it as small as it will go, you’ll have much more control. (Make sure Snap-to-grid is on.)
- Select the block and press Ctrl+E to center it in the 2D windows. Use your mouse wheel to zoom in, let our block fill each of the 2D view ports, keep pressing Ctrl+E as you zoom in.
- With the block selected click on the Clipping tool or press ⇧ Shift+X.
- Use your mouse to slice a line across the block in any of the 2D view ports.
- Notice that one side is red and the other is white. Click on the Clipping tool to switch these areas of red. The red area is what we will be clipping away. Keep clicking to cycle through the states.
- When you are clipping watch all of the view ports and you will have perfect alignment with your cuts. Practice, you’ll get the hang of it in no time.
- Now press ↵ Enter to slice away the section, in red.
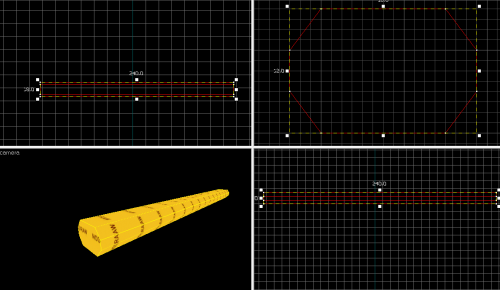
Let’s use the Clipping tool to create a log. The log we are going to create will be the interlocking type for log home construction. We’ll start with a brush that is 12 units tall, 18 units wide and 240 units long. Use the nodraw texture (tools/toolsnodraw) to create this brush. With the Clipping tool we need to make a few cuts on each side to “round” them. The top and bottom faces of this brush will remain flat, that’s where the logs will stack onto each other. With our new brush still selected click on the Clipping tool. You can also press ⇧ Shift+X to chose this tool. Focus only on the Front 2D view, zoom in and press Ctrl+E to center the view.
Because our brush is 18 units by 12 units we can count back from each corner when making cuts with the Clipping tool, this way our completed log will be symmetrical. Cut 3 units back to 4 units down. The outside corner should be red. This is the part we are going to remove so that’s fine but if we wanted to remove the other part, in white, or if we only wanted to make a cut and not remove any parts at all we would click on the toolbar button for the Clipping tool and each time we did it would cycle between those three modes. To remove the section in Red press ↵ Enter.
Now use the same method to make three more cuts. For our complete wall I’ve cloned the first log by selecting it and holding ⇧ Shift and then used the mouse to drag a new copy in the Front 2D view.
Notice that:
- We could have made 4 additional cuts for a more rounded appearance.
- Each of these logs has 10 faces.
- The optimum method for creating a log wall like this would be with a model.
When you use the Clipping tool:
- Reduce the size of your grid lines. “Snap: On Grid: 1” is best for this.
- Only begin and end your cuts at grid lines.
- Try not to make jagged cuts.
- Zoom in so you can accurately begin and end your cuts precisely.
- Be creative and use fewer faces to keep the total face count down.
