|
|
| (33 intermediate revisions by 5 users not shown) |
| Line 1: |
Line 1: |
| {{otherlang2 | | {{LanguageBar|title = L4D关卡制作/你的第一个求生之路地图}} |
| |en=L4D Level Design/Getting_Started | |
| |pt-br=L4D_Level_Design/Your First L4D Level:pt-br
| |
| |ru=L4D_Level_Design/Your First L4D Level:ru}}
| |
|
| |
|
| {{L4D level intro menu:zh-cn}}__TOC__
| |
|
| |
|
| (译者:ljj)
| | {{L4D level intro menu}}__TOC__ |
|
| |
|
| ''[[笔刷]]''是使用Hammer的“固体工具”创建的简单3D造型。笔刷用于在地图里创建大多数大型表面,例如天花板和地板。现在我们将使用笔刷来创建一个简单的房间。 | | 译者:joyo_a(百度ID) |
| | |
| | ''{{L|brush|笔刷}}''是使用Hammer的“固体工具”创建的简单3D造型。笔刷用于在地图里创建大多数大型表面,例如天花板和地板。现在我们将使用笔刷来创建一个简单的房间。 |
|
| |
|
| == 创建一个地板笔刷 == | | == 创建一个地板笔刷 == |
| [[Image:l4d_hammer_brush_01.jpg|thumb|right|400px|caption|绘画一个笔刷。]] | | [[File:l4d_hammer_brush_01.jpg|thumb|right|400px|caption|绘画一个笔刷。]] |
|
| |
|
| # 在左侧'''工具'''栏选择“固体工具”。 | | # 在左侧'''工具'''栏选择“固体工具”。 |
| Line 32: |
Line 30: |
| 默认网格大小为64个单位,这意味着每个网格线相隔64个单位。当前网格的大小显示在Hammer窗口的底部的状态栏上。 | | 默认网格大小为64个单位,这意味着每个网格线相隔64个单位。当前网格的大小显示在Hammer窗口的底部的状态栏上。 |
|
| |
|
| * 点击'''缩小网格'''图标[[Image:hammer_SmallerGrid.png]]将使网格调整为一半大小。你也可以按{{key|[}}键来缩小网格大小。 | | * 点击'''缩小网格'''图标[[File:hammer_SmallerGrid.png]]将使网格调整为一半大小。你也可以按{{key|[}}键来缩小网格大小。 |
| * 点击'''增大网格'''图标[[Image:hammer_LargerGrid.png]]将使网格调整为两倍大小。你也可以按{{key|]}}键来增大网格大小。 | | * 点击'''增大网格'''图标[[File:hammer_LargerGrid.png]]将使网格调整为两倍大小。你也可以按{{key|]}}键来增大网格大小。 |
|
| |
|
| 要使网格大小降至16个单位,按{{key|[}}键两次。看下Hammer窗口右下角的'''状态栏'''并确认那里显示'''Grid: 16'''。如果没有显示的话,按{{key|[}}或{{key|]}}直到显示为止。 | | 要使网格大小降至16个单位,按{{key|[}}键两次。看下Hammer窗口右下角的'''状态栏'''并确认那里显示'''Grid: 16'''。如果没有显示的话,按{{key|[}}或{{key|]}}直到显示为止。 |
|
| |
|
| === 调整地板 === | | === 调整地板 === |
| [[Image:l4d_hammer_brush_02.jpg|thumb|right|400px|caption|在侧视图中降低笔刷高度。]] | | [[File:l4d_hammer_brush_02.jpg|thumb|right|400px|caption|在侧视图中降低笔刷高度。]] |
|
| |
|
| 现在网格应该足够小了。 | | 现在网格应该足够小了。 |
| Line 45: |
Line 43: |
|
| |
|
| === 移动笔刷 === | | === 移动笔刷 === |
| [[Image:hammer_movingBrushes.png|frame|right|在任何2D视图里点击并拖动以移动笔刷。]] | | [[File:hammer_movingBrushes.png|frame|right|在任何2D视图里点击并拖动以移动笔刷。]] |
| 一旦笔刷被创建你可以移动它们。选择{{Hammer select}}并且鼠标在一个2d视图里的笔刷之上,保持清晰的处理。指针将变成四个箭头指向所有四个方向 [[Image:fourArrows.png]],表明移动对象的选项。 | | 一旦笔刷被创建你可以移动它们。选择{{Hammer select}}并且鼠标在一个2d视图里的笔刷之上,保持清晰的处理。指针将变成四个箭头指向所有四个方向 [[File:fourArrows.png]],表明移动对象的选项。 |
|
| |
|
| 单击并拖动移动笔刷以便在任何2d视图里移动笔刷。释放后,笔刷将移动到那个位置。{{clr}} | | 单击并拖动移动笔刷以便在任何2d视图里移动笔刷。释放后,笔刷将移动到那个位置。{{clr}} |
|
| |
|
| [[Image:l4d_hammer_options_2d.jpg|thumb|right|300px|caption|在Hammer里配置选项。]] | | [[File:l4d_hammer_options_2d.jpg|thumb|right|300px|caption|在Hammer里配置选项。]] |
|
| |
|
| 你也可以用箭头(光标)键移动对象。要做到这一点,我们需要在Hammer设置里更改一项设置以便能允许使用方向键: | | 你也可以用箭头(光标)键移动对象。要做到这一点,我们需要在Hammer设置里更改一项设置以便能允许使用方向键: |
| Line 61: |
Line 59: |
| 现在让我们通过放置鼠标光标到'''侧面'''视图并按下一次{{key|下箭头}}以移动地面笔刷16个单位。 | | 现在让我们通过放置鼠标光标到'''侧面'''视图并按下一次{{key|下箭头}}以移动地面笔刷16个单位。 |
|
| |
|
| [[Image:l4d_hammer_brush_03.jpg|thumb|left|400px|caption|在侧视图里移动一个笔刷。]]{{clr}} | | [[File:l4d_hammer_brush_03.jpg|thumb|left|400px|caption|在侧视图里移动一个笔刷。]]{{clr}} |
|
| |
|
| {{note|你需要将你的地平面放在原点行的同一水平以便包含导航文件在内的东西能够工作。}} | | {{Note|你需要将你的地平面放在原点行的同一水平以便包含导航文件在内的东西能够工作。}} |
|
| |
|
| == 在2D视图里导航 == | | == 在2D视图里导航 == |
| Line 71: |
Line 69: |
| * 使用鼠标滑轮来放大或缩小。 | | * 使用鼠标滑轮来放大或缩小。 |
|
| |
|
| == Texturing == | | == 纹理 == |
| To see textures in the 3D Camera viewport, right-click on the '''camera''' text in the 3D Camera viewport and select '''3D Textured'''.
| | 要在3D镜头视图中查看纹理,在3D镜头视图中的'''镜头'''文本上右键点击并选择'''3D纹理'''。 |
|
| |
|
| [[Image:l4d_hammer_3DTextured.jpg|thumb|right|400px|caption|Selecting the 3D Textured mode in the Camera viewport.]] | | [[File:l4d_hammer_3DTextured.jpg|thumb|right|400px|caption|在镜头视图中选择3D纹理模式。]] |
|
| |
|
| === Navigating in the 3D Camera viewport === | | === 在3D镜头视图中导航 === |
|
| |
|
| Moving around in 3D is a bit different from the 2D viewports:
| | 在3D中移动有点不同于2D视图: |
|
| |
|
| * Hold down the {{key|Spacebar}} and left-click and drag to '''rotate''' the camera. | | * 按住{{key|空格}}和鼠标左键并拖动以便'''旋转'''镜头。 |
| * Hold down the {{key|Spacebar}} and right-click and drag to move '''up/down''' and '''left/right'''. | | * 按住{{key|空格}}和鼠标右键并拖动以便'''上/下'''和'''左/右'''移动。 |
| * Hold down the {{key|Spacebar}} and both right and left-click and drag to move '''forward''' and '''backward'''. | | * 按住{{key|空格}}和鼠标左右两个键并拖动以便'''向前'''和'''向后'''移动。 |
| * You can also use {{key|W}}, {{key|A}}, {{key|S}}, and {{key|D}} to move '''forward''', '''backward''', '''strafe left''' and '''strafe right''' respectively. | | * 你也可以用{{key|W}}、{{key|A}}、{{key|S}}和{{key|D}}来分别'''向前移动''','''向后移动''','''向左平移'''和'''向右平移'''。 |
| * The {{key|Z}} key toggles on and off "mouse look" mode. Move your mouse cursor over the 3D Camera viewport and press the {{key|Z}} key. You can now move your mouse around as if mouse look was on in the game. | | * {{key|Z}}键切换“鼠标观察”模式的开关。移动你的鼠标光标到3D镜头视图的上方并按{{key|Z}}键。你现在可以移动你的鼠标了,就好像在游戏里面那样。 |
|
| |
|
| {{note|The {{key|W}} {{key|A}} {{key|S}} {{key|D}} keys can be used in combination with the {{key|Spacebar}} navigation}} | | {{note|{{key|W}} {{key|A}} {{key|S}} {{key|D}}这四个键可以与{{key|空格}}组合使用}} |
| {{clr}} | | {{clr}} |
|
| |
|
| Move up in the '''3D Camera''' viewport and look downward at the floor that you've just created.
| | 在'''3D相机'''视口中向上移动并向下看你刚刚创建的地板。 |
|
| |
|
| [[Image:l4d_hammer_texture_browse.jpg|frame|right|caption|The '''Browse''' button on the '''Texture''' bar.]] | | [[File:l4d_hammer_texture_browse.jpg|frame|right|caption|'''纹理'''栏里面的'''浏览'''按钮。]] |
|
| |
|
| You'll notice there's a default texture on your floor. You'll probably want to change it. To change the current texture, click on the '''Browse''' button on the '''Texture''' Box.
| | 你会注意到有一个默认的纹理在你的地板上。你可能想更换它。要更换当前纹理,在'''纹理'''栏里面点击'''浏览'''按钮。 |
|
| |
|
| This will bring up the '''Texture Browser''' window.{{clr}}
| | 它会弹出'''纹理浏览器'''窗口。{{clr}} |
|
| |
|
| [[Image:l4d_hammer_texture_dev.jpg|thumb|right|200px|caption|The generic gray developer texture.]] | | [[File:l4d_hammer_texture_dev.jpg|thumb|right|200px|caption|通用的灰色开发者纹理。]] |
|
| |
|
| In the '''Filter''' field at the bottom of the browse, you can filter the textures shown based on name. For this tutorial, type in the word <code>"dev_measure"</code> (with the underscore) into the field. This will bring up a listing of "developer" textures that will make it easier to create something quickly.
| | 在浏览器的底部的'''过滤'''的下拉列表框里,您可以根据名称过滤显示的纹理。在这个教程里,在下拉列表框里输入字词<code>"dev_measure"</code>(带下划线)。它将显示一个“开发者”纹理的列表,这使得更容易快速创建一些东西。 |
|
| |
|
| Now, find the texture called <code>dev/dev_measuregeneric01b</code> and '''double-click''' on it.
| | 现在,找到名叫<code>dev/dev_measuregeneric01b</code>的纹理并'''双击'''它。 |
| {{clr}} | | {{clr}} |
|
| |
|
|
| |
|
| [[Image:l4d_hammer_texture_apply.jpg|thumb|right|400px|caption|Applying the current texture to the selected brush.]] | | [[File:l4d_hammer_texture_apply.jpg|thumb|right|400px|caption|应用当前纹理到选择的笔刷。]] |
|
| |
|
| This should bring back the 4 viewports of the editor and place the generic developer texture as the current one in the '''Texture''' bar.
| | 它应该返回到编辑器的四个视图并将通用开发者纹理作为当前的纹理放置在'''纹理'''栏中。 |
|
| |
|
| Select the floor brush, if it isn't already selected, by clicking on it in the Camera viewport. It should turn red.
| | 在镜头视图里点击地板笔刷以选择之如果还没有被选择。它应该变成红色。 |
|
| |
|
| After the brush is selected, click on the [[Image:Hammer_ApplyCurrentTexture.png|28px]] '''Apply current texture''' icon on the '''Tool''' bar to apply the current texture to the selection. The gray developer texture should appear on the floor as shown.
| | 选择了这个笔刷后,在'''工具'''栏里点击[[File:Hammer_ApplyCurrentTexture.png|28px]]'''应用当前纹理'''图标以应用当前纹理到选择的笔刷。灰色开发者纹理应该显示在地板上,如图所示。 |
| {{clr}} | | {{clr}} |
|
| |
|
| == Creating the walls and ceiling == | | == 创建墙壁和天花板 == |
|
| |
|
| Now let's go over how to create the walls and ceiling of the room. The easiest way to do this is to ''duplicate'' the floor brush.
| | 现在让我们来看看如何创建房间的墙壁和天花板。最简单的方法就是“复制”地板笔刷。 |
|
| |
|
| === Duplicating === | | === 复制 === |
|
| |
|
| You can also select an existing brush and duplicate it to create them.
| | 你也可以选择一个已存在的笔刷并复制来创建它们。 |
|
| |
|
| {{note|To duplicate, you will need to have the '''Arrow keys nudge selected object/vertex''' option set if you didn't do this earlier in the tutorial. You can find it under '''Tools > Options > 2D Tab'''.}} | | {{note|复制前,你需要设置'''Arrow keys nudge selected object/vertex'''这个选项如果你在之前的教程没有这样做。你可以到'''Tools > Options > 2D Tab'''那里找到它。}} |
|
| |
|
| [[Image:l4d_hammer_brush_04.jpg|right|thumb|300px|caption|Duplicating brushes to make a room.]] | | [[File:l4d_hammer_brush_04.jpg|right|thumb|300px|caption|复制笔刷以制作一间室。]] |
|
| |
|
| To duplicate:
| | 要复制: |
| # Select the floor brush that you've created. | | # 选择你已经创建的地板笔刷。 |
| # Move your cursor over the '''Side''' viewport. | | # 将你的光标移到'''侧面'''视图。 |
| # Hold the {{key|Shift}} key down and press the {{key|Up_arrow}} key to create a duplicate and move it up 1 grid unit. | | # 按住{{key|Shift}}键并按下{{key|Up_arrow}}键以创建一个复制并向上移动一个单元格。 |
|
| |
|
| This will create a brush exactly like the floor on top of the existing floor.
| | 这将创建一个完全像现有地板上的地板刷。 |
|
| |
|
| You can now change the size and dimensions of this new brush to create a wall grabbing the corner handles on the brush and dragging it to the size you wish. Let's make the wall 128 units tall and 16 units thick.
| | 您现在可以更改这个新画笔的大小和尺寸,以创建一个墙,抓住画笔上的角落手柄,并将其拖动到所需的大小。让我们来制作128个单位高和16个单位厚的墙壁吧。 |
|
| |
|
| {{tip|To move the brush you created, using the arrow keys or simply click and drag inside the center of the brush to drag it to another location.}} | | {{Tip|要移动你所创建的笔刷,使用方向键或者单击并拖动笔刷的正中间来拖动到另外一个位置。}} |
|
| |
|
| Now duplicate the wall 3 more times to outline the floor.{{clr}}
| | 现在复制墙壁3次,以勾勒出地板。{{clr}} |
|
| |
|
| [[Image:l4d_hammer_brush_05.jpg|right|thumb|300px|caption|Duplicating the floor to create a ceiling.]] | | [[File:l4d_hammer_brush_05.jpg|right|thumb|300px|caption|复制地板以创建一个天花板。]] |
| Duplicate the floor brush 1 more time and raise it to become the ceiling.
| | 复制地板笔刷1次并提高它成为天花板。 |
|
| |
|
| {{tip|Keeping your level clean will become very important when you start to run it in the game. It's a good idea not to have overlapping brushes (brushes that intersect one another). This can cause "z-fighting" in the game, which is where multiple faces fight to get drawn over one another.}}{{clr}} | | {{Tip|保持你的关卡清洁将变得非常重要,当你开始在游戏中运行它。不要有重叠的画笔(相互交叉的画笔)是一个好主意。这可能使得多个面相互绘制而在游戏里出现“深度冲突”。}}{{clr}} |
|
| |
|
| == Deleting brushes == | | == 删除笔刷 == |
| To delete a brush, select it with the {{Hammer select}} and press the {{key|Delete}} key.
| | 要删除一个笔刷,通过{{Hammer select}}来选择它并按{{key|Delete}}键。 |
|
| |
|
| == Multiple selection == | | == 多重选择 == |
| [[Image:l4d_hammer_brush_06.jpg|right|thumb|300px|caption|Applying the generic orange developer texture to the walls.]] | | [[File:l4d_hammer_brush_06.jpg|right|thumb|300px|caption|将通用橙色开发者纹理应用到墙壁上。]] |
|
| |
|
| You'll notice that in the Camera viewport, if you navigate inside the room, it's hard to tell what's going on because all of the walls, floor and ceiling are the same texture. Next we'll change the walls to a different texture.
| | 你会注意到,在镜头视图中,如果你在房间内导航,很难知道发生了什么,因为所有的墙壁、地板和天花板都是使用相同的纹理。接下来我们将墙改变为不同的纹理。 |
|
| |
|
| You can select all of the walls by holding down the {{key|Ctrl}} key and clicking on them one at a time in the Camera viewport. You will have to use the {{key|Spacebar}} camera controls (or turn on mouse look with {{key|Z}}) to rotate the camera around so you can select each wall.
| | 你可以按住{{key|Ctrl}}键并在镜头视图中依次点击每一个墙壁来选择所有的墙壁。你必须使用{{key|Spacebar}}镜头控制(或者使用{{key|Z}}打开鼠标观察模式)来旋转镜头,这样你就能选择每一个墙壁。 |
|
| |
|
| After you have all of the walls selected, click on the '''Browse''' button in the '''Texture''' bar. This time, select the orange texture next to the current one, labeled <code>dev/dev_measuregeneric01</code>. Double-click it to select it and close the browser window.
| | 选择了所有的墙壁后,点击'''纹理'''栏里的'''浏览'''按钮。这一次,选择当前纹理旁边的一个名叫<code>dev/dev_measuregeneric01</code>的橙色纹理。双击它以选择它并关闭浏览器窗口。 |
|
| |
|
| Use the [[Image:Hammer_ApplyCurrentTexture.png|28px]] tool on the '''Tool''' Bar to apply the orange texture to the walls.{{clr}}
| | 使用'''工具'''栏里的[[File:Hammer_ApplyCurrentTexture.png|28px]]工具来应用这个橙色纹理到墙壁上。{{clr}} |
|
| |
|
| == Saving the file == | | == 保存文件 == |
|
| |
|
| To save a level, you can use {{key|Ctrl}}+{{key|S}} or '''Save''' from the '''File''' menu.
| | 要保存一个关卡,你可以使用{{key|Ctrl}}+{{key|S}}或者'''文件'''菜单下的'''保存'''。 |
|
| |
|
| You will need to give the map a file a name and choose the directory to place it in.
| | 你需要为地图取一个文件名称,并选择要放置它的目录。 |
|
| |
|
| For this tutorial, name the map "<code>tutorial01</code>" and save it into the mapsrc directory, located by default at:
| | 对于本教程,命名该地图为"<code>tutorial01</code>"并保存它到mapsrc目录,该目录默认在: |
| C:\Program Files\Steam\steamapps\common\left 4 dead\sdk_content\mapsrc\ | | C:\Program Files\Steam\steamapps\common\left 4 dead\sdk_content\mapsrc\ |
|
| |
|
| Your directory may be slightly different, depending upon where you have installed Steam.
| | 你的目录可能会略有不同,这取决于你在哪里安装Steam。 |
|
| |
|
| == Included sample maps == | | == 包含的示例地图 == |
|
| |
|
| When you went to save your map, you may have noticed other directories underneath the <code>mapsrc</code> path. The Left 4 Dead Authoring Tools come with some example maps to help you.
| | 当你去保存你的地图,你可能已经注意到<code>mapsrc</code>路径下的其他目录。Left 4 Dead Authoring Tools自带了一些示例地图来帮助你。(译注:内容已经过期,请无视。) |
|
| |
|
| {| {{standard-table}} | | {| {{standard-table}} |
| ! Directory !! Contents | | ! 目录 !! 内容 |
| |- | | |- |
| | <code>mapsrc\No Mercy Apartments</code> || Contains an example map from the "No Mercy" campaign that ships with Left 4 Dead. | | | <code>mapsrc\No Mercy Apartments</code> || 包含来自求生之路的“毫不留情”战役的示例地图。 |
| |- | | |- |
| | <code>mapsrc\standards</code> || Examples maps that contain many of the standard pieces for co-op and Versus mode maps. | | | <code>mapsrc\standards</code> || 包含许多关于合作和对抗模式地图的标准内容的示例地图。 |
| |- | | |- |
| | <code>mapsrc\Your_First_L4D_Level_Tutorial</code> || Contains completed versions of all the sections of this tutorial. | | | <code>mapsrc\Your_First_L4D_Level_Tutorial</code> || 包含该教程的所有部分的完整版本。 |
| |- | | |- |
| | <code>mapsrc\zoo</code> || "Style guide" maps for rural and urban types of Left 4 Dead maps. | | | <code>mapsrc\zoo</code> || “风格向导”地图为农村和城市类型的求生之路地图。 |
| |} | | |} |
|
| |
|
| At times, this tutorial will refer you to different maps in these directories.
| | 有些时候,本教程将引导您到这些目录中的不同地图。 |
|
| |
|
| {{tip|Of these, the "<code>Your_First_L4D_Level_Tutorial</code>" is probably the most immediately useful. If you have a hard time completing one of the sections of this tutorial, you can refer to the files in the this directory to give you an idea of what the finished map for that section should look like.}} | | {{Tip|在这些当中,“<code>Your_First_L4D_Level_Tutorial</code>”可能是最直接有用的。如果你很难完成本教程的其中一个部分,你可以参考此目录中的文件以了解该部分的完成地图应该是什么样子的。}} |
|
| |
|
| == Placing entities == | | == 放置实体 == |
|
| |
|
| [[Image:l4d_hammer_entity_01b.jpg|frame|left|caption|Selecting the entity.]] | | [[File:l4d_hammer_entity_01b.jpg|frame|left|caption|选择实体。]] |
| [[Image:l4d_hammer_entity_01.jpg|thumb|right|300px|caption|Placing an info_survivor_position.]] | | [[File:l4d_hammer_entity_01.jpg|thumb|right|300px|caption|放置一个info_survivor_position实体。]] |
|
| |
|
| Next we'll place an entity in our level:
| | 接下来我们将放置一个实体在我们的关卡中: |
| # Select the {{Hammer entity}} on the '''Tool''' Bar. | | # 在'''工具'''栏上选择{{Hammer entity}}。 |
| # Once the {{Hammer entity}} is enabled, the '''Entity''' selection list on the '''Object''' bar becomes active. | | # 一旦{{Hammer entity}}被启用,在'''对象'''栏上的'''实体'''选择列表变为激活。 |
| # Keep the '''Categories''' entry as '''Entities'''. | | # 保持'''类别'''条目为'''实体'''。 |
| # Click the arrow on the '''Objects''' drop down list and select <code>info_survivor_position</code>. | | # 单击'''对象'''下拉列表上的箭头并选择<code>info_survivor_position</code>。 |
| # Now, navigate in the Camera viewport to the middle of the inside of the room. | | # 现在,在镜头视图里导航到房间里面的中间。 |
| # left-click on the floor to place the entity. | | # 左键点击地板以放置该实体。 |
|
| |
|
| This will place an <code>info_survivor_position</code> entity in the middle of the room.{{clr}}
| | 这会在房间的中间放置一个<code>info_survivor_position</code>实体。{{clr}} |
|
| |
|
| The model for an <code>info_survivor_position</code> is Francis. He's the tallest character in Left 4 Dead, so this is a good entity to drop down to check your scale.
| | 这个<code>info_survivor_position</code>实体的模型是弗朗西斯。他在求生之路里是最高的角色,所以这是用来放置以检查你的规模的一个好的实体。 |
|
| |
|
| === Placing a light === | | === 放置灯光实体 === |
|
| |
|
| Now we'll place a source of illumination in the map:
| | 现在我们将在地图里放置照明源: |
| # Select the '''Entity Tool''' again | | # 再次选择'''实体工具'''。 |
| # Select <code>light</code> from the '''Objects''' drop down list on the '''Object''' bar. | | # 在'''对象'''栏上的'''对象'''下拉列表里选择<code>light</code>。 |
| # This time, place the light on the ceiling (above Francis' head). | | # 这一次,把灯放在天花板上(在弗朗西斯头上)。 |
| # Go back into selection mode by clicking on the {{Hammer select}} in the '''Tool''' Bar or by pressing the {{key|Esc}} key. | | # 点击在'''工具'''栏里的{{Hammer select}}或者按{{key|Esc}}键来返回到选择模式。 |
|
| |
|
| [[Image:l4d_hammer_entity_02.jpg|thumb|left|500px|caption|The Object Properties for a light.]] | | [[File:l4d_hammer_entity_02.jpg|thumb|left|500px|caption|灯光的对象属性。]] |
|
| |
|
| Next we'll change some settings on the light. Bring up the light's properties by double-clicking it in the Camera viewport or by selecting it (left-clicking on it) and then pressing the {{key|Alt}}+{{key|Enter}} keys. This will bring up the '''Object Properties''' dialog box.
| | 接下来我们将改变灯光的一些设置。通过在镜头视图中双击以打开灯光的属性,或着选择它(左键单击它)然后按{{key|Alt}}+{{key|Enter}}键。这将打开'''对象属性'''对话框。 |
|
| |
|
| From the '''Object Properties''', you can change various properties of the entity. For example, you can change the '''Brightness''' of this light. Click on the '''Brightness''' row under '''Keyvalues''' and you will see a set of numbers on the drop down menu on the right side. The default setting for the brightness of a light is 255 255 255 200. The first three numbers represent the RGB values (color) and the last number represents the intensity of the light.
| | 在'''对象属性'''里,你可以改变该实体的属性值。例如,你可以改变该灯光的'''亮度'''。点击'''Keyvalues'''下的'''亮度'''那行,然后你会见到在右边下拉菜单里的一个设置数据。这个灯光的亮度的默认设置为255 255 255 200。头三个数字代表RGB值(颜色),而最后一个数字代表光的强度。 |
|
| |
|
| You can click on the '''Pick Color''' button to select a color rather than input values for it.{{clr}}
| | 你可以点击'''Pick Color'''按钮来选择一种颜色而不是输入数值。{{clr}} |
|
| |
|
| [[Image:l4d_hammer_entity_03.jpg|thumb|right|300px|caption|Picking a color for a light.]] | | [[File:l4d_hammer_entity_03.jpg|thumb|right|300px|caption|拾取一种灯光颜色。]] |
|
| |
|
| Simply click on the color you want the light to be and click '''OK'''.
| | 简单点击你想要的灯光颜色然后点击'''OK'''。 |
|
| |
|
| This will bring you back to the '''Object Properties''' dialog box for the light. You should see any changes you made to the brightness on the '''Brightness''' row and the drop down field on the right side if the '''Brightness''' row is selected.
| | 这会返回灯光的'''对象属性'''对话框。如果选择了'''亮度'''行,你应该看到对'''亮度'''行的亮度和右侧的下拉字段所做的任何更改。 |
|
| |
|
| Click the '''Apply''' button to set your changes to the entity and close the dialog box by clicking on the "X" at the upper right side of the window.{{clr}}
| | 点击'''应用'''按钮以保存你对实体的更改,然后点击窗口右上方的“X”。{{clr}} |
|
| |
|
| === Placing a prop_static === | | === 放置静态实体 === |
| [[Image:l4d_hammer_entity_05.jpg|thumb|right|500px|caption|The Object Properties for a prop_static entity.]] | | [[File:l4d_hammer_entity_05.jpg|thumb|right|500px|caption|一个静态实体的对象属性。]] |
|
| |
|
| Entities also consist of props like furniture, decoration, and complex parts of architecture. There are a variety of different kinds of props. <code>Prop_static</code> entities are props that are static – they don't move, animate, turn on or turn off. There are also <code>prop_dynamic</code> entities that can move, animate, be enabled and disabled. There are also prop_physics entities which the player can interact with and behave physically as they would in the real world.
| | 实体也包括道具如家具、装饰和建筑的复杂部分。这里有各种不同种类的道具。<code>Prop_static</code>实体是静态的实体——它们不能移动,没有动画,无法不能打开或关闭。这里也有<code>prop_dynamic</code>实体,它能移动,有动画,可以启动和禁止。这里也有prop_physics实体,玩家可以与他们进行交互和表现,就好像它们在现实世界中。 |
|
| |
|
| To place a prop:
| | 要放置一个道具: |
| # Select on the {{Hammer entity}} again. | | # 再次选择{{Hammer entity}}。 |
| # Go to the '''Object''' bar and change the '''Objects''' field to <code>[[prop_static]]</code>. | | # 转到'''对象'''栏,将'''对象'''字段更改为<code>{{L|prop_static}}</code>。 |
| # Point to the floor in front of the model of Francis and left-click to place a prop_static. You will see a red cube that represents the <code>prop_static</code> before a model is attached to it. | | # 指向弗朗西斯模型前面的地板并左键点击以放置一个静态实体。你会见到一个表示<code>prop_static</code>的红色的立方体在模型附加到它之前。 |
| # Go back into selection mode by clicking on the {{Hammer select}} in the '''Tool''' Bar or by pressing the {{key|Esc}} key. | | # 点击在'''工具'''栏里的{{Hammer select}}或者按{{key|Esc}}键来返回到选择模式。 |
| # Double-click on the red cube to open the properties. | | # 双击红色立方体以打开属性。 |
| # Double-click on the '''World Model''' field to open the '''Model Browser'''. | | # 双击'''World Model'''字段以打开'''模型浏览器'''。 |
|
| |
|
| {{warning|The first time that the '''Model Browser''' window loads, it can take a while to load in all of the models. It might not immediately look like the image you see below. If you cannot find the model you're looking for, give it a minute to finishing loading.}}{{clr}} | | {{Warning|第一次加载'''模型浏览器'''窗口,它可能花费一些时间来加载所有模型。它可能不会立即看起来像下面你看到的图像。如果你找不到你要找的模型,给它一分钟完成加载。}}{{clr}} |
|
| |
|
| === Selecting the model === | | === 选择模型 === |
| [[Image:l4d_hammer_entity_06.jpg|thumb|right|500px|caption|Selecting the table model in the Model Browser.]] | | [[File:l4d_hammer_entity_06.jpg|thumb|right|500px|caption|在模型浏览器里选择桌子模型。]] |
|
| |
|
| # In the '''Filter''' field at the bottom of the dialog box, type in "<code>table</code>". This will show all the models that have the word "table" in their name. | | # 在对话框底部的'''Filter'''字段中,输入"<code>table</code>"。这将显示所有在其名称中包含单词“table”的模型。 |
| # Scroll down to the one named: | | # 向下滚动到命名的那个: |
| #: "<code>props_furniture\it_mkt_table2.mdl</code>". | | #: "<code>props_furniture\it_mkt_table2.mdl</code>"。 |
| #: It should look like the image shown. | | #: 它应该看起来像显示的图像。 |
| # Click '''OK''' to select it and close the browser and return to the '''Object Properties''' dialog box. You should see the name of the model now in the '''World Model''' row. | | # 点击'''OK'''以选择它并关闭浏览器返回到'''对象属性'''对话框。现在,你应该在'''World Model'''行里看见模型的名字。 |
| # Click the Apply button to set your changes to the entity. | | # 点击应用按钮以设置对实体的更改。 |
| # Close the '''Properties''' box. | | # 关闭'''属性'''窗口。 |
|
| |
|
| You will see the table that you just placed in the room in any of the viewports in the editor.{{clr}}
| | 你将在编辑器中的任何视图中看到刚刚放在房间中的桌子。{{clr}} |
|
| |
|
| == Moving entities == | | == 移动实体 == |
| [[Image:l4d_hammer_entity_07.jpg|right|thumb|350px|caption|Placing the table in the corner of the room.]] | | [[File:l4d_hammer_entity_07.jpg|right|thumb|350px|caption|将桌子放在房间的角落。]] |
|
| |
|
| You can move entities like our table the same way you can move brushes. Click and drag inside the bounding box of the selected entity to move it around with your mouse or put your mouse over any of the viewports and use the arrow keys on your keyboard to move them around.
| | 你可以像移动笔刷一样移动我们的桌子实体。在所选实体的边框内单击并用鼠标拖动它或者将鼠标放在任何视图上并用键盘上的方向键来移动它们。 |
|
| |
|
| Move the table to a corner of our room and set it so that it sits on the floor.
| | 将桌子移动到我们房间的一个角落,并将其放置在地板上。 |
| {{clr}} | | {{clr}} |
|
| |
|
| == Rotating entities == | | == 旋转实体 == |
|
| |
|
| [[Image:l4d_hammer_item_01.jpg|right|frame|caption|Selecting the shotgun from the Objects list.]] | | [[File:l4d_hammer_item_01.jpg|right|frame|caption|从对象列表中选择散弹枪。]] |
|
| |
|
| Next we'll try placing a pump shotgun on the table in our room and rotating it so that it looks like it's in a natural position.
| | 接下来,我们将尝试在我们房间的桌子上放置一个泵霰弹枪,并旋转它,使它看起来像在一个自然的位置。 |
|
| |
|
| Click on the {{Hammer entity}} in the '''Tool''' bar.
| | 在'''工具'''栏里点击{{Hammer entity}}。 |
|
| |
|
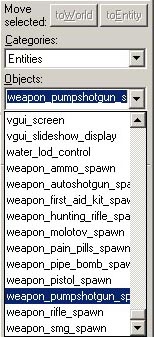
| Select <code>weapon_pumpshotgun_spawn</code> from the drop down menu under '''Objects'''.
| | 从'''对象'''下的下拉菜单中选择<code>weapon_pumpshotgun_spawn</code>。 |
|
| |
|
| {{clr}} | | {{clr}} |
|
| |
|
| [[Image:l4d_hammer_item_02.jpg|right|thumb|300px|caption|Placing the weapon_pumpshotgun_spawn.]] | | [[File:l4d_hammer_item_02.jpg|right|thumb|300px|caption|放置weapon_pumpshotgun_spawn实体。]] |
|
| |
|
| Click on the floor underneath the table prop to place the shotgun entity.
| | 点击桌面下方的地板以放置散弹枪实体。 |
|
| |
|
| {{note|In the Camera viewport, entities can only be placed on brush surfaces.}} | | {{Note|在镜头视图里,实体只能被放置在笔刷表面。}} |
|
| |
|
| {{clr}} | | {{clr}} |
|
| |
|
| [[Image:hammer_rotate1.png|frame|left|Circles at corners indicate that the object is ready to be rotated.]] | | [[File:hammer_rotate1.png|frame|left|角处的圆圈表示对象已准备好旋转。]] |
| [[Image:hammer_rotate2.png|frame|left|Click & drag a circle in any 2D view to rotate the object.]] | | [[File:hammer_rotate2.png|frame|left|在任何2D视图中单击并拖动圆形以旋转对象。]] |
|
| |
|
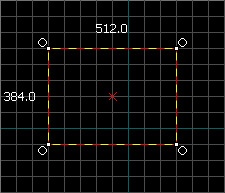
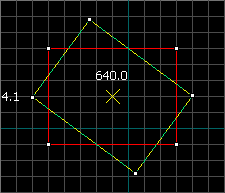
| To rotate an object , you simply select the object you wish to rotate using the {{Hammer select}}, then click once on the object. You should see the object surrounded at the corners with circles. Mouse over a circle in any 2D view, then click and drag to rotate the object.
| | 要旋转对象,你只需使用{{Hammer select}}选择你要旋转的对象,然后在对象上单击一次。你应该看到对象周围的角上的圆。将鼠标悬停在任意2D视图中的圆上,然后单击并拖动以旋转对象。 |
| {{clr}} | | {{clr}} |
|
| |
|
| [[Image:l4d_hammer_item_03.jpg|right|thumb|300px|caption|Rotating the shotgun in the Front viewport]] | | [[File:l4d_hammer_item_03.jpg|right|thumb|300px|caption|在正视图中旋转散弹枪]] |
|
| |
|
| Use your mouse wheel to zoom into the '''Front''' viewport and click once inside the bounding box of the pump shotgun model to make its four corners highlight with circles around each one.
| | 使用鼠标滚轮放大正视图,然后在散弹枪模型的边界框内单击一次使其四个角上每一个圆圈突出显示。 |
|
| |
|
| Left-click and drag in a counter-clockwise motion to rotate the pump shotgun so that it's lying on its side. {{clr}}
| | 左键单击并逆时针拖动以旋转散弹枪,使它躺在它的边上。 {{clr}} |
|
| |
|
| [[Image:l4d_hammer_item_04.jpg|right|thumb|300px|caption|Decreasing the grid spacing.]] | | [[File:l4d_hammer_item_04.jpg|right|thumb|300px|caption|减小网格间距。]] |
|
| |
|
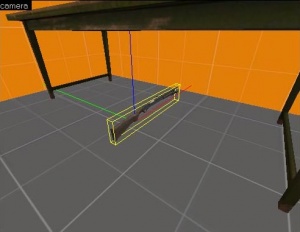
| Zoom into the '''Side''' viewport and press the {{key|[}} key 4 times to decrease the grid spacing. Click and drag inside the bounding box of the shotgun to move it to sit on top of the table. You don't have to place it exactly as long it is above the table and not inside it.{{clr}}
| | 放大'''侧'''视图并按{{key|[}}键4次以减小网格间距。在散弹枪的边界框内单击并拖动,将其移动到桌面顶部。你不必把它放在正上方,只要它在桌子上面,而不是在里面。{{clr}} |
|
| |
|
| [[Image:l4d_hammer_item_05.jpg|right|thumb|300px|caption|Rotating the shotgun in the Top viewport.]] | | [[File:l4d_hammer_item_05.jpg|right|thumb|300px|caption|在俯视图里旋转散弹枪。]] |
|
| |
|
| In the '''Top''' viewport, click inside the bounding box of the shotgun until it's in the rotate mode again. Left-click and drag one of the corners counter-clockwise until the shotgun sits almost parallel to the table.
| | 在'''俯'''视图里,在散弹枪的边界框内单击,直到它再次处于旋转模式。 左键单击并逆时针拖动其中一个角,直到散弹枪几乎平行于桌子。 |
|
| |
|
| Now you will have a shotgun that you can pick up from the table.{{clr}}
| | 现在你会有一个散弹枪可以从桌子上拿起。{{clr}} |
|
| |
|
| == Adding to your room == | | == 添加到你的房间 == |
| [[Image:l4d_hammer_test_map.jpg|right|thumb|350px|caption|Creating the hallway and second room.]] | | [[File:l4d_hammer_test_map.jpg|right|thumb|350px|caption|创建走廊和第二个房间。]] |
|
| |
|
| Using the duplication, scaling and moving of the brushes you currently have in your room, you can now build a hallway and another room identical to the first.
| | 在你的房间使用复制、缩放和移动你目前有的笔刷,你现在可以建立一个走廊和与第一个房间相同的另一个房间。 |
|
| |
|
| Make sure to create openings into both rooms from the hallway.
| | 确保在走廊上的两个房间都开放。 |
|
| |
|
| You can also duplicate the light in the first room and move it to the middle of the second room.
| | 你还可以复制第一个房间中的灯光,并将其移动到第二个房间的中间。 |
|
| |
|
| {{tip|Remember you can duplicate any object in your level by holding the {{key|Shift}} key and then moving the object by dragging it or using the arrow keys. It's much faster than always creating objects from scratch. You can even have multiple objects selected and clone them together. This is a much safer strategy for creating passageways than using the [[Carve]] tool.}} | | {{Tip|记住你可以通过按住{{key|Shift}}键复制你的关卡中的任何对象,然后通过拖动或使用箭头键移动对象。它比从头开始创建对象要快得多。你甚至可以选择多个对象,并一起复制它们。这是一个比使用{{L|Carve}}工具创建通道更安全的策略。}} |
|
| |
|
| After you've finished making your second room and hallway, save the level as "<code>tutorial01.vmf</code>" if you haven't already.
| | 在你完成了你的第二个房间和走廊,保存关卡为“<code>tutorial01.vmf</code>”如果你还没有保存。 |
|
| |
|
| {{clr}} | | {{clr}} |
|
| |
|
| == Add a player start == | | == 添加一个玩家出生点 == |
|
| |
|
| One last thing we'll want to do is add a ''player start'' entity to test out the map. This will be where the player will spawn in a simple level.
| | 最后我们要做的是添加一个“玩家出生点”实体来测试地图。这将是玩家将在一个简单的关卡里出生的地方。 |
|
| |
|
| [[Image:l4d_hammer_playerstart.jpg|thumb|right|300px|caption|Placing an info_player_start.]] | | [[File:l4d_hammer_playerstart.jpg|thumb|right|300px|caption|放置一个info_player_start。]] |
|
| |
|
| # Select the {{Hammer entity}} on the '''Tool''' Bar. | | # 在'''工具'''栏里选择{{Hammer entity}}。 |
| # Pick <code>[[info_player_start]]</code> from the '''Objects''' drop down list.
| | # 从'''对象'''下拉列表中点击<code>{{L|info_player_start}}</code>。 |
| # Now, navigate in the Camera viewport to the center of the room next to the model of Francis. | | # 现在,在“相机”视图中导航到弗朗西斯模型旁边的房间中心。 |
| # Left-click on the floor to place the player_start. | | # 左键点击地板以放置玩家出生点。 |
|
| |
|
| The exact position isn't critical. Just make sure it's in this general location. You can even rotate it another direction if you wish and the player will be facing that way when they spawn.{{clr}}
| | 确切的位置不是关键的。只要确保它在这个一般的位置。如果你愿意,你甚至可以旋转它到另一个方向,那么当玩家出生时,他们将面朝那个方向。{{clr}} |
|
| |
|
| == Running your level in the game == | | == 在游戏中运行关卡 == |
|
| |
|
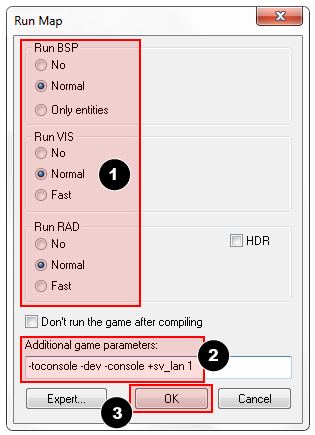
| [[Image:hammer_setmapparam.png|frame|right|Change the '''Run Map''' parameters to match these settings, then click '''OK'''.]] | | [[File:hammer_setmapparam.png|frame|right|更改'''Run Map'''参数以匹配这些设置,然后点击'''OK'''。]] |
|
| |
|
| You have saved your map, but you will also need to compile it before it can be played in the game engine.
| | 你已经保存你的地图,但是在游戏里试玩之前你也需要编译它。 |
|
| |
|
| When a map is compiled, it is converted from the raw .VMF file that you just saved, into the .BSP format used by the game engine. The geometry is processed and the proper lighting and shadows are pre-calculated with several compile programs.
| | 当一个地图被编译后,你刚保存的.VMF格式的文件会被转换为用于游戏的.BSP格式。处理几何形状,并且利用若干编译程序预先计算适当的照明和阴影。 |
|
| |
|
| * Open the '''File''' menu, and choose '''Run Map...''' or press the {{key|F9}} key. | | * 打开'''File'''菜单,然后选择'''Run Map...'''或者按{{key|F9}}键。 |
| * The '''Run Map''' dialog will open. | | * '''Run Map'''对话框将被打开。 |
| * This dialog is used to set some basic compile parameters. | | * 该对话框用来设置一些基本的编译参数。 |
| *# Make sure that '''Normal''' is set under the '''Run BSP''', '''Run VIS''', and '''Run RAD''' settings. | | *# 确保在'''Run BSP'''、'''Run VIS'''和'''Run RAD'''设置下面的'''Normal'''已经被选中。 |
| *# Under '''Additional game parameters:''', make sure these settings are present, and type them in if not: | | *# 在'''Additional game parameters:'''下面,确保这些设置存在,如果没有就输入它们: |
| *#: <code>-toconsole -dev -console +sv_lan 1</code> | | *#: <code>-toconsole -dev -console +sv_lan 1</code> |
| *# Now click the '''OK''' button to start the map compile process. | | *# 现在点击'''OK'''按钮来开始地图编译过程。 |
|
| |
|
| The '''Compile Process Window''' will show the progress of the compile. When the compilation is done, the game you are mapping for will automatically launch, and load your map in the engine.
| | '''Compile Process Window'''将显示编译过程。编译完成后,游戏会自动启动并加载你的地图。 |
|
| |
|
| {{note|If you wish to compile with [[HDR|High Dynamic Range]] lighting, simply check the box that says '''HDR'''. The time to compile the map will be twice as long, but that is completely normal.}} | | {{Note|如果你想使用{{L|HDR|高动态范围}}照明来编译,只需选中'''HDR'''复选框。编译地图的时间将是两倍,但这是完全正常的。}} |
| {{clr}} | | {{clr}} |
|
| |
|
| [[Image:l4d_hammer_unplayable.jpg|thumb|right|300px|caption|Click '''Continue''' on this dialog.]] | | [[File:l4d_hammer_unplayable.jpg|thumb|right|300px|caption|在对话框中点击'''Continue'''。]] |
|
| |
|
| Your level in the game should load up after compiling. It may take a minute or two.
| | 你的关卡在编译后应该会在游戏里加载。可能需要一两分钟。 |
|
| |
|
| * When the game launches, the "'''Map is unplayable!'''" dialog will immediately appear. This is OK because we haven't created a navigation file for our level yet. You'll learn about navigation files later in the tutorial. | | * 当游戏启动后,“'''Map is unplayable!'''”对话框会立即出现。这是好的,因为我们还没有为我们的关卡创建导航文件。你将在本教程后面了解导航文件。 |
| * Press the '''Continue''' button. {{clr}} | | * 按'''Continue'''按钮。{{clr}} |
|
| |
|
| [[Image:l4d_hammer_tutorial01.jpg|thumb|right|400px|caption|Running the level in the game.]] | | [[File:l4d_hammer_tutorial01.jpg|thumb|right|400px|caption|在游戏中运行地图。]] |
|
| |
|
| A screen shot of the running map. Note that without a navigation file, the Survivor bots won't respond fully.
| | 运行地图的屏幕截图。请注意,因为没有导航文件,幸存者电脑将不会完全响应。 |
|
| |
|
| {{tip|Your .vmf source map is automatically saved to disk when you compile and run it with the '''Run Map''' command. However, it's a good idea to save every once in a while so you don't lose any work.}}{{clr}} | | {{Tip|当你编译并运行它通过'''Run Map'''命令时,你的.vmf源地图会被自动保存到硬盘。然而,每隔一段时间保存一次是一个好主意,这样你就不会丢失任何进度。}}{{clr}} |
|
| |
|
| == The Developer console == | | == 开发人员控制台 == |
|
| |
|
| Making levels for Left 4 Dead sometimes involves using commands typed into the ''[[Developer Console]]'' window. The console can also be used to do things like spawn Infected zombies to test your level.
| | 制作求生之路关卡有时需要使用键入到''{{L|Developer Console}}''窗口中的命令。控制台也可以用来做一些事情例如产生感染者来测试你的关卡。 |
|
| |
|
| [[Image:l4d_nav_advanced.jpg|thumb|400px|caption|Enabling the developer console.]] | | [[File:l4d_nav_advanced.jpg|thumb|400px|caption|开启开发人员控制台。]] |
|
| |
|
| If you haven't already, make sure the console is enabled in the game:
| | 如果你还没有,请确保控制台在游戏中启用: |
| # Press the {{key|Esc}} key in the game. | | # 在游戏中按{{key|Esc}}键。 |
| # Click on '''Options''', then '''Keyboard/Mouse'''. | | # 点击'''Options''',然后'''Keyboard/Mouse'''。 |
| # Click on the '''Allow Developer Console''' and select "'''Enabled'''". | | # 点击'''Allow Developer Console'''并选择“'''Enabled'''”。 |
| # Click on the '''Done''' Button. | | # 点击'''Done'''按钮。 |
| # Click on '''Return to Game'''. | | # 点击'''Return to Game'''。 |
|
| |
|
| Using the developer console:
| | 使用开发人员控制台: |
|
| |
|
| # Bring down your developer console {{key|`}} (tilde). | | # 关闭开发者控制台{{key|`}}(波浪号)。 |
| # Type any console command and press the {{key|Enter}} key. | | # 键入任何控制台命令,然后按{{key|Enter}}键。 |
| # Hide the console again with {{key|`}}. | | # 使用{{key|`}}再次隐藏控制台。 |
|
| |
|
| {{clr}} | | {{clr}} |
|
| |
|
| == Noclip mode == | | == 穿墙模式 == |
|
| |
|
| One console command you'll find constantly useful is ''noclip'' mode. This is a mode that let's you fly around the level without being stopped ("clipped") by anything in the level. It's useful to get around large levels quickly.
| | 有一个控制台命令是''noclip''(穿墙)模式,你会发现它非常有用。这种模式会让你在地图里自由飞行而不被地图中的任何东西阻挡(“clipped”)。它在大地图中快速穿越时很有用。 |
|
| |
|
| To enter <code>noclip</code> mode:
| | 要进入<code>noclip</code>模式: |
| * Press {{key|`}} to enter the console. | | * 按{{key|`}}进入控制台。 |
| * Type <code>noclip</code> in the console and press {{key|Enter}}. | | * 在控制台输入<code>noclip</code>并按{{key|Enter}}。 |
| * Fly around the level. | | * 飞来飞去。 |
| * Type <code>noclip</code> again to leave noclip and walk around the level normally. | | * 再次输入<code>noclip</code>以退出穿墙模式并且正常地在地图中四处走动。 |
|
| |
|
| == Some useful console commands == | | == 一些有用的控制台命令 == |
|
| |
|
| There are lots of console commands available. Here is a sampling.
| | 这里有很多可用的控制台命令。这里有一些例子。 |
|
| |
|
| ; sv_cheats 1 | | ; sv_cheats 1 |
| : Turns on cheats. Necessary for many console commands. | | : 打开作弊。对于许多控制台命令是必需的。 |
|
| |
|
| ; director_stop | | ; director_stop |
| : Stops the AI Director (no spawning for common Infected or Specials). | | : 停止AI导演系统(不产生普通感染者或者特殊感染者)。 |
|
| |
|
| ; director_start | | ; director_start |
| : Starts the AI Director (spawning resumes). | | : 启动AI导演系统(恢复产生)。 |
|
| |
|
| ; nb_delete_all | | ; nb_delete_all |
| : Deletes all existing NPCs (Infected and Survivors). | | : 删除所有存在的NPC(感染者和幸存者)。 |
|
| |
|
| ; map <nowiki><name of map></nowiki> | | ; map <nowiki><name of map></nowiki> |
| : Loads a map or reloads the level you're in. | | : 载入地图或重新载入你所在的地图。 |
|
| |
|
| ; changelevel <nowiki><name of map></nowiki> | | ; changelevel <nowiki><name of map></nowiki> |
| : Loads a map while continuing the session. | | : 在继续会话时加载地图。 |
|
| |
|
| ; god 1 | | ; god 1 |
| : Turns on god mode for all Survivors. The Survivors are invulnerable. | | : 为所有幸存者打开上帝模式。这时幸存者是无敌的。 |
|
| |
|
| ; noclip | | ; noclip |
| : Allows you to fly through the world. | | : 允许你飞越世界。 |
|
| |
|
| ; z_spawn | | ; z_spawn |
| : Spawn a common Infected zombie where the cursor is. | | : 在鼠标所在的地方产生一个普通感染者。 |
|
| |
|
| ; z_spawn smoker | | ; z_spawn smoker |
| : Spawn a Smoker. | | : 产生一个Smoker。 |
|
| |
|
| ; z_spawn hunter | | ; z_spawn hunter |
| : Spawn a Hunter. | | : 产生一个Hunter。 |
|
| |
|
| ; z_spawn boomer | | ; z_spawn boomer |
| : Spawn a Boomer. | | : 产生一个Boomer。 |
|
| |
|
| ; z_spawn tank | | ; z_spawn tank |
| : Spawn a Tank. | | : 产生一个Tank。 |
|
| |
|
| ; z_spawn witch | | ; z_spawn witch |
| : Spawn a Witch. | | : 产生一个Witch。 |
|
| |
|
| ; nb_blind 1 | | ; nb_blind 1 |
| : Make the infected blind to the player. | | : 让感染者看不见玩家。 |
| {{note|<code>nb_blind 1</code> isn't fool proof. If you bump into an infected, they will attack. If a mob is spawned, they will come after you.}} | | {{Note|<code>nb_blind 1</code>并非完全看不见。如果你碰到感染者,他会攻击。如果出现感染者暴动,他们会在你的后面出现。}} |
|
| |
|
| ; sb_stop 1 | | ; sb_stop 1 |
| : Stop the survivor bot AI -- the Survivors will stop moving. | | : 停止幸存者电脑AI——电脑幸存者会停止行动。 |
|
| |
|
| ; director_force_panic_event | | ; director_force_panic_event |
| : Start a panic event (Infected mob). | | : 触发一个尸潮事件(感染者暴动)。 |
|
| |
|
| {{NavBar|L4D Level Design/Getting Started|L4D Level Design Basics Tutorial|L4D Level Design/Ladders}} | | {{Navbar2|L4D Level Design/Getting Started|L4D关卡制作/准备开始|L4D Level Design Basics Tutorial|L4D关卡制作基础教程|L4D Level Design/Ladders|L4D关卡制作/梯子}} |
|
| |
|
| [[Category:Left 4 Dead]]
| | {{ACategory|Left 4 Dead}} |
| [[Category:Left 4 Dead 2]]
| | {{ACategory|Left 4 Dead 2}} |
| [[Category:Level Design]]
| | {{ACategory|Level Design}} |
译者:joyo_a(百度ID)
笔刷(en)是使用Hammer的“固体工具”创建的简单3D造型。笔刷用于在地图里创建大多数大型表面,例如天花板和地板。现在我们将使用笔刷来创建一个简单的房间。
创建一个地板笔刷
- 在左侧工具栏选择“固体工具”。
- 现在,在2D俯视图里左键点击并拖动至右下方(如下图所示)。
- 当你拖动时你应该看到一个长方形或正方形的虚线框。
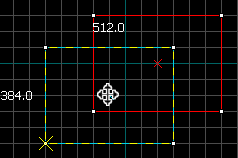
- 创建一个512x512个单位的正方形并放开鼠标左键。
- 在你的键盘上按↵ Enter以创建你刚才画的笔刷。
要返回选择模式,在工具栏里点击“选择”图标或者按Esc键。
在选择了笔刷的选择模式下,你可以通过左键点击出现在笔刷的边界上的任何框,并将它们拖出或拖进来改变笔刷的大小。
让我们将笔刷的厚度由默认的64个单位减少至16个单位(我们将作为一个地板来使用)。要做到这个,我们需要改变网格的大小。
网格
网格被显示在所有2D视图里面。默认情况下,所有对象都会对齐到网格。尽管你可以关闭它,但是保留它却被认为是很好的行为习惯,因为它防止在你的地图上出现泄漏或者其它错误。
默认网格大小为64个单位,这意味着每个网格线相隔64个单位。当前网格的大小显示在Hammer窗口的底部的状态栏上。
- 点击缩小网格图标
 将使网格调整为一半大小。你也可以按[键来缩小网格大小。
- 点击增大网格图标
 将使网格调整为两倍大小。你也可以按]键来增大网格大小。
要使网格大小降至16个单位,按[键两次。看下Hammer窗口右下角的状态栏并确认那里显示Grid: 16。如果没有显示的话,按[或]直到显示为止。
调整地板
现在网格应该足够小了。
切换到右下方的视图。当你的鼠标在它上方时他应该标记为侧面。拖动笔刷的顶部边框并向下使它有16个单位厚。
移动笔刷
在任何2D视图里点击并拖动以移动笔刷。
一旦笔刷被创建你可以移动它们。选择Selection tool  并且鼠标在一个2d视图里的笔刷之上,保持清晰的处理。指针将变成四个箭头指向所有四个方向
  ,表明移动对象的选项。
单击并拖动移动笔刷以便在任何2d视图里移动笔刷。释放后,笔刷将移动到那个位置。
你也可以用箭头(光标)键移动对象。要做到这一点,我们需要在Hammer设置里更改一项设置以便能允许使用方向键:
- 到工具菜单并点击选项以打开配置Hammer对话框。
- 点击2D视图选项卡。
- 这里有其他设置,不过现在,我们只需要标记复选框Arrow keys nudge selected object/vertex。
- 按OK确认更改并关闭选项。
现在让我们通过放置鼠标光标到侧面视图并按下一次下箭头以移动地面笔刷16个单位。
 注意:你需要将你的地平面放在原点行的同一水平以便包含导航文件在内的东西能够工作。
在2D视图里导航
- 您可以使用滚动条来获得视图。
- 更快的方法,按住空格键然后左键点击并拖动以获得。
- 使用鼠标滑轮来放大或缩小。
纹理
要在3D镜头视图中查看纹理,在3D镜头视图中的镜头文本上右键点击并选择3D纹理。
在3D镜头视图中导航
在3D中移动有点不同于2D视图:
- 按住空格和鼠标左键并拖动以便旋转镜头。
- 按住空格和鼠标右键并拖动以便上/下和左/右移动。
- 按住空格和鼠标左右两个键并拖动以便向前和向后移动。
- 你也可以用W、A、S和D来分别向前移动,向后移动,向左平移和向右平移。
- Z键切换“鼠标观察”模式的开关。移动你的鼠标光标到3D镜头视图的上方并按Z键。你现在可以移动你的鼠标了,就好像在游戏里面那样。
注意:W A S D这四个键可以与空格组合使用
在3D相机视口中向上移动并向下看你刚刚创建的地板。
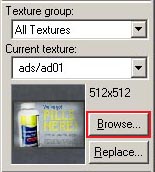
纹理栏里面的浏览按钮。
你会注意到有一个默认的纹理在你的地板上。你可能想更换它。要更换当前纹理,在纹理栏里面点击浏览按钮。
它会弹出纹理浏览器窗口。
在浏览器的底部的过滤的下拉列表框里,您可以根据名称过滤显示的纹理。在这个教程里,在下拉列表框里输入字词"dev_measure"(带下划线)。它将显示一个“开发者”纹理的列表,这使得更容易快速创建一些东西。
现在,找到名叫dev/dev_measuregeneric01b的纹理并双击它。
它应该返回到编辑器的四个视图并将通用开发者纹理作为当前的纹理放置在纹理栏中。
在镜头视图里点击地板笔刷以选择之如果还没有被选择。它应该变成红色。
选择了这个笔刷后,在工具栏里点击 应用当前纹理图标以应用当前纹理到选择的笔刷。灰色开发者纹理应该显示在地板上,如图所示。
创建墙壁和天花板
现在让我们来看看如何创建房间的墙壁和天花板。最简单的方法就是“复制”地板笔刷。
复制
你也可以选择一个已存在的笔刷并复制来创建它们。
注意:复制前,你需要设置Arrow keys nudge selected object/vertex这个选项如果你在之前的教程没有这样做。你可以到Tools > Options > 2D Tab那里找到它。
要复制:
- 选择你已经创建的地板笔刷。
- 将你的光标移到侧面视图。
- 按住⇧ Shift键并按下Up_arrow键以创建一个复制并向上移动一个单元格。
这将创建一个完全像现有地板上的地板刷。
您现在可以更改这个新画笔的大小和尺寸,以创建一个墙,抓住画笔上的角落手柄,并将其拖动到所需的大小。让我们来制作128个单位高和16个单位厚的墙壁吧。
 提示:要移动你所创建的笔刷,使用方向键或者单击并拖动笔刷的正中间来拖动到另外一个位置。
现在复制墙壁3次,以勾勒出地板。
复制地板笔刷1次并提高它成为天花板。
提示:保持你的关卡清洁将变得非常重要,当你开始在游戏中运行它。不要有重叠的画笔(相互交叉的画笔)是一个好主意。这可能使得多个面相互绘制而在游戏里出现“深度冲突”。
删除笔刷
要删除一个笔刷,通过Selection tool 来选择它并按Delete键。
多重选择
你会注意到,在镜头视图中,如果你在房间内导航,很难知道发生了什么,因为所有的墙壁、地板和天花板都是使用相同的纹理。接下来我们将墙改变为不同的纹理。
你可以按住Ctrl键并在镜头视图中依次点击每一个墙壁来选择所有的墙壁。你必须使用Spacebar镜头控制(或者使用Z打开鼠标观察模式)来旋转镜头,这样你就能选择每一个墙壁。
选择了所有的墙壁后,点击纹理栏里的浏览按钮。这一次,选择当前纹理旁边的一个名叫dev/dev_measuregeneric01的橙色纹理。双击它以选择它并关闭浏览器窗口。
使用工具栏里的工具来应用这个橙色纹理到墙壁上。
保存文件
要保存一个关卡,你可以使用Ctrl+S或者文件菜单下的保存。
你需要为地图取一个文件名称,并选择要放置它的目录。
对于本教程,命名该地图为"tutorial01"并保存它到mapsrc目录,该目录默认在:
C:\Program Files\Steam\steamapps\common\left 4 dead\sdk_content\mapsrc\
你的目录可能会略有不同,这取决于你在哪里安装Steam。
包含的示例地图
当你去保存你的地图,你可能已经注意到mapsrc路径下的其他目录。Left 4 Dead Authoring Tools自带了一些示例地图来帮助你。(译注:内容已经过期,请无视。)
| 目录 |
内容
|
mapsrc\No Mercy Apartments |
包含来自求生之路的“毫不留情”战役的示例地图。
|
mapsrc\standards |
包含许多关于合作和对抗模式地图的标准内容的示例地图。
|
mapsrc\Your_First_L4D_Level_Tutorial |
包含该教程的所有部分的完整版本。
|
mapsrc\zoo |
“风格向导”地图为农村和城市类型的求生之路地图。
|
有些时候,本教程将引导您到这些目录中的不同地图。
提示:在这些当中,“Your_First_L4D_Level_Tutorial”可能是最直接有用的。如果你很难完成本教程的其中一个部分,你可以参考此目录中的文件以了解该部分的完成地图应该是什么样子的。
放置实体
选择实体。
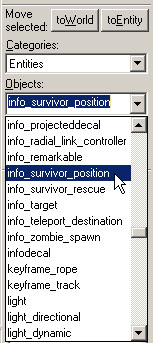
放置一个info_survivor_position实体。
接下来我们将放置一个实体在我们的关卡中:
- 在工具栏上选择Entity tool
 。
。
- 一旦Entity tool 被启用,在对象栏上的实体选择列表变为激活。
- 保持类别条目为实体。
- 单击对象下拉列表上的箭头并选择
info_survivor_position。
- 现在,在镜头视图里导航到房间里面的中间。
- 左键点击地板以放置该实体。
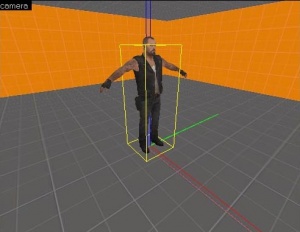
这会在房间的中间放置一个info_survivor_position实体。
这个info_survivor_position实体的模型是弗朗西斯。他在求生之路里是最高的角色,所以这是用来放置以检查你的规模的一个好的实体。
放置灯光实体
现在我们将在地图里放置照明源:
- 再次选择实体工具。
- 在对象栏上的对象下拉列表里选择
light。
- 这一次,把灯放在天花板上(在弗朗西斯头上)。
- 点击在工具栏里的Selection tool 或者按Esc键来返回到选择模式。
接下来我们将改变灯光的一些设置。通过在镜头视图中双击以打开灯光的属性,或着选择它(左键单击它)然后按Alt+↵ Enter键。这将打开对象属性对话框。
在对象属性里,你可以改变该实体的属性值。例如,你可以改变该灯光的亮度。点击Keyvalues下的亮度那行,然后你会见到在右边下拉菜单里的一个设置数据。这个灯光的亮度的默认设置为255 255 255 200。头三个数字代表RGB值(颜色),而最后一个数字代表光的强度。
你可以点击Pick Color按钮来选择一种颜色而不是输入数值。
简单点击你想要的灯光颜色然后点击OK。
这会返回灯光的对象属性对话框。如果选择了亮度行,你应该看到对亮度行的亮度和右侧的下拉字段所做的任何更改。
点击应用按钮以保存你对实体的更改,然后点击窗口右上方的“X”。
放置静态实体
实体也包括道具如家具、装饰和建筑的复杂部分。这里有各种不同种类的道具。Prop_static实体是静态的实体——它们不能移动,没有动画,无法不能打开或关闭。这里也有prop_dynamic实体,它能移动,有动画,可以启动和禁止。这里也有prop_physics实体,玩家可以与他们进行交互和表现,就好像它们在现实世界中。
要放置一个道具:
- 再次选择Entity tool 。
- 转到对象栏,将对象字段更改为
prop_static(en)。
- 指向弗朗西斯模型前面的地板并左键点击以放置一个静态实体。你会见到一个表示
prop_static的红色的立方体在模型附加到它之前。
- 点击在工具栏里的Selection tool 或者按Esc键来返回到选择模式。
- 双击红色立方体以打开属性。
- 双击World Model字段以打开模型浏览器。
 警告:第一次加载模型浏览器窗口,它可能花费一些时间来加载所有模型。它可能不会立即看起来像下面你看到的图像。如果你找不到你要找的模型,给它一分钟完成加载。
选择模型
- 在对话框底部的Filter字段中,输入"
table"。这将显示所有在其名称中包含单词“table”的模型。
- 向下滚动到命名的那个:
- "
props_furniture\it_mkt_table2.mdl"。
- 它应该看起来像显示的图像。
- 点击OK以选择它并关闭浏览器返回到对象属性对话框。现在,你应该在World Model行里看见模型的名字。
- 点击应用按钮以设置对实体的更改。
- 关闭属性窗口。
你将在编辑器中的任何视图中看到刚刚放在房间中的桌子。
移动实体
你可以像移动笔刷一样移动我们的桌子实体。在所选实体的边框内单击并用鼠标拖动它或者将鼠标放在任何视图上并用键盘上的方向键来移动它们。
将桌子移动到我们房间的一个角落,并将其放置在地板上。
旋转实体
从对象列表中选择散弹枪。
接下来,我们将尝试在我们房间的桌子上放置一个泵霰弹枪,并旋转它,使它看起来像在一个自然的位置。
在工具栏里点击Entity tool 。
从对象下的下拉菜单中选择weapon_pumpshotgun_spawn。
放置weapon_pumpshotgun_spawn实体。
点击桌面下方的地板以放置散弹枪实体。
注意:在镜头视图里,实体只能被放置在笔刷表面。
角处的圆圈表示对象已准备好旋转。
在任何2D视图中单击并拖动圆形以旋转对象。
要旋转对象,你只需使用Selection tool 选择你要旋转的对象,然后在对象上单击一次。你应该看到对象周围的角上的圆。将鼠标悬停在任意2D视图中的圆上,然后单击并拖动以旋转对象。
使用鼠标滚轮放大正视图,然后在散弹枪模型的边界框内单击一次使其四个角上每一个圆圈突出显示。
左键单击并逆时针拖动以旋转散弹枪,使它躺在它的边上。
放大侧视图并按[键4次以减小网格间距。在散弹枪的边界框内单击并拖动,将其移动到桌面顶部。你不必把它放在正上方,只要它在桌子上面,而不是在里面。
在俯视图里,在散弹枪的边界框内单击,直到它再次处于旋转模式。 左键单击并逆时针拖动其中一个角,直到散弹枪几乎平行于桌子。
现在你会有一个散弹枪可以从桌子上拿起。
添加到你的房间
在你的房间使用复制、缩放和移动你目前有的笔刷,你现在可以建立一个走廊和与第一个房间相同的另一个房间。
确保在走廊上的两个房间都开放。
你还可以复制第一个房间中的灯光,并将其移动到第二个房间的中间。
提示:记住你可以通过按住⇧ Shift键复制你的关卡中的任何对象,然后通过拖动或使用箭头键移动对象。它比从头开始创建对象要快得多。你甚至可以选择多个对象,并一起复制它们。这是一个比使用Carve(en)工具创建通道更安全的策略。
在你完成了你的第二个房间和走廊,保存关卡为“tutorial01.vmf”如果你还没有保存。
添加一个玩家出生点
最后我们要做的是添加一个“玩家出生点”实体来测试地图。这将是玩家将在一个简单的关卡里出生的地方。
- 在工具栏里选择Entity tool 。
- 从对象下拉列表中点击
info_player_start(en)。
- 现在,在“相机”视图中导航到弗朗西斯模型旁边的房间中心。
- 左键点击地板以放置玩家出生点。
确切的位置不是关键的。只要确保它在这个一般的位置。如果你愿意,你甚至可以旋转它到另一个方向,那么当玩家出生时,他们将面朝那个方向。
在游戏中运行关卡
更改Run Map参数以匹配这些设置,然后点击OK。
你已经保存你的地图,但是在游戏里试玩之前你也需要编译它。
当一个地图被编译后,你刚保存的.VMF格式的文件会被转换为用于游戏的.BSP格式。处理几何形状,并且利用若干编译程序预先计算适当的照明和阴影。
- 打开File菜单,然后选择Run Map...或者按F9键。
- Run Map对话框将被打开。
- 该对话框用来设置一些基本的编译参数。
- 确保在Run BSP、Run VIS和Run RAD设置下面的Normal已经被选中。
- 在Additional game parameters:下面,确保这些设置存在,如果没有就输入它们:
-toconsole -dev -console +sv_lan 1
- 现在点击OK按钮来开始地图编译过程。
Compile Process Window将显示编译过程。编译完成后,游戏会自动启动并加载你的地图。
注意:如果你想使用高动态范围(en)照明来编译,只需选中HDR复选框。编译地图的时间将是两倍,但这是完全正常的。
你的关卡在编译后应该会在游戏里加载。可能需要一两分钟。
- 当游戏启动后,“Map is unplayable!”对话框会立即出现。这是好的,因为我们还没有为我们的关卡创建导航文件。你将在本教程后面了解导航文件。
- 按Continue按钮。
运行地图的屏幕截图。请注意,因为没有导航文件,幸存者电脑将不会完全响应。
提示:当你编译并运行它通过Run Map命令时,你的.vmf源地图会被自动保存到硬盘。然而,每隔一段时间保存一次是一个好主意,这样你就不会丢失任何进度。
开发人员控制台
制作求生之路关卡有时需要使用键入到Developer Console(en)窗口中的命令。控制台也可以用来做一些事情例如产生感染者来测试你的关卡。
如果你还没有,请确保控制台在游戏中启用:
- 在游戏中按Esc键。
- 点击Options,然后Keyboard/Mouse。
- 点击Allow Developer Console并选择“Enabled”。
- 点击Done按钮。
- 点击Return to Game。
使用开发人员控制台:
- 关闭开发者控制台`(波浪号)。
- 键入任何控制台命令,然后按↵ Enter键。
- 使用`再次隐藏控制台。
穿墙模式
有一个控制台命令是noclip(穿墙)模式,你会发现它非常有用。这种模式会让你在地图里自由飞行而不被地图中的任何东西阻挡(“clipped”)。它在大地图中快速穿越时很有用。
要进入noclip模式:
- 按`进入控制台。
- 在控制台输入
noclip并按↵ Enter。
- 飞来飞去。
- 再次输入
noclip以退出穿墙模式并且正常地在地图中四处走动。
一些有用的控制台命令
这里有很多可用的控制台命令。这里有一些例子。
- sv_cheats 1
- 打开作弊。对于许多控制台命令是必需的。
- director_stop
- 停止AI导演系统(不产生普通感染者或者特殊感染者)。
- director_start
- 启动AI导演系统(恢复产生)。
- nb_delete_all
- 删除所有存在的NPC(感染者和幸存者)。
- map <name of map>
- 载入地图或重新载入你所在的地图。
- changelevel <name of map>
- 在继续会话时加载地图。
- god 1
- 为所有幸存者打开上帝模式。这时幸存者是无敌的。
- noclip
- 允许你飞越世界。
- z_spawn
- 在鼠标所在的地方产生一个普通感染者。
- z_spawn smoker
- 产生一个Smoker。
- z_spawn hunter
- 产生一个Hunter。
- z_spawn boomer
- 产生一个Boomer。
- z_spawn tank
- 产生一个Tank。
- z_spawn witch
- 产生一个Witch。
- nb_blind 1
- 让感染者看不见玩家。
注意:nb_blind 1并非完全看不见。如果你碰到感染者,他会攻击。如果出现感染者暴动,他们会在你的后面出现。
- sb_stop 1
- 停止幸存者电脑AI——电脑幸存者会停止行动。
- director_force_panic_event
- 触发一个尸潮事件(感染者暴动)。


