Zh/L4D Level Design/Ladders: Difference between revisions
No edit summary |
m (Multipage removal) |
||
| (14 intermediate revisions by 4 users not shown) | |||
| Line 1: | Line 1: | ||
{{ | {{LanguageBar|title = L4D关卡制作/梯子}} | ||
| | |||
}} | |||
{{L4D level intro menu | {{L4D level intro menu}}__TOC__ | ||
译者:joyo_a(百度ID) | 译者:joyo_a(百度ID) | ||
| Line 31: | Line 27: | ||
在第二个房间中选择墙壁笔刷并复制它们使新的墙壁搁置在旧的墙上。 | 在第二个房间中选择墙壁笔刷并复制它们使新的墙壁搁置在旧的墙上。 | ||
{{ | {{Note|通过复制墙壁和移动他们到旧墙的上方,而不是使原来的墙壁变得更高,这样你就有更多的空间来按照你的想法去应用墙壁的纹理。}} | ||
你修改的房间应该看起来像这样: | 你修改的房间应该看起来像这样: | ||
[[ | [[File:l4d_hammer_ladder_01.jpg|thumb|left|500px|caption|复制墙壁以创建一个更高的房间。]] | ||
{{clr}} | {{clr}} | ||
你现在将看到一个我们包含的房间和走廊之外的黑色的洞。如果有一个洞或“ | 你现在将看到一个我们包含的房间和走廊之外的黑色的洞。如果有一个洞或“{{L|leak}}”到地图的外部,地图将无法正确编译或正确运行。我们来修复它。 | ||
[[ | [[File:l4d_hammer_ladder_02.jpg|thumb|left|500px|caption|确保正确密封地图。]] | ||
选择墙的上面部分到洞的一侧。 | 选择墙的上面部分到洞的一侧。 | ||
| Line 48: | Line 44: | ||
== 创建一个窗台 == | == 创建一个窗台 == | ||
[[ | [[File:l4d_hammer_ladder_03.jpg|thumb|left|500px|caption|使其中一个底壁为一个壁架。]] | ||
现在在3D视图中单击第二个房间中后墙的下部。 | 现在在3D视图中单击第二个房间中后墙的下部。 | ||
| Line 62: | Line 58: | ||
只是为了说明如何改变笔刷面的纹理,让我们改变所有的地板和天花板的纹理为<code>dev/dev_measuregeneric01b</code>纹理。 | 只是为了说明如何改变笔刷面的纹理,让我们改变所有的地板和天花板的纹理为<code>dev/dev_measuregeneric01b</code>纹理。 | ||
编辑笔刷的各个面,在'''Tool'''栏中单击[[ | 编辑笔刷的各个面,在'''Tool'''栏中单击[[File:Hammer_ToggleTextureApplication.png]]'''Texture application mode'''按钮。 | ||
[[ | [[File:l4d_hammer_face_edit_00.jpg|thumb|right|300px|caption|“Face Edit Sheet”对话框。]] | ||
你将看到'''Face Edit Sheet'''对话框。 | 你将看到'''Face Edit Sheet'''对话框。 | ||
| Line 70: | Line 66: | ||
{{clr}} | {{clr}} | ||
[[ | [[File:l4d_hammer_texture_face_01.jpg|thumb|right|500px|caption|从现有面提升纹理。]] | ||
你可以浏览纹理,就像当你使用'''Texture'''栏的'''Browse'''来查找纹理,或者你可以从现有的面“提升”。 | 你可以浏览纹理,就像当你使用'''Texture'''栏的'''Browse'''来查找纹理,或者你可以从现有的面“提升”。 | ||
| Line 80: | Line 76: | ||
{{clr}} | {{clr}} | ||
[[ | [[File:l4d_hammer_texture_face_02.jpg|thumb|right|500px|caption|应用纹理到一个面。]] | ||
要将它应用到另一个面,只需在要接收纹理的面上'''右键单击'''。 | 要将它应用到另一个面,只需在要接收纹理的面上'''右键单击'''。 | ||
| Line 90: | Line 86: | ||
== 放置一个梯子模型 == | == 放置一个梯子模型 == | ||
切换到[[ | 切换到[[File:Hammer_entity.png]] '''Entity Tool''',并从'''Entity'''栏的'''Objects'''下拉菜单中选择“<code>{{L|prop_static}}</code>”,如果它还没有设置为这个。 | ||
通过点击你刚刚扩大的后墙以放置prop_static。 | 通过点击你刚刚扩大的后墙以放置prop_static。 | ||
[[ | [[File:l4d_hammer_ladder_04.jpg|thumb|right|500px|caption|在模型浏览器中选择梯子。]] | ||
按{{key|Esc}}键取消选择prop_static,然后'''双击'''它以显示其属性。 | 按{{key|Esc}}键取消选择prop_static,然后'''双击'''它以显示其属性。 | ||
| Line 110: | Line 106: | ||
{{clr}} | {{clr}} | ||
[[ | [[File:l4d_hammer_ladder_05.jpg|thumb|right|500px|caption|放置梯子。]] | ||
你现在应该有个梯子在你放置你的prop_static的地方。 | 你现在应该有个梯子在你放置你的prop_static的地方。 | ||
| Line 116: | Line 112: | ||
{{clr}} | {{clr}} | ||
[[ | [[File:l4d_hammer_ladder_06.jpg|thumb|right|500px|caption|将梯子移动到位。]] | ||
切换回'''Selection tool''',然后旋转并移动你的梯子,这样它就在这个后壁的中间,并且底部接触地板。 | 切换回'''Selection tool''',然后旋转并移动你的梯子,这样它就在这个后壁的中间,并且底部接触地板。 | ||
| Line 124: | Line 120: | ||
== 创建一个func_ladder == | == 创建一个func_ladder == | ||
现在你有了显示梯子位置的模型,你需要放置允许玩家和其他角色爬上去的实体。 | |||
[[ | [[File:l4d_hammer_nodraw.jpg|thumb|right|200px|caption|使这个tools/toolsnodraw纹理为当前纹理。]] | ||
点击'''Texture'''栏上的'''Browse'''按钮。 | |||
在过滤器中键入“<code>nodraw</code>”。 | |||
双击纹理“<code>tools/toolsnodraw</code>”以选择它,然后关闭浏览器。 | |||
{{Tip| | {{Tip|Nodraw是一个特殊的“工具”纹理,它在游戏里有特殊的属性。在这个例子里,当地图在游戏中被读取时,它创建了一个不渲染(“绘制”)的固体对象。基本上是一个看不见的但又是固体的对象。}} | ||
{{clr}} | {{clr}} | ||
按下{{key|[}}键两次,将网格大小减小为2个单位,以更好地适应梯子。 | |||
[[ | [[File:l4d_hammer_ladder_07.jpg|thumb|right|500px|caption|在梯子模型的前面绘制一个笔刷。]] | ||
点击[[File:Hammer block.png]]'''固体工具'''然后在'''顶部'''视图里的梯子前面创建一个笔刷。 | |||
笔刷应该是大约32单位宽,128单位高,和2单位厚。如有必要,通过拖动拐角手柄并拖动到梯子模型前面的位置来调整画笔大小,如图所示。 | |||
{{clr}} | {{clr}} | ||
[[ | [[File:l4d_hammer_face_edit_01.jpg|thumb|right|300px|caption|在Face Edit Sheet对话框上出现nodraw纹理。]] | ||
现在,你将需要使笔刷的一个面(从梯子指出的面)涂上梯子工具纹理。要编辑画笔的单个面,点击[[File:Hammer_ToggleTextureApplication.png]]'''纹理应用模式'''按钮。 | |||
你将看到'''Face Edit Sheet'''对话框再次出现。 | |||
{{clr}} | {{clr}} | ||
[[ | [[File:l4d_hammer_ladder_08.jpg|thumb|right|200px|caption|tools/toolsinvisibleladder纹理。]] | ||
在此对话框仍然出现的情况下,通过使用鼠标左键单击,在'''镜头'''视图里选择指向远离梯子的面。 | |||
点击'''Face Edit Sheet'''对话框中的'''Browse'''按钮,您将看到'''Texture'''浏览器窗口再次出现。 | |||
在'''Filter'''过滤器中键入“<code>ladder</code>”。 | |||
双击纹理“<code>tools/toolsinvisibleladder</code>”。 | |||
{{ | {{Tip|这是另一个特殊的“工具”纹理。它将笔刷面标记为一个可以在游戏中爬的面。}} | ||
{{clr}} | {{clr}} | ||
[[ | [[File:l4d_hammer_ladder_09.jpg|thumb|right|500px|caption|'''Face Edit Sheet'''里的梯子纹理。]] | ||
你应该会看到<code>LADDER</code>纹理现在占据了'''Face Edit Sheet'''里的缩略图。 | |||
{{clr}} | {{clr}} | ||
[[ | [[File:l4d_hammer_ladder_10.jpg|thumb|right|500px|caption|应用当前纹理到选择的面。]] | ||
现在点击'''Apply'''按钮,然后你选择的面应该换成<code>LADDER</code>纹理。 | |||
{{clr}} | {{clr}} | ||
[[ | [[File:l4d_hammer_ladder_11.jpg|thumb|right|300px|caption|从'''Tools'''菜单中选择'''Tie to Entity'''。]] | ||
关闭'''Face Edit Sheet'''对话框以退出纹理应用模式。 | |||
选择一个面上带有<code>LADDER</code>纹理的笔刷。 | |||
转到'''Tools'''菜单并选择'''Tie to Entity'''。 | |||
{{clr}} | {{clr}} | ||
[[ | [[File:l4d_hammer_func_ladder_01.jpg|thumb|right|500px|caption|将func_detail改变为func_ladder。]] | ||
这将使笔刷变为一个“{{L|brush entity}}”。这将我们之前创建的几何固体块改变为一个特殊笔刷,这个特殊笔刷具有可以改变以影响游戏的属性。 | |||
默认的笔刷实体是一个<code>{{L|func_detail}}</code>,我们稍后会谈到。 | |||
我们想让这个笔刷实体变为<code>{{L|func_ladder}}</code>。拉下下拉菜单选项并选择“<code>func_ladder</code>”。 | |||
然后单击'''Apply'''按钮确认更改并关闭'''Object Properties'''对话框。 | |||
{{clr}} | {{clr}} | ||
== | == 编译地图 == | ||
[[ | [[File:l4d_hammer_ladder_12.jpg|thumb|right|400px|caption|游戏里的梯子。]] | ||
现在通过按{{key|F9}}键,然后点击'''OK'''按钮来编译地图。 | |||
{{ | {{Note|当游戏启动后,通过按'''Continue'''按钮来关闭“'''Map is unplayable!'''”对话框。这是预期的,因为我们还没有为我们的地图创建导航文件。}} | ||
你的梯子在游戏中看起来像这样的。 | |||
你应该能够移动到你的梯子并向上移动爬上到窗台上。如果不能,那么有可能没有正确创建。尝试返回到Hammer,删除你的梯子并再次创建它。 | |||
{{clr}} | {{clr}} | ||
== | == 参见 == | ||
* [[L4D_Level_Design/Versus_Maps#Making Infected Ladders Visible| | * [[L4D_Level_Design/Versus_Maps#Making Infected Ladders Visible|感染者用的梯子]] | ||
{{ | {{Navbar2|L4D_Level_Design/Your_First_L4D_Level|L4D关卡制作/你的第一个求生之路地图|L4D Level Design Basics Tutorial|L4D关卡制作基础教程|L4D Level Design/Visibility|L4D关卡制作/可见性}} | ||
{{ACategory|Left 4 Dead}} | |||
{{ACategory|Left 4 Dead 2}} | |||
{{ACategory|Level Design}} | |||
Latest revision as of 06:44, 12 July 2024
译者:joyo_a(百度ID)
接下来我们将返回Hammer来添加一个梯子到我们的地图。
创建tutorial02.vmf
我们要做的第一件事是我们为在上一节中使用的地图创建一个新版本的地图。
在Hammer里,打开你先前创建的地图文件tutorial01.vmf(如果你还没有打开)。默认情况下,它应位于mapsrc文件夹中:
C:\Program Files\Steam\steamapps\common\left 4 dead\sdk_content\mapsrc\
现在我们将建立一个新版本来工作并完成它:
- 转到文件File,然后选择Save As...。
- 更改名字为
tutorial02.vmf。
建造房间
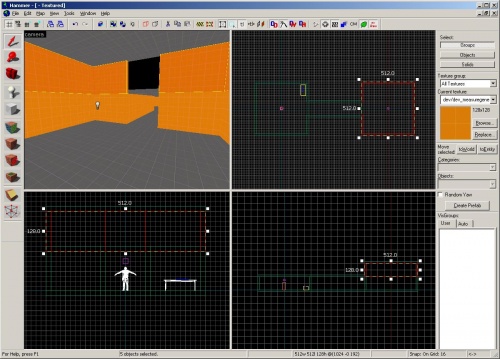
首先,选择在第一个房间教程中创建的第二个房间的天花板。
将笔刷向上移动128个单位。
在第二个房间中选择墙壁笔刷并复制它们使新的墙壁搁置在旧的墙上。
你修改的房间应该看起来像这样:
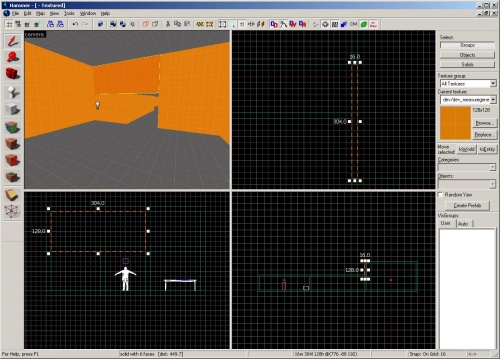
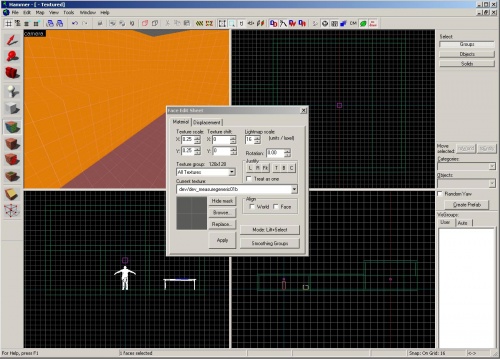
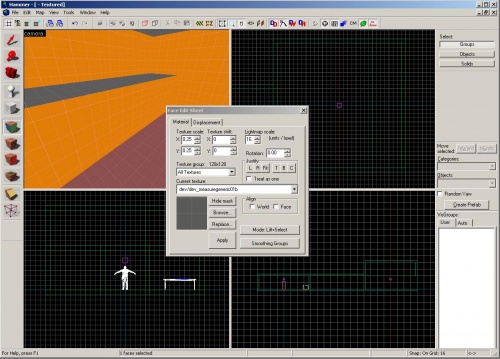
你现在将看到一个我们包含的房间和走廊之外的黑色的洞。如果有一个洞或“leak”到地图的外部,地图将无法正确编译或正确运行。我们来修复它。
选择墙的上面部分到洞的一侧。
通过拖动拐角手柄来扩大其大小以覆盖开口。
创建一个窗台
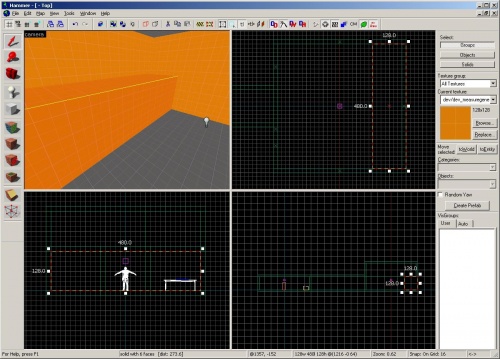
现在在3D视图中单击第二个房间中后墙的下部。
使用顶部视图,将墙扩大到房间,使其宽128个单位,形成一个窗台。
通过按Esc键取消选择画笔。
纹理一个笔刷面
只是为了说明如何改变笔刷面的纹理,让我们改变所有的地板和天花板的纹理为dev/dev_measuregeneric01b纹理。
编辑笔刷的各个面,在Tool栏中单击![]() Texture application mode按钮。
Texture application mode按钮。
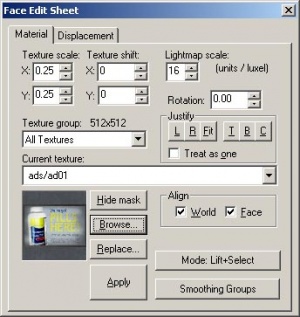
你将看到Face Edit Sheet对话框。
你可以浏览纹理,就像当你使用Texture栏的Browse来查找纹理,或者你可以从现有的面“提升”。
要从现有的面提升,只需在您看到灰色显影剂纹理的地板上左键单击。
你会注意到这会将Face Edit面板上的缩略图替换为measuregeneric纹理。
要将它应用到另一个面,只需在要接收纹理的面上右键单击。
在你创建的窗台的顶部右键单击以给它与地板相同的灰色纹理。
放置一个梯子模型
切换到![]() Entity Tool,并从Entity栏的Objects下拉菜单中选择“
Entity Tool,并从Entity栏的Objects下拉菜单中选择“prop_static”,如果它还没有设置为这个。
通过点击你刚刚扩大的后墙以放置prop_static。
按Esc键取消选择prop_static,然后双击它以显示其属性。
单击World Model行。
单击Object Properties对话框右侧的Browse。
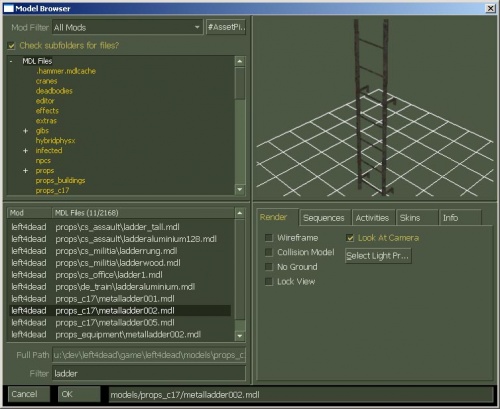
在Filter字段中输入“ladder”。
选择“props_c17/metalladder002.mdl”然后单击OK。
单击Object Properties对话框里的Apply。
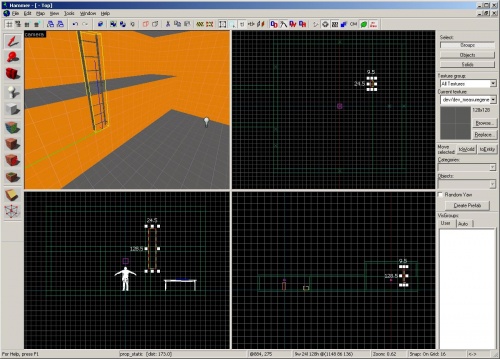
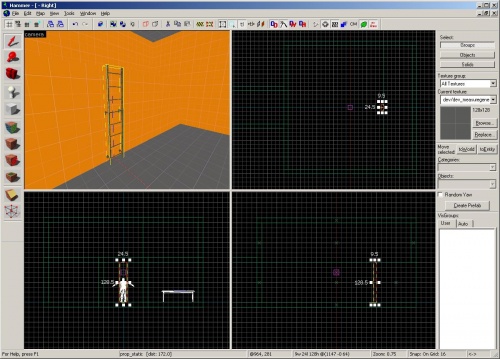
你现在应该有个梯子在你放置你的prop_static的地方。
切换回Selection tool,然后旋转并移动你的梯子,这样它就在这个后壁的中间,并且底部接触地板。
创建一个func_ladder
现在你有了显示梯子位置的模型,你需要放置允许玩家和其他角色爬上去的实体。
点击Texture栏上的Browse按钮。
在过滤器中键入“nodraw”。
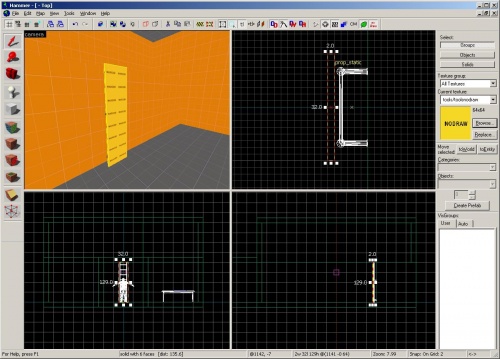
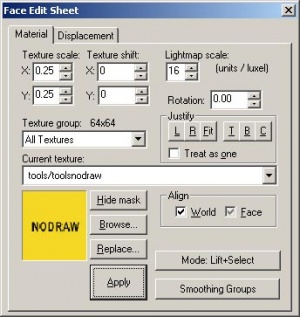
双击纹理“tools/toolsnodraw”以选择它,然后关闭浏览器。
按下[键两次,将网格大小减小为2个单位,以更好地适应梯子。
笔刷应该是大约32单位宽,128单位高,和2单位厚。如有必要,通过拖动拐角手柄并拖动到梯子模型前面的位置来调整画笔大小,如图所示。
现在,你将需要使笔刷的一个面(从梯子指出的面)涂上梯子工具纹理。要编辑画笔的单个面,点击![]() 纹理应用模式按钮。
纹理应用模式按钮。
你将看到Face Edit Sheet对话框再次出现。
在此对话框仍然出现的情况下,通过使用鼠标左键单击,在镜头视图里选择指向远离梯子的面。
点击Face Edit Sheet对话框中的Browse按钮,您将看到Texture浏览器窗口再次出现。
在Filter过滤器中键入“ladder”。
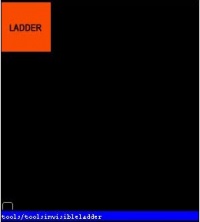
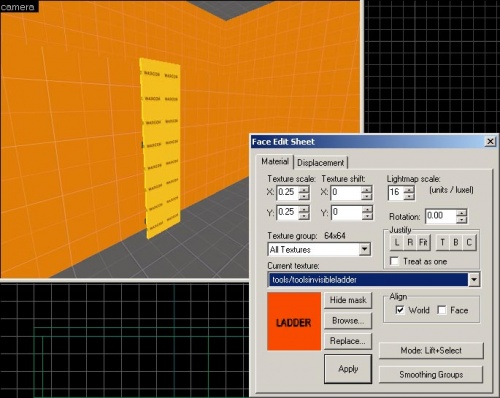
双击纹理“tools/toolsinvisibleladder”。
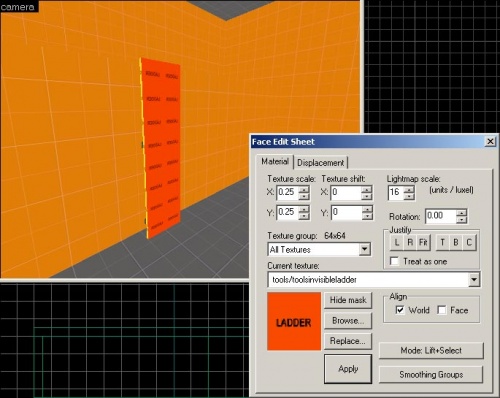
你应该会看到LADDER纹理现在占据了Face Edit Sheet里的缩略图。
现在点击Apply按钮,然后你选择的面应该换成LADDER纹理。
关闭Face Edit Sheet对话框以退出纹理应用模式。
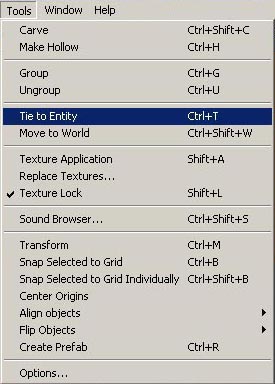
选择一个面上带有LADDER纹理的笔刷。
转到Tools菜单并选择Tie to Entity。
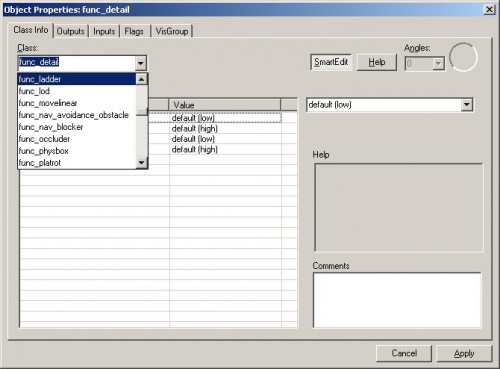
这将使笔刷变为一个“brush entity”。这将我们之前创建的几何固体块改变为一个特殊笔刷,这个特殊笔刷具有可以改变以影响游戏的属性。
默认的笔刷实体是一个func_detail,我们稍后会谈到。
我们想让这个笔刷实体变为func_ladder。拉下下拉菜单选项并选择“func_ladder”。
然后单击Apply按钮确认更改并关闭Object Properties对话框。
编译地图
现在通过按F9键,然后点击OK按钮来编译地图。
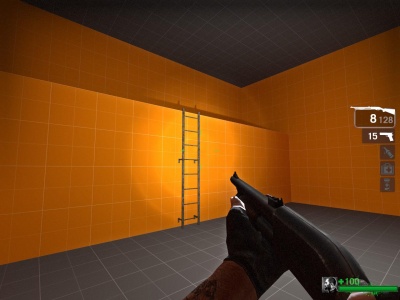
你的梯子在游戏中看起来像这样的。
你应该能够移动到你的梯子并向上移动爬上到窗台上。如果不能,那么有可能没有正确创建。尝试返回到Hammer,删除你的梯子并再次创建它。
