Harbinger
![]() Harbinger is a command-line-interface (CLI) tool included in the
Harbinger is a command-line-interface (CLI) tool included in the ![]() Aura SDK and the
Aura SDK and the ![]() Half-Life Legacy Mod Tools by The Phoenix Project Software. It was created and released in 2025 as a quick and simple way of uploading Add-ons to the Steam Workshop for
Half-Life Legacy Mod Tools by The Phoenix Project Software. It was created and released in 2025 as a quick and simple way of uploading Add-ons to the Steam Workshop for ![]() Half-Life: Cross Product Multiplayer.
Half-Life: Cross Product Multiplayer.
With Harbinger, users can create and modify Add-ons for Cross Product Multiplayer. Unlike The Phoenix Project Software's other tools, currently, Harbinger is not open-source, meaning you cannot find its source code on the GitHub page.
Currently, The Phoenix Project Software is working on a GUI successor, ![]() Harbinger 2 which will leverage the Dear ImGui library.
Harbinger 2 which will leverage the Dear ImGui library.
Using Harbinger
Preface
Before getting started with Harbinger, you should know the fundamentals of ![]() GoldSrc modding concepts, specifically directories, where files are placed, et cetera. If you're a creator, chances are you know these fundamentals already, but if you'd like to repost an item, it's best to keep this in mind.
GoldSrc modding concepts, specifically directories, where files are placed, et cetera. If you're a creator, chances are you know these fundamentals already, but if you'd like to repost an item, it's best to keep this in mind. ![]() Half-Life: Cross Product Multiplayer &
Half-Life: Cross Product Multiplayer & ![]() Half-Life Legacy allow you to modify and mount nearly any type of file, apart from the server & client DLLs.
Half-Life Legacy allow you to modify and mount nearly any type of file, apart from the server & client DLLs.
Your files - maps, gamemodes, etc, should be kept and prepared in the Cross Product or Half-Life Legacy install directory at zamnhlmp_workshop/<ADDONNAME>. Replace <ADDONNAME> with whatever you want.
Addon Info
To help with the game's local filtering of items downloaded, you must create a file at the root of your addon content called addoninfo.txt. This is not the metadata that is published to Steam. The tags are Boolean data types, so 1 = ON, and 0 = OFF. Therefore, you should switch the tags off and on depending on what content is in your addon - for example, if it contains playermodels and nothing else, every tag's value would be "0" except for "playermodels". In the contents of the Aura SDK & Half-Life Legacy Mod Tools, there is an example of this file which looks like the below:
For  Half-Life: Cross Product Multiplayer
"AddonInfo"
{
    "Title"       "Your Title"
    "Author"      "Your Name or Alias"
    "Description" "A short description of your addon"

    "Tags"
    {
        "maps"       	 "1"
        "mp3"     	  	 "1"
        "sounds"     	 "1"
        "HUD"			 "1"
        "mapcycles"      "1"
        "trackerscheme"  "1"
        "resources"      "1"
        "sprays"         "1"
		"locs"			 "1"
		"gamemodes"		 "1"
		"playermodels"	 "1"
		"viewmodels"	 "1"
		"ctf"			 "1"
		"dom"			 "1"
    }
}
For  Half-Life Legacy
"AddonInfo"
{
    "Title"       "Your Title"
    "Author"      "Your Name or Alias"
    "Description" "A short description of your addon"

    "Tags"
    {
        "campaign"       "1"
        "maps"       	 "1"
        "mp3"     	  	 "1"
        "sounds"     	 "1"
        "HUD"			 "1"
        "trackerscheme"  "1"
        "resources"      "1"
        "sprays"         "1"
		"playermodels"	 "1"
		"viewmodels"	 "1"
    }
}
Thumbnail Image
For your addon to be accepted, a thumbnail is required which is displayed both in-game and on the Steam Workshop webpages. You are free to create your own thumbnail if needed, of which the image dimensions must be 640 X 360. Once you have prepared your thumbnail, name it thumb.png and place it in your addon content folder. Next, you must convert it to TGA format so that it can be displayed in-game. Bundled within the Aura SDK is a tool called Spectra which is used as the following in a terminal:
Spectra input.pngOnce you have your thumbnail file in both PNG and TGA format, and they are both called thumb, you are now ready to proceed with using Harbinger.
Uploading to the Workshop
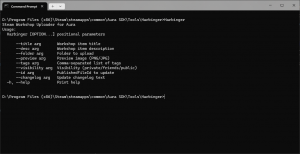
Open a Terminal/CMD in the Harbinger folder. Typing the program's name into the terminal presents you with the options the tool provides.
Steam Workshop Uploader for Aura
Usage:
  Harbinger [OPTION...] positional parameters

      --title arg       Workshop item title
      --desc arg        Workshop item description
      --folder arg      Folder to upload
      --preview arg     Preview image (PNG/JPG)
      --tags arg        Comma-separated list of tags
      --visibility arg  Visibility (private/friends/public)
      --id arg          PublishedFileId to update
      --changelog arg   Update changelog text
  -h, --help            Print help
The method of using Harbinger is pretty straight forward. In order, build your command by setting your title, a short description (as you'll update it once the page is up), content folder, preview image (thumbnail), tags, and visibility. You can set the ID and Changelog ONLY if you are updating an existing add-on you have write access to.
Example usage of Harbinger:
Harbinger create --title "My Addon" --desc "Hello!" --folder "C:\wsp\bounfire_addon" --preview "C:\wsp\bounfire_addon\thumb.png" --tags maps --visibility privateIf successful, you should be able to see the Addon in your content page on Steam.
Updating existing addons with Harbinger
Doing this is easy, whether you still have your local copy of the addon or not. When creating an addon, Harbinger creates a ".wsm" file which contains the addon's metadata, including its ID. So, to update an addon, use the following approach:
Harbinger update --id <ADDON_ID_FROM_URL> --tags maps --visibility public --changelog "Your changelog can be short here if you like, as you can update it on the webpage."External links
| |||||||||||||||||||||||||||||||||||
