Pt-br/Creating a Room: Difference between revisions
< Pt-br
Jump to navigation
Jump to search
(Created page with "{{subst:#if: CREATING TRANSLATION OF 'Creating a Room' to 'português do Brasil' VIA Template:LanguageBar BUTTONS...") |
No edit summary |
||
| Line 4: | Line 4: | ||
{{first room menu}} | {{first room menu}} | ||
{{src|3.1}} | Os mapas da {{src|3.1}} são, na verdade, apenas uma série de salas. As áreas externas são salas com [[skybox]]es em vez de tetos normais. | ||
O interior das salas deve estar completamente vedado em relação ao “vazio” preto que as cerca; se houver algum buraco [[Leak|o mapa não será compilado corretamente]]. Uma compilação adequada é essencial para o bom desempenho, pois controla a visibilidade dos objetos dentro dos níveis e a iluminação adequada. | |||
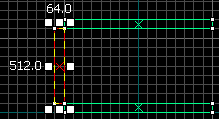
Agora criaremos uma sala na qual o restante desta série de tutoriais ocorrerá. Ela terá 1024L×1024W×512H unidades de tamanho, o que é bastante grande, e consistirá em seis pincéis. | |||
# Using the {{hammer block}}, make a brush to use as the floor. It should be about about 1024L×1024W×64H. | # Using the {{hammer block}}, make a brush to use as the floor. It should be about about 1024L×1024W×64H. | ||
Revision as of 16:49, 8 September 2024
This page needs to be translated.
This page either contains information that is only partially or incorrectly translated, or there isn't a translation yet.
If this page cannot be translated for some reason, or is left untranslated for an extended period of time after this notice is posted, the page should be requested to be deleted.
Also, please make sure the article complies with the alternate languages guide.
This page is actively undergoing a major edit.
As a courtesy, please do not edit this while this message is displayed.
If this page has not been edited for at least several hours to a few days, please remove this template. This message is intended to help reduce edit conflicts; please remove it between editing sessions to allow others to edit the page.
The person who added this notice will be listed in its edit history should you wish to contact them.
Os mapas da Source são, na verdade, apenas uma série de salas. As áreas externas são salas com skyboxes em vez de tetos normais.
O interior das salas deve estar completamente vedado em relação ao “vazio” preto que as cerca; se houver algum buraco o mapa não será compilado corretamente. Uma compilação adequada é essencial para o bom desempenho, pois controla a visibilidade dos objetos dentro dos níveis e a iluminação adequada.
Agora criaremos uma sala na qual o restante desta série de tutoriais ocorrerá. Ela terá 1024L×1024W×512H unidades de tamanho, o que é bastante grande, e consistirá em seis pincéis.
- Using the Block tool
 , make a brush to use as the floor. It should be about about 1024L×1024W×64H.
 - Using the Selection tool
 , drag it into position if you are not happy with where it is already. The pointer will change into four arrows pointing in all directions
  , indicating the option to move the object.
  Dica:To delete a brush, select it and press Delete.
 - In the side (X/Z) or front (Y/Z) grid view, and again using the Selection tool , ⇧ Shift+drag the brush to “clone” it. Move the mouse upwards while dragging so that the new brush forms a ceiling directly above the floor. If you get the position wrong, just drag the new brush as you did in step two. If you accidentally move the floor instead of cloning it, press Ctrl+Z to go back a step.
 Notar:In some CAD tools, a “cloned” object is linked to the original object. This is not the case in Hammer.
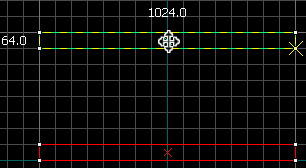 3: Create a ceiling by cloning the floor.
 - Clone another one of the brushes and resize it so that it connects the floor to the ceiling. It is better for texturing if the brushes “touch corners” instead of being flush against each other, but ultimately it doesn’t matter in what manner they touch so long as there is no gap between the inside of the room and the outside.
 4: Connect the floor to the ceiling with a wall.
 - Clone this wall brush and drag it to the other side of the room to form the opposite wall.
- Switch from whatever side view you were using to the other one, and repeat steps four and five to create the remaining two walls.
- Check for any gaps. Make sure the room has been completely sealed. If you’ve been designing your room on a relatively large grid scale (e.g. 64 units), then any gaps will be apparent. Mouse-over the 3D view window and press Z to enter mouselook mode to carefully inspect your room.
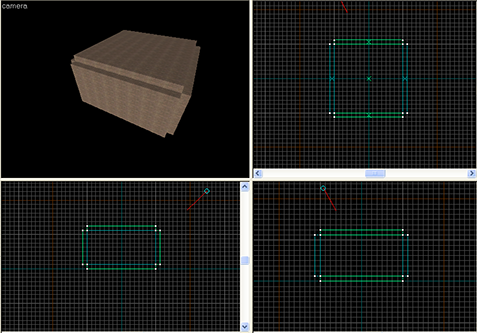 7: The complete room, with no leaks.


