Ru/L4D Level Design/Visibility: Difference between revisions
(New page: {{L4D level intro menu:ru}} == Visibility basics == The file extension for the maps that are compiled is <code>.bsp</code>. ''BSP'' stands for Binary Space Partitioning. Basically, the ga...) |
m (Multipage removal) |
||
| (16 intermediate revisions by 7 users not shown) | |||
| Line 1: | Line 1: | ||
{{L4D level intro menu | {{LanguageBar}} | ||
{{Underlinked|date=January 2024}} | |||
{{L4D level intro menu}} | |||
== Visibility basics == | == Visibility basics == | ||
Файл компилируемых карт имеет расширение <code>.bsp</code>. ''BSP'' является аббревиатурой Binary Space Partitioning. Строго говоря, игровой движок должен отрисовать только те области игрового уровня, которые видны из точки, в которой находится игрок. Это улучшает производительность в уровне (т.е. влияет на то, насколько быстро происходит смена кадров). Чтобы этого добиться, движок делит уровень на порции, называемые ''leafs'' (листья). Если игрок находится в листе из котрого виден следующий дист, тогда тот лист также отрисовывается. Постоянные (не сущностные) браши определяют, где лист будет разрезаться. Браши сущностей, такие как <code>func_ladder</code>, которые мы создавали в предыдущей секции, не влияют на порядок разрезания уровня. | |||
Так почему бы не сделать браши для разрезания уровня на большое количество листов? | |||
Если будет много брашей, режущих уровень на листы видимости, движок вынужден будет делать больше работы при вычислении видимости большего количества деталей для прорисовки. | |||
Любой созданный Вами браш, которые не должен блокировать видимость, должен быть сущностным брашем (<code>func_detail</code>). Эти <code>func_detail</code> браши являются уже твердыми телами в мире, но игнорируются при вычислении области видимости. | |||
* | * Это довольно общее представление системы визуализации в игровом движке. Для более подробной информации об BSP и графической визуализации смотрите {{L|Visibility optimization}}. | ||
== | == Создайте tutorial03.vmf == | ||
В первую очередь нам нужно создать новую версию карты, что мы использовали в предыдущем разделе. | |||
Откройте файл карты tutorial01.vmf который вы создали ранее в Hammer (если он еще не открыт). Он расположен в папке mapsrc, по умолчанию: | |||
C:\Program Files\Steam\steamapps\common\left 4 dead\sdk_content\mapsrc\ | C:\Program Files\Steam\steamapps\common\left 4 dead\sdk_content\mapsrc\ | ||
Итак мы сделаем новую рабочую версию и скомпилируем ее: | |||
* | * Для этого проходим в меню '''File''' и выбираем '''Save As...''' | ||
* | * Меняем имя на <code>tutorial03.vmf</code>. | ||
== Creating a Platform == | == Creating a Platform == | ||
| Line 24: | Line 30: | ||
Sticking with our level called <code>tutorial02</code>, let's create a platform that extends the upper floor where we created our ladder. | Sticking with our level called <code>tutorial02</code>, let's create a platform that extends the upper floor where we created our ladder. | ||
Using the [[ | Using the [[File:Hammer select.png]] '''Selection tool''', duplicate the back wall brush that we extended out to create the upper story in the last tutorial by {{key|Shift}}-dragging it. Reshape it to be a platform that extends out from the upper story on one side. | ||
It should be 368 units wide, 176 units long, and 16 units deep. | It should be 368 units wide, 176 units long, and 16 units deep. | ||
[[ | [[File:l4d_hammer_platform_01.jpg|thumb|left|500px|caption|Duplicating a wall brush to make a platform.]]{{clr}} | ||
Feel free to re-texture the bottom of the platform so that it matches the ceiling and floor. | Feel free to re-texture the bottom of the platform so that it matches the ceiling and floor. | ||
[[ | [[File:l4d_hammer_platform_02.jpg|thumb|left|500px|500px|caption|Texturing the bottom of the platform.]]{{clr}} | ||
Now, go to the '''Tools''' menu and choose '''Tie to Entity'''. You can also use the {{key|Ctrl}}+{{key|T}} keyboard shortcut. | Now, go to the '''Tools''' menu and choose '''Tie to Entity'''. You can also use the {{key|Ctrl}}+{{key|T}} keyboard shortcut. | ||
[[ | [[File:l4d_hammer_tie_to_entity.jpg|thumb|left|300px|caption|Selecting Tie to Entity from the Tools menu.]]{{clr}} | ||
The default '''Class''' for a brush entity is <code>func_detail</code>. | The default '''Class''' for a brush entity is <code>func_detail</code>. | ||
[[ | [[File:l4d_hammer_func_detail_01.jpg|thumb|left|500px|caption|Creating a brush entity with the default Class.]]{{clr}} | ||
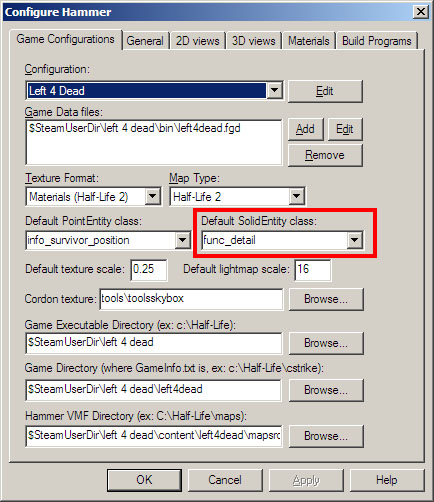
If you see something else under the '''Class''' drop-down menu, you will need to change a setting in '''Tools > Options > Game Configurations''' tab. | If you see something else under the '''Class''' drop-down menu, you will need to change a setting in '''Tools > Options > Game Configurations''' tab. | ||
| Line 46: | Line 52: | ||
Make sure the '''Default SolidEntity Class''' field is set to "<code>func_detail</code>". | Make sure the '''Default SolidEntity Class''' field is set to "<code>func_detail</code>". | ||
[[ | [[File:l4d_hammer_options_class.jpg|thumb|left|500px|caption|Setting func_detail as the Default SolidEntity Class.]]{{clr}} | ||
That's it. You're done! You just created a brush that will not cut up the BSP into more leafs. | That's it. You're done! You just created a brush that will not cut up the BSP into more leafs. | ||
| Line 69: | Line 75: | ||
* Trusses | * Trusses | ||
{{note|Remember that your level has to be completely enclosed to compile correctly and to make use of the visibility work the engine does. Therefore, no brush that seals the level should be a <code>func_detail.</code> This will create a | {{note|Remember that your level has to be completely enclosed to compile correctly and to make use of the visibility work the engine does. Therefore, no brush that seals the level should be a <code>func_detail.</code> This will create a {{L|leak}} to the outside.}} | ||
{{NavBar|:L4D Level Design/Лестницы|Основные статьи по созданию уровней для Left 4 Dead|L4D Level Design/Навигационная сетка}} | |||
{{ACategory|Left 4 Dead}} | |||
{{ACategory|Left 4 Dead 2}} | |||
{{ACategory|Level Design}} | |||
Latest revision as of 06:46, 12 July 2024
January 2024
Visibility basics
Файл компилируемых карт имеет расширение .bsp. BSP является аббревиатурой Binary Space Partitioning. Строго говоря, игровой движок должен отрисовать только те области игрового уровня, которые видны из точки, в которой находится игрок. Это улучшает производительность в уровне (т.е. влияет на то, насколько быстро происходит смена кадров). Чтобы этого добиться, движок делит уровень на порции, называемые leafs (листья). Если игрок находится в листе из котрого виден следующий дист, тогда тот лист также отрисовывается. Постоянные (не сущностные) браши определяют, где лист будет разрезаться. Браши сущностей, такие как func_ladder, которые мы создавали в предыдущей секции, не влияют на порядок разрезания уровня.
Так почему бы не сделать браши для разрезания уровня на большое количество листов? Если будет много брашей, режущих уровень на листы видимости, движок вынужден будет делать больше работы при вычислении видимости большего количества деталей для прорисовки.
Любой созданный Вами браш, которые не должен блокировать видимость, должен быть сущностным брашем (func_detail). Эти func_detail браши являются уже твердыми телами в мире, но игнорируются при вычислении области видимости.
- Это довольно общее представление системы визуализации в игровом движке. Для более подробной информации об BSP и графической визуализации смотрите Visibility optimization.
Создайте tutorial03.vmf
В первую очередь нам нужно создать новую версию карты, что мы использовали в предыдущем разделе.
Откройте файл карты tutorial01.vmf который вы создали ранее в Hammer (если он еще не открыт). Он расположен в папке mapsrc, по умолчанию:
C:\Program Files\Steam\steamapps\common\left 4 dead\sdk_content\mapsrc\
Итак мы сделаем новую рабочую версию и скомпилируем ее:
- Для этого проходим в меню File и выбираем Save As...
- Меняем имя на
tutorial03.vmf.
Creating a Platform
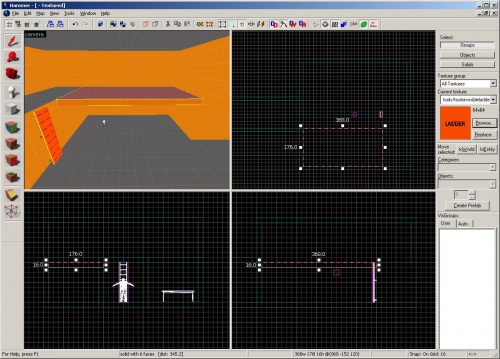
Sticking with our level called tutorial02, let's create a platform that extends the upper floor where we created our ladder.
Using the ![]() Selection tool, duplicate the back wall brush that we extended out to create the upper story in the last tutorial by ⇧ Shift-dragging it. Reshape it to be a platform that extends out from the upper story on one side.
Selection tool, duplicate the back wall brush that we extended out to create the upper story in the last tutorial by ⇧ Shift-dragging it. Reshape it to be a platform that extends out from the upper story on one side.
It should be 368 units wide, 176 units long, and 16 units deep.
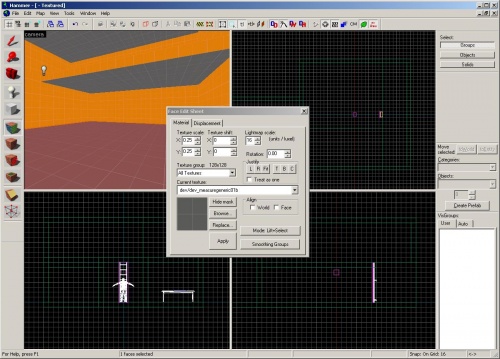
Feel free to re-texture the bottom of the platform so that it matches the ceiling and floor.
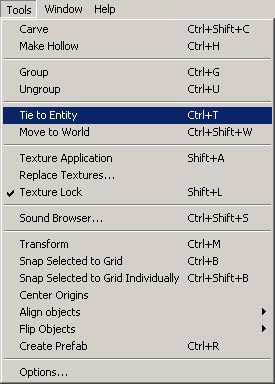
Now, go to the Tools menu and choose Tie to Entity. You can also use the Ctrl+T keyboard shortcut.
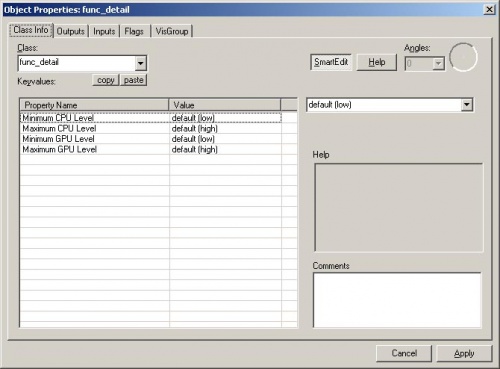
The default Class for a brush entity is func_detail.
If you see something else under the Class drop-down menu, you will need to change a setting in Tools > Options > Game Configurations tab.
Make sure the Default SolidEntity Class field is set to "func_detail".
That's it. You're done! You just created a brush that will not cut up the BSP into more leafs.
Run the map
Press F9 to open the Run Map dialog and click on the OK Button to compile the map and run it in the game.
Good candidates for func_detail brushes
So how do you know to make a brush a func_detail or not?
Details such as:
- Columns and beams
- Trim
- Frames
- Small platforms
- Posts
- Furniture
- Trusses
func_detail. This will create a leak to the outside.- L4D Level Design/Лестницы|:L4D Level Design/Лестницы]]
