Creating a Payload Map
This gametype is included in A Boojum Snark's Team Fortress 2 Gametype Library
The complete entity setup for this gametype is included in "A Boojum Snark's Team Fortress 2 Gametype Library," a downloadable VMF that includes all official Team Fortress 2 gametypes. The entities can easily be transferred from the VMF to your own custom map without the hassle of having to build it yourself or debugging it.
"A Boojum Snark's Team Fortress 2 Gametype Library" can be downloaded here: TF2Maps.net
This tutorial will walk you through setting up the basic elements of a payload map. The standard convention is that the blue team attacks and the red team defends. This tutorial offers no advice as to how the layout of a payload map should be designed. For that information, see Payload Design Theory. In this tutorial you will create the train for the payload and all the necessary entities to work the map with 2 capture points on the first round. To create a single stage payload map, certain entities are unnecessary and you will be alerted to what can be omitted.
Setting up the round
Game Rules and Logic
For this tutorial there is only 1 round but has been made with other rounds in mind.
- Create a tf_gamerules and name it GameRules.
- Create a logic_auto entity and select the outputs tab.
- Place a team_control_point_master and name it CP_master, and adjust the properties (not all are displayed).
Property Name Description Value Name Name of the entity CP_Master Start Disabled Self-explanatory No Cap Layout Self-explanatory Restrict team from winning Self-explanatory Red Switch teams on map win? Self-explanatory Yes Scoring Style Self-explanatory Add team score for each captured point Play all rounds before changelevel Self-explanatory Only changelevel after all mini-rounds have been played to completion Partial cap rate Rate at which to give partial cap points for area captures 0.1
Round Entities
Next, an entity must be set up for each round in a round-based payload map.
- Create a team_control_point_round entity, and name it Round_A.
Set the team_control_point_round properties as follows:
Property Name Description Value Name Name of the entity Round_A Start Disabled Self-explanatory No Print Name Self-explanatory Priority Higher rounds are played first #TotalRounds Control points in this round Self-explanatory CP_A_1 CP_A_2 Restrict team from winning Self-explanatory Red
Round Timer
Now we will create entities that will ensure that if the round time runs out, that Red team will win.
- Create a game_round_win entity and name it Round_Win Set Team to Red.
- Create a team_round_timer entity and set the following properties:
Property Name Description Value Name Name of the entity Round_Timer Timer length (in seconds) Self-explanatory 270 Max timer length (in seconds) Self-explanatory 600 Start paused Self-explanatory No Setup timer length (in seconds) Self-explanatory 70 Reset time on round restart Self-explanatory Yes
Go to outputs and enter the following new outputs:
This sets the winner of the round to Red when time runs out, and opens the SetupGate after the setup timer expires.
Filters
Now we will create important filters for this gametype.
- Create a filter_activator_name entity with the following properties:
Property Name Description Value Name Name of the entity Filter_Cart Filter mode Self-explanatory Allow entities that match criteria Filter Name Self-explanatory Bomb_Model
This entity is used so only the cart prop will activate the final capture and explosion.
- Create a filter_activator_class entity with the following properties:
Property Name Description Value Name Name of the entity Filter_Players Filter mode Self-explanatory Disallow entities that match criteria Filter Classname Self-explanatory player
This entity is used to prevent players from being hurt by the cart.
- Create a filter_activator_tfteam entity with the following properties:
Property Name Description Value Name Name of the entity filter_A_2 Filter mode Self-explanatory Allow entities that match criteria Associated Control Point Self-explanatory CP_A_2
This filter is used for any entity that should be usable by the owner of the Second Capture Point of the First Round. This could apply to Spawn Door Triggers, Resupply/Regeneration Triggers, etc.
- Create another filter_activator_tfteam entity with the following properties:
Property Name Description Value Name Name of the entity filter_B_2 Filter mode Self-explanatory Allow entities that match criteria Associated Control Point Self-explanatory CP_B_2
Similar to the entity above, this filter should be used for any entity that should be usable by the owner of the Second Capture Point of the Second Stage.
Building the payload
Prepping the payload
This section will help you build the train section and the entities needed to get it to function.
First we create a simple brush entity that represents the payload train.
- Create a brush the same size of the payload model(64 79 128), but using the
tools/toolscliptexture and make it a func_tracktrain (with ctrl+t). Name this brush Bomb_Train.
 Note:Make sure your train is oriented 0 degrees: facing east/right from the overhead view in Hammer. It must stay oriented this way to function properly.
- Set the origin of the func_tracktrain to be above the train. This will ensure that the spectator camera view of the cart is above the cart, and not in the cart.
 Note:In order to set the origin above the train, edit the z value of the origin property in the func_tracktrain. Raising the origin by a value of +16 units should be sufficient in most cases.
Now we add the actual physics prop for the train.
- Create a prop_physics_override and set the following properties:
Property Name Description Value Name Name of the entity Bomb_Model Pitch Yaw Roll Y Z X 0 180 0 World Model Self-explanatory models/props_trainyard/bomb_cart.mdlDisable Shadows Self-explanatory Yes Fade Scale Forcible fade distance 0
 Note:Resize the Bomb_Train brush so that it matches the size of the model. This ensures that the players won't get stuck in the model.
Now we need to attach the cart's model to the Bomb_Train.
- Create a phys_constraint with the parameters:
Property Name Value Name Bomb_Const Entity 1 Bomb_Train Entity 2 Bomb_Model
Now we need to add a volume to keep objects from getting stuck on the cart.
- Create a brush slightly larger than the payload model, but this time use the
tools/tooltriggertexture and make it a trigger_hurt brush. Set the following properties for this trigger:
Property Name Description Value Parent Entity bound to Bomb_Train Filter Name Applicable Filter Filter_Players Damage Self-explanatory 1000
- Edit the flags: Uncheck Clients, Check Everything (not including physics debris)
Now we need to create the capture or push zone around the payload cart.
- Using the
tools/toolstriggertexture create a box around the train to be used as the capture zone. Make this a trigger_capture_area and set the following properties:
Property Name Description Value Name Name of the entity Bomb_CapArea Parent Entity bound to Bomb_Train
 Note:This brush needs to extend out from the model as far as you wish players to be when moving the payload.
Now it's time to set up the regeneration zone around the cart.
- Create another box using the
tools/toolstriggertexture again around the train. Make this brush the same size as the Bomb_CapArea. This new trigger will be the health and ammo regeneration zone. Make this into a dispenser_touch_trigger with the following properties:
Property Name Description Value Name Name of the entity Bomb_Dispense Parent Entity bound to Bomb_Train
Activating the payload
In this section you will need to set the values, the inputs and the outputs required to get the train working. First we will set some additional properties in the Bomb_CapArea. Make sure the following properties are set:
Property Name Description Value Name Name of the entity Bomb_CapArea Start Disabled Self-explanatory No Parent Self-explanatory Bomb_Train Control Point The cap assigned to this trigger CP_A_1 Can RED cap? Self-explanatory No Can BLUE cap? Self-explanatory Yes Number of RED players to cap Self-explanatory 1 Number of BLUE players to cap Self-explanatory 1 RED spawn adjust How much to change the spawn time on cap 0 Blue spawn adjust How much to change the spawn time on cap 0 Time to cap Prevents capture by standing in the zone 99999
Next, we can work on the Bomb_Train. This tutorial presumes that you want the mine cart sounds from Goldrush. Make sure these variables are set correctly:
Property Name Description Value Name Name of the entity Bomb_Train First Stop Target Self-explanatory Track_A_01 Max Speed Self-explanatory 90 Change Velocity How the acceleration is handled Linear blend Distance Between the Wheels Self-explanatory 20 Damage on Crush Self-explanatory 99999 Move Sound Self-explanatory Cart.Roll Start Sound Self-explanatory Cart.RollStart Stop Sound Self-explanatory Cart.RollStop Manual Train Speed Self-explanatory On Manual Accel Speed Self-explanatory 70 Manual Decel Speed Self-explanatory 150
- Additionally, click on the Flags tab and check No User Control and Is unblockable by player.
Building the Track
You may want to lay track models first until you know what each model is.
You now have a working train but you will now need to build a line for it to run on.
- Create a path_track entity and place it where you want to start the track, Name this Track_A_01.
- Create another path_track and place it where you next want the line to follow and name this Track_A_02.
- Click back on Track_A_01 and set
Next Stop Targetto Track_A_02.
- Keep creating new path_track and continue naming and linking them in the line you want the train to follow.
To mimic the track models seen in tf2, use several prop_static entities to generate the track segments, and place these on the path underneath the path_track entities.
- The models required are those named
props_mining/track*.mdlwith the asterisk in place of the type of track segment required.
- For the model around the midpoint capture points, use a prop_dynamic entity, with the world model as
props_trainyard/track_midcap.mdl. Name your first capture point model CP_A_1_Model.
Adding a Capture Point
There are generally two capture points per round: midpoint captures and endpoint captures.
Mid point cap
First, make sure you have your static CP_A_1_Model in place. Next, find the Path_Track that sits directly on top of that model. In this example it's Track_A_24.
- Select the middle path_track and go to the outputs tab. Add the following outputs:
This performs several important functions when the payload cart reaches this track point. It changes the skin on the capture point model, it captures the area for blue team, disables rollback to the previous track point, plays a sound and stops sparking effects, as well as adding time to blue team's assault via the Round_Timer.
Now we need to create the team_control_point entity and position it so that it is floating over the center of the model and track point.
- Set the following properties on your newly created team_control_point:
Property Name Description Value Name Name of the entity CP_A_1 Start Disabled Self-explanatory No Print Name Name to display on HUD #Goldrush_cap_1_A Group Index N/A 0 Default Owner Team Red Index #ofCapPoint starting at 0 0 Warning Type Announcer No Announcements BLUE Previous Required Point Self-Explanatory CP_A_1
- Set the following output:
This effectively creates a capture point. This will display a red hologram over the point until blue captures the point, thus displaying a blue hologram. Additionally, the output sets the next capture point for the payload.
End point cap
Set up this point's team_control_point entity with the same properties as CP_A_1, but with the following changes:
Property Name Description Value Name Name of the entity CP_A_2 Print Name Name to display on HUD #Goldrush_cap_1_B Index #ofCapPoint starting at 0 1 BLUE Previous Required Point Self-Explanatory CP_A_1
- Don't forget, this entity needs the following output:
This sets up the capture point for the next round.
- Set the following outputs on your second to last path_track. For this tutorial it is Track_A_42.
Set Track_A_42 Outputs:
The last path_track should be underneath this one in order for the cart to ride down the chute like in Goldrush. This final track point, Track_A_43, should have the following Outputs:
This will teleport the cart to the next round's starting track point, and enable it's push area.
Train Watcher
The next stage is to add in the train display, which is also used to tell when the train should start rolling back.
- Create a team_train_watcher and name this Watcher_A. If you are creating a multi-round map, create a watcher for each round. Set the properties of the first round team_train_watcher to:
Property Name Description Value Name Name of the entity Watcher_A Start Disabled Self-explanatory No Train to watch Self-explanatory Bomb_Train Allow the train to recede Self-explanatory Yes Train recede time (in seconds) Self-explanatory 0 Handle Train Movement Self-explanatory Yes Default Speed Modifier Self-explanatory 1 Associated env_spark Self-explanatory Bomb_Sparks Node that the path starts at Self-explanatory Track_A_01 Node that the path ends at Self-explanatory Track_A_43 Linked PathTrack 1 Self-explanatory Track_A_24 Linked CP 1 Self-explanatory CP_A_1 Linked PathTrack 2 Self-explanatory Track_A_42 Linked CP 2 Self-explanatory CP_A_2 Linked PathTrack 3 Self-explanatory Linked CP 3 Self-explanatory Min Speed for Speed level 1 Self-explanatory 1 Min Speed for Speed level 2 Self-explanatory 60 Min Speed for Speed level 3 Self-explanatory 80
Subsequent watchers should be created for each round with appropriately modified variables, such as the name, linked control points, and linked path tracks and nodes. The rest of the variables can stay the same.
Additional Effects
On Gold Rush and Badwater, additional effects are added to the cart, such as the dispenser beam, a flashing light, and sparks while the train is moving backwards along the track. Both are simple entities that start and stop depending on certain conditions.
Dispenser Beam
Now we will add a dispense beam effect to the train.
- Create a mapobj_cart_dispenser entity and place it where you want the healing beam to come from. Set the following properties:
Property Name Description Value Name Name of the entity Bomb_DispenseBeam Parent Entity bound to Bomb_Train Team Selt-explanatory Blue Custom Touch Trigger Trigger zone Bomb_Dispense
Flashing Light
- Create a info_particle_system and align it with the light on top of the bomb cart, and name it Bomb_Light
Property Name Description Value Name Name of the entity Bomb_Light Parent Self-explanatory Bomb_Train Particle System Name Self-explanatory cart_flashinglight Start Active? Self-explanatory No
Sparks
- Create a env_spark entity at the bottom center of both rear wheels and name it Bomb_Sparks
Property Name Description Value Name Name of the entity Bomb_Sparks Parent Self-explanatory Bomb_Train Spark Trail Length Self-explanatory Medium
Capture Bell
On Badwater and Gold Rush, a bell "ding" is used to announce point captures by BLU. Making this sound is simple.
- Create a new ambient_generic and name it cap_sound
Property Name Description Value Name Name of the entity cap_sound Sound Name Self-explanatory Hud.EndRoundScored
Final Terminus
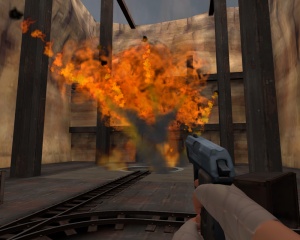
Now we are going to create a basic version of the explosion at the final terminus. KaBOOOOOOM!
Final Capture Point
- Make sure your final team_control_point has its properties properly configured, with Index # reflecting the highest number of total capture points.
- Also, the print name should be increased correctly in sequence,
- Additionally, BLUE Previous Required Point 1 should reflect the previous point's entity name.
- Finally, set the following Flags as checked:
Flag Name Description Value Start with model hidden Self-explanatory True Disable Shadow Self-explanatory True Disable Sounds Self-explanatory True
Explode Pit
Pit Model
- First you should create a pit for the cart to fall into for the final explosion. After you've created the brushwork, cover the pit with the following models.
- Create a prop_static with World Model models/hybridphysx/badwater_destruction_before.mdl
- Make another with World Model models/props_farm/sewer_cap001a.mdl.
Doors to Pit
- Create two brush-entities func_door, with the material glass/glasswindow002a on the upper face.
Parameters for two func_door:
Property Name Description Value Name Self-explanatory cap_door Speed Self-explanatory 700 Move Direction (Pitch Yaw Roll) Self-explanatory 0 270 0
- In Flags check Touch Opens to false and check Toggle to true.
- On one of two doors create the outputs:
It will destroy the door when it's fully open.
- In the pit create a brush-entity trigger_hurt with the parameters Damage - 1000, Damage Cap - 1000.
- Create a brush-entity func_nobuild on the upper doors with parameter Team - Any.
Barrels in Pit
- Create 10-15 entities prop_dynamic_override with WorldModel models/props_badlands/barrel03.mdl and Name - End_Barrels
Final Explosion

- Create near pit three ambient_generic.
Parameters of the first:
Property Name Description Value Name Self-explanatory Cart_tip SoundName Self-explanatory Cart.Falling
Parameters of the second:
Property Name Description Value Name Self-explanatory pre_kaboom SoundName Self-explanatory Cart.Trigger
Parameters of the Third:
Property Name Description Value Name Self-explanatory kaboom SoundName Self-explanatory Cart.Explode
Additionally, create an env_shake entity with the following properties:
Property Name Description Value Name Self-explanatory kaboom_shake Amplitude Self-explanatory 16 Effect Radius Self-explanatory 500 Duration In seconds 1 Frequency Self-explanatory 150
- Set the following Flags as checked:
Flag Name Value Global Shake True In Air True
- Now create under doors one info_particle_system with parameters:
Property Name Description Value Name Self-explanatory pit_effect Particle System Name Self-explanatory cinefx_goldrush Pitch Yaw Roll (Y Z X) Self-explanatory -90 0 0
- Now create trigger_multiple with properties:
Property Name Description Value Name Self-explanatory KaBoomZone Start Disabled Self-explanatory Yes
- Set the following outputs:
Now we are ready to address the outputs for the final path_track.
- Set the outputs as follows:
Finally, create a trigger_once brush at the bottom of the pit where you want the cart to explode.
- Set the following properties:
Property Name Description Value Name Self-explanatory Final_Trigger Start Disabled Self-explanatory No Filter Name Associated Filter Filter_Cart
- Add the following outputs:
- Set the Flags to only Physics debris true, with every other flag false.
Timeline
So what happens is:
0.0:
- open doors to pit
- destroy Bomb_Train
- cart tipping sound played
- cart effects disabled
0.01:
- detach and fall cart's model
0.5:
- "beep" sound played
On Contact with Trigger:
- play ka-boom sound
- play ka-boom effect
- ka-boom shakes screen
- destroy barrels
- destroy cart's model
- capture final CP
- destroy Capture Zone
- activate killing zone
After Contact (.1 seconds):
- deactivate killing zone
You should now have at least a fully working 1 stage round of payload style game play, if you have taken in this tutorial fully you should be able to change the number of rounds and capture point to anything you need.


