Zh/L4D2 Level Design/Foot Lockers: Difference between revisions
mNo edit summary |
(finish) |
||
| (16 intermediate revisions by the same user not shown) | |||
| Line 2: | Line 2: | ||
{{LanguageBar}} | {{LanguageBar}} | ||
{{L4D2 level intro menu}} | {{L4D2 level intro menu}} | ||
{{l4ds}} | 本简体中文页面由[[User:Payne%E9%85%B1|Payne酱]]翻译。 | ||
{{l4ds}}“储物柜”(叫其他名字也可以) 是在DLC《短暂时刻》更新时加入的,可塑性很强。这些储物箱不像[[Half-Life 2]]那样是一个单独的实体,而是由现有实体构成。实际上,更新中加入的新素材就是模型和音效。这里我们来讨论的是静态储物柜、可生成的储物柜和包含多个物品的储物柜。 | |||
==静态(Static)储物柜== | |||
这是最基础的储物柜类型:始终存在于游戏地图内(与游戏中随机生成的储物柜不同),想放什么东西进去都可以。 | |||
[[File:Footlocker01.png|frame|left|The locker. ''Foot'' locker.]] | [[File:Footlocker01.png|frame|left|The locker. ''Foot'' locker.]] | ||
{{clr}} | {{clr}} | ||
在Hammer编辑器看的话,什么也看不清楚。没关系,下面是制作教程。 | |||
====1:储物柜模型和碰撞体==== | |||
=== | |||
---- | ---- | ||
[[File:Footlocker02.png|thumb|The locker model.]] | [[File:Footlocker02.png|thumb|The locker model.]] | ||
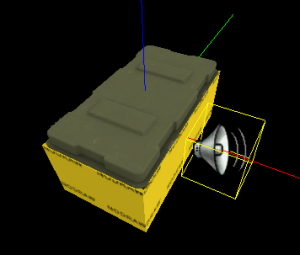
第一个是储物柜模型,一个简单的 [[prop_dynamic]]。将其插入到一个空白地图中(最好用想要的实例名称保存),并赋予它以下属性(其余可保持默认): | |||
*'''World Model:''' ''models/props_waterfront/footlocker01.mdl'' - | *'''World Model:''' ''models/props_waterfront/footlocker01.mdl'' - 使用的模型 | ||
*'''Name:''' ''static_locker'' - | *'''Name:''' ''static_locker'' - 模型的名称在实例插入地图时,根据需要修改。 | ||
*'''Start Fade Dist:''' ''1500'' - | *'''Start Fade Dist:''' ''1500'' - Valve用于开始淡出储物柜模型的通用距离,用于优化 | ||
*'''End Fade Dist:''' ''1900'' - | *'''End Fade Dist:''' ''1900'' - 在这个距离之外,储物柜将不再可见。请确保在这个距离上储物柜在视野之外,否则可能看到里面的物品悬空着。 | ||
*'''Collisions:''' ''Not Solid'' - | *'''Collisions:''' ''Not Solid'' - 储物柜模型本身没有实际的碰撞体,因此设置此选项将确保游戏中的控制台不会报错。 | ||
[[File:Footlocker03.png|thumb|Collision brushes.]] | [[File:Footlocker03.png|thumb|Collision brushes.]] | ||
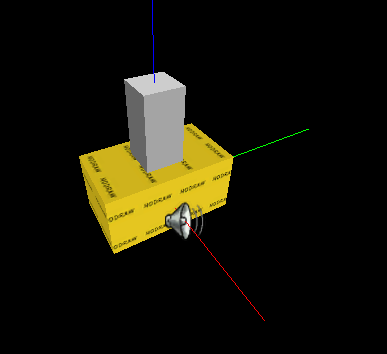
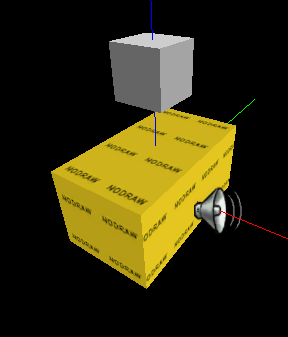
接下来,放入几个使用 nodraw 纹理的笔刷,以便玩家和物体能与储物柜产生碰撞。Valve并没有为储物柜制作碰撞,可能是因为 VPhysics 计算十分消耗性能(因为储物柜是凹形),因此使用笔刷来充当储物柜的实体侧面和底座。 | |||
碰撞笔刷应为 2 单位厚,并沿着储物柜的边缘放置。为储物柜底座放一个笔刷很有用。不要忘了将所有的这些笔刷转换成 func_detail ,否则会严重影响[[visleaves]]的计算。 | |||
{{note| | {{note|你可能需要设置储物柜的动画以帮助创建碰撞笔刷。在模型的属性中,转到“Model”选项卡并选择序列“open”。完成后别忘了将其设置回“ref”,因为在此选项卡中更改默认动画可能会在 Hammer 中引起bug}} | ||
{{clr}} | {{clr}} | ||
===2: | |||
====2:储物柜物品及其他实体==== | |||
---- | ---- | ||
[[File:Footlocker04.png|thumb|Items in the locker.]] | [[File:Footlocker04.png|thumb|Items in the locker.]] | ||
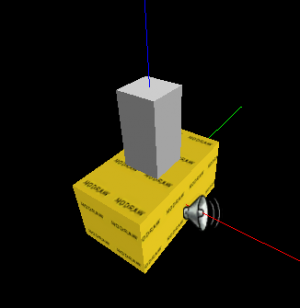
将想要的物品放入储物柜并旋转/定位它们。这里使用了医疗包和手枪,因为设计这个储物柜用于出现在我的战役开头。如果您使用其他物品,最好几乎铺满整个储物柜模型底部的物品层。 | |||
如果使用的是诸如土制炸弹(pipe bombs)、燃烧瓶(molotovs)或boomer胆汁罐(boomer bile)之类的物品,您需要将它们的 Count 值设置为 10,或者可能更高。这意味着玩家在游戏中能拾取多个物品;当然,你只想要单次拾取的物品(如图中的医疗包),请将 Count 值设置为 1。 | |||
{{tip| | {{tip|某些物品,例如肾上腺素(adrenaline),默认没有计数值(count value)且只允许拾取一次。可以通过禁用“Smart Edit”并添加一个名为 count 的键值(KeyValue)来覆盖,值设置为您选择的任何数字。}} | ||
将添加的所有物品命名为 "static_locker_items"。. | |||
{{clr}} | {{clr}} | ||
[[File:Footlocker05.png|thumb|The locker opening sound.]] | [[File:Footlocker05.png|thumb|The locker opening sound.]] | ||
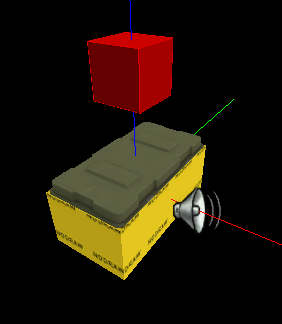
将储物柜动画设置成 "ref"(关上柜子的动画),并在储物柜附近某处添加一个 [[ambient_generic]],位置并不重要,因为我们将在 [[ambient_generic]] 的属性中指定声音的原点。 | |||
属性可以保持默认,除了这些: | |||
*'''Name:''' ''static_locker_snd_open'' - | Name: static_locker_snd_open - 这将允许我们稍后触发声音。 | ||
*'''Sound Name:''' ''Trunk.Open'' - | |||
*'''SourceEntityName:''' ''static_locker'' - | Sound Name: Trunk.Open - 储物柜开启音效的声音脚本条目。 | ||
SourceEntityName: static_locker - 这是 [[prop_dynamic]] 储物柜模型的名称。当被触发时,声音将源自储物柜模型本身,而不是 [[ambient_generic]] 实体的位置。 | |||
*'''Name:''' ''static_locker_snd_open'' - 这将允许我们稍后触发声音。 | |||
*'''Sound Name:''' ''Trunk.Open'' - 储物柜开启音效的[[Soundscript]] | |||
*'''SourceEntityName:''' ''static_locker'' - 这是[[prop_dynamic]]的模型名称. 当被触发时,声音将来源自储物柜模型本身,而不是 [[ambient_generic]] 实体的位置。 | |||
{{clr}} | {{clr}} | ||
==== | ==== 生成物品 ==== | ||
[[File:Footlocker06.png|thumb|The template spawner.]] | [[File:Footlocker06.png|thumb|The template spawner.]] | ||
接下来,我们需要一个 [[point_template]],以便在我们想要的时候生成我们的物品。仅仅勾选物品上的 [[Must Exist]] 标志可能会导致它们的发光效果透过储物柜模型,因此 [[point_template]] 确保物品只在需要时才被创建。对于那些可能不存在的储物柜,[[point_template]] 允许仅在储物柜存在时才生成物品(它被视为一个集合)。 | |||
设置 [[point_template]] : | |||
*'''Name:''' ''static_locker_template'' - | *'''Name:''' ''static_locker_template'' - [[point_template]] 的名称。 | ||
*'''Template 1:''' ''static_locker_items'' - | *'''Template 1:''' ''static_locker_items'' - 当被触发时,point_template 会在它们对应的生成点上生成我们之前命名的 static_locker_items。 | ||
{{clr}} | {{clr}} | ||
==== logic_game_event ==== | ==== logic_game_event ==== | ||
---- | ---- | ||
添加一个[[logic_game_event]]实体用于触发储物柜已被打开的事件。之所以需要这个,是因为它不是一个“专用”的实体(对于该实体类的每个实例都会触发游戏事件)。这个实体可能在 Hammer 的实体列表(FGD)中找不到,因此添加一个不同的实体(例如 info_target),然后在下拉框中将其名称更改为 logic_game_event。您可能需要手动添加这些键值(KeyValues): | |||
*'''Key:''' ''targetname'', '''Value:''' ''static_locker_event'' - 实体的名称 | |||
*'''Key:''' ''eventName'', '''Value:''' ''foot_locker_opened'' - 此实体被触发时将触发的游戏事件的名称。 | |||
*'''Key:''' ''spawnflags'', '''Value:''' ''1'' - 不清楚这个标志的作用。为了保险起见,我是从 [[Valve]] 的地图里复制这些值的。 | |||
---- | ---- | ||
[[File:Footlocker07.png|thumb|The func_button to open the locker.]] | [[File:Footlocker07.png|thumb|The func_button to open the locker.]] | ||
现在用一个刷子围绕储物柜,并将其绑定到 func_button 实体上。按钮使用 nodraw 纹理。它通常应比储物柜模型的每侧(当然底部除外,它应与储物柜底座平齐)向外延伸约 4 个单位。 | |||
需要更改以下属性: | |||
*'''Name:''' ''static_locker_button'' - | *'''Name:''' ''static_locker_button'' - 以便您随时可以通过输入(inputs)锁定/解锁按钮。 | ||
*'''Glow Entity:''' ''static_locker'' - | *'''Glow Entity:''' ''static_locker'' -当玩家在按钮范围内并看向它时,储物柜的 prop_dynamic 模型会发光,吸引玩家打开它。 | ||
需要设置以下Flags: | |||
*'''Don't Move.''' | *'''Don't Move.''' | ||
按钮还需要以下输出(Outputs):: | |||
*'''OnPressed,''' ''static_locker'' -> '''SetAnimation:''' ''opening''. | *'''OnPressed,''' ''static_locker'' -> '''SetAnimation:''' ''opening''. | ||
| Line 107: | Line 115: | ||
All of these need the "Fire Once Only" box ticked. An explanation of each: | All of these need the "Fire Once Only" box ticked. An explanation of each: | ||
:1. | 所有这些都需要勾选 Fire Once Only 框。解释如下: | ||
:2. | :1. 设置储物柜模型的打开动画。动画会自动停止,因此无需发送另一个输入来停止它。 | ||
:3. | :2. 移除 func_button,这样就不能被再次按下,也不会阻挡箱子的顶部,妨碍玩家拾取物品。 | ||
:4. | :3. 播放储物柜开启音效。 | ||
:5. | :4. 告诉“打开”储物柜的角色(按下按钮的那个)说一句台词,主要是告诉其他玩家他们找到了物品。 | ||
:6. | :5. 在储物柜内部生成物品。 | ||
:6. 向导演(Director)触发游戏事件。仅当您遵循了上面可选的步骤 5.5 时才包含此输出。 | |||
{{clr}} | {{clr}} | ||
| Line 120: | Line 129: | ||
[[File:Footlocker08.png|thumb|The info_remarkable.]] | [[File:Footlocker08.png|thumb|The info_remarkable.]] | ||
最后一步是添加一个 info_remarkable,让游戏知道角色在发现储物柜时应该说点什么。设置以下属性: | |||
*'''Name:''' ''static_locker_remarkable'' - | |||
*'''Subject Context:''' ''WorldFootLocker'' - | |||
*'''Name:''' ''static_locker_remarkable'' - 实体的名称 | |||
*'''Subject Context:''' ''WorldFootLocker'' - 告诉游戏角色应该说些与发现储物柜相关的话,比如“我们打开它吧”之类的。 | |||
{{clr}} | {{clr}} | ||
===3: | ===3: 测试=== | ||
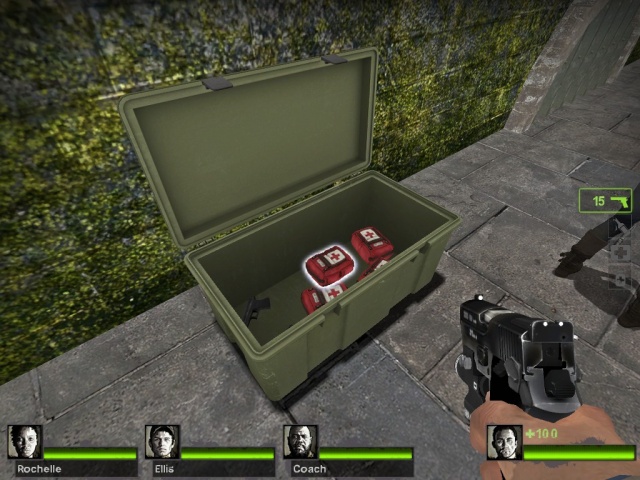
储物柜看起来应该类似这样: | |||
[[File:Footlocker09.jpg|thumb|left|640px|The locker in-game.]] | [[File:Footlocker09.jpg|thumb|left|640px|The locker in-game.]] | ||
编译并加载您的地图,在游戏中测试您的储物柜。 | |||
{{clr}} | {{clr}} | ||
== | == 可生成的储物柜 == | ||
可生成储物柜(Spawnable locker)与静态储物柜类似,只有少量修改。 | |||
== 多种物品 == | |||
在《短暂时刻》战役中,一个储物柜可以拥有随机化的物品生成类型。例如,在一回合中,与其拥有过多的 [[Weapon_pain_pills_spawn]],某个特定的储物柜的内容物可能包含大量 [[Weapon_molotov_spawn]]。这只需要多几个实体和修改。 | |||
== Prefab == | == Prefab == | ||
[http://l4d2.gamebanana.com/prefabs/6281 Download] | [http://l4d2.gamebanana.com/prefabs/6281 Download] 模版 | ||
{{NavBar|L4D2 Level Design/Boss Prohibition|L4D2 Level Design|L4D2 Level Design/Hard Rain}} | {{NavBar|L4D2 Level Design/Boss Prohibition|L4D2 Level Design|L4D2 Level Design/Hard Rain}} | ||
[[Category:Left 4 Dead 2]] | [[Category:Left 4 Dead 2]] | ||
Latest revision as of 23:24, 1 July 2025
As a courtesy, please do not edit this while this message is displayed.
If this page has not been edited for at least several hours to a few days, please remove this template. This message is intended to help reduce edit conflicts; please remove it between editing sessions to allow others to edit the page.
The person who added this notice will be listed in its edit history should you wish to contact them.
You can help by finishing the translation.
If this page cannot be translated for some reason, or is left untranslated for an extended period of time after this notice is posted, the page should be requested to be deleted.
Also, please make sure the article complies with the alternate languages guide.
本简体中文页面由Payne酱翻译。
![]()
![]() “储物柜”(叫其他名字也可以) 是在DLC《短暂时刻》更新时加入的,可塑性很强。这些储物箱不像Half-Life 2那样是一个单独的实体,而是由现有实体构成。实际上,更新中加入的新素材就是模型和音效。这里我们来讨论的是静态储物柜、可生成的储物柜和包含多个物品的储物柜。
“储物柜”(叫其他名字也可以) 是在DLC《短暂时刻》更新时加入的,可塑性很强。这些储物箱不像Half-Life 2那样是一个单独的实体,而是由现有实体构成。实际上,更新中加入的新素材就是模型和音效。这里我们来讨论的是静态储物柜、可生成的储物柜和包含多个物品的储物柜。
静态(Static)储物柜
这是最基础的储物柜类型:始终存在于游戏地图内(与游戏中随机生成的储物柜不同),想放什么东西进去都可以。
在Hammer编辑器看的话,什么也看不清楚。没关系,下面是制作教程。
1:储物柜模型和碰撞体
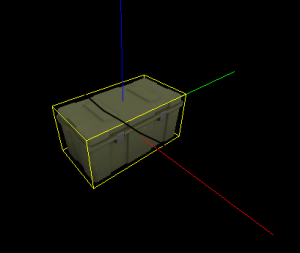
第一个是储物柜模型,一个简单的 prop_dynamic。将其插入到一个空白地图中(最好用想要的实例名称保存),并赋予它以下属性(其余可保持默认):
- World Model: models/props_waterfront/footlocker01.mdl - 使用的模型
- Name: static_locker - 模型的名称在实例插入地图时,根据需要修改。
- Start Fade Dist: 1500 - Valve用于开始淡出储物柜模型的通用距离,用于优化
- End Fade Dist: 1900 - 在这个距离之外,储物柜将不再可见。请确保在这个距离上储物柜在视野之外,否则可能看到里面的物品悬空着。
- Collisions: Not Solid - 储物柜模型本身没有实际的碰撞体,因此设置此选项将确保游戏中的控制台不会报错。
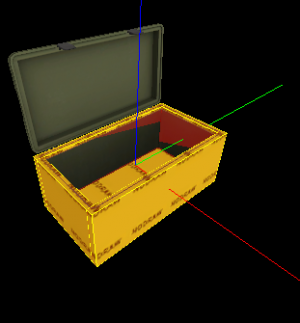
接下来,放入几个使用 nodraw 纹理的笔刷,以便玩家和物体能与储物柜产生碰撞。Valve并没有为储物柜制作碰撞,可能是因为 VPhysics 计算十分消耗性能(因为储物柜是凹形),因此使用笔刷来充当储物柜的实体侧面和底座。
碰撞笔刷应为 2 单位厚,并沿着储物柜的边缘放置。为储物柜底座放一个笔刷很有用。不要忘了将所有的这些笔刷转换成 func_detail ,否则会严重影响visleaves的计算。
2:储物柜物品及其他实体
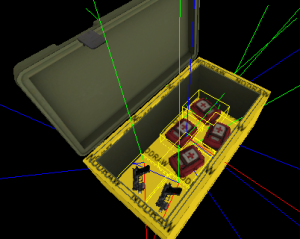
将想要的物品放入储物柜并旋转/定位它们。这里使用了医疗包和手枪,因为设计这个储物柜用于出现在我的战役开头。如果您使用其他物品,最好几乎铺满整个储物柜模型底部的物品层。
如果使用的是诸如土制炸弹(pipe bombs)、燃烧瓶(molotovs)或boomer胆汁罐(boomer bile)之类的物品,您需要将它们的 Count 值设置为 10,或者可能更高。这意味着玩家在游戏中能拾取多个物品;当然,你只想要单次拾取的物品(如图中的医疗包),请将 Count 值设置为 1。
将添加的所有物品命名为 "static_locker_items"。.
将储物柜动画设置成 "ref"(关上柜子的动画),并在储物柜附近某处添加一个 ambient_generic,位置并不重要,因为我们将在 ambient_generic 的属性中指定声音的原点。
属性可以保持默认,除了这些:
Name: static_locker_snd_open - 这将允许我们稍后触发声音。
Sound Name: Trunk.Open - 储物柜开启音效的声音脚本条目。
SourceEntityName: static_locker - 这是 prop_dynamic 储物柜模型的名称。当被触发时,声音将源自储物柜模型本身,而不是 ambient_generic 实体的位置。
- Name: static_locker_snd_open - 这将允许我们稍后触发声音。
- Sound Name: Trunk.Open - 储物柜开启音效的Soundscript
- SourceEntityName: static_locker - 这是prop_dynamic的模型名称. 当被触发时,声音将来源自储物柜模型本身,而不是 ambient_generic 实体的位置。
生成物品
接下来,我们需要一个 point_template,以便在我们想要的时候生成我们的物品。仅仅勾选物品上的 Must Exist 标志可能会导致它们的发光效果透过储物柜模型,因此 point_template 确保物品只在需要时才被创建。对于那些可能不存在的储物柜,point_template 允许仅在储物柜存在时才生成物品(它被视为一个集合)。
设置 point_template :
- Name: static_locker_template - point_template 的名称。
- Template 1: static_locker_items - 当被触发时,point_template 会在它们对应的生成点上生成我们之前命名的 static_locker_items。
logic_game_event
添加一个logic_game_event实体用于触发储物柜已被打开的事件。之所以需要这个,是因为它不是一个“专用”的实体(对于该实体类的每个实例都会触发游戏事件)。这个实体可能在 Hammer 的实体列表(FGD)中找不到,因此添加一个不同的实体(例如 info_target),然后在下拉框中将其名称更改为 logic_game_event。您可能需要手动添加这些键值(KeyValues):
- Key: targetname, Value: static_locker_event - 实体的名称
- Key: eventName, Value: foot_locker_opened - 此实体被触发时将触发的游戏事件的名称。
- Key: spawnflags, Value: 1 - 不清楚这个标志的作用。为了保险起见,我是从 Valve 的地图里复制这些值的。
现在用一个刷子围绕储物柜,并将其绑定到 func_button 实体上。按钮使用 nodraw 纹理。它通常应比储物柜模型的每侧(当然底部除外,它应与储物柜底座平齐)向外延伸约 4 个单位。
需要更改以下属性:
- Name: static_locker_button - 以便您随时可以通过输入(inputs)锁定/解锁按钮。
- Glow Entity: static_locker -当玩家在按钮范围内并看向它时,储物柜的 prop_dynamic 模型会发光,吸引玩家打开它。
需要设置以下Flags:
- Don't Move.
按钮还需要以下输出(Outputs)::
- OnPressed, static_locker -> SetAnimation: opening.
- OnPressed, self -> Kill.
- OnPressed, static_locker_snd_open -> PlaySound.
- OnPressed, !activator -> Speakresponseconcept: OpenLocker.
- OnPressed, static_locker_template -> ForceSpawn.
- OnPressed, static_locker_event -> FireEvent.
All of these need the "Fire Once Only" box ticked. An explanation of each:
所有这些都需要勾选 Fire Once Only 框。解释如下:
- 1. 设置储物柜模型的打开动画。动画会自动停止,因此无需发送另一个输入来停止它。
- 2. 移除 func_button,这样就不能被再次按下,也不会阻挡箱子的顶部,妨碍玩家拾取物品。
- 3. 播放储物柜开启音效。
- 4. 告诉“打开”储物柜的角色(按下按钮的那个)说一句台词,主要是告诉其他玩家他们找到了物品。
- 5. 在储物柜内部生成物品。
- 6. 向导演(Director)触发游戏事件。仅当您遵循了上面可选的步骤 5.5 时才包含此输出。
info_remarkable
最后一步是添加一个 info_remarkable,让游戏知道角色在发现储物柜时应该说点什么。设置以下属性:
- Name: static_locker_remarkable - 实体的名称
- Subject Context: WorldFootLocker - 告诉游戏角色应该说些与发现储物柜相关的话,比如“我们打开它吧”之类的。
3: 测试
储物柜看起来应该类似这样:
编译并加载您的地图,在游戏中测试您的储物柜。
可生成的储物柜
可生成储物柜(Spawnable locker)与静态储物柜类似,只有少量修改。
多种物品
在《短暂时刻》战役中,一个储物柜可以拥有随机化的物品生成类型。例如,在一回合中,与其拥有过多的 Weapon_pain_pills_spawn,某个特定的储物柜的内容物可能包含大量 Weapon_molotov_spawn。这只需要多几个实体和修改。
Prefab
Download 模版
