Pt-br/Applying Textures: Difference between revisions
(Created page with "{{subst:#if: CREATING TRANSLATION OF 'Applying Textures' to 'português do Brasil' VIA Template:LanguageBar BUTTONS...") |
No edit summary |
||
| Line 4: | Line 4: | ||
{{first room menu}} | {{first room menu}} | ||
__NOTOC__ | __NOTOC__ | ||
Nesta seção, selecionaremos [[texture|textura]]s para as paredes, o piso e o teto. | |||
== | == O navegador de texturas == | ||
O '''[[Hammer_Texture_Browser|Navegador de texturas]]'''' é usado para visualizar e selecionar texturas (ou, mais precisamente, [[materials|materiais]]) que você deseja aplicar aos [[brush|pincéis]] em seu mapa. A textura ativa é exibida em uma caixa no lado direito da interface do Hammer. | |||
Para abrir o navegador de textura, clique no botão '''Browse...''' no grupo Texture (Textura) no lado direito da interface do Hammer: | |||
[[File:hammer_texturebrowser1.png|thumb|none| | [[File:hammer_texturebrowser1.png|thumb|none|Clique no botão '''Browse...''' para abrir o Navegador de textura.]] | ||
; Thumbnail | ; Tamanho da Thumbnail | ||
: | : Para facilitar a navegação pelas texturas, talvez você queira ajustar o tamanho da visualização das texturas: no canto inferior esquerdo da janela do navegador de texturas, selecione “128×128” no menu suspenso “Size” (Tamanho). Isso reduzirá o tamanho das amostras de textura, para que você possa ver mais de uma vez. | ||
: [[File:Hammer texturebrowserSize.png|frame|none| | : [[File:Hammer texturebrowserSize.png|frame|none|Mudando o tamanho da Thumbnail]] | ||
; | ; Filtragem da galeria | ||
: | : Na maioria dos jogos, o navegador de texturas hospeda milhares de itens. Navegar até a textura exata que você deseja usar seria problemático se não fosse pelo [[Hammer Texture Browser#Filter|filtro]]. Esse recurso permite que você pesquise partes de nomes de arquivos. Você pode usar espaços para dividir o filtro em vários termos, como “parede de concreto”, “teto de gesso” ou “porta de metal” (não inclua as aspas). | ||
: | : Para mostrar toda a lista de texturas novamente, abra o Navegador de texturas, selecione o texto no campo de filtro e pressione {{key|Backspace}} ou {{key|Delete}} para excluí-lo. | ||
; | ; Texturas de desenvolvimento | ||
: Source | : Source vem com várias texturas projetadas especificamente para ajudar você a criar pincéis proporcionais ao jogador. Elas são chamadas de “dev textures”, que significa “desenvolvimento”, e você pode encontrá-las filtrando por “dev”. | ||
: | : | ||
Localize e clique duas vezes <code>dev/dev_measurewall01a</code>. | |||
[[File:Devbrowser.PNG|frame|none| | [[File:Devbrowser.PNG|frame|none|Selecionando a textura dev_measurewall1101a]] | ||
== | == Aplicando texturas == | ||
Com uma textura selecionada, ela agora precisa ser aplicada a um pincel. | |||
# | # Ative o {{hammer select}}. | ||
# | # Destaque a parede que você deseja texturizar clicando nela na visualização da câmera. Se você selecionar uma das paredes e ela selecionar toda a sala, altere a configuração “Selecionar” no canto superior direito de “Grupos” para “Objetos” ou [[Hammer Tools Menu#Group and Ungroup .3CCtrl.2BG.3E and .3CCtrl.2BU.3E|Desagrupe]] os pincéis. | ||
# | # Clique no botão '''[[Hammer Map Tools Toolbar#Apply Current Texture|Apply Current Texture]]''' [[File:Hammer_ApplyCurrentTexture.png|28px]] no painel esquerdo para aplicar a textura ativa ao pincel selecionado. | ||
[[File:Hammer appliedTextureExample.png|thumb|none|<code>dev_measurewall01a</code> | [[File:Hammer appliedTextureExample.png|thumb|none|<code>dev_measurewall01a</code> em ação.]] | ||
== | == Ajustando texturas == | ||
Uma textura recém-aplicada pode não se encaixar corretamente em um pincel. Usando a ferramenta [[Hammer Map Tools Toolbar#Toggle Texture Application|Toggle Texture Application]] [[File:Hammer_TextureApplication|28px]], você pode ajustá-la para que isso aconteça. | |||
Como as dimensões da nossa parede são ambas potências de dois (1024 e 512), todas as texturas se ajustarão uniformemente. No entanto, ainda podemos ver algumas mudanças alterando as configurações na caixa de diálogo [[Hammer Face Edit Dialog|Face Edit Dialog.]] que apareceu: | |||
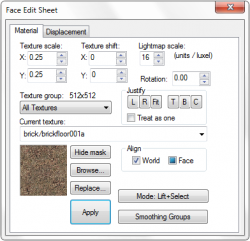
[[File:Hammer faceeditdialog.png|250px|thumb|right|link=Hammer Face Edit Dialog| | [[File:Hammer faceeditdialog.png|250px|thumb|right|link=Hammer Face Edit Dialog|O dialogo Face Edit]] | ||
; | ; Escala de textura | ||
: | : Ajusta o tamanho da textura. Um valor de “1” mapeia um pixel de textura em uma [[unit|unidade]]. Números negativos espelham a textura. | ||
; | ; Mudança de textura | ||
: | : Move a textura ao longo do eixo X ou Y. Números positivos movem a textura para a esquerda (eixo X) e para baixo (eixo Y). Os números negativos movem a textura para a direita (eixo X) e para cima (eixo Y). | ||
; | ; Textura atual | ||
: | : Altera a textura aplicada na superfície. {{tip|Com a folha de edição de face aberta, você pode clicar com o botão direito do mouse em qualquer superfície para aplicar a textura atual a ela. [[Hammer Face Edit Dialog#”Right-Click” Texture Application|Mais detalhes aqui.]]}} | ||
; Lightmap | ; Escala do Lightmap | ||
: | : Afeta a forma como os efeitos de luz se aplicam à superfície. Números menores têm resolução mais alta e produzem efeitos de iluminação mais caros. Números maiores têm resolução mais baixa e produzem efeitos de iluminação mais baratos. Veja também [[Lightmap]]. | ||
; | ; Rotação | ||
: | : Gira a textura na face do pincel. | ||
; | ; Justificativa | ||
: | : Fixa a posição da textura em uma posição especificada na parede. Você pode escolher entre as seguintes opções: “L”eft (Esquerda), “R”ight (Direita), “T”op (Topo, “B”ottom (Fundo) e “C”enter (Centro). Por fim, “Fit” esmaga toda a textura na superfície. | ||
: | : Ao marcar a caixa “Treat as one”, você fará com que o Hammer considere todas as faces selecionadas como um item contínuo. Isso é útil ao ajustar uma textura em várias superfícies. | ||
; | ; Alinhamento | ||
: | : Especifica como a textura é projetada na face. [[Texture alignment#World Alignment|World alignment]] aplica texturas ao longo do eixo global x, y ou z. [[Texture alignment#Face Alignment|Face alignment]] aplica a textura diretamente na face, independentemente da direção para a qual ela esteja voltada. | ||
; | ; Modo | ||
: | : Permite que você selecione o que acontecerá quando clicar em uma face do pincel com o botão esquerdo do mouse. | ||
Aplique a mesma textura às três paredes restantes e, usando o mesmo processo, aplique uma textura dev ao teto e ao piso. | |||
{{Navbar|Creating a Room|Your First Map|Adding Point Entities}} | {{Navbar|Creating a Room|Your First Map|Adding Point Entities}} | ||
[[Category: Level Design]] | [[Category: Level Design]] | ||
[[Category: Tutorials]] | [[Category: Tutorials]] | ||
Revision as of 18:05, 8 September 2024
This page either contains information that is only partially or incorrectly translated, or there isn't a translation yet.
If this page cannot be translated for some reason, or is left untranslated for an extended period of time after this notice is posted, the page should be requested to be deleted.
Also, please make sure the article complies with the alternate languages guide.
As a courtesy, please do not edit this while this message is displayed.
If this page has not been edited for at least several hours to a few days, please remove this template. This message is intended to help reduce edit conflicts; please remove it between editing sessions to allow others to edit the page.
The person who added this notice will be listed in its edit history should you wish to contact them.
Nesta seção, selecionaremos texturas para as paredes, o piso e o teto.
O Navegador de texturas' é usado para visualizar e selecionar texturas (ou, mais precisamente, materiais) que você deseja aplicar aos pincéis em seu mapa. A textura ativa é exibida em uma caixa no lado direito da interface do Hammer.
Para abrir o navegador de textura, clique no botão Browse... no grupo Texture (Textura) no lado direito da interface do Hammer:

- Tamanho da Thumbnail
- Para facilitar a navegação pelas texturas, talvez você queira ajustar o tamanho da visualização das texturas: no canto inferior esquerdo da janela do navegador de texturas, selecione “128×128” no menu suspenso “Size” (Tamanho). Isso reduzirá o tamanho das amostras de textura, para que você possa ver mais de uma vez.
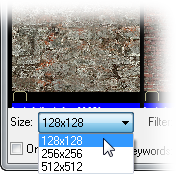 Mudando o tamanho da Thumbnail
- Filtragem da galeria
- Na maioria dos jogos, o navegador de texturas hospeda milhares de itens. Navegar até a textura exata que você deseja usar seria problemático se não fosse pelo filtro. Esse recurso permite que você pesquise partes de nomes de arquivos. Você pode usar espaços para dividir o filtro em vários termos, como “parede de concreto”, “teto de gesso” ou “porta de metal” (não inclua as aspas).
- Para mostrar toda a lista de texturas novamente, abra o Navegador de texturas, selecione o texto no campo de filtro e pressione ← Backspace ou Delete para excluí-lo.
- Texturas de desenvolvimento
- Source vem com várias texturas projetadas especificamente para ajudar você a criar pincéis proporcionais ao jogador. Elas são chamadas de “dev textures”, que significa “desenvolvimento”, e você pode encontrá-las filtrando por “dev”.

Localize e clique duas vezes dev/dev_measurewall01a.

Aplicando texturas
Com uma textura selecionada, ela agora precisa ser aplicada a um pincel.
- Ative o Selection tool
 .
. - Destaque a parede que você deseja texturizar clicando nela na visualização da câmera. Se você selecionar uma das paredes e ela selecionar toda a sala, altere a configuração “Selecionar” no canto superior direito de “Grupos” para “Objetos” ou Desagrupe os pincéis.
- Clique no botão Apply Current Texture
 no painel esquerdo para aplicar a textura ativa ao pincel selecionado.

Ajustando texturas
Uma textura recém-aplicada pode não se encaixar corretamente em um pincel. Usando a ferramenta Toggle Texture Application File:Hammer TextureApplication, você pode ajustá-la para que isso aconteça.
Como as dimensões da nossa parede são ambas potências de dois (1024 e 512), todas as texturas se ajustarão uniformemente. No entanto, ainda podemos ver algumas mudanças alterando as configurações na caixa de diálogo Face Edit Dialog. que apareceu:
- Escala de textura
- Ajusta o tamanho da textura. Um valor de “1” mapeia um pixel de textura em uma unidade. Números negativos espelham a textura.
- Mudança de textura
- Move a textura ao longo do eixo X ou Y. Números positivos movem a textura para a esquerda (eixo X) e para baixo (eixo Y). Os números negativos movem a textura para a direita (eixo X) e para cima (eixo Y).
- Textura atual
- Altera a textura aplicada na superfície.
 Dica:Com a folha de edição de face aberta, você pode clicar com o botão direito do mouse em qualquer superfície para aplicar a textura atual a ela. Mais detalhes aqui.
 - Escala do Lightmap
- Afeta a forma como os efeitos de luz se aplicam à superfície. Números menores têm resolução mais alta e produzem efeitos de iluminação mais caros. Números maiores têm resolução mais baixa e produzem efeitos de iluminação mais baratos. Veja também Lightmap.
- Rotação
- Gira a textura na face do pincel.
- Justificativa
- Fixa a posição da textura em uma posição especificada na parede. Você pode escolher entre as seguintes opções: “L”eft (Esquerda), “R”ight (Direita), “T”op (Topo, “B”ottom (Fundo) e “C”enter (Centro). Por fim, “Fit” esmaga toda a textura na superfície.
- Ao marcar a caixa “Treat as one”, você fará com que o Hammer considere todas as faces selecionadas como um item contínuo. Isso é útil ao ajustar uma textura em várias superfícies.
- Alinhamento
- Especifica como a textura é projetada na face. World alignment aplica texturas ao longo do eixo global x, y ou z. Face alignment aplica a textura diretamente na face, independentemente da direção para a qual ela esteja voltada.
- Modo
- Permite que você selecione o que acontecerá quando clicar em uma face do pincel com o botão esquerdo do mouse.
Aplique a mesma textura às três paredes restantes e, usando o mesmo processo, aplique uma textura dev ao teto e ao piso.