Glview: Difference between revisions
TomEdwards (talk | contribs) No edit summary |
No edit summary |
||
| (7 intermediate revisions by 6 users not shown) | |||
| Line 1: | Line 1: | ||
'''glview''' is a program that displays [[visleaf|visleaves]]. It has been | {{obsolete|tool=1}} | ||
'''glview''' is a program that displays [[visleaf|visleaves]]. It has been deprecated in the [[Orange Box (engine branch)|Orange Box]] (Source 2007) by Hammer's {{code|Map > Load Portal File}} feature. Despite that, glview is still available for games made after Orange Box.<!-- confirmed that L4D2 still has it despite it was deprecated. --> | |||
However, for those who are mapping with an older version of Source: | However, for those who are mapping with an older version of Source: | ||
| Line 5: | Line 6: | ||
== Setting up == | == Setting up == | ||
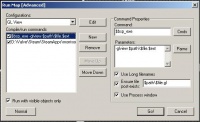
[[ | [[File:Opt_glview_expertcompile.jpg|thumb|200px|glview setup]] You will need to use Expert compile mode for this, but it is not actually tricky. | ||
#In Hammer, go to the '''Run Map''' menu (where you normally compile the map) and click the '''Expert...''' button at the bottom. The '''Run Map [Advanced]''' dialog will appear. Click '''Edit''', '''New''', type "GL View" (or whatever), hit Enter then click '''Close'''. "GL View" should now be in the drop-down list. Select it. Now press '''New'''. | #In Hammer, go to the '''Run Map''' menu (where you normally compile the map) and click the '''Expert...''' button at the bottom. The '''Run Map [Advanced]''' dialog will appear. Click '''Edit''', '''New''', type "GL View" (or whatever), hit Enter then click '''Close'''. "GL View" should now be in the drop-down list. Select it. Now press '''New'''. | ||
#In the ''Command'' box type <code>$bsp_exe</code>, and in the ''Parameters'' box type <code>-glview $path\$file.$ext</code>. | #In the ''Command'' box type <code>$bsp_exe</code>, and in the ''Parameters'' box type <code>-glview $path\$file.$ext</code>. | ||
#Enable ''Use Long filenames'', ''Ensure file post-exists'', and ''Use Process window''. In the ''Ensure file post-exists'' box type <code>$path\$file.gl</code>. | #Enable ''Use Long filenames'', ''Ensure file post-exists'', and ''Use Process window''. In the ''Ensure file post-exists'' box type <code>$path\$file.gl</code>. | ||
#Click '''New''' again. Press the '''Cmds''' button and select ''Executable''. Locate ''glview.exe'' (look in C:\Valve\Steam\SteamApps\''username''\sourcesdk\bin\glview.exe) and '''Open''' it. In the ''Parameters'' box type <code>-portals $path\$file.gl</code>. Enable ''Use Long filenames'' and ''Use Process window''. | #Click '''New''' again. Press the '''Cmds''' button and select ''Executable''. Locate ''glview.exe'' (look in C:\Valve\Steam\SteamApps\''username''\sourcesdk\bin\ep1\bin\glview.exe) and '''Open''' it. In the ''Parameters'' box type <code>-portals $path\$file.gl</code>. Enable ''Use Long filenames'' and ''Use Process window''. | ||
#In the ''Compile/run commands'' box, make sure both items are checked. Also check ''Run with visible objects only''. | #In the ''Compile/run commands'' box, make sure both items are checked. Also check ''Run with visible objects only''. | ||
[[ | [[File:Opt_glview_generic.jpg|thumb|200px|'''glview''' showing a good hallway.]] | ||
When "GL View" is set up, it can be accessed through the Advanced run menu by selecting it from the drop-down list and clicking '''Go!'''. To get back to your regular compiling, click the '''Normal''' button. (Or you can set it up to do it from the Advanced dialog, but doing so is beyond the scope of this article.) | When "GL View" is set up, it can be accessed through the Advanced run menu by selecting it from the drop-down list and clicking '''Go!'''. To get back to your regular compiling, click the '''Normal''' button. (Or you can set it up to do it from the Advanced dialog, but doing so is beyond the scope of this article.) | ||
| Line 19: | Line 20: | ||
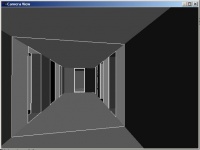
If successful, a strange window called "Camera View" should appear, with black/gray/white contents. This is glview showing you what your level looks like when the BSP program is done with it. You can use the WASD keys and the mouse to move around. By the way, use the Esc key to close glview; otherwise it might crash. Spend some time zooming around your level. Ignore the different shades of gray--they are not important. The white lines are the important part. You can control visibility of these lines by using L and B keys. | If successful, a strange window called "Camera View" should appear, with black/gray/white contents. This is glview showing you what your level looks like when the BSP program is done with it. You can use the WASD keys and the mouse to move around. By the way, use the Esc key to close glview; otherwise it might crash. Spend some time zooming around your level. Ignore the different shades of gray--they are not important. The white lines are the important part. You can control visibility of these lines by using L and B keys. | ||
== See also == | |||
* [[PRT]] | |||
{{SDKTools}} | |||
[[Category:Level Design]] | [[Category:Level Design]] | ||
Latest revision as of 09:49, 20 September 2024
glview is a program that displays visleaves. It has been deprecated in the Orange Box (Source 2007) by Hammer's Map > Load Portal File feature. Despite that, glview is still available for games made after Orange Box.
However, for those who are mapping with an older version of Source:
Setting up
You will need to use Expert compile mode for this, but it is not actually tricky.
- In Hammer, go to the Run Map menu (where you normally compile the map) and click the Expert... button at the bottom. The Run Map [Advanced] dialog will appear. Click Edit, New, type "GL View" (or whatever), hit Enter then click Close. "GL View" should now be in the drop-down list. Select it. Now press New.
- In the Command box type
$bsp_exe, and in the Parameters box type-glview $path\$file.$ext. - Enable Use Long filenames, Ensure file post-exists, and Use Process window. In the Ensure file post-exists box type
$path\$file.gl. - Click New again. Press the Cmds button and select Executable. Locate glview.exe (look in C:\Valve\Steam\SteamApps\username\sourcesdk\bin\ep1\bin\glview.exe) and Open it. In the Parameters box type
-portals $path\$file.gl. Enable Use Long filenames and Use Process window. - In the Compile/run commands box, make sure both items are checked. Also check Run with visible objects only.
When "GL View" is set up, it can be accessed through the Advanced run menu by selecting it from the drop-down list and clicking Go!. To get back to your regular compiling, click the Normal button. (Or you can set it up to do it from the Advanced dialog, but doing so is beyond the scope of this article.)
If successful, a strange window called "Camera View" should appear, with black/gray/white contents. This is glview showing you what your level looks like when the BSP program is done with it. You can use the WASD keys and the mouse to move around. By the way, use the Esc key to close glview; otherwise it might crash. Spend some time zooming around your level. Ignore the different shades of gray--they are not important. The white lines are the important part. You can control visibility of these lines by using L and B keys.
See also
| |||||||||||||||||||||||||||||

