L4D Level Design/Finale Events Part 3: Difference between revisions
No edit summary |
Thunder4ik (talk | contribs) m (→top: Unicodifying, replaced: [[Image: → [[File: (12)) |
||
| (6 intermediate revisions by 4 users not shown) | |||
| Line 1: | Line 1: | ||
{{lang|L4D Level Design|Finale Events Part 3}} | |||
{{L4D level intro menu}} | {{L4D level intro menu}} | ||
| Line 17: | Line 19: | ||
Change the '''Seconds to reach FOV target''' to 0. This is the time it takes to transition from the normal FOV (which is 90) to the new one. | Change the '''Seconds to reach FOV target''' to 0. This is the time it takes to transition from the normal FOV (which is 90) to the new one. | ||
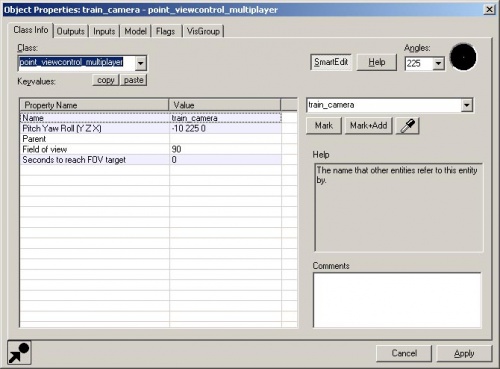
[[ | [[File:l4d_hammer_outro_01.jpg|thumb|left|500px|caption|The point_viewcontrol_multiplayer properties.]]{{clr}} | ||
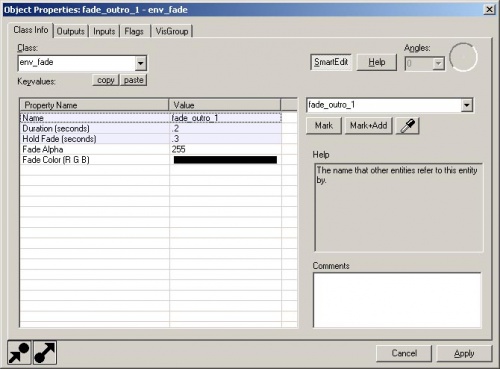
[[ | [[File:l4d_hammer_outro_02.jpg|thumb|right|500px|caption|The env_fade properties for the first fade.]] | ||
Go back to the '''Entity Tool''' and select "env_fade" from the '''Objects''' list. | Go back to the '''Entity Tool''' and select "env_fade" from the '''Objects''' list. | ||
| Line 33: | Line 35: | ||
{{clr}} | {{clr}} | ||
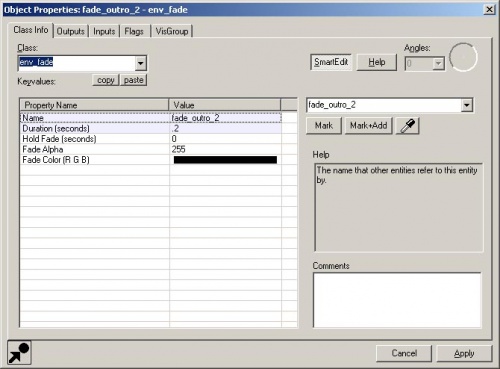
[[ | [[File:l4d_hammer_outro_04.jpg|thumb|right|500px|caption|The env_fade properties for the second fade.]] | ||
Place a second env_fade (or you can duplicate fade_outro_1) and change its properties: | Place a second env_fade (or you can duplicate fade_outro_1) and change its properties: | ||
| Line 42: | Line 44: | ||
{{clr}} | {{clr}} | ||
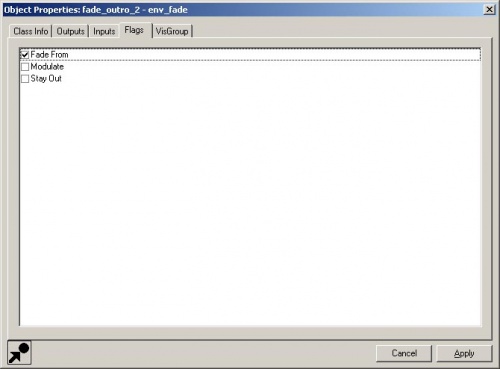
[[ | [[File:l4d_hammer_outro_05.jpg|thumb|right|500px|caption|The Flags tab for the second fade.]] | ||
Switch to the '''Flags''' tab. | Switch to the '''Flags''' tab. | ||
| Line 52: | Line 54: | ||
{{clr}} | {{clr}} | ||
[[ | [[File:l4d_hammer_outro_06.jpg|thumb|right|500px|caption|The Outputs tab for the first fade.]] | ||
Go back to the fade_outro_1 env_fade and switch to the Outputs tab. | Go back to the fade_outro_1 env_fade and switch to the Outputs tab. | ||
| Line 66: | Line 68: | ||
{{clr}} | {{clr}} | ||
[[ | [[File:l4d_hammer_outro_03.jpg|thumb|right|500px|caption|The Outputs tab for the train_continue_relay.]] | ||
Go back to the "train_continue_relay". Open it and switch to the '''Outputs''' tab. | Go back to the "train_continue_relay". Open it and switch to the '''Outputs''' tab. | ||
| Line 89: | Line 91: | ||
Now, we need to add a fade to black when the train is leaving. | Now, we need to add a fade to black when the train is leaving. | ||
[[ | [[File:l4d_hammer_outro_07.jpg|thumb|right|500px|caption|The env_fade properties for the third fade.]] | ||
Place another <code>env_fade</code> (or duplicate "fade_outro_1") and open up its properties. | Place another <code>env_fade</code> (or duplicate "fade_outro_1") and open up its properties. | ||
| Line 99: | Line 101: | ||
{{clr}} | {{clr}} | ||
[[ | [[File:l4d_hammer_outro_08.jpg|thumb|right|500px|caption|The Flags tab for the third fade.]] | ||
Switch to the '''Flags''' tab. | Switch to the '''Flags''' tab. | ||
| Line 111: | Line 113: | ||
Once the screen fades, it kind of ruins the effect to still see instructor messages. Let's place an info_game_event_proxy to disable the instructor messages. | Once the screen fades, it kind of ruins the effect to still see instructor messages. Let's place an info_game_event_proxy to disable the instructor messages. | ||
[[ | [[File:l4d_hammer_outro_09.jpg|thumb|right|500px|caption|The info_game_event_proxy properties to cancel all game instructor messages.]] | ||
Go to the '''Entity Tool''' and select "info_game_event_proxy" from the '''Objects''' list. | Go to the '''Entity Tool''' and select "info_game_event_proxy" from the '''Objects''' list. | ||
| Line 125: | Line 127: | ||
{{clr}} | {{clr}} | ||
[[ | [[File:l4d_hammer_outro_10.jpg|thumb|right|500px|caption|The env_outtro_stats properties.]] | ||
There's also an entity we can place called "<code>env_outtro_stats</code> to display the end credits where the stats are shown for the campaign. | There's also an entity we can place called "<code>env_outtro_stats</code> to display the end credits where the stats are shown for the campaign. | ||
| Line 137: | Line 139: | ||
{{clr}} | {{clr}} | ||
[[ | [[File:l4d_hammer_outro_11.jpg|thumb|right|500px|caption|The Outputs tab for the train_end_relay.]] | ||
Go back to the "train_end_relay" and open its properties. | Go back to the "train_end_relay" and open its properties. | ||
| Line 165: | Line 167: | ||
Save and compile with {{key|F9}} to test your outro. | Save and compile with {{key|F9}} to test your outro. | ||
[[ | [[File:l4d_hammer_outro_12.jpg|thumb|right|500px|caption|The Survivors have escaped!]]{{clr}} | ||
{{NavBar| | {{NavBar|L4D Level Design/Finale Events Part 2|L4D Level Design Basics Tutorial|L4D Level Design/Additional Finale Components}} | ||
[[Category:Left 4 Dead]] | [[Category:Left 4 Dead]] | ||
[[Category:Left 4 Dead 2]] | |||
[[Category:Level Design]] | [[Category:Level Design]] | ||
Latest revision as of 09:41, 8 January 2024
The Outro is when the survivors escape the finale. Typically, the camera switches from first person to somewhere to watch the vehicle move out of the area.
Let's start by placing the camera.
Go to the Entity Tool and select "point_viewcontrol_multiplayer" from the Objects list.
Position the camera so that it's where you want to show the escape from.
Open up its properties.
Change the Name to "train_camera".
You can also change the Field of view field. The Field of view will be tighter with a smaller number and wider with a larger number.
Change the Seconds to reach FOV target to 0. This is the time it takes to transition from the normal FOV (which is 90) to the new one.
Go back to the Entity Tool and select "env_fade" from the Objects list.
Open up its properties and change:
- Name: "fade_outro_1"
- Duration (seconds): "0.2"
- This is the time it will take the screen to fade.
- Hold Fade (seconds): "0.3"
- This is the time it keeps the fade.
Place a second env_fade (or you can duplicate fade_outro_1) and change its properties:
- Name: "fade_outro_2".
- Duration: "0.2"
Switch to the Flags tab.
Check the Fade From box.
This will fade the screen back the game from black.
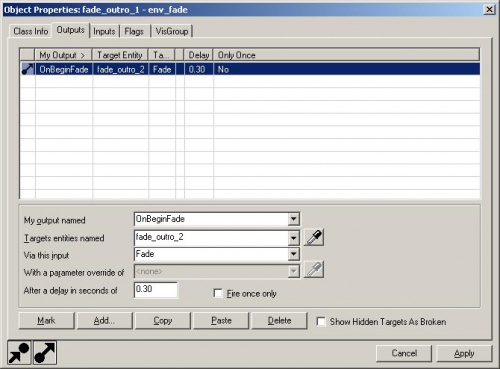
Go back to the fade_outro_1 env_fade and switch to the Outputs tab.
Add an output with the following:
- My output named: "OnBeginFade"
- Targets entities named: "fade_outro_2"
- Via this input: "Fade"
- After a delay in seconds of: "0.30"
This will start to fade the scene back from black 0.3 seconds after "fade_outro_1" starts to fade. These two env_fade entities just fade to black and fade back very quickly.
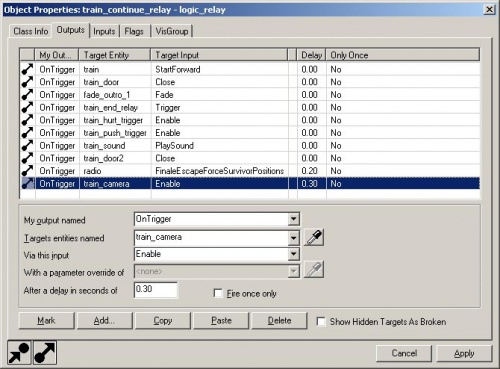
Go back to the "train_continue_relay". Open it and switch to the Outputs tab.
Add an output with the following:
- My output named: "OnTrigger"
- Targets entities named: "train_camera"
- Via this input: "Enable"
- After a delay in seconds of: "0.30"
This will change the players' views to the "train_camera" view.
Add another output with the following:
- My output named: "OnTrigger"
- Targets entities named: "fade_outro_1"
- Via this input: "Fade"
This will start the env_fade to black just before the outro camera starts so that the switch won't be jarring.
Now, we need to add a fade to black when the train is leaving.
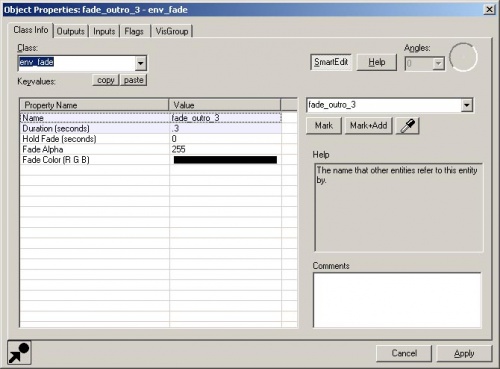
Place another env_fade (or duplicate "fade_outro_1") and open up its properties.
Change:
- Name: "fade_outro_3".
- Duration (seconds): "0.3"
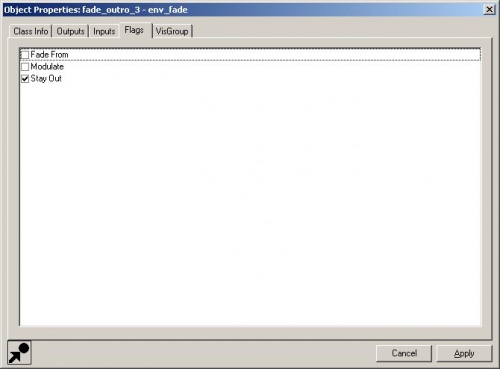
Switch to the Flags tab.
Check the Stay Out box.
This means that it will stay black once it fades to it.
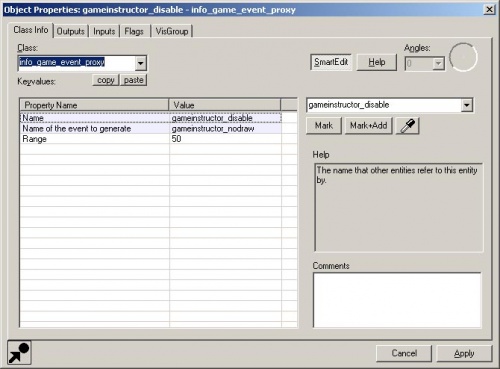
Once the screen fades, it kind of ruins the effect to still see instructor messages. Let's place an info_game_event_proxy to disable the instructor messages.
Go to the Entity Tool and select "info_game_event_proxy" from the Objects list.
Place it in the Camera viewport and open up its properties.
Change:
- Name: "gameinstructor_disable".
- Name of the event to generate: "gameinstructor_nodraw".
This is a string that's already set to not draw any instructor messages.
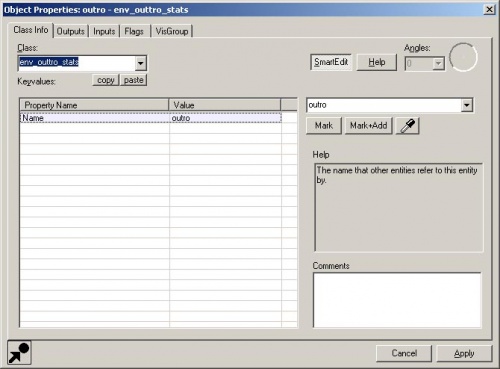
There's also an entity we can place called "env_outtro_stats to display the end credits where the stats are shown for the campaign.
Go to the Entity Tool and select "env_outtro_stats" from the Objects list.
Place it in the Camera viewport and open up its properties.
Change the Name to "outro".
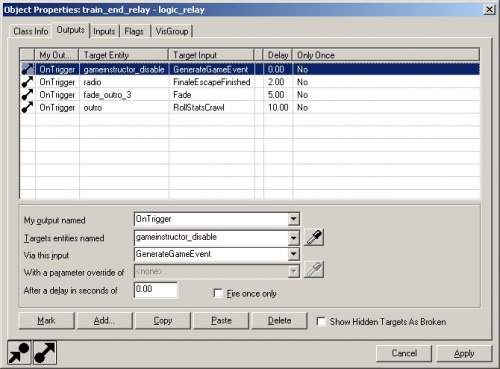
Go back to the "train_end_relay" and open its properties.
Switch to the Outputs tab.
Add the following outputs:
- My output named: "OnTrigger"
- Targets entities named: "gameinstructor_disable"
- Via this input: "GenerateGameEvent"
- My output named: "OnTrigger"
- Targets entities named: "fade_outro_3"
- Via this input: "Fade"
- After a delay in seconds of: "5"
- My output named: "OnTrigger"
- Targets entities named: "outro"
- Via this input: "RollStatsCrawl"
- After a delay in seconds of: "10"
Click on Apply and close the properties window.
Save and compile with F9 to test your outro.
