Territorial Control
This gametype is included in A Boojum Snark's Team Fortress 2 Gametype Library
The complete entity setup for this gametype is included in "A Boojum Snark's Team Fortress 2 Gametype Library," a downloadable VMF that includes all official Team Fortress 2 gametypes. The entities can easily be transferred from the VMF to your own custom map without the hassle of having to build it yourself or debugging it.
"A Boojum Snark's Team Fortress 2 Gametype Library" can be downloaded here: TF2Maps.net
TC maps, like Hydro, are the most complex of all, which is probably why there are few of them in circulation. (There are very few fan-made ones, and only one official one.) TC maps are also some of the most replayable map types, due to a long campaign composed of relatively short rounds and the different structuring of routes each game.
The main reference in learning to do this was a decompiled version of tc_hydro, obtained from TF2maps.net.
Laying Out the level
Mapping in general is outside the scope of this tutorial. It is assumed that you already know how to use Hammer and have one or two maps of other types under your belt. For beginners, it's recommended that you start with a CTF (Capture the Flag) type, as it's the easiest to set up.
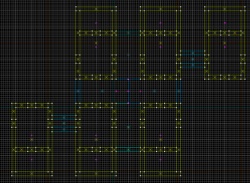
For this tutorial, we'll use a really basic map with six rooms and six spawn rooms, using the same arrangement as Hydro. It will have the same rules as Hydro:
- Each team has one home base, but these are only seen when the opposing team is on the verge of winning.
- Between the bases are four other zones, each with one control point. We'll call these A, B, C and D.
- Each team starts off owning the control points at their home base, plus two in the central area. BLU initially owns A and B, and RED initially owns C and D.
- The computer randomly selects two of the four central points that have different owning teams, and starts a round between those two points. During these rounds, each team must defend its single point while trying to capture the other team's single point.
- When one team controls all four central points, then a different type of round occurs. In this endgame round type, the losing team must defend its base from the winning team. These rounds can involve either control point A and the blue base (if RED is winning) or D and the red base (if BLU is winning). Although there are two control points in an endgame round, the point of the winning team is locked and cannot be captured.
- If the defending team in an endgame round successfully defends their point until time runs out, they gain possession of the neighboring point and play returns to the normal type of round.
- If the attacking team captures the base of the defending team, they win the game.
Each of the six large rooms will contain a single control point. The six smaller attached rooms will contain the associated spawn rooms. The left and right end rooms will be the bases, and the four interconnected rooms will host each of the six possible inner rounds.
Remember, just because there are four control points in the central zone doesn't mean there has to be six possible rounds played there (or ten for five points, fifteen for six, etc.). As you'll see later, you define which pairs of points can be involved in a round.
The Control Points
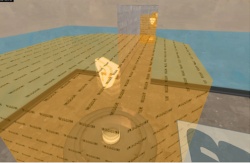
Next we'll place the base plates for each of the control points and give each one a unique name. Make them as a prop_dynamic with model cap_point_base.mdl and skin 0. In this example, the baseplates are named cp_baseplate_X where X is one of BLUE, A, B, C, D or RED.
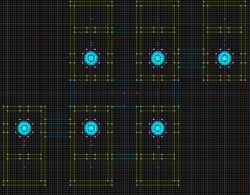
Then, on each baseplate, place a team_control_point entity. Give each a unique name (cp_BLUE, cp_A, cp_B, cp_C, cp_D, and cp_RED in this case), and give each one a unique index number. These indexes will be important for creating the map overview later. in this example we'll set them as: cp_BLUE = 0, cp_A = 1, cp_B = 2, cp_C = 3, cp_D = 4, and cp_RED = 5. You'll probably also want to set the Print Name property to something informative too—this gets displayed when a capture occurs, as in, "<PlayerName> captured <PrintName> for <Team>!"
For each of the four inner team_control_point entities, add two output events. On event OnCapTeam1, set the skin of the associated baseplate to 1, and when OnCapTeam2 occurs, set the skin to 2. This just changes the color of the light at the center of the baseplate to reflect the owning team.
Set the default owner to blue for cp_BLUE, cp_A and cp_B, and red for cp_C, cp_D and cp_RED. You should also enable "Warn on capture" for all of them, so that people will notice when a cap starts.
Now select the texture tools/toolstrigger. For each baseplate, draw a brush around it with this texture and then bind the brush to func_capturezone. Give each a unique name—for example, cap_trigger_BLUE, cap_trigger_A, and so on. These are the zones that players must enter to capture a point. DO NOT select them all and then bind to func_capturezone, because that will group them to a single entity; we want a separate entity for each capture point. Set the associated control point of each to the name of the team_control_point entity inside it.
Spawn Rooms
Since the map presented here is only an example, each is just a func_respawnroom brush textured with tools/toolstrigger, with an info_player_teamspawn inside. Normally you should have 12-16 spawn points inside, all with the same properties.
You don't need to name any of these unless for other purposes. All you have to do is open the properties for each of the info_player_teamspawn entities and set its associated control point to the name of the team_control_point that you want to belong with this spawn room. The game will automatically assign that spawn room to the team that owns that point at the start of a round that involves that point.
When testing your map, you may see some warnings on the console to the effect that some of your spawn rooms cannot find spawn points inside themselves.
Entities
This is something that is completely up to you. You can have the entities in any place in the map you'd like, wherever makes the job easier.
Notes
Add a team_control_point_master entity and call it cp_master. You don't have to change any values on this one; it just exists to trigger Sudden Death when time runs out.
Timers and Special Win Conditions
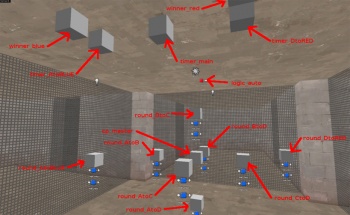
We need a round timer to prevent them from going on forever. And because of the particular rules regarding the base defense rounds, we'll want special round timers for those, as well as special rules for winning the rounds. So create three team_round_timer entities and call them timer_main, timer_AtoBLUE, and timer_DtoRED. These latter two will be the special ones. Note my naming convention that anything associated with a round contains the pattern FOOtoBAR, where FOO and BAR are the two control points involved in the round. Hydro uses a similar convention.
For the special win rules of the defense rounds, create two game_round_win entities and call them winner_blue and winner_red. For winner_blue, set Team to Blue and on the other one, set Team to Red. For both, set Force map reset to No, because we want to treat it as if the team that was on the defensive is now fighting back and has to reclaim the middle ground.
For timer_main, set the timer length to 480 seconds (this is just the length of the inner rounds from Hydro). Add one event: OnFinished cp_master.SetWinner(0). This triggers Sudden Death when time runs out.
For timer_AtoBLUE, set a timer length (Hydro uses 300 here; the defense rounds are shorter than the normal ones). Add two output events: OnFinished winner_blue.RoundWin, and OnFinished cp_A.SetOwner(3). The first will trigger blue to win the blue base defense round when the timer runs out, and the second will give blue ownership of control point A so they have a foothold in the middle ground again. Set up timer_DtoRED similarly, with the events going to winner_red and cp_D instead.
Note you can cut and paste events in Hammer, but be careful when doing so—sometimes when you paste events and then change their targets, the changes don't really take effect. After setting up an entity, it's a good idea to click away and then come back to verify that the events and properties are set up the way you intended.
Round Controls
That takes care of everything but the round controls themselves. Now for each round, add one team_control_point_round entity and two logic_relay entities. In the screenshot above, you can see that we've grouped the logic_relays below their associated round control. The logic_relays are perhaps not really necessary, but they help simplify things by encapsulating all the events associated with the start or end of a round, as you'll see.
In this map, as in Hydro, there are a total of eight round controls. The six normal rounds are called round_AtoB, round_AtoC, round_AtoD, round_BtoC, round_BtoD, and round_CtoD. As you can see these represent all possible combinations of two control points from the inner four. It is not necessary to cover all possible combinations though. If you don't want to create paths for all of them you can leave some out, so long as there is a possible route between the red and blue bases through all the rounds.
The other two rounds are the special defense rounds called round_AtoBLUE and round_DtoRED. We'll discuss how these differ from the normal inner rounds later.
The two logic_relay entities associated with each round name round_X_start and round_X_end, where X is AtoC, AtoBLUE, etc. More on these later, but they're basically just event forwarders used to control path blockers and signs.
Let's look at the properties for a normal round, round_AtoB. Priority is 20—this is an arbitrary number greater than zero. This controls the random selection of rounds in the inner area. All six normal rounds set to a priority of 20, which means the server can select any of the six that has at least one control point owned by each team.
Next, the Control points in this round property. For round_AtoB, set this to "cp_A cp_B" without the quote marks. Also note it's a space separating the names of the control points. Each of the rounds has a different pair of control points, and you should be able to figure out how to set them up. Note that a round need not have two control points—you could make variations of this map type with any number of control points per round. The default winning condition for a round is that one team controls all the involved points, but you can add other winning conditions too. That is left as an exercise for the reader.
Now, each normal round has six output events. Actually it has more, but as mentioned before we're using logic_relay entities to simplify things. Here's a list of the events for round_AtoB. You can figure out how to set them up for the other five normal rounds; cut-and-paste and modify accordingly (and double-check your modifications).
- OnEnd round_AtoB_end.Trigger
- OnStart round_AtoB_start.Trigger
- OnStart tf_gamerules.SetRedTeamGoalString("Capture the enemy's single control point while defending yours!")
- OnStart tf_gamerules.SetBlueTeamGoalString("Capture the enemy's single control point while defending yours!")
- OnWonByTeam1 timer_main.Pause
- OnWonByTeam2 timer_main.Pause
The first two events go to the forwarders, which will be described below. The next two set the messages that are displayed to the players when the round starts. Unfortunately in an arrangement like Hydro you can't know for sure which team is starting from which control point (for example, round_AtoB could start with either red or blue owning A), which means you can't make the messages specific to the control points. The last two events just stop the countdown timer when the round is won, to prevent accidentally triggering Stalemate or Sudden Death.
Round setup and teardown
Now let's talk about the two logic_relay entities associated with this round. As mentioned before, they just exist to forward events and simplify the event list of the round entity itself. round_AtoB_start is responsible for setting up all the entities, doors, blockers, signs and so on for round_AtoB. This means sealing off paths to the other control points or disabling them so they don't interfere, setting up the signs that direct players to the control points, changing the colors of other signs to reflect ownership, and so on. The other logic_relay, round_AtoB_end, undoes some of these changes when the round ends. It doesn't need to undo all of them; just the things that would otherwise have to be taken care of multiple times by the "_start" relays of other rounds; use your judgement to minimize repetition of events.
Here are the output events of round_AtoB_start. All of these are activated by OnTrigger, so we'll omit that part.
- timer_main.SetTime(480) - Resets the timer for this round.
- timer_AtoBLUE.ShowInHUD(0) - Controls which timer players see.
- timer_DtoRED.ShowInHUD(0) - Controls which timer players see.
- timer_main.ShowInHUD(1) - Controls which timer players see.
- timer_main.Resume - Starts the timer for this round.
- brush_AtoB_disable.Disable - Removes obstructions that would hinder this round.
- brush_AtoB_enable.Enable - Adds obstructions that prevent players from going to areas not relevant to this round.
The timer events should be pretty obvious. The ShowInHUD business is only needed for this map because we have more than one round timer, so each round needs to make sure the right timer is displayed and the other timers are not displayed.
The last two events, referencing brush entities that haven't been described yet, deserve more explanation. This is a pattern copied from Hydro. If you want to block off a hallway to cut off access to other areas during this round, create a brush that blocks the hallway, bind it (CTRL-t) to func_brush, and give it the name brush_AtoB_enable. You can give any number of brushes the same name. There is nothing magic about the name itself; it's just so that this logic_relay can send all those brushes the Enable event, which causes them to appear. Similarly, the other event causes all brushes named brush_AtoB_disable to disappear. And as you would expect, the round-end relay does the opposite. Here are the OnTrigger output events of round_AtoB_end:
- brush_AtoB_enable.Disable
- brush_AtoB_disable.Enable
You can set up similar events from these relays to enable and disable props and signs, change the skins on signs and so on. We will not be going into detail describing how to place all these blocking brushes in the example map; you can see that for yourself, and there are many different possible places to put them anyway.
One thing to notice about all these enable and disable brushes: You can't give a func_brush more than one name. That means if multiple rounds want to control whether a given path is open, you either need to have multiple brushes that can block that path (one for each interested round), or else give the blocking brush for that hallway a special name and add extra enable/disable events to the interested rounds. There is a direct trade off here between proliferation of events and proliferation of brushes. For the example map, we're keeping the number of events to a minimum and let the brushes proliferate, which seems to be the choice made in Hydro.
Defense Rounds
We're almost done! After you've generalized the above to set up all your normal rounds, all that's left is to set up the two special defense rounds round_AtoBLUE and round_DtoRED. We'll describe only how these differ from the inner rounds.
First, both defense rounds have a lower priority: 10. This ensured they won't occur until one team owns all the inner control points. If round_AtoBLUE had a priority of 20 (same as the six inner rounds), then this round could occur as soon as red gains control of A. We don't want that to happen, hence the lower priority. No priority-10 rounds can be played until all the control points referenced by priority-20 rounds are owned by one team.
Second, these rounds reference the special timers. Instead of calling Pause, Resume, and SetTime on timer_main, round_AtoBLUE and its relays call timer_AtoBLUE and similarly round_DtoRED uses timer_DtoRED. Of course the ShowInHUD arguments also differ so that the appropriate special timer is displayed instead of the main one. You can figure that out easily enough.
Third, the goal strings are also different. For the AtoBLUE round, set BLU's goal string to "Defend your base from the enemy!" and RED's to "Capture the blue base!" and switch these two around for the DtoRED round.
Fourth, the logic_relays for AtoBLUE and DtoRED have some extra events to implement the special control point rules for these rounds. The special rules are that although there are two control points involved and each team starts out owning one of them (as in the normal rounds), the point belonging to the team on offense is locked. So the team on offense doesn't need to defend, and the team on defense only has to defend; if they successfully defend until time runs out, then they automatically gain control of the locked contol point. If the team on offense captures the unlocked control point, they win the game - but this part is automatic since this means that team owns all of the control points in the map.
Here are the extra events for the round_AtoBLUE_start relay:
- OnTrigger cap_trigger_A.Disable - Prevents capturing A by disabling the trigger zone brush.
- OnTrigger cap_trigger_A.SetTeamCanCap(3 0) - Marks A as locked. Note that's "3 0" and not 30.
And conversely the extra events for round_AtoBLUE_end:
- cap_trigger_A.Enable - Restores the trigger zone brush.
- cap_trigger_A.SetTeamCanCap(3 1) - Unlocks control point A.
Note that ownership of control point A is given to BLU by the round timer and not by the logic_relay. That's because the logic_relay is always fired at the end of the round regardless of who wins, whereas the timer event only occurs if the defending team wins.
Applying this information to set up the DtoRED round should be trivial. One difference is that the "3 0" and "3 1" arguments to SetTeamCanCap should be "2 0" and "2 1" instead. This is because entity TeamNum values consider RED to be
Done!
And that's it! We now have a functional Territory Control map, though to really complete the experience (other than finishing the decoration etc), you might want to add an overview map—see the relevant section below.
Build your map and test it. You can test a map of this type with a single player—just pick Scout to speed up captures, and try all possible combinations of wins and losses by switching teams between some captures.
There is one interesting minor bug here which also occurs on Hydro. If a team successfully defends their base and wins ownership of the neighboring point, then at the beginning of the next round, they can still trigger the "capturing" sound effects of that point even though they already own it. This doesn't affect gameplay.
The example map will be attached to this article below. If you run into trouble creating your own TC map, refer to this one for entity properties. Or, if you're just starting, use the example as a base for your own map.
Similar Map Types
Creating a linear, bidirectional tug-of-war map is actually a simplification of the TC case; given the map we've developed so far, it's just a matter of deleting rounds AC, AD and BD, increasing the priority of round BC, and replacing some dynamic blockers with static walls. The result is a linear back-and-forth game like a combination of 5CP and multi-stage Attack/Defend, with the control points being taken a pair per round. Another example map with this style of play will be attached below.
The Overview Map
One thing missing from the map developed for this tutorial is the overview image that is displayed between rounds in Hydro. At the end of each round, an overhead diagram of the entire map is displayed, with the current ownership of each of the control points, and a pair of arrows then shows which control points will be involved in the next round.
If you want to release your TC map, you may want to draw up a map yourself of the general shape of your level in the same chalk style as the hydro map. You may have some trouble getting the registration of the map right against the blackboard background that the game displays. You'll also need to create information to show the status displays of the control point ownership and the arrows showing which round would be played next.
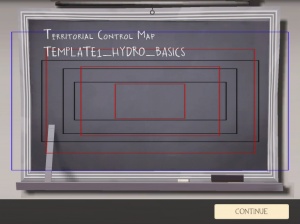
Here's how the registration of the image works: The blue rectangle is the outline of a 1024x1024 texture. Inside it there are black rectangles of 800x600, 640x480 and 560x280, and red squares of 768x768, 512x512 and 256x256. As you can see, the overview of your map should occupy approximately the 800x600 sub-region of the texture, plus a bit at the bottom, minus a bit at the top where the title is displayed and a bit at the lower right where the ruler is. Don't mean make the texture 800x600, because that won't work on some graphics cards. Keep it square (1024x1024 is preferable) but make most of it transparent except for this proportional sub-area. You can find instructions for converting your .tga file into a .vtf and creating the accompanying .vmt in the Material Creation article.
Now, to tell the game where your control points are, create a <mapname>.res file in resource/roundinfo (create the directory if it doesn't exist) and fill it in like this:
"roundinfo/tc_template1_hydro_basics.res"
{
   "cp_BLUE"
   {
       "x"     "143"
       "y"     "211"
   }

   "cp_A"
   {
       "x"     "259"
       "y"     "211"
   }

   "cp_B"
   {
       "x"     "259"
       "y"     "140"
   }

   "cp_C"
   {
       "x"     "373"
       "y"     "211"
   }

   "cp_D"
   {
       "x"     "373"
       "y"     "140"
   }

   "cp_RED"
   {
       "x"     "488"
       "y"     "140"
   }
}
To figure out the coordinates to put in, make a copy of your .tga file in your favorite image editor and scale it to 560x280. I don't know why that size, but that's what is specified in the hydro.res file. Then find the coordinates in the scaled image of each of your control points, and plug them into the .res</t> file. You must list the control points in the .res file using the same names you gave them in the editor, AND they must be listed in order of ascending index—so cp_BLUE is first in this example, because it has index 0, and cp_RED is last because it has the highest index, 5.
You do not need to give coordinates for the round arrows; the game can figure them out from the control point coordinates.
Finally you'll want to bundle all this up into distributable form. The example files are just loose files in a .zip, but it's probably better to roll everything into a single .bsp file using a program like bspzip or pakrat.
