Creating a Material
This tutorial is a step-by-step guide to creating a brand new material, including the creation of the material's texture.
Creating a Texture
Any image file can be used as a texture, so long as both of its dimensions (height and width) are a power of two (1, 2, 4, 8, 16, 32, 64, 128, 256, 512, 1024, 2048, 4096). To decide which to use, examine existing textures that fill the same role as yours. Higher resolutions lower performance but make an image sharper when viewed up close.
Different classes of object have different standard resolutions (e.g. character models' are very high). Check Valve's choices in hl2_textures_dir.vpk (from Half-Life 2) with GCFScape or VPKEdit if you are ever confused.
Converting the Texture
Textures must be converted to the Valve Texture Format before Source can use them. The tool Valve provides for this is VTEX. It's a command line tool with quite a few limitations, so the third-party tool ![]() VTFEdit (or
VTFEdit (or ![]() VTFEdit Reloaded) is preferable: it provides a graphical user interface, allows you to change a texture's properties without re-compiling it from scratch, accepts a wide range of image formats, and doesn't require the creation of script files for every texture. There are a handful of situations where you'll need to fall back on VTEX… but only a handful. Also, if you have textures that use transparency, it is recommended that you save them in TIFF format before importing to VTFedit as PNG transparency tends to have problems.
VTFEdit Reloaded) is preferable: it provides a graphical user interface, allows you to change a texture's properties without re-compiling it from scratch, accepts a wide range of image formats, and doesn't require the creation of script files for every texture. There are a handful of situations where you'll need to fall back on VTEX… but only a handful. Also, if you have textures that use transparency, it is recommended that you save them in TIFF format before importing to VTFedit as PNG transparency tends to have problems.
(There are VTF plug-ins that let you save to the format directly from Photoshop, GIMP, and Paint.NET, but this tutorial will not cover them as not everyone uses those tools.)
To import your texture with VTFEdit, use File > Import or press Ctrl+I. Select your image and you will be presented with the import screen:

General settings
These settings are the most important. There are three:
- Normal format
- The color/compression format should be used if the texture is opaque.
- Alpha format
- The color/compression format should be used if the texture has an alpha channel.
- Texture type
- Importing more than one image determines what they will be used as (animation frames/cubemap faces/depth slices).
If you're making a plain and simple world texture you won't need to change any of these. If you're making a texture with fine gradient detail however, you'll need to choose a non-lossy compression mode.
Mipmap settings
Mipmaps are low-resolution versions of a texture that swap in when a surface is far away from the camera. They greatly reduce the amount of texture resizing needed, improving both performance and image quality. Mips are required for texture LOD to work.
The following images demonstrate the various mipmap filters available in VTFEdit:
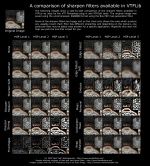
Sharpen filters
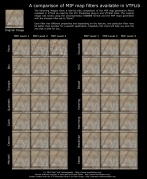
Mip filters #1
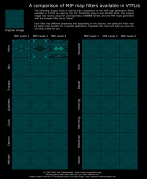
Mip filters #2
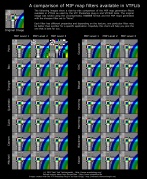
Mip filters #3
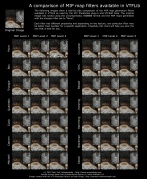
Mip filters #4


Normal map settings
These (mislabelled[How?]) settings allow you to automatically generate a bump map from your input image. You'll want to do this properly with an image editor for the material you ship, but the automated option is there if you want quick results or a base to work from.
Configuring and Saving
When you hit OK the input file is converted (there may be quite a lengthy pause for large images) and the output VTF appears. Now all that is left is configuring the texture with the options in the checkbox list on the left-hand side of the screen. See Valve Texture Format#Image_flags for descriptions of each.
Finally, save the file somewhere under your game or mod's \materials folder.
Creating a Material
Source doesn't access textures directly. Everything goes through a material.
Materials are script files that can be created in any text editor, but it's recommended that you use ![]() Notepad++ in conjunction with the community-made syntax highlighting rules. For your material to be detected, you must save it under your game or mod's
Notepad++ in conjunction with the community-made syntax highlighting rules. For your material to be detected, you must save it under your game or mod's \materials folder with the extension .vmt.
Syntax
A material file looks like this:
<shader>
{
	<parameter> <value>
	...
}
LightmappedGeneric
{
	$basetexture coast\shingle_01
	$surfaceprop gravel
}
There are many shaders to choose from, but most materials will use either LightmappedGeneric (brushes) or VertexLitGeneric (models). The third most common shader is UnlitGeneric, which is used for UI materials and the occasional tool texture. A full list of shaders can be found here.
Parameters
- For a list of all documented shader parameters, see Category:List of Shader Parameters.
With a shader chosen, you're onto parameters (also called commands). There are hundreds of options for what to put in a material so this article will only cover the most common, which are accepted by more or less all shaders. They are:
mat_reloadallmaterials command exists, it's not recommended to use it, since various artifacts may appear. mat_reloadtextures is presented, too, but it seems to be very buggy.
For instance:
mat_reloadmaterial combine_barricade_short01awill reload every single material in the filesystem named combine_barricade_short01a, including all the custom content. For example: both materials/models/props_combine/combine_barricade_short01a.vmt and materials/models/props_metal_barricade/combine_barricade_short01a.vmt will be reloaded. This may appear very useful when writing proxies.