Whether you are adding Scavenge support to an existing map or making a scavenge-only map, you will need to include each of the following elements:
- A "safe" starting area
- A generator (or other fuel-consuming device) with a pour spot for scoring points and a status indication
- Scavenge gas cans, weapons, and items placed throughout your map
- An info_director entity with scavenge outputs
Let's cover each in greater detail:
Starting area
Survivors begin scavenge matches at positions indicated by the info_survivor_position entity, so you'll need to place 4 of them and specify scavenge in the Game Mode entry.
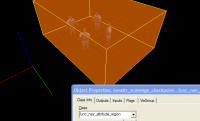
The func_nav_attribute_region volume
The starting area needs to be represented in your maps nav mesh, which is saved in the .NAV file. The easiest way to do this is placing a func_nav_attribute_region volume entity in your .VMF. This will apply the proper checkpoint attribute to the nav mesh when it is analyzed. You will want to make sure that your nav mesh is subdivided well enough so that it can accurately reflect the boundary of this volume.
Next, you'll need to place the visible boundary marker which survivors see at the start of each round. Start by making a solid that covers the starting region, assign it the no draw material, and make it hollow Tools > Make Hollow. This turns the solid into six. Now delete the top and bottom, leaving four short walls.
On the four inside surfaces, apply the material "effects/scavenge_boundary". The boundary should now be visible, but we need to make it non-solid as well. Select the 4 side boundary brushes and make them a func_brush entity.
Under properties, set solidity to "Never Solid". This specifies that they are not to affect collision in game. Since we need to delete the boundary when the match starts, we'll need to give it a target name. The standard for Valve maps is "brush_scavenge_boundary"
The only thing left for now is to add an
info_game_event_proxy set to generate an event named "
explain_scavenge_leave_area".
Generator
Next, let's place the generator and it's associated logic.
The new instance functionality makes this very easy. Simply create a new func_instance and point it to
Steam\steamapps\common\left 4 dead 2\sdk_content\mapsrc\instance\scavenge_generator.vmf
This is included in the L4D2 authoring tools and contains a fully functional generator including a glowing pour target, as well as lights that blink green, yellow and red based on the time remaining.
Of course, it need not be in an instance, you can copy and paste or make a prefab should you desire.
Cans and weapons and items
The standard scavenge level has 16 cans scattered around the arena. You can specify these locations by placing weapon_scavenge_item_spawn entities.
The standard for scavenge maps is to have weapons and items be consistent each time, so it's best to use specific weapon spawning entities when placing them. If your map supports other gamemodes, you'll want to spawn your scavenge weapons and items using a point_template which is activated by the info_gamemode entity when it detects that the map has been launched in scavenge mode.
At the same time, any
weapon_spawn and
weapon_item_spawn that are there for other gamemodes may not work properly. It's best to have them killed whenever a map loads in Scavenge using
info_gamemode.
info_director
The last bit is to add some outputs from the info_director.
Since there is only one in the map, and other gamemodes rely on it, you may need to be put in the main .VMF, not the scavenge instance.
Round start camera
A nice touch is to add a moving camera when the round starts. This can be done by creating a couple of point_viewcontrol_multiplayer entities and coordinating them with env_fade. See the example map:
Steam\steamapps\common\left 4 dead 2\sdk_content\DeadLine2\mapsrc\l4d_deadline02_scavenge.vmf
Testing scavenge mode
To load up a map in Scavenge mode, use the following console commands:
mp_gamemode scavenge (Does not function in l4d2)
map <your .BSP map filename> scavenge (This is the right usage)
This is a useful shortcut to avoid having to go through the main menu every time or if you haven't yet set up your add-on. You can similarly change the gamemode to "coop", "versus", and "survival", if you're testing a map with multi-gamemode support.
During normal play, a Scavenge server will shut down after a short time if there are not enough human players. When you are developing and testing your Scavenge maps, you'll need to disable this using the console:
sv_cheats 1
sb_all_bot_team 1
jointeam infected
z_spawn charger
The sb_all_bot_team prevents the timeout from happening if there is a team with only bots.
If you are testing your map from the lobby, and want to start a game with only one player, use this command:
ui_lobby_start_enabled 1
This enables the 'Start Game' button in multiplayer game lobbies (Scavenge and Versus) even if there is only one human player.
 注意: Test your nav-mesh! Although bots cannot score points, it's important that they be able to reach any spot that human players can.


