Zh/Working ladders: Difference between revisions
No edit summary |
No edit summary |
||
| Line 5: | Line 5: | ||
{{Finishtranslation}} | {{Finishtranslation}} | ||
在'''大多数'''{{src|4}}引擎制作的游戏中(伴有少数例外),游戏中一个由{{L|Prop|道具}}或{{L|Brush|笔刷}}组成的可见梯子模型会被玩家视作梯子,而在梯子模型前的不可见{{L|Entity|实体}}或{{L|Brush|笔刷}}则使其真正意义上可供攀爬。这使人认为玩家所爬之物为可见的梯子模型,而不是真正提供攀爬能力的不可见{{L|Entity|实体}}或{{L|Brush|笔刷}} | 在'''大多数'''{{src|4}}引擎制作的游戏中(伴有少数例外),游戏中一个由{{L|Prop|道具}}或{{L|Brush|笔刷}}组成的可见梯子模型会被玩家视作梯子,而在梯子模型前的不可见{{L|Entity|实体}}或{{L|Brush|笔刷}}则使其真正意义上可供攀爬。这使人认为玩家所爬之物为可见的梯子模型,而不是真正提供攀爬能力的不可见{{L|Entity|实体}}或{{L|Brush|笔刷}}。若要创建一个可见的梯子模型(要使其可供攀爬,请看下文“点实体梯子”或“笔刷梯子的部分”),你可以使用: | ||
* 一个具有梯子模型(例如<tt>models/props_c17/metalladder001.mdl</tt>)的{{ent|prop_static}}实体。 | * 一个具有梯子模型(例如<tt>models/props_c17/metalladder001.mdl</tt>)的{{ent|prop_static}}实体。 | ||
* 一个具有梯子纹理(例如<tt>metal/metalladder001a</tt>)的{{L|Brush}}。 | * 一个具有梯子纹理(例如<tt>metal/metalladder001a</tt>)的{{L|Brush}}。 | ||
一个梯子的攀爬系统的差异取决于不同{{src|4}} | 一个梯子的攀爬系统的差异取决于不同{{src|4}}引擎游戏的需要。为了给地图制作者及玩家提供更高的可控性,在{{hl2|2}}及{{hl2dm|2}}中的梯子与更早游戏中的梯子做出了差异,而在{{css|2}}、{{dods|2}}及大多数由{{src|4}}引擎制作的多人游戏中,梯子则与{{hl1|2}}、{{quake2|2}}中的梯子的使用方式更为相像。 | ||
{{clr}} | {{clr}} | ||
== | == 点实体梯子 == | ||
=== | ===创建可用的梯子=== | ||
:'' | :''在这些游戏中使用'' {{hl2series|4}}, {{sineps|4}}, {{dmmm|4}} | ||
为了创建可用的梯子,你必须确定玩家将从哪个位置上梯。此位置可用名为{{ent|func_useableladder}}的点实体来定义。(同时存在一个可能在较古早地图中碰见的{{ent|func_ladderendpoint}}点实体。) | |||
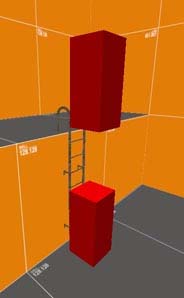
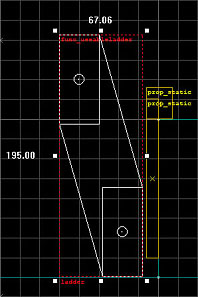
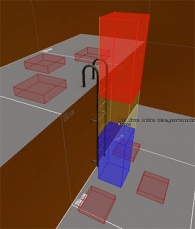
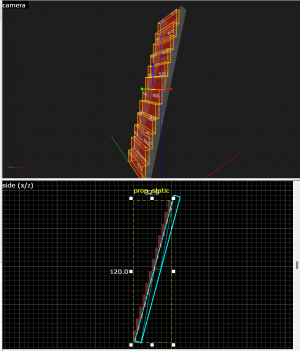
The <tt>func_useableladder</tt> entity can be divided into two sub-entities: a starting point and an ending point (''see Fig. 1a''). Their positions can be typed into the keyvalue fields, or more typically the ladder volume can be defined using the visual ladder tool, by dragging its center circle that is visible when the entity is selected (''see Fig. 1b''). Using this tool, you can drag the start and end points of the ladder into appropriate positions in the 2D view. The ladder's start and ending points may be of arbitrary orientation and length (''see Fig. 1c''). Simply pull the endpoints where you want them, and the player will move between these points while on the ladder. | The <tt>func_useableladder</tt> entity can be divided into two sub-entities: a starting point and an ending point (''see Fig. 1a''). Their positions can be typed into the keyvalue fields, or more typically the ladder volume can be defined using the visual ladder tool, by dragging its center circle that is visible when the entity is selected (''see Fig. 1b''). Using this tool, you can drag the start and end points of the ladder into appropriate positions in the 2D view. The ladder's start and ending points may be of arbitrary orientation and length (''see Fig. 1c''). Simply pull the endpoints where you want them, and the player will move between these points while on the ladder. | ||
Revision as of 19:31, 6 September 2025
You can help by finishing the translation.
If this page cannot be translated for some reason, or is left untranslated for an extended period of time after this notice is posted, the page should be requested to be deleted.
Also, please make sure the article complies with the alternate languages guide.
在大多数![]() 起源引擎制作的游戏中(伴有少数例外),游戏中一个由道具或笔刷组成的可见梯子模型会被玩家视作梯子,而在梯子模型前的不可见实体或笔刷则使其真正意义上可供攀爬。这使人认为玩家所爬之物为可见的梯子模型,而不是真正提供攀爬能力的不可见实体或笔刷。若要创建一个可见的梯子模型(要使其可供攀爬,请看下文“点实体梯子”或“笔刷梯子的部分”),你可以使用:
起源引擎制作的游戏中(伴有少数例外),游戏中一个由道具或笔刷组成的可见梯子模型会被玩家视作梯子,而在梯子模型前的不可见实体或笔刷则使其真正意义上可供攀爬。这使人认为玩家所爬之物为可见的梯子模型,而不是真正提供攀爬能力的不可见实体或笔刷。若要创建一个可见的梯子模型(要使其可供攀爬,请看下文“点实体梯子”或“笔刷梯子的部分”),你可以使用:
- 一个具有梯子模型(例如models/props_c17/metalladder001.mdl)的prop_static实体。
- 一个具有梯子纹理(例如metal/metalladder001a)的Brush。
一个梯子的攀爬系统的差异取决于不同![]() 起源引擎游戏的需要。为了给地图制作者及玩家提供更高的可控性,在
起源引擎游戏的需要。为了给地图制作者及玩家提供更高的可控性,在![]() 半衰期2及
半衰期2及![]() 半衰期2:死亡竞赛中的梯子与更早游戏中的梯子做出了差异,而在
半衰期2:死亡竞赛中的梯子与更早游戏中的梯子做出了差异,而在![]() 反恐精英:起源、
反恐精英:起源、![]() 胜利之日:起源及大多数由
胜利之日:起源及大多数由![]() 起源引擎制作的多人游戏中,梯子则与
起源引擎制作的多人游戏中,梯子则与![]() 半衰期、
半衰期、![]() Quake II中的梯子的使用方式更为相像。
Quake II中的梯子的使用方式更为相像。
点实体梯子
创建可用的梯子
为了创建可用的梯子,你必须确定玩家将从哪个位置上梯。此位置可用名为func_useableladder的点实体来定义。(同时存在一个可能在较古早地图中碰见的func_ladderendpoint点实体。)
The func_useableladder entity can be divided into two sub-entities: a starting point and an ending point (see Fig. 1a). Their positions can be typed into the keyvalue fields, or more typically the ladder volume can be defined using the visual ladder tool, by dragging its center circle that is visible when the entity is selected (see Fig. 1b). Using this tool, you can drag the start and end points of the ladder into appropriate positions in the 2D view. The ladder's start and ending points may be of arbitrary orientation and length (see Fig. 1c). Simply pull the endpoints where you want them, and the player will move between these points while on the ladder.
As you place the endpoints, make sure that you place them a couple of units away from the visible ladder brush (or any other brush or model), because if any four sides of the ladder volume are even touching against a surface of a brush or a model, this will make that part of the ladder volume unclimbable.
Dismounts
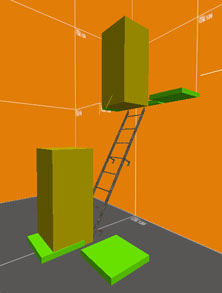
Along with the volume of movement, you can also provide dismount points for the ladder (see Fig. 2) to allow easier and more controlled dismounts. These points are marked using the info_ladder_dismount entity. While next to and facing one of these markers, the player can press his use key to dismount to the position of the marker (typically when ladders run between more than two floors). If he has reached one of the ends of the ladder, he can also simply walk off the ladder by facing one of the markers nearby and walking forward. You can use multiple info_ladder_dismount markers for each dismount place to provide more directions to exit the ladder in.
To avoid possible confusion between nearby ladders using different dismount markers, each info_ladder_dismount entity has a property value called LadderName, which can be used to contain the name of the ladder it belongs to.
Like the ladder volume, the dismount points must be free of obstruction and allow the player to stand at their position without intersecting solid world geometry.
In-game testing
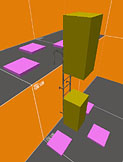
Once you have created your ladders, you can compile your map and test them. If you wish, you can also display the ladder entities in-game along with some debug information by opening the console and typing sv_showladders 1 to enable this, and then load or reload (by typing restart) the map you wish to view.
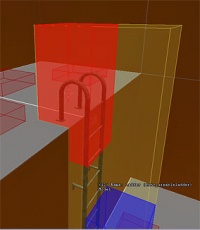
This will show you all the start and end points of the ladders (func_useableladder entities), as well as the dismount points (info_ladder_dismount entities; see Fig. 3a). It can also help you determine if these entities are set up properly if ladder entities are colliding with solid world geometry or the prop model of the ladder itself (see Fig. 3b).
How ladders work in-game
The safest way to mount a ladder is to approach its invisible ladder volume and, within reaching distance, press the use key. This will automatically position you on the ladder. (You can also walk into the ladder volume, with greater risk of missing it and falling down any holes.)
To dismount a ladder you can always either jump off or press your use key. If the ladder has info_ladder_dismounts, you can also simply walk off from its endpoints, and pressing your use key while next to and facing an info_ladder_dismount will also allow more controlled dismounts anywhere on the ladder.
Brush ladders
Object-brush–based ladders
- Used in:

 求生之路系列,
  反恐精英:起源,
  胜利之日:起源,
  Garry's Mod,
  Vampire: The Masquerade – Bloodlines,
  The Ship: Murder Party,
  黑山,
黑山,  半衰期:起源,
  Jabroni Brawl: Episode 3
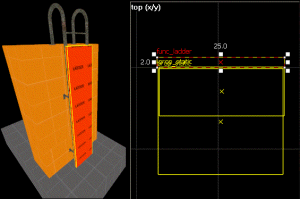
Create another brush in front of the object/brush you want to be climbable, as close as you can to it, but without touching it. Make sure that the face is the same width/height as the climbable object. Assign the material tools/toolsinvisibleladder to this brush, then tie it to an entity (via Ctrl+T). Select func_ladder from the Object Properties dialog. You now have a climbable face in front of the object/brush. While on a ladder in Counter-Strike: Source, your shooting accuracy will be significantly reduced.
Ladders can also be dismounted sideways. For example, climbing a ladder that dismounts to the left side of the ladder prop, as opposed to climbing over the func_ladder brush.
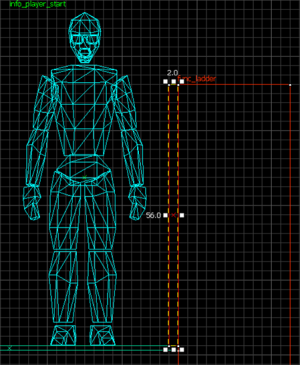
Those ladders should have the ladder brush extend about 56 units above the floor it will dismount to, but not touch any roof above the ladder.
If the func_ladder does not reach high enough, you cannot dismount onto the floor and fall down instead. If the func_ladder comes too close to a roof, or any solid prop above, the AI will stick to that roof/prop, because AI always climbs to the very top of a ladder and won't think about when dismounting makes most sense.
- Any texture can be used on func_ladder; VBSP automatically assigns ladder contents to func_ladder brushes. Any faces that would normally be rendered will still be visible in-game. (for example,
 ladders use the tools/toolsinvisible texture.)
 - Ladders that touch each other will be turned into one single ladder. If you need to block navigation on one ladder, it would block navigation on both ladders. Add gaps between ladders.
- Infected-only ladders in the

 求生之路系列 use the tools/climb_versus texture. Ladders that are accessible to both survivors/infected teams may simply use non-object brush based ladders. See also how to create ladders for the Left 4 Dead series.
Non-object brush-based ladders
This ladder type is set up and works in exactly the same way as object brush ladders, but it shouldn't be tied to a func_ladder entity, or it will make the ladder nonexistent in-game. To make it, create a brush in front of the object/brush you want to be climbable, as close as you can to it but without touching it.
Make sure that the face is the same width/height as the climbable object and then assign the material tools/toolsinvisibleladder to this brush. You now have a climbable face which is in front of the object/brush. No other setup is required for your ladder to work in game.
- Since tools/toolsinvisibleladder still cuts visleafs, make sure to tie the ladder brush to a func_detail or other brush entity.
- Leave at least a unit gap between the ladder and any detail brushes to prevent it from eating brush faces.
- Any brush texture can be made climbable by adding the
%CompileLaddercompile parameter. - toolsinvisibleladder and any other %CompileLadder material will make the entire brush act like a ladder, even if it is only on a single face of the brush. Other faces of the brush will still show their textures in game.
- If only one side of the brush should be climbable, then the ladder $surfaceprop can be used instead (tested in
 ; may not work in all games. Some games also have a woodladder $surfaceprop for different climbing sounds).
 - In games where non-object brush based ladders work, models with collision meshes can be made climbable like ladders by using the
$contents "ladder"QC command.
Brush-based ladder workaround
Some Source games do not support the standard ladder entity; however, it is possible to fake a ladder by creating a very narrow staircase.
To start off, make a prop_static and set the world model to models/props_c17/metalladder002.mdl or similar. You can also make a ladder prop out of brushes or use a ladder texture on a single brush face.
Next, create a brush 16 units high using a clip texture. Use the clip brushes to make a stack of blocks, making sure each higher block is one unit "behind" the lower one. The players will climb these 16-unit-high brushes as stairs. To keep them from going too far out once you reach the bottom select the no clip blocks group them and then compress them as long as the top step sticks out past where the prop ends and each block still has a small lip it will work just fine. There you have it—a good-looking, climbable ladder.
Video Showing how to create it: TF2 mapping: Ladders in TF2
Optimizing ladders
The ladder props, like every prop_static, default to using VPhysics for collision detection. This will provide more detailed physics collisions, but in some cases this might not be preferable. In multiplayer maps and very resource-demanding maps, using VPhysics props costs precious resources, and you might want to sacrifice good physics to avoid potential lag. Here are some good methods to minimize resource cost:
- If the ladder is for
 半衰期2 or
  半衰期2:死亡竞赛, and the ladder is straight, the best method depends on whether somebody is going to be able to shoot through the ladder. If they are not (like if the ladder is against a wall), you could simply change the Collisions keyvalue to "Use Bounding Box." If they are, you could change the keyvalue to "Not Solid" and place an invisible Clip brush to detect collision with it instead.
 - If you are creating a slanting ladder for
 半衰期2 or
  半衰期2:死亡竞赛, a bounding box will not rotate with the prop, and will obstruct the climbing system, in which case you are better off making the ladder prop Not Solid and place an invisible, rotated Clip- or Player Clip–textured brush alongside the ladder. Alternatively, if not using prop_static, you may turn off SmartEdit and set the prop's solid keyvalue to 3, which will cause it to use a properly-rotated version of the prop's bounding box.
 - If the ladder is for a
 反恐精英:起源 or
  胜利之日:起源 map, you could change the Collisions keyvalue to "Not Solid" and make the func_ladder brush cover the ladder prop, rotating it if necessary.
In multiplayer maps, it's also an understood expectation to be able to move freely parallel to the surface that a ladder covers. When it comes to brush based ladders, you can get away with turning the ladder brush into a non-solid func_brush to avoid players getting temporarily "stuck" against the side of the ladder, but when it comes to prop ladders, they often protrude from the wall too much to make a player standing inside one believable. In that case, you are probably better off using two Player Clip–textured wedges at the sides of the prop, guiding the player to the front of the prop.
If nothing else, you could turn a brush ladder into a func_detail to avoid unnecessary visleafs.
See also
- func_useableladder
- info_ladder_dismount
- func_ladder
- Brush ladders Tutorial on implementing Brush ladders for your Source Engine mod
