Pt-br/Adding Light: Difference between revisions
< Pt-br
Jump to navigation
Jump to search
No edit summary |
No edit summary |
||
| Line 4: | Line 4: | ||
{{First room menu}} | {{First room menu}} | ||
Agora vamos '''adicionar alguma iluminação''' à sala. Se nenhuma luz for colocada, o mapa será automaticamente iluminado “fullbright” quando for carregado no jogo, mas, como você deve ter notado, isso não é o ideal. A criação de luzes fará com que o mapa pareça muito mais realista. | |||
{{Note| | {{Note|Para ver a iluminação em um mapa que foi carregado anteriormente no jogo “sem” luzes, talvez você precise abrir o [[developer console]] e definir {{Command|mat_fullbright|0}}.}} | ||
# | # Ative a entidade {{hammer entity}} (as luzes também são entidades) e selecione {{ent|light}} em [[:File:Hammer picklight.jpg|the drop-down list in the Object Toolbar]]. Essa é a luz mais básica de todas e brilha em toda a volta a partir de uma fonte invisível. Coloque uma no centro do teto agora, clicando na visualização 3D:<p>[[File:Hammer placelight.png|400px|Colooque o {{ent|light}}.]]</p> | ||
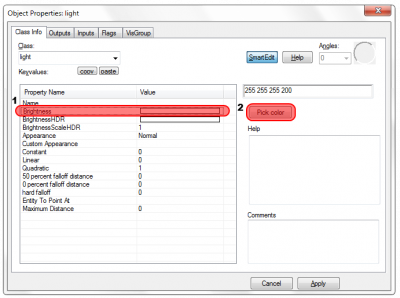
# | # Agora, vamos editar a cor e o brilho dessa luz. Volte para {{hammer select}} e, em seguida, clique duas vezes na entidade <tt>light</tt> na Vista 3D para abrir a caixa de diálogo Propriedades do Objeto. Para exibir as configurações do brilho da luz, localize e clique no campo <tt>Brilho</tt> na lista [[Keyvalue|Valor-chave]]. | ||
# While you could type a color into the new text box directly, it’s better to use Hammer’s built-in dialog by clicking the ''Pick color'' button, just beneath the text box:<p>[[File:Hammer pickbrightness.png|400px|Select the <tt>Brightness</tt> field, then click the ''Pick color'' button.]]</p> | # While you could type a color into the new text box directly, it’s better to use Hammer’s built-in dialog by clicking the ''Pick color'' button, just beneath the text box:<p>[[File:Hammer pickbrightness.png|400px|Select the <tt>Brightness</tt> field, then click the ''Pick color'' button.]]</p> | ||
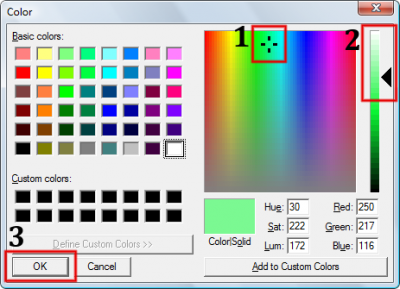
# The ''Color'' dialog will now appear, letting us change the color of the light. | # The ''Color'' dialog will now appear, letting us change the color of the light. | ||
| Line 18: | Line 18: | ||
# Now that we’ve made changes to the light’s parameters, hit the ''Apply'' button to commit them. The color of the light’s icon will change to the color you have selected for it. | # Now that we’ve made changes to the light’s parameters, hit the ''Apply'' button to commit them. The color of the light’s icon will change to the color you have selected for it. | ||
== | == Resultados == | ||
Ao compilar o mapa, você verá uma esfera de luz projetada nas paredes que é mais brilhante perto da sua entidade de luz e mais escura mais distante. Lembre-se de desativar o {{Command|mat_fullbright}} se necessário! | |||
No entanto, sua luz não terá uma fonte visual - ela simplesmente aparece do nada. Você poderá corrigir isso no próximo artigo. | |||
== | == Veja também == | ||
* [[Intermediate Lighting]] | * [[Intermediate Lighting|Iluminação intermediária]] | ||
* [[Advanced Lighting]] | * [[Advanced Lighting|Iluminação avançada]] | ||
=== | === Entidades de luz === | ||
* {{ent|light}} — | * {{ent|light}} — Uma fonte de luz básica omnidirecional. | ||
* {{ent|light_spot}} — | * {{ent|light_spot}} — Uma luz direcionada que brilha em um formato de cone. | ||
* {{ent|light_environment}} — | * {{ent|light_environment}} — O controlador para a luz global emitida de um [[skybox]]. | ||
* {{ent|light_dynamic}} — | * {{ent|light_dynamic}} — Uma fonte de luz dinâmica que pode ser alterada e movida no jogo. | ||
* {{ent|env_projectedtexture}} — | * {{ent|env_projectedtexture}} — Uma fonte de luz dinâmica como uma <tt>light_dynamic</tt>, mas que também pode projetar sombras dinâmicas adequadas. | ||
{{Navbar|Creating Brush Entities|Your First Map|Adding Prop Models}} | {{Navbar|Creating Brush Entities|Your First Map|Adding Prop Models}} | ||
Revision as of 18:41, 8 September 2024
This page needs to be translated.
This page either contains information that is only partially or incorrectly translated, or there isn't a translation yet.
If this page cannot be translated for some reason, or is left untranslated for an extended period of time after this notice is posted, the page should be requested to be deleted.
Also, please make sure the article complies with the alternate languages guide.
This page is actively undergoing a major edit.
As a courtesy, please do not edit this while this message is displayed.
If this page has not been edited for at least several hours to a few days, please remove this template. This message is intended to help reduce edit conflicts; please remove it between editing sessions to allow others to edit the page.
The person who added this notice will be listed in its edit history should you wish to contact them.
Agora vamos adicionar alguma iluminação à sala. Se nenhuma luz for colocada, o mapa será automaticamente iluminado “fullbright” quando for carregado no jogo, mas, como você deve ter notado, isso não é o ideal. A criação de luzes fará com que o mapa pareça muito mais realista.
mat_fullbright 0.- Ative a entidade Entity tool
 (as luzes também são entidades) e selecione light em the drop-down list in the Object Toolbar. Essa é a luz mais básica de todas e brilha em toda a volta a partir de uma fonte invisível. Coloque uma no centro do teto agora, clicando na visualização 3D:
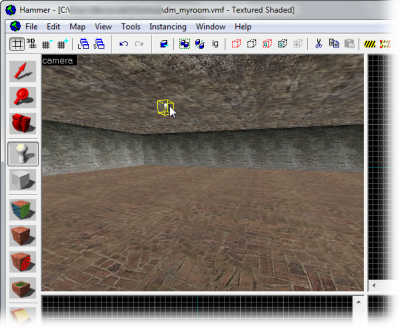
- Agora, vamos editar a cor e o brilho dessa luz. Volte para Selection tool
 e, em seguida, clique duas vezes na entidade light na Vista 3D para abrir a caixa de diálogo Propriedades do Objeto. Para exibir as configurações do brilho da luz, localize e clique no campo Brilho na lista Valor-chave.
 - While you could type a color into the new text box directly, it’s better to use Hammer’s built-in dialog by clicking the Pick color button, just beneath the text box:
- The Color dialog will now appear, letting us change the color of the light.
- Change the hue and saturation of the color by clicking in the square color spectrum area on the right.
- Because luminance is set to max, the color will still be white. Lower the luminance to change the color from bright white to something of the hue you picked. You can see how the color changes in the preview square at the bottom of the dialog to something more colorful, instead of white.
- Click the OK button to confirm your choice:
- We have now set the color of the light, but this has not affected its intensity. The color is described by the first three numbers of the Brightness setting, leaving the brightness value itself as the fourth number. Mark this number (currently 200) with the mouse, and enter
800instead, to have the light shine four times as intensely: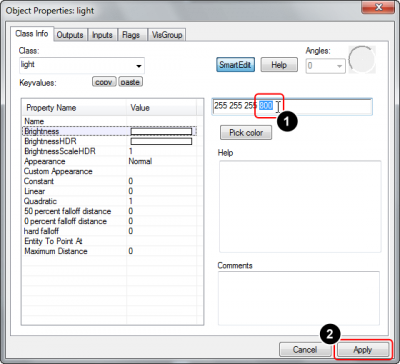
 Dica:If you want your light to shine in a different color under High Dynamic Range lighting, edit the BrightnessHDR or BrightnessScaleHDR settings. This is generally used to balance out the richer colors that HDR generates.
 - Now that we’ve made changes to the light’s parameters, hit the Apply button to commit them. The color of the light’s icon will change to the color you have selected for it.


Resultados
Ao compilar o mapa, você verá uma esfera de luz projetada nas paredes que é mais brilhante perto da sua entidade de luz e mais escura mais distante. Lembre-se de desativar o mat_fullbright se necessário!
No entanto, sua luz não terá uma fonte visual - ela simplesmente aparece do nada. Você poderá corrigir isso no próximo artigo.
Veja também
Entidades de luz
- light — Uma fonte de luz básica omnidirecional.
- light_spot — Uma luz direcionada que brilha em um formato de cone.
- light_environment — O controlador para a luz global emitida de um skybox.
- light_dynamic — Uma fonte de luz dinâmica que pode ser alterada e movida no jogo.
- env_projectedtexture — Uma fonte de luz dinâmica como uma light_dynamic, mas que também pode projetar sombras dinâmicas adequadas.