Intermediate Lighting
This tutorial will cover the more advanced lighting techniques used in ![]() Source maps. If you are new to lighting in Hammer, you may want to read the basic light tutorial first. To begin the tutorial all the possible ways to create light will be covered and then onto all the settings related to playing with lighting. This will then be followed by a set of more in depth mini articles on how to use and take advantage of the lighting you’ve been introduced to.
Source maps. If you are new to lighting in Hammer, you may want to read the basic light tutorial first. To begin the tutorial all the possible ways to create light will be covered and then onto all the settings related to playing with lighting. This will then be followed by a set of more in depth mini articles on how to use and take advantage of the lighting you’ve been introduced to.
Light entities
This is a list of entities that cast physical light in some form or another.
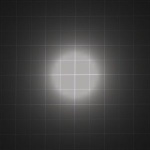
lightA static, invisible, omni-directional light source. Able to set up with patterns given effects but cannot move locations. Light is cast in all directions from the origin of the entity. The brightness depends upon the falloff values you set up. This light entity is the simplest of all lights and is used commonly. |
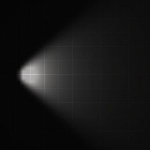
light_spotA static, directional form of the light entity. This light can be pointed in any direction and contains controls for the shape and properties of the light cone. It can also be turned on and off through the I/O system, though a switchable light_spot may cause lightmap errors. The controls of the light make it the easiest to mimic real-world light sources, and is recommended for common use. |
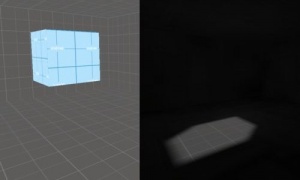
light_environment The skybox texture. A directional light cast in only one direction, commonly used for sunlight. The direction is decided by the values entered into the entity. The key is that the light is only cast from the If you don't want to come up with your own values for this entity, the values used in the Normally, only one light_environment entity is required per level. If multiple light_environment entities are placed, VRAD uses the keyvalues from the first found light_environment to calculate the lighting. |
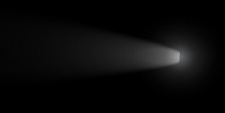
point_spotlight and npc_spotlightA straight beam of light used for a spotlight effect. The visual effects include a flare around the light source, a beam along the direction it’s pointing, and a light_dynamic where the beam touches the ground. While incapable of moving on its own, the light or its target may be tied to a moving entity. Alternatively, npc_spotlight can be used to produce the same visual effect while being controlled precisely and fluently by an NPC's intelligence. This dynamic lighting source is expensive to render and should be used sparingly. |
Related items
This is a list of all the topics related to lighting itself but don't emit light. While none of these emit any physical light they're all essential to creating effects with it. If it’s controlling the lighting of entities or controlling an antlion's shadow they all fall under lighting effects.
env_sunOften misinterpreted as a light that creates lighting like the sun it is instead an effect that places a flare in the sky that looks and acts like the sun. Casting no light at all it is often used with a light_environment to create its lighting effect. |
env_spriteOne entity that also does not cast light is env_sprite. Env_sprite is mainly used for light glows and even as glares and other various extreme glows. In |
shadow_controlUsed to control all the dynamic shadows cast within the game. Shadows cast by any movable object (such as NPCs and physics entities) fall into this category. Used to line up the shadows angles so they appear correct with lighting. The one-directional nature may be a problem, but the use of triggers to control it may help. In
Dynamic shadows do not blend well with subtle lightmap shadows.
See also info_no_dynamic_shadow. |
VRADIt is the part of the compiling process that will generate all your lighting effects, it’s also one of the longest parts of a compile and can often be the one you need to run the most. With no way to estimate lighting effects apart from experience, it can often be tiresome to compile enough time to get a lighting effect right. The topic of how to compile Rad well is tackled later. For now familiarization with its features and setup should be a priority. |
Techniques
This covers how to use the mentioned items to create effective lighting. Before, a lot of practical knowledge was covered. But knowledge is useless unless it's utilized well. The next few sections are specifics about how to use all the information to create better lighting in your maps.
Color temperature
While the RGB color of the Brightness setting of every light entity is preset to 255 255 255, very few forms of real life lighting are actually white in color. Depending on the "blackbody temperature" of the light emitted, it will emit a color somewhere between orange "red" (referred to as "warm", although its temperature is actually lower) and ultra violet "blue" (referred to as "cool"), as shown accurately on this scale. You can use this article as a reference to where on the scale your light source should end up, or you can use Valve map standards, where the RGB value for a common tungsten light bulb is a "warm" 254 216 146, a common fluorescent light is a "cool" 159 237 215, and usual Combine lighting is an icy 147 226 240.
Lighting psychology
It has been proven that cooler lighting in the "blackbody temperature" spectra (see above) will stress players, making them feel uneasy and sometimes even sick, while warmer lighting will not.
This subconscious emotional response to lighting can be utilized to deliver purposely lighted environments that will set the mood of the player. It can be as simple as choosing between using fluorescent lights (for horror settings) or glowing light bulbs (for safe environments).
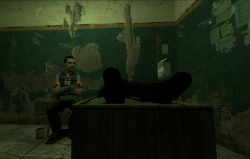
For instance, in the first map of ![]() Half-Life 2 there is a corridor that a civil protection guard will escort the player through when he is being brought in for interrogation (or what-not). Examination of the lighting will reveal that Valve has kept the psychological effects in mind while setting it. The corridor starts off with a standard tungsten lamp (with a warm glow), directly followed by a fluorescent light (with an uneasy glow). This combination is at most very rare in real life, because it would require that the architect would suddenly change his mind while designing the corridor, or the electrician running out of light fixtures. It is more likely that Valve (or the Combine) wanted to achieve the effect that one would be walking from a safe environment to an unsafe one.
Half-Life 2 there is a corridor that a civil protection guard will escort the player through when he is being brought in for interrogation (or what-not). Examination of the lighting will reveal that Valve has kept the psychological effects in mind while setting it. The corridor starts off with a standard tungsten lamp (with a warm glow), directly followed by a fluorescent light (with an uneasy glow). This combination is at most very rare in real life, because it would require that the architect would suddenly change his mind while designing the corridor, or the electrician running out of light fixtures. It is more likely that Valve (or the Combine) wanted to achieve the effect that one would be walking from a safe environment to an unsafe one.
In the cell before the one the player enters, he may bear witness to an unsettling scene involving a citizen explaining his predicament. Here there is a tungsten light hanging from the ceiling. This is probably because a fluorescent light would clash too much with the small, cubic room. (Fluorescent lights are usually used for corridors and large areas.) However, off to the side, is a disembodied light_spot, whose sole purpose is to provide the mood lighting for the scene.
Apart from the above direct effects, using color theory can also aid in setting the mood of the environment through indirect half subconscious association. Taking fluorescent lights as an example, they have a cold uneasy feeling in general, so the soft unnatural blue glow can conjure up feelings of cold emptiness and isolation.
The color isn't the only effect though. The spacing and brightness of the light and what isn't lit, carries much weight too. Bright rooms feel safer because what's there is directly visible and easy to work with, but on the other hand sporadically dotted lights will amplify or create an uneasy feeling because the user has so much hidden or not quite visible to them. Along the same lines, if every corner of a room is lit except one, that corner will be perceived as holding a potential threat, or other hidden stuff, and will therefore often draw the exploring players attention.
Using this knowledge is up to the level designer. Horror maps and kids games alike can be augmented by it, and accidentally creating a spooky kids game is a sure way to lose the pay check for the work. Lighting doesn't just make things be seen, it defines how they appear to everyone.
Creating a believable light source
Creating a believable light source can often be a challenge. Simply placing a light entity in a map does nothing to explain where that light came from or why it's there. A believable light source is one that appears like it should be there and sits comfortably within the environment. Often a good light is made up of multiple entities. Commonly there are two: One for the light and one for its source, often a lamp (made from a prop_static or a func_detail with an appropriate texture).
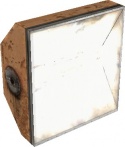
The first step is to determine what light sources are available. Look for textures or models that would be emitting light. Filtering by the word "light" or "lamp" in either the model or texture browser, works well. Now pick one that fits the feel of the room (i.e. industrial lights for an industrial scene) and place that model or texture in the room. For this example pick the light shown on the right and place it with a prop_static.
Now that there's something that looks like it would emit light, the next step is to create the light it's emitting. Look at the source that has been chosen and ask yourself if the light emitted is going to be colored by tinted glass, and if the source is focusing/shading the light into a directed light source. Use the assorted light entities and set its properties accordingly to create the effect. With the given example the light is going to be focused in one direction, so pick a light_spot. Next, this is an intense light, so give it a brightness of 1000. Now look at its color. The glass is not tinted, and while the light emitted is intense, a flood light in the real world will gain its intensity through using very reflective surfaces on its inside to focus the light, so the temperature is also close enough to justify leaving the values at 255 255 255. Now line it up compared to the prop_static, and alter the angles and focus of the light so that it appears to come from the prop_static.
Now there’s a light lined up to its source, there may be a problem though. If the aligned light source has ended up inside the boundaries of the model/brush used for the source, it is going to block the light emitted (only lighting up props). To prevent this, go into the properties of the prop_static, and make sure that it has "Disable shadows" set to "Yes". (If the light source is a brush, tie it to a func_brush and alter its properties in the same way. This prevent the light from being blocked by the light source itself.
Now that you have a working setup, a good idea is to group them (and perhaps also turn this group into a prefab for insertion into other maps) so that they always stay together. Now if you need more lights, you can copy this group.
Another way to create a high quality light source that portrays real life better but doesn't compromise on performance, is combination of a light and light_spot. Position the light_spot as described above, but position the light around 50 units away from the model that is the light's source. Make this light have a brightness of approximately 50, and be the same color as the light_spot. This will often create a more correct form of glow on surfaces that the light_spot often lacks.
Static versus dynamic
There are many advantages, performance wise, of using static light sources over dynamic ones. Static lights carry no additional processing weight so their use is essential to fast rendering maps. Dynamic lights can carry a lot of rendering weight and can be expensive to use in your map. Its important to know where and when to use each type of light and avoid using the wrong type.
Firstly, static lights are calculated during the VRAD compile process; therefore, there are next to no calculations done in-game—it merely needs to render the pre-calculated light, which is a fast process. The common static light entities are light, light_spot, and light_environment, but there are conditions that can change this. The problem that comes with static lights is the fact that they are static. While static lighting allows very precise and detailed lighting for little processing cost, no special effects can be given, because it isn't going to change.
Dynamic lighting, on the other hand, comes in two flavors. There are the switchable lights and the true dynamically calculated lights. Each has its own processing weight but both are expensive to render and should be used sparingly.
Switchable lights are the same as static lights in that they use lightmap information compiled during RAD. A light is set as being switchable by one of three things: giving it a name, giving it a style, or giving it a pattern. Regular lights that don't support dynamic effects are the lights generally used as switchable lights, including light and light_spot but not light_environment. Switchable lights use a set of two lightmaps, on and off. Switchable lights alternate or blend between the two lightmaps, allowing partial brightness while keeping it to just two lightmaps. This gives all the benefits of the static lighting but allows it to change and be partially dynamic. Say you have two switchable lights shining on the same face, how many lightmaps are needed?
- Light 1 & 2 ON
- Light 1 ON, 2 OFF
- Light 1 OFF, 2 ON
- Light 1 & 2 OFF
That's four states in total. You add a third switchable light and it goes up to eight lightmaps. Herein lies the problem with switchable lights—it becomes expensive in lightmaps to create all the possible states. So expensive, in fact, that there is a hard-coded limit that means you can only have two switchable lights affecting the same face. There is a slight solution though: lights with identical names will all be given the same lightmap, so you can have 50 switchable lights with the same name shining on the same face; however, you cannot have more than 32 light source names. Because of the extra lightmaps required, switchable lights increase the amount of time it takes RAD to run, increase file size, and use system resources when they alternate between states; however, a switchable light sitting in a specific state has no more runtime cost than a static light.
True dynamic lighting is something that has to be built into the entity itself, most often recognized by the Parent property within the entity. The entities with the built-in dynamic effect are light_dynamic and point_spotlight. You can also enable arbitrary dynamic entities to shed dynamic light with the EF_BRIGHTLIGHT or EF_DIMLIGHT effect flags. point_spotlight is special in that it has a flag that can enable it as dynamic or static. This flag is set to dynamic by default, which can often catch you off-guard. The rendering process done for dynamic lights is run entirely within the game at runtime. This means it has little to no effect on the RAD compile or file size, but it will slow down your map. Dynamic lights should be used even more sparingly than switchable lights. The system slowdown caused by dynamic lights is generally consistent as the light needs to be rendered continuously. Such entities should only be used when the source of the light is moving. If the light itself is not meant to move, then it shouldn't be a true dynamic light. If it’s merely meant to turn on and off, a switchable light should be used instead. If used improperly, the costs of dynamic lighting will outweigh its benefits. Another downside to dynamic light is that, to simplify calculations, it doesn’t run processes like reflection and diffusion, resulting in harsher- and simpler-looking lights.
Static lights are easy on the engine and give great detail, but dynamic lights represent the possibility for movement and change. The easiest way to tell what effect the dynamic lights are having is to test your map with the +Showbudget command. This allows you to figure out when an effect is too much and lighting effects are slowing down your map. Good use of dynamic lights can improve your map, but they can be a costly effect.
Quick and effective RAD
The RAD compile process can be quite long, so frequently compiling can easily slow development progress to a crawl. There are a number of strategies you can employ to tackle this:
- Turn off RAD for the majority of your compiles, and only turn it on specifically when you want to tweak and test your lighting.
- Use the Cordon tool, so you are never compiling more of the level than you need to. (If you are using a light_environment, make sure that you copy it so that there is one within the cordon boundary.)
- Make multiple changes at once. Rather than tweaking just one section of lights in the map, can you tweak multiple sets in different parts of the level, and then compile all your changes at once.
- Standardize your lighting. Choose RGB and brightness values for each type of light in your level (e.g. fluorescents, or spotlights, etc), and make each instance of that type of light have the same values to start with. Then instead of coming up with light values for each light in your level, you need only slightly tweak the light values to get the effect you need (e.g. a larger room might need a larger light of a particular type).
- Make use of any spare computer you have in your house. Install the SDK on those computers and use them to do your lighting compiles. Then you can continue doing other edits to the level, while you wait for the results of the lighting compile.
- Using a program like Dropbox or SparkleShare can automate synchronizing your map files, and make this easier.
Conclusion
This covers the base of all lighting effects that can be found in standard Source games.
