Zh/Crusher: Difference between revisions
< Zh
Jump to navigation
Jump to search
No edit summary |
No edit summary |
||
| Line 1: | Line 1: | ||
{{LanguageBar|Crusher|title= | {{LanguageBar|Crusher|title=钉板(Crusher)}} | ||
[[File:Crushericon.png|thumb|right]] | [[File:Crushericon.png|thumb|right]] | ||
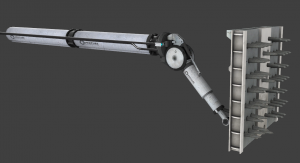
在{{Portal 2|4}}中,''' | 在{{Portal 2|4}}中,'''钉板'''是带有尖刺的{{L|Panels|移动面板}}。和普通面板一样,它们连接在机械臂上,但机械臂后方装有一个驱动钉板的大型活塞。 | ||
[[File:Portal2crusherpanel.PNG|thumb|right|300px| | [[File:Portal2crusherpanel.PNG|thumb|right|300px|钉板面板]] | ||
== | == 创建钉板 == | ||
{{note| | {{note|除了从头创建钉板,您也可以下载现成的实例文件,详见{{L|Crusher#外部链接|外部链接}}部分。}} | ||
1. 创建一个{{L|prop_dynamic}}实体,设置如下参数: | 1. 创建一个{{L|prop_dynamic}}实体,设置如下参数: | ||
| Line 28: | Line 28: | ||
| Parent || crusher1,base_attach | | Parent || crusher1,base_attach | ||
|} | |} | ||
{{note|Hammer会提示parent键值无效(因为额外的<code>,base_attach</code> | {{note|Hammer会提示parent键值无效(因为额外的<code>,base_attach</code>参数)。请忽略该警告,游戏中将正常运作。此设置用于使笔刷跟随钉板动画。}} | ||
3. 创建<code>200x112x192</code>的方块笔刷包围前一个笔刷,将其绑定到{{L|trigger_hurt}}实体并设置以下参数: | 3. 创建<code>200x112x192</code>的方块笔刷包围前一个笔刷,将其绑定到{{L|trigger_hurt}}实体并设置以下参数: | ||
| Line 146: | Line 146: | ||
|} | |} | ||
10. | 10. 设置触发器来控制钉板的开关,通过触发'''crusher1_proxy_crush'''上的代理中继器实现。使用'''crusher1_logic_compare'''获取钉板状态。 | ||
(懒人方法:直接将"实例"文件夹中的文件复制到"预设"文件夹,加载预设并解组后添加你自己的触发器) | (懒人方法:直接将"实例"文件夹中的文件复制到"预设"文件夹,加载预设并解组后添加你自己的触发器) | ||
== 外部链接 == | == 外部链接 == | ||
* [http://forums.thinking.withportals.com/downloads.php?view=detail&df_id=1092 | * [http://forums.thinking.withportals.com/downloads.php?view=detail&df_id=1092 钉板实例下载(多种自定义选项)] - 由[http://forums.thinking.withportals.com/memberlist.php?mode=viewprofile&u=3264 Skotty]制作 | ||
{{ACategory|Portal 2 Level Design}} | {{ACategory|Portal 2 Level Design}} | ||
{{ACategory|Portal 2 Tutorials}} | {{ACategory|Portal 2 Tutorials}} | ||
Latest revision as of 07:59, 4 July 2025
在![]() 传送门2中,钉板是带有尖刺的移动面板。和普通面板一样,它们连接在机械臂上,但机械臂后方装有一个驱动钉板的大型活塞。
传送门2中,钉板是带有尖刺的移动面板。和普通面板一样,它们连接在机械臂上,但机械臂后方装有一个驱动钉板的大型活塞。
创建钉板
1. 创建一个prop_dynamic实体,设置如下参数:
Property Name Value World Model models/anim_wp/cursher/crusher.mdl Name crusher1 Collision Not Solid Hold animation? Yes
2. 创建一个128x64x192的方块笔刷包围模型上的尖刺,将其绑定到func_brush实体并设置以下参数:
Property Name Value Name crusher1_brush Parent crusher1,base_attach
,base_attach参数)。请忽略该警告,游戏中将正常运作。此设置用于使笔刷跟随钉板动画。3. 创建200x112x192的方块笔刷包围前一个笔刷,将其绑定到trigger_hurt实体并设置以下参数:
Property Name Value Name crusher1_trigger_hurt Parent crusher1,base_attach Damage 1000 Damage Cap 1000 Damage Type CRUSH
4. 创建200x96x192的方块笔刷包围trigger_hurt笔刷,将其绑定到trigger_portal_cleanser实体并设置以下参数:
Property Name Value Name crusher1_trigger_hurt Parent crusher1,base_attach Visible No
还有它的输出:
5. 创建logic_relay实体并设置以下参数:
Property Name Value Name crusher1_logic_relay_crush
还有它的输出:
6. 再创建logic_relay实体并设置以下参数:
Property Name Value Name crusher1_logic_relay_uncrush
它的输出:
7. 创建logic_compare实体并配置以下参数:
Property Name Value Name crusher1_logic_compare Initial Value 0 Compare Value 1
它的输出:
8. 创建math_counter实体并配置以下参数:
Property Name Value Name crusher1_math_counter Maximum Legal Value 1
它的输出:
9. 要为func_instance中的实体启用输出功能,需要创建func_instance_io_proxy实体并配置以下参数:
Property Name Value Name crusher1_proxy_crush
还有它的输出:
10. 设置触发器来控制钉板的开关,通过触发crusher1_proxy_crush上的代理中继器实现。使用crusher1_logic_compare获取钉板状态。
(懒人方法:直接将"实例"文件夹中的文件复制到"预设"文件夹,加载预设并解组后添加你自己的触发器)
外部链接
- 钉板实例下载(多种自定义选项) - 由Skotty制作
