Creating a Room: Difference between revisions
Jump to navigation
Jump to search
")


")
 Tip:You can also make a room by creating a single brush to the correct size, then right-clicking on it and selecting the Hollow option. This method is quicker, but once you start creating more complex maps becomes inflexible.
 Note:If you try to compile your map now, VBSP will report that it has a leak. This is because there is nothing in it, not because of any gaps! The message will go away when the room has entities inside it.
(Moving the camera part to the new View Navigation chapter.) |
m (Nesciuse moved page Creating a Room/en to Creating a Room without leaving a redirect: Move en subpage to basepage) |
||
| (74 intermediate revisions by 39 users not shown) | |||
| Line 1: | Line 1: | ||
{{LanguageBar}} | |||
{{first room menu}} | {{first room menu}} | ||
{{src|3.1}} maps are really just a series of rooms. Outdoor areas are rooms with [[skybox]]es instead of normal ceilings. | |||
[[ | |||
The inside of the rooms must be completely sealed off from the black “void” surrounding them; if there are any holes [[Leak|the map will not compile properly]]. A proper compile is essential for good performance, as it controls the visibility of objects within levels, and for proper lighting. | |||
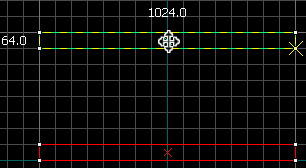
We will now create a room within which the rest of this tutorial series will take place. It will be 1024L×1024W×512H units large, which is quite big, and will consist of six brushes. | |||
# Using the {{hammer block}}, make a brush to use as the floor. It should be about about 1024L×1024W×64H. | |||
# Using the {{hammer select}}, drag it into position if you are not happy with where it is already. The pointer will change into four arrows pointing in all directions [[File:FourArrows.png|link=]], indicating the option to move the object. {{tip|To delete a brush, select it and press {{key|Delete}}.}} | |||
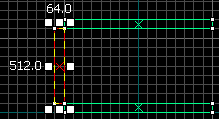
# In the side (X/Z) or front (Y/Z) grid view, and again using the {{hammer select}}, {{key|Shift}}+drag the brush to “clone” it. Move the mouse upwards while dragging so that the new brush forms a ceiling directly above the floor. If you get the position wrong, just drag the new brush as you did in step two. If you accidentally move the floor instead of cloning it, press {{key|Ctrl+Z}} to go back a step. {{note|In some CAD tools, a “cloned” object is linked to the original object. This is ''not'' the case in Hammer.}} <p>[[File:Hammer floorCeiling.png|frame|none|'''3:''' Create a ceiling by cloning the floor.]]</p> | |||
# Clone another one of the brushes and [[Basic Construction#Resize, Rotate, & Skew|resize]] it so that it connects the floor to the ceiling. It is better for texturing if the brushes “touch corners” instead of being flush against each other, but ultimately it doesn’t matter in what manner they touch so long as there is no gap between the inside of the room and the outside. <p>[[File:Hammer wall.png|frame|none|'''4:''' Connect the floor to the ceiling with a wall.]]</p> | |||
# Clone this wall brush and drag it to the other side of the room to form the opposite wall. | |||
# Switch from whatever side view you were using to the other one, and repeat steps four and five to create the remaining two walls. | |||
# Check for any gaps. Make sure the room has been completely sealed. If you’ve been designing your room on a relatively large grid scale (e.g. 64 units), then any gaps will be apparent. Mouse-over the 3D view window and press Z to enter mouselook mode to carefully inspect your room. <p>[[File:Hammer roomEnclosed.png|frame|none|'''7:''' The complete room, with no leaks.]]</p> | |||
{{tip|You can also make a room by creating a single brush to the correct size, then right-clicking on it and selecting the [[Hammer Make Hollow Dialog|Hollow]] option. This method is quicker, but once you start creating more complex maps becomes inflexible.}} | |||
{{note|If you try to compile your map now, [[VBSP]] will report that it has a leak. This is because there is nothing in it, not because of any gaps! The message will go away when the room has entities inside it.}} | |||
{{Navbar|Basic Construction|Your First Map|Applying Textures}} | |||
[[Category:Level Design]] | |||
Latest revision as of 06:03, 12 July 2024
Source maps are really just a series of rooms. Outdoor areas are rooms with skyboxes instead of normal ceilings.
The inside of the rooms must be completely sealed off from the black “void” surrounding them; if there are any holes the map will not compile properly. A proper compile is essential for good performance, as it controls the visibility of objects within levels, and for proper lighting.
We will now create a room within which the rest of this tutorial series will take place. It will be 1024L×1024W×512H units large, which is quite big, and will consist of six brushes.
- Using the Block tool
 , make a brush to use as the floor. It should be about about 1024L×1024W×64H.
 - Using the Selection tool
 , drag it into position if you are not happy with where it is already. The pointer will change into four arrows pointing in all directions
  , indicating the option to move the object. Tip:To delete a brush, select it and press Delete.
 - In the side (X/Z) or front (Y/Z) grid view, and again using the Selection tool , ⇧ Shift+drag the brush to “clone” it. Move the mouse upwards while dragging so that the new brush forms a ceiling directly above the floor. If you get the position wrong, just drag the new brush as you did in step two. If you accidentally move the floor instead of cloning it, press Ctrl+Z to go back a step. Note:In some CAD tools, a “cloned” object is linked to the original object. This is not the case in Hammer.
 3: Create a ceiling by cloning the floor.
 - Clone another one of the brushes and resize it so that it connects the floor to the ceiling. It is better for texturing if the brushes “touch corners” instead of being flush against each other, but ultimately it doesn’t matter in what manner they touch so long as there is no gap between the inside of the room and the outside.
 4: Connect the floor to the ceiling with a wall.
 - Clone this wall brush and drag it to the other side of the room to form the opposite wall.
- Switch from whatever side view you were using to the other one, and repeat steps four and five to create the remaining two walls.
- Check for any gaps. Make sure the room has been completely sealed. If you’ve been designing your room on a relatively large grid scale (e.g. 64 units), then any gaps will be apparent. Mouse-over the 3D view window and press Z to enter mouselook mode to carefully inspect your room.
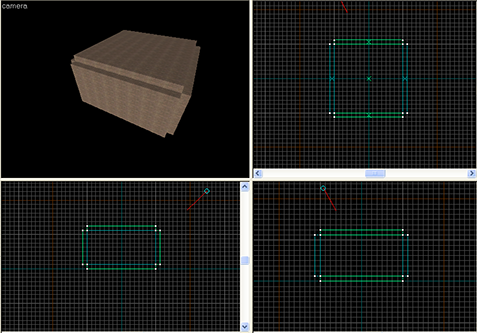 7: The complete room, with no leaks.


