本页面由大康翻译于2021年9月25日,相当于原文有小改动(例如输出)并修复了一些内容,但没有删减内容。部分内容由机器翻译。
 清道夫结局需要一个结局区域,感染者会在此区域试图阻止生还者捡起散落在地图上的汽油桶,以及用它们给逃生载具加油。对抗模式的得分取决于在一个回合中给逃生载具加了油的汽油桶数量。与标准结局相比,清道夫结局需要一些额外的实体和脚本,才可以正常进行。
组成内容
c1m4_atrium 的反编译地图将作为案例。另一张地图是 c6m3_port,其中还有求生之路1的生还者。这是与清道夫结局相关的组成内容的粗略列表:
- 清道夫模式专用的实体:
- 其他实体:
- VScript 脚本
- c1m4_atrium.nut
- c1m4_atrium_finale.nut
- c1m4_delay.nut
 注意:c1m4_atrium_finale.nut 在结局开始时会自动加载。它遵循命名规则 scripts/vscripts/<地图名>_finale.nut
地图
一般来说,你需要在生还者和汽油桶的空间之间设置障碍物。障碍物通常是加油口(point_prop_use_target)和汽油桶之间的距离/地形。
武器
考虑到生还者在开始终局时需要武器,他们仍然需要能够为面前的挑战做好准备,所以路上还应该有武器和物品,以便生还者可以坚持一段时间。玩你的地图的人会有很多不同的方式,例如,喜欢花时间游玩的人与快速通关的人相比。
环境
这些只是建议:
- 制作多条路径,让生还者可以进出建筑物以获取补给品,甚至可以在终局中使用汽油桶(译者注:应该不是灌油用的汽油)。
- 请记住,玩家并不总是想要走狭窄的走廊,而是大型开放区域,例如生还者可以走在街道上,但会被附近建筑物中生成的感染者或从屋顶攻击他们的特殊感染者攻击。
清道夫结局实体
- 你需要一个 trigger_finale 以便生还者可以开始结局。在该实体中,你将找到各种选项(即键值)。其中之一是结局类型。它的默认设置为“Standard”(标准)。你要把它设置为“Scavenge”(清道夫)。现在保持 Use Delay 键值不变,但将 First Use Delay 设置为 5 秒。这可以让生还者通过播放音频知道他们在做什么。(这不是必需的,但确实有帮助)
- 你要放置一个 game_scavenge_progress_display 实体。在它的属性界面上,你可以将(加油的)最大值更改为你想要的任何值。出于本教程的目的,我们将其设为 8。然后将其目标名(Name, 不是 Classname)设置为唯一的名称。在本教程里,我们设置为 scav_progshower。接下来,你需要一个 math_counter 实体。将其目标名设置为 scav_counter,然后将其 Initial Value (初始值)保留为 0,最大值与你在 game_scavenge_progress_display 中设置的最大值相同。在本教程中,我们将其设置为 8。将其最小值保留为 0。
- 你需要确定要灌油的位置。模型可以是你选择的任何模型。在本教程中,我们将使用灌油口模型 radio_generator_fillup.mdl。你需要放置一个 prop_dynamic 实体,然后在模型浏览器中查找 radio_generator_fillup。将其放置在距离玩家可以操作的范围内(玩家高度约为 64 个单位,因此最好的高度为 45 到 50 个单位)。将其轮廓颜色设置为你选择的任何颜色。
- 你需要在加油口上放置一个 point_prop_use_target 实体。

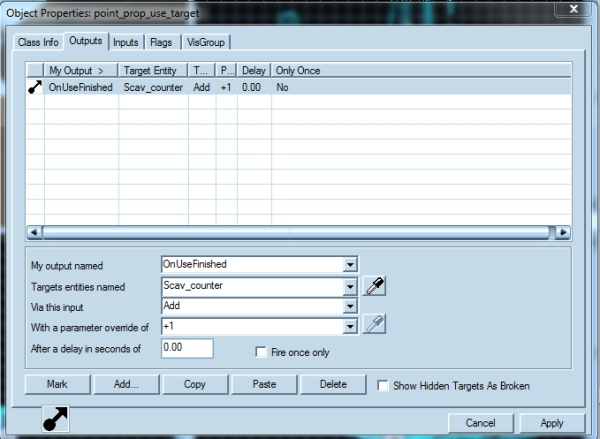
转到你的加油口模型实体并打开其属性并将其目标名设置为 scav_nozzle。然后返回你的 point_prop_use_target 并打开属性界面切换到输出菜单。添加具有以下设置的新输出:
| |
My Output |
Target Entity |
Target Input |
Parameter |
Delay |
Only Once
|
 |
OnUseFinished |
scav_counter |
Add |
+1 (或者是1) |
0.00 |
No
|
这意味着当玩家用汽油桶在加油口加了油后,point_prop_use_target 将向 scav_counter 添加一个值。
汽油桶
在实体列表中查找 weapon_scavenge_item_spawn 实体。将它放置于地图并打开其属性界面。将其目标名更改为 scav_gascans。
然后回到你的 trigger_finale 实体,打开它的属性界面,转到输出选项卡并单击添加(Add)
输入以下内容:
| |
My Output |
Target Entity |
Target Input |
Parameter |
Delay |
Only Once
|
|
UseStart |
scav_gascans |
TurnGlowsOn |
<none> |
0.00 |
No
|
(以上意味着当结局开始时,所有名为 scav_gascans 的实体的轮廓会开始发光。)
添加另一个输出,如下所示:
| |
My Output |
Target Entity |
Target Input |
Parameter |
Delay |
Only Once
|
|
UseStart |
scav_nozzle |
StartGlowing |
<none> |
0.00 |
No
|
(与上面类似,让加油口的模型的轮廓发光。)
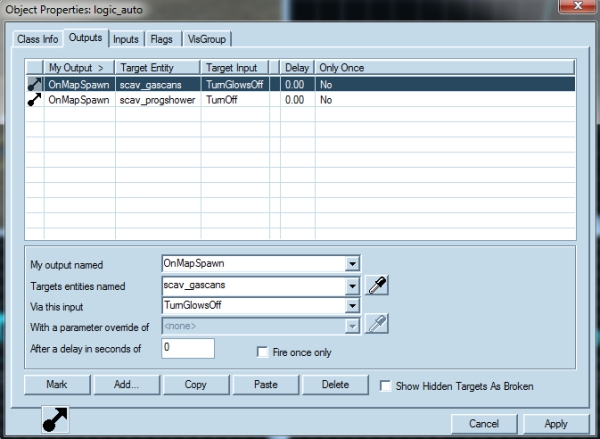
接下来放置实体 logic_auto 并转到其属性的输出选项卡,然后单击 Add。
添加以下输出:
| |
My Output |
Target Entity |
Target Input |
Parameter |
Delay |
Only Once
|
|
OnMapSpawn |
scav_gascans |
TurnGlowsOff |
<none> |
0.00 |
No
|
|
OnMapSpawn |
scav_nozzle |
StopGlowing |
<none> |
0.00 |
No
|
|
OnMapSpawn |
scav_progshower |
TurnOff |
<none> |
0.00 |
No
|
(以上两个输出确保它们在我们开始结局之前不会发光,最后的输出可确保加油进度的 HUD 在我们启用之前不会处于活动状态。)
救援载具
这通常是一个带有动画的 prop_dynamic,但实际上它可以是任何东西。
出于本教程的目的,我们仅将 C130 用于 prop_dynamic 实体作为救援载具。
转到纹理浏览器并查找"trigger"。它看起来像这样:
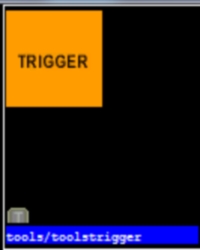
制作一个和你的逃离载具一样大的固体,空间大小是 C130 的内部空间。按 ↵ Enter 键创建它,然后按 Ctrl+T 转换为实体。在 Classname 下输入 trigger_multiple 并将其目标名改为 escape_trigger。然后将 Entire Team Number 设置为 Survivor,并将 Start Disabled 设置为 Yes。然后关闭它的属性界面。
返回你的 math_counter 并转到输出选项卡。添加如下输出:
| |
My Output |
Target Entity |
Target Input |
Parameter |
Delay |
Only Once
|
|
OnHitMax |
Scav_finale_starter |
FinaleEscapeVehicleReadyForSurvivors |
<none> |
0.00 |
No
|
|
OnHitMax |
escape_trigger |
Enable |
<none> |
0.00 |
Yes
|
|
OnHitMax |
scav_gascans |
TurnGlowsOff |
<none> |
0.00 |
Yes
|
|
OnHitMax |
scav_usenozzle |
Kill |
<none> |
0.00 |
Yes
|
|
OnHitMax |
scav_nozzle |
StopGlowing |
<none> |
0.00 |
Yes
|
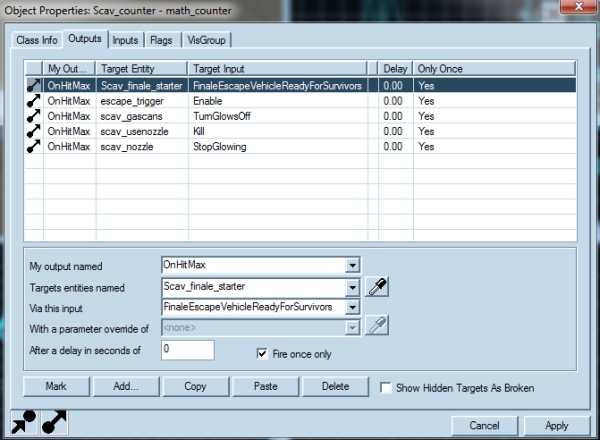
然后返回到你的 trigger_finale 并将其目标名更改为 Scav_finale_starter。
安全地带
你需要在地图范围之外制作一个带有 4 个info_survivor_position实体的区域。在实体属性界面中,将第一个 info_survivor_position 的 Order 更改为 1,将第二个更改为 2,依此类推,直到第四个。然后将它们的目标名更改为你放置它们的任何顺序。(例如:survivor_pos1、survivor_pos2 等)
 警告:有时这块区域在地图外生成时会出现问题,建议不要这样做。
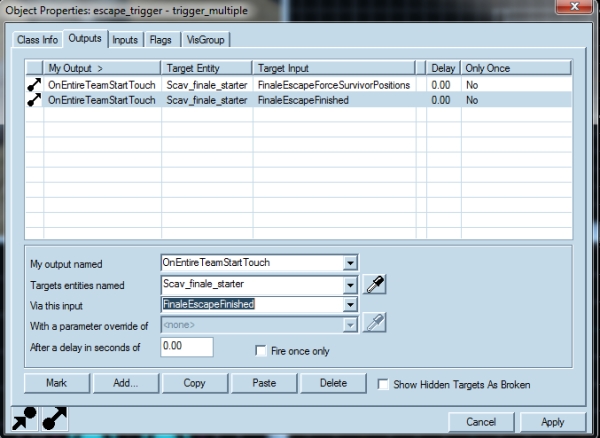
转到你的 trigger_escape(你在救援载具中制作的 trigger 笔刷)并添加具有以下内容的输出:
| |
My Output |
Target Entity |
Target Input |
Parameter |
Delay |
Only Once
|
|
OnEntireTeamStartTouch |
Scav_finale_starter |
FinaleEscapeForceSurvivorPositions |
<none> |
0.00 |
No
|
|
OnEntireTeamStartTouch |
Scav_finale_starter |
FinaleEscapeFinished |
<none> |
0.00 |
No
|
然后返回到纹理浏览器。寻找 Clip (空气墙);它看起来像这样:
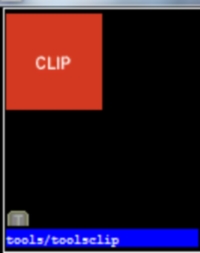
使用应用了此纹理的固体将 info_survivor_position 的位置包围在地图范围之外,然后按 ↵ Enter 键以创建它。然后单击 Ctrl+T 转换为实体。将 Classname 更改为 func_brush。将 Solid BSP 键值设置为 Yes,然后把 Solidity 键值设置为 Always Solid。最后,将目标名设置为 clip_scavend,点击应用并关闭其属性界面。
返回你的 trigger_multiple 添加输出:
| |
My Output |
Target Entity |
Target Input |
Parameter |
Delay |
Only Once
|
|
OnEntireTeamStartTouch |
clip_scavend |
Kill |
<none> |
0.00 |
No
|
用 nodraw 纹理的固体覆盖逃离载具的地板,这样你就可以在上面行走并在上面创建导航网格。
然后放置 point_veiwcontrol_multiplayer 实体,作为救援载具逃离动画的相机。然后打开其属性并将其命名为 outro_cam。然后放置 2 个 env_fade 实体,将第一个命名为 fade1,并将其 Hold Time (保持时间)键值设置为1。然后将其 Fade In/Out 键值设置为 0.15。
(这样做不是看到玩家和快速切换到相机,而是允许淡入淡出。在此期间,生还者将传送到他们的位置,然后视图将返回到相机。)
在第一个淡入淡出的实体的输出选项卡中添加输出:
| |
My Output |
Target Entity |
Target Input |
Parameter |
Delay |
Only Once
|
|
OnFade |
fade2 |
Fade |
<none> |
6.00 |
No
|
然后返回到逃离载具内的 trigger_escape 并添加输出:
| |
My Output |
Target Entity |
Target Input |
Parameter |
Delay |
Only Once
|
|
OnEntireTeamStartTouch |
outro_cam |
Enable |
<none> |
0.00 |
No
|
转到 fade2 实体并添加如下输出:
| |
My Output |
Target Entity |
Target Input |
Parameter |
Delay |
Only Once
|
|
OnFade |
outro_stats |
RollStatsCrawl |
<none> |
0.00 |
No
|
然后在实体选项卡中查找 env_outtro_stats。 在其属性中将其目标名设置为 outro_stats。
导航网格
运行你的地图,进入关卡后按波浪号键 ~ 打开开发者控制台,然后输入
- sv_cheats 1——这允许在游戏中启用作弊
- noclip——允许在地图上自由移动,你不会被任何东西挡住
- nav_edit 1——启用导航网格编辑
- z_debug 1——允许你在地图上查看导航属性和所有丧尸
- director_stop——阻止导演生成丧尸
- nb_delete_all——在地图上删除所有的 NPC
然后去你的结局区域并打开开发者控制台并输入
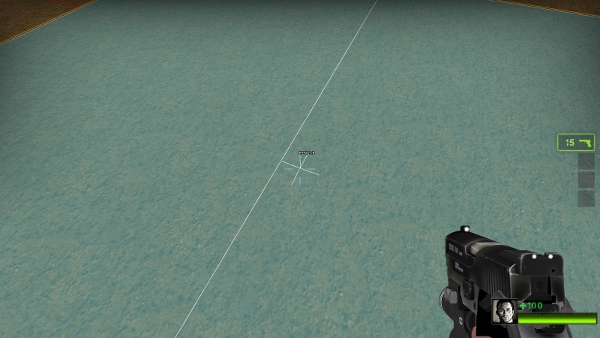
- nav_mark_walkable——在地图上标记一个可步行的点,由紫色金字塔标记,可以生成导航网格
- nav_generate_incremental——生成距 nav_mark_walkable 一定距离的导航网格
然后确保你在结局触发器周围选择了你想要的区域,以及丧尸从中产生的距离区域。然后在开发者控制台中输入以下内容:
- mark Finale——这是在战役的最终关卡中使用的导航网格的属性,并与 trigger_finale 结合使用。
注意:为了使导航工作,必须有一个标记有 checkpoint 属性的导航网格。
然后去你的玩家起始区域并用 CHECKPOINT 标记这些区域。
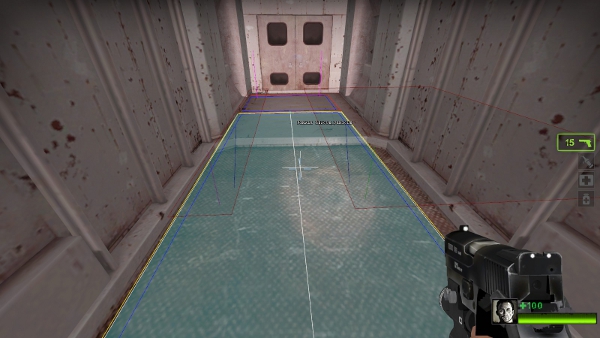
最后,你需要去你的逃离载具并用 RESCUE_VEHICLE 标记里面的导航区域。(如右图所示)
完成后,在开发者控制台中输入以下内容:
- nav_analyze——这会分析所有导航网格并在 left4dead2 文件夹的地图文件夹中写入一个名为“<你的地图名称>.nav”的文件。
这是你制作清道夫结局所需的全部内容,希望对你有所帮助
脚本(VScript)
此次清道夫结局需要三个脚本。请注意,有些代码是多余的或被注释掉的,可能是开发过程的标记。包括补充意见:
c1m4_atrium.nut
该脚本需要作为导演脚本使用 info_director 实体的 BeginScript 输入手动在 OnMapSpawn 事件加载。它设置汽油桶的数量、默认的 CommonLimit、解锁救援车辆导航区域,并且(出于某种原因)声明函数 GasCanPoured()。
- 如果是单人游戏,汽油桶的数量会减少
- 由于人类玩家将在救援车辆上活动,因此救援车辆导航区域是不能被阻挡的。
- GasCanPoured() 将由导演 (OnTeamScored) 或 point_prop_use_target (OnUsedFinished) 调用,只要成功倒入汽油桶。
Msg(" atrium map script "+"\n")

// number of cans needed to escape.

if ( Director.IsSinglePlayerGame() )
{
	NumCansNeeded <- 8
}
else
{
	NumCansNeeded <- 13
}

// This script is called on MapSpawn, so the CommonLimit is for play before the finale start.
DirectorOptions <-
{

CommonLimit = 15

}

NavMesh.UnblockRescueVehicleNav() // Unblock so humans can be rescued when incapped near nozzle

EntFire( "progress_display", "SetTotalItems", NumCansNeeded ) //Set number of cans with game_scavenge_progress_display


function GasCanPoured(){} // Declaration of function, but was moved to main finale script
c1m4_atrium_finale.nut
一旦结局强制开始(当电梯门在中庭的最低层打开时),就会加载此脚本。它包含大多数结局设置和逻辑。
- 有多个结局阶段,ONSLAUGHT (猛攻)、PANIC (尸潮)或 TANK。第一阶段是 ONSLAGUT,本阶段的 DirectorOptions 将使用 InitialOnslaughtOptions。一旦汽油桶被捡起四次或一个汽油桶成功倒出,本阶段就会结束,导致 PANIC 阶段
- 其余的猛攻从 DirectorOptions 的 c1m4_delay.nut 运行。这种猛攻与时间有关,并且在进入下一阶段之前对汽油桶接触次数的容忍度较低。
Msg("----------------------FINALE SCRIPT------------------\n")
//-----------------------------------------------------
// Stage type enumerations
PANIC <- 0
TANK <- 1
DELAY <- 2
ONSLAUGHT <- 3
//-----------------------------------------------------
// Initialized tables along with stage settings

SharedOptions <-
// Base DirectorOptions
{
 	A_CustomFinale1 = ONSLAUGHT //Will be stopped with input to director, EndCustomScriptedStage
	A_CustomFinaleValue1 = "" //InitialOnslaughtOptions is slightly different from c1m4_delay

	A_CustomFinale2 = PANIC
	A_CustomFinaleValue2 = 1 //1 PANIC wave

	A_CustomFinale3 = ONSLAUGHT
	A_CustomFinaleValue3 = "c1m4_delay" //This onslaught also depends on timer

	A_CustomFinale4 = PANIC
	A_CustomFinaleValue4 = 1

	A_CustomFinale5 = ONSLAUGHT
	A_CustomFinaleValue5 = "c1m4_delay"

	A_CustomFinale6 = TANK
	A_CustomFinaleValue6 = 1

	A_CustomFinale7 = ONSLAUGHT
	A_CustomFinaleValue7 = "c1m4_delay"

 	A_CustomFinale8 = PANIC
	A_CustomFinaleValue8 = 1

	A_CustomFinale9 = ONSLAUGHT
	A_CustomFinaleValue9 = "c1m4_delay"

 	A_CustomFinale10 = PANIC
	A_CustomFinaleValue10 = 1

	A_CustomFinale11 = ONSLAUGHT
	A_CustomFinaleValue11 = "c1m4_delay"

	A_CustomFinale12 = PANIC
	A_CustomFinaleValue12 = 1

 	A_CustomFinale13 = ONSLAUGHT
	A_CustomFinaleValue13 = "c1m4_delay"

	A_CustomFinale14 = TANK
	A_CustomFinaleValue14 = 1 //1 TANK

 	A_CustomFinale15 = ONSLAUGHT
	A_CustomFinaleValue15 = "c1m4_delay"

	A_CustomFinale16 = PANIC
	A_CustomFinaleValue16 = 1

 	A_CustomFinale17 = ONSLAUGHT
	A_CustomFinaleValue17 = "c1m4_delay"

 	A_CustomFinale18 = PANIC
	A_CustomFinaleValue18 = 1

 	A_CustomFinale19 = ONSLAUGHT
	A_CustomFinaleValue19 = "c1m4_delay"

	A_CustomFinale20 = PANIC
	A_CustomFinaleValue20 = 1

 	A_CustomFinale21 = ONSLAUGHT
	A_CustomFinaleValue21 = "c1m4_delay"

	A_CustomFinale22 = TANK
	A_CustomFinaleValue22 = 1

 	A_CustomFinale23 = ONSLAUGHT
	A_CustomFinaleValue23 = "c1m4_delay"

 	A_CustomFinale24 = PANIC
	A_CustomFinaleValue24 = 1

 	A_CustomFinale25 = ONSLAUGHT
	A_CustomFinaleValue25 = "c1m4_delay"

	A_CustomFinale26 = PANIC
	A_CustomFinaleValue26 = 1

 	A_CustomFinale27 = ONSLAUGHT
	A_CustomFinaleValue27 = "c1m4_delay"

	A_CustomFinale28 = PANIC
	A_CustomFinaleValue28 = 1

 	A_CustomFinale29 = ONSLAUGHT
	A_CustomFinaleValue29 = "c1m4_delay"

 	A_CustomFinale30 = PANIC
	A_CustomFinaleValue30 = 1

 	A_CustomFinale31 = ONSLAUGHT
	A_CustomFinaleValue31 = "c1m4_delay"
        // End of finale, regardless of gas cans filled

	//-----------------------------------------------------
        // More Default DirectorOptions

	PreferredMobDirection = SPAWN_LARGE_VOLUME
	PreferredSpecialDirection = SPAWN_LARGE_VOLUME

//	BoomerLimit = 0
//	SmokerLimit = 2
//	HunterLimit = 1
//	SpitterLimit = 1
//	JockeyLimit = 0
//	ChargerLimit = 1

	ProhibitBosses = true
	ZombieSpawnRange = 3000
	MobRechargeRate = 0.5
	HordeEscapeCommonLimit = 15
	BileMobSize = 15

	MusicDynamicMobSpawnSize = 8
	MusicDynamicMobStopSize = 2
	MusicDynamicMobScanStopSize = 1
}

InitialOnslaughtOptions <-
// DirectorOptions for first onslaught
{
    LockTempo = 0
	IntensityRelaxThreshold = 1.1
	RelaxMinInterval = 2
	RelaxMaxInterval = 4
	SustainPeakMinTime = 25
	SustainPeakMaxTime = 30

	MobSpawnMinTime = 4
	MobSpawnMaxTime = 8
	MobMinSize = 2
	MobMaxSize = 6
	CommonLimit = 5

	SpecialRespawnInterval = 100
}

PanicOptions <-
// DirectorOptions when in a PANIC stage
{

	MegaMobSize = 0 // randomized in OnBeginCustomFinaleStage
	MegaMobMinSize = 20
	MegaMobMaxSize = 40

	CommonLimit = 15

	SpecialRespawnInterval = 40
}

TankOptions <-
// DirectorOptions when in a TANK stage
{
	ShouldAllowMobsWithTank = true
	ShouldAllowSpecialsWithTank = true

	MobSpawnMinTime = 10
	MobSpawnMaxTime = 20
	MobMinSize = 3
	MobMaxSize = 5

	CommonLimit = 7

	SpecialRespawnInterval = 60
}


DirectorOptions <- clone SharedOptions
// Start with SharedOptions
{
}


//-----------------------------------------------------

// number of cans needed to escape. again. (Later moved to c1m4_atrium.nut)
NumCansNeeded <- 13

// fewer cans in single player since bots do not help much
if ( Director.IsSinglePlayerGame() )
{
	NumCansNeeded <- 8
}

// duration of delay stage.
DelayMin <- 10
DelayMax <- 20

// Number of touches and/or pours allowed before a delay is aborted.
DelayPourThreshold <- 1
DelayTouchedOrPouredThreshold <- 2


// Once the delay is aborted, amount of time before it progresses to next stage.
AbortDelayMin <- 1
AbortDelayMax <- 3

// Number of touches and pours it takes to transition out of c1m4_finale_wave_1
GimmeThreshold <- 4


// console overrides
if ( Director.IsPlayingOnConsole() )
{
	DelayMin <- 20
	DelayMax <- 30

	// Number of touches and/or pours allowed before a delay is aborted.
	DelayPourThreshold <- 2
	DelayTouchedOrPouredThreshold <- 4

	TankOptions.ShouldAllowSpecialsWithTank = false

}
//-----------------------------------------------------
//      INIT
//-----------------------------------------------------

GasCansTouched          <- 0
GasCansPoured           <- 0
DelayTouchedOrPoured    <- 0
DelayPoured             <- 0

EntFire( "timer_delay_end", "LowerRandomBound", DelayMin )
EntFire( "timer_delay_end", "UpperRandomBound", DelayMax )
EntFire( "timer_delay_abort", "LowerRandomBound", AbortDelayMin )
EntFire( "timer_delay_abort", "UpperRandomBound", AbortDelayMax )

// this is occurs too late. moved to c1m4_atrium.nut
//EntFire( "progress_display", "SetTotalItems", NumCansNeeded )

function AbortDelay(){}  	// only defined during a delay, in c1m4_delay.nut
function EndDelay(){}		// only defined during a delay, in c1m4_delay.nut

NavMesh.UnblockRescueVehicleNav() // This is redundant since it was already done once

//-----------------------------------------------------

function GasCanTouched()
// This is called by weapon_scavenge_item_spawn OnItemPickedUp
{
    GasCansTouched++
    Msg(" Touched: " + GasCansTouched + "\n")

    EvalGasCansPouredOrTouched()
}

function GasCanPoured()
// In this map, it is called by the director OnTeamScored
{
    GasCansPoured++
    DelayPoured++
    Msg(" Poured: " + GasCansPoured + "\n")

    if ( GasCansPoured == NumCansNeeded )
    {
        Msg(" needed: " + NumCansNeeded + "\n")
        EntFire( "relay_car_ready", "trigger" )
    }

    EvalGasCansPouredOrTouched()
}

function EvalGasCansPouredOrTouched()
// Evaluate the number of times gas cans poured or touched
{
    TouchedOrPoured <- GasCansPoured + GasCansTouched
    Msg(" Poured or touched: " + TouchedOrPoured + "\n")

    DelayTouchedOrPoured++
    Msg(" DelayTouchedOrPoured: " + DelayTouchedOrPoured + "\n")
    Msg(" DelayPoured: " + DelayPoured + "\n")

    if (( DelayTouchedOrPoured >= DelayTouchedOrPouredThreshold ) || ( DelayPoured >= DelayPourThreshold ))
    // This is for c1m4_delay.nut (c1m4_delay.nut also resets the counter for Poured and TouchOrPoured)
    {
        AbortDelay()
    }

    switch( TouchedOrPoured ) //For stopping the InitialOnslaught (first stage)
    {
        case GimmeThreshold:
            EntFire( "@director", "EndCustomScriptedStage" )
            break
    }
}
//-----------------------------------------------------

function AddTableToTable( dest, src )
// This function is used to move table keys and values to other tables
{
	foreach( key, val in src )
	{
		dest[key] <- val
	}
}

function OnBeginCustomFinaleStage( num, type )
// Special Function every time a finale stage starts.
// Instructions in this function set DirectorOptions for PANIC and TANK
{
	printl( "Beginning custom finale stage " + num + " of type " + type );

	local waveOptions = null
	if ( num == 1 )
	{
		waveOptions = InitialOnslaughtOptions
	}
	else if ( type == PANIC )
	{
		waveOptions = PanicOptions
		waveOptions.MegaMobSize = PanicOptions.MegaMobMinSize + rand()%( PanicOptions.MegaMobMaxSize - PanicOptions.MegaMobMinSize )

		Msg("*************************" + waveOptions.MegaMobSize + "\n")

	}
	else if ( type == TANK )
	{
		waveOptions = TankOptions
	}

	//---------------------------------


	MapScript.DirectorOptions.clear()


	AddTableToTable( MapScript.DirectorOptions, SharedOptions );

	if ( waveOptions != null )
	{
		AddTableToTable( MapScript.DirectorOptions, waveOptions );
	}


	Director.ResetMobTimer()

	if ( developer() > 0 )
	{
		Msg( "\n*****\nMapScript.DirectorOptions:\n" );
		foreach( key, value in MapScript.DirectorOptions )
		{
			Msg( "    " + key + " = " + value + "\n" );
		}

		if ( LocalScript.rawin( "DirectorOptions" ) )
		{
			Msg( "\n*****\nLocalScript.DirectorOptions:\n" );
			foreach( key, value in LocalScript.DirectorOptions )
			{
				Msg( "    " + key + " = " + value + "\n" );
			}
		}
	}
}

//-----------------------------------------------------


if ( Director.GetGameMode() == "coop" )
{
}
else if ( Director.GetGameMode() == "versus" ) // Allow tanks and witches in VS
{
	SharedOptions.ProhibitBosses = false
}
c1m4_delay.nut
每当开始猛攻阶段时都会加载此脚本,但第一个阶段除外。
- 调用 logic_timer 实体启动计时器以进入下一阶段
- 阶段在结束时间(timer_delay_end)或汽油桶可以灌油和拾取(timer_delay_abort)时结束
Msg("**Delay started**\n")

DirectorOptions <-
{
	MobMinSize = 2
	MobMaxSize = 3

	BoomerLimit = 0
	SmokerLimit = 0
	HunterLimit = 0
	SpitterLimit = 0
	JockeyLimit = 0
	ChargerLimit = 0

	MinimumStageTime = 15

	CommonLimit = 5
}

Director.ResetMobTimer() //Start the above onslaught settings immediately


// start the delay timer
EntFire( "timer_delay_end", "enable" )

//reset for this stage (PANIC and TANK depend on other factors)
DelayTouchedOrPoured   <- 0
DelayPoured            <- 0
//-------------------------------------------------


// abort the delay if a survivor picks up or pours a gas can
// Function called by c1m4_atrium_finale.nut
function AbortDelay()
{
    Msg("**Delay aborted early**\n")
    EntFire( "timer_delay_abort", "enable" )
}

// called by the timers themselves
// These EntFired timers MUST be the same targetname in the map!
function EndDelay()
{
        Msg("**Delay ended**\n")
        EntFire( "timer_delay_end", "Disable" )
        EntFire( "timer_delay_end", "ResetTimer" )
        EntFire( "timer_delay_abort", "Disable" )
        EntFire( "timer_delay_abort", "ResetTimer" )
        EntFire( "@director", "EndCustomScriptedStage" )
}
Scavenge finales consist of an arena where infected attempt to stop survivors from filling up an escape vehicle with gas cans scattered throughout the map. Versus mode scoring depends on the number of gas cans filled during a round. Compared to a standard finale, there are some additional entities and a reliance on vscripts in order for scavenge finale to work.
Components
c1m4_atrium decompiled will be used as a reference. Another map is c6m3_port, which also features L4D1 survivors bots. This is a rough list of components involved with scavenge finale:
- Scavenge-specific Entities:
- Other entities:
- 3 vscripts
- c1m4_atrium.nut
- c1m4_atrium_finale.nut
- c1m4_delay.nut
注意:c1m4_atrium_finale.nut is loaded automatically on finale start. It follows naming convention scripts/vscripts/<map name>_finale.nut
Map
In general, the space needs to provide obstacles between the survivors and the gas cans. The obstacle is typically distance/terrain between the nozzle (point_prop_use_target) and the gas can.
Weapons
Consider that the survivors need starting weapons for when they reach the finale. They still need to be able to stock up for the challenge ahead of them. There should also be weapons and items on the way so that survivors can hold out for a bit to heal or resupply. There will be many different ways someone playing your map will go, for example someone that likes to take their time compared to someone that sparatically runs through your map to try and quickly grab the cans to escape.
Environment
These are merely suggestions:
- Make branching paths so that the survivors can duck in and out of buildings for supplies or even gascans for the finale.
- Keep in mind players dont constantly want to have to go down narrow hallways make open areas for large combat scenarios where the survivors can go down a street for example but be attacked by infected spawning in nearby building or special infected attacking them from rooftops.
- The distance between the gas can and goal is a balance of advantages between two teams.
Scavenge finale entities
- Firstly you will need a trigger_finale so the survivors can start the finale. In that entity you will find various settings. One of these is the finale type. It's default is set to standard. You will want to change this to scavenge. For now leave the use delay the same, but change the first use delay to five seconds. This lets the survivors know what their doing by making a sound play. (This is not necessary but it does help)
- Second you want to place a game_scavenge_progress_display. Inside it, you can change the max value to whatever you want. For the purpose of this tutorial we'll make it 8. Then change its name to something unique. For ours it will be scav_progshower. Next you will need a math_counter. Change its name property to scav_counter, then leave its initial value to 0. Make the max value the same number you set in the game_scavenge_progress_display. For this tutorial, we have it set to 8. Leave it's min value at 0.
- Third you will need to make the location where you will fill up. This can be anything you choose. For this tutorial, we will be using the nozzle prop radio_generator_fillup.mdl. You will need to place a prop_dynamic, then in its model field look up radio_generator_fillup. Place this within reachable distance from the player (player height is about 64 units so a good height will be 45 to 50 units). Set its glow color to any color of your choice.
- Fourth you will need to place a point_prop_use_target on the nozzle.
Go to your nozzle and open its properties and set its name field to scav_nozzle. Then go back to your point_prop_use_target and open up its output menu. Add a new output with the following settings :
- My output named: OnUseFinished
- Targets entities named: Scav_counter
- Via this input: Add
- With a parameter override of: +1
This means when a player finishes filling up the nozzle with a gas can, point_prop_use_target will add a point to scav_counter.
Gas cans
In the entities tab look up weapon_scavenge_item_spawn. Place it down and go into its properties. Change its name to scav_gascans.
Then go back to your finale trigger, go into its properties, go to outputs tab and click add
Input the following:
- My output named: UseStart
- Targets entities named: scav_gascans
- Via this input: TurnGlowsOn
(The above means when the finale has started, all entities named scav_gascans will glow.)
Add another output with the following:
- My output named: UseStart
- Targets entities named: scav_nozzle
- Via this input: StartGlowing
(Similarly to above, this will make the nozzle glow.)
Next go to your entities tab and look up logic_auto. Place it down and go to its outputs tab and click add.
Input the following:
- My output named: OnMapSpawn
- Targets entities named: scav_gascans
- Via this input: TurnGlowsOff
Add another output and input the following:
- My output named: OnMapSpawn
- Targets entities named: scav_nozzle
- Via this input: StopGlowing
(The above two ensure they do not glow until we start the finale.)
Add another output and input the following:
- My output named: OnMapSpawn
- Targets entities named: scav_progshower
- Via this input: TurnOff
(This ensures the progress shower isn't active until we enable it.)
Escape vehicle
- This is usually a prop_dynamic with animations but it really can be anything.
For the purpose of this tutorial we'll just use the C130 for the prop_dynamic escape vehicle.
Go to the texture browser and look up trigger. It will look like this:
Make a brush the size of your escape vehicle. This would be the inside of the C130. Hit enter to create it, then hit ctrl+t to tie to entity. Under the class type put in trigger_multiple and give it the name escape_trigger. Then set the entire team number to survivor and set start disabled to yes. Then close out of its properties.
Go back to your math_counter and to the outputs tab. Add a new output:
- My output named: OnHitMax
- Targets entities named: Scav_finale_starter
- Via this input: FinaleEscapeVehicleReadyForSurvivors
- Fire Once Only: click the checkbox
- My output named: OnHitMax
- Targets entities named: escape_trigger
- Via this input: Enable
- Fire Once Only: click the checkbox
- My output named: OnHitMax
- Targets entities named: scav_gascans
- Via this input: TurnGlowsOff
- Fire Once Only: click the checkbox
- My output named: OnHitMax
- Targets entities named: scav_usenozzle
- Via this input: Kill
- Fire Once Only: click the checkbox
- My output named: OnHitMax
- Targets entities named: scav_nozzle
- Via this input: StopGlowing
- Fire Once Only: click the checkbox
Then go back to your finale_trigger and change its name field to Scav_finale_starter.
Escape sequence
You will need to make a box outside the reach of your map with 4 info_survivor_position. In the properties, change the first info_survivor_position to 1. Change the second to 2 and so on until you've reached 4. Then change their names to whatever order you put them. (Ex. survivor_pos1 survivor_pos2 etc.)
警告:Sometimes there is a problem with spawning outside the map in this box its advisable to not do this.
- Go to your trigger_escape (the trigger brush you made in the escape vehicle) and add a new output with the following:
- My output named: OnEntireTeamStartTouch
- Targets entities named: Scav_finale_starter
- Via this input: FinaleEscapeForceSurvivorPositions
- My output named: OnEntireTeamStartTouch
- Targets entities named: Scav_finale_starter
- Via this input: FinaleEscapeFinished
Then go back to the texture browser. Look for clip; it will look like this:
Surround the survivor positions outside the reach of your map with this brush and hit enter to create it. Then click crtl+t to tie to entity. Change class type to func_brush. Look for Solid BSP and set it to yes. Then find Solidity and set it to always solid. Lastly, change its name to clip_scavend, hit apply, and close its properties menu.
Go back to your trigger_multiple and in the properties field click add
- My output named: OnEntireTeamStartTouch
- Targets entities named: clip_scavend
- Via this input: Kill
Cover the floor of the escape vehicle with nodraw so you can walk on it and create navigation meshes within it.
Then in the entities tab look for point_veiwcontrol_multiplayer. Place this somewhere to view your escape vehicle leaving, then open up its properties and name it outro_cam. Then look for an env_fade entity and place 2 of them. Name the first one fade1 and set its hold time to 1. Then set its fade out/in to .15.
(What this does is instead of seeing the player and then quickly switching to the camera, it allows for a fade to happen. The survivors will teleport to their positions and then the view will come back to the camera.)
In the outputs tab of the first fade click add
- My output named: OnFade
- Target entities named: fade2
- Via this input: Fade
- After a delay of: 6
Then go back to the trigger_escape that is inside the escape vehicle and go to its outputs click add
- My output named: OnEntireTeamStartTouch
- Target entities named: outro_cam
- Via this input: Enable
Go to the fade2 entity and in its outputs tab click add
- My output named: OnFade
- Target entities named: outro_stats
- Via this input: RollCredits
Then in the entities tab look up env_outro_credits.
In its properties set its name field as outro_stats.
Nav mesh
Run your map, once you are in the level hit the tilde key {~} to open the developer console then type
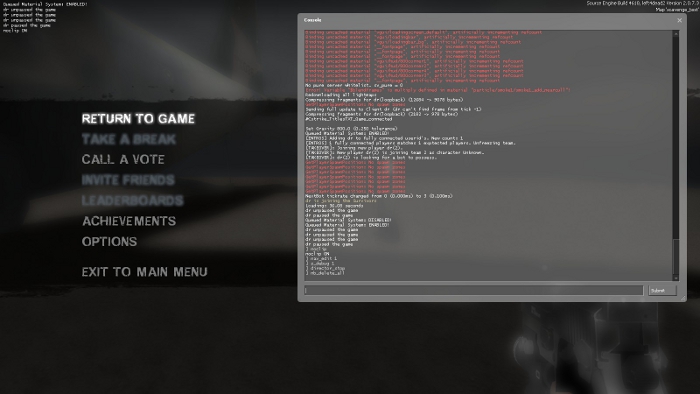
- sv_cheats 1- This allows cheats to be enabled in game
- noclip- Allows free movement around the map, you will not be blocked by anything
- nav_edit 1- Enables nav mesh editting
- z_debug 1- Allows you to see navigation attributes and all zombies on the map
- director_stop- Stops the director from spawning zombies
- nb_delete_all- Deletes all npc's on the map
Then go to you finale area and open the developer console and type in
- nav_mark_walkable- Marks a walkable point in the map marked by a purple pyramid that can be generated into nav meshes
- nav_generate_incremental- Generates the nav meshes to a certain distance from the nav_mark_walkable
Then make sure you have the areas selected that you want around the finale trigger, as well as distanced areas for the zombies to spawn from. Then type in the following in the developer console:
- mark Finale- This an attribute for nav meshes that is used in the final level of a campaign and is used in conjunction with a trigger_finale.
注意:To make the navigation work there must be a navigation mesh marked with the checkpoint attribute.
Then go to your player start area and mark those areas with checkpoint and player start.
Finally you need to go to your escape vehicle and mark those nav areas inside with rescue vehicle.
 After that is done, type the following in the developer console:
- nav_analyze- (This analyzes all the nav meshes and writes a file named "yourmapname".nav in the maps folder of your left4dead2 folder.)
This is all you need to make a scavenge finale, I hope this helped
VScripts
There are three vscripts are involved in this scavenge finale. Note that some code is redundant or commented out, possibly marks of the development process. Included are additional comments:
c1m4_atrium.nut
This script needs to be loaded on MapSpawn manually as a Director script, using the BeginScript input of the info_director entity. It sets the number of gas cans, the default CommonLimit, unblocks the rescue vehicle nav area, and (for some reason) declares the function GasCanPoured().
- The number of gas cans will decrease if it is a single player game
- Since human players will be navigating on the rescue vehicle, the rescue vehicle nav area is unblocked.
- GasCanPoured() will be called either by the director (OnTeamScored) or point_prop_use_target (OnUsedFinished) whenever a gas can is successfully poured.
Msg(" atrium map script "+"\n")

// number of cans needed to escape.

if ( Director.IsSinglePlayerGame() )
{
	NumCansNeeded <- 8
}
else
{
	NumCansNeeded <- 13
}

// This script is called on MapSpawn, so the CommonLimit is for play before the finale start.
DirectorOptions <-
{

CommonLimit = 15

}

NavMesh.UnblockRescueVehicleNav() // Unblock so humans can be rescued when incapped near nozzle

EntFire( "progress_display", "SetTotalItems", NumCansNeeded ) //Set number of cans with game_scavenge_progress_display


function GasCanPoured(){} // Declaration of function, but was moved to main finale script
c1m4_atrium_finale.nut
This script is loaded as soon as the finale is forced to start (when the elevator opens at the lowest floor of the atrium). It contains most of the finale settings and logic.
- There are multiple finale stages, either onslaught, panic, or tank. The first stage is an onslaught and uses InitialOnslaughtOptions for DirectorOptions. The will end once gas cans are picked up four times or one gas can is successfully poured, leading to a PANIC stage
- The rest of the onslaughts run off c1m4_delay.nut for DirectorOptions. This onslaught is time dependent and has a lower tolerance for the number of gas can touches before moving to the next stage.
Msg("----------------------FINALE SCRIPT------------------\n")
//-----------------------------------------------------
// Stage type enumerations
PANIC <- 0
TANK <- 1
DELAY <- 2
ONSLAUGHT <- 3
//-----------------------------------------------------
// Initialized tables along with stage settings

SharedOptions <-
// Base DirectorOptions
{
 	A_CustomFinale1 = ONSLAUGHT //Will be stopped with input to director, EndCustomScriptedStage
	A_CustomFinaleValue1 = "" //InitialOnslaughtOptions is slightly different from c1m4_delay

	A_CustomFinale2 = PANIC
	A_CustomFinaleValue2 = 1 //1 PANIC wave

	A_CustomFinale3 = ONSLAUGHT
	A_CustomFinaleValue3 = "c1m4_delay" //This onslaught also depends on timer

	A_CustomFinale4 = PANIC
	A_CustomFinaleValue4 = 1

	A_CustomFinale5 = ONSLAUGHT
	A_CustomFinaleValue5 = "c1m4_delay"

	A_CustomFinale6 = TANK
	A_CustomFinaleValue6 = 1

	A_CustomFinale7 = ONSLAUGHT
	A_CustomFinaleValue7 = "c1m4_delay"

 	A_CustomFinale8 = PANIC
	A_CustomFinaleValue8 = 1

	A_CustomFinale9 = ONSLAUGHT
	A_CustomFinaleValue9 = "c1m4_delay"

 	A_CustomFinale10 = PANIC
	A_CustomFinaleValue10 = 1

	A_CustomFinale11 = ONSLAUGHT
	A_CustomFinaleValue11 = "c1m4_delay"

	A_CustomFinale12 = PANIC
	A_CustomFinaleValue12 = 1

 	A_CustomFinale13 = ONSLAUGHT
	A_CustomFinaleValue13 = "c1m4_delay"

	A_CustomFinale14 = TANK
	A_CustomFinaleValue14 = 1 //1 TANK

 	A_CustomFinale15 = ONSLAUGHT
	A_CustomFinaleValue15 = "c1m4_delay"

	A_CustomFinale16 = PANIC
	A_CustomFinaleValue16 = 1

 	A_CustomFinale17 = ONSLAUGHT
	A_CustomFinaleValue17 = "c1m4_delay"

 	A_CustomFinale18 = PANIC
	A_CustomFinaleValue18 = 1

 	A_CustomFinale19 = ONSLAUGHT
	A_CustomFinaleValue19 = "c1m4_delay"

	A_CustomFinale20 = PANIC
	A_CustomFinaleValue20 = 1

 	A_CustomFinale21 = ONSLAUGHT
	A_CustomFinaleValue21 = "c1m4_delay"

	A_CustomFinale22 = TANK
	A_CustomFinaleValue22 = 1

 	A_CustomFinale23 = ONSLAUGHT
	A_CustomFinaleValue23 = "c1m4_delay"

 	A_CustomFinale24 = PANIC
	A_CustomFinaleValue24 = 1

 	A_CustomFinale25 = ONSLAUGHT
	A_CustomFinaleValue25 = "c1m4_delay"

	A_CustomFinale26 = PANIC
	A_CustomFinaleValue26 = 1

 	A_CustomFinale27 = ONSLAUGHT
	A_CustomFinaleValue27 = "c1m4_delay"

	A_CustomFinale28 = PANIC
	A_CustomFinaleValue28 = 1

 	A_CustomFinale29 = ONSLAUGHT
	A_CustomFinaleValue29 = "c1m4_delay"

 	A_CustomFinale30 = PANIC
	A_CustomFinaleValue30 = 1

 	A_CustomFinale31 = ONSLAUGHT
	A_CustomFinaleValue31 = "c1m4_delay"
        // End of finale, regardless of gas cans filled

	//-----------------------------------------------------
        // More Default DirectorOptions

	PreferredMobDirection = SPAWN_LARGE_VOLUME
	PreferredSpecialDirection = SPAWN_LARGE_VOLUME

//	BoomerLimit = 0
//	SmokerLimit = 2
//	HunterLimit = 1
//	SpitterLimit = 1
//	JockeyLimit = 0
//	ChargerLimit = 1

	ProhibitBosses = true
	ZombieSpawnRange = 3000
	MobRechargeRate = 0.5
	HordeEscapeCommonLimit = 15
	BileMobSize = 15

	MusicDynamicMobSpawnSize = 8
	MusicDynamicMobStopSize = 2
	MusicDynamicMobScanStopSize = 1
}

InitialOnslaughtOptions <-
// DirectorOptions for first onslaught
{
    LockTempo = 0
	IntensityRelaxThreshold = 1.1
	RelaxMinInterval = 2
	RelaxMaxInterval = 4
	SustainPeakMinTime = 25
	SustainPeakMaxTime = 30

	MobSpawnMinTime = 4
	MobSpawnMaxTime = 8
	MobMinSize = 2
	MobMaxSize = 6
	CommonLimit = 5

	SpecialRespawnInterval = 100
}

PanicOptions <-
// DirectorOptions when in a PANIC stage
{

	MegaMobSize = 0 // randomized in OnBeginCustomFinaleStage
	MegaMobMinSize = 20
	MegaMobMaxSize = 40

	CommonLimit = 15

	SpecialRespawnInterval = 40
}

TankOptions <-
// DirectorOptions when in a TANK stage
{
	ShouldAllowMobsWithTank = true
	ShouldAllowSpecialsWithTank = true

	MobSpawnMinTime = 10
	MobSpawnMaxTime = 20
	MobMinSize = 3
	MobMaxSize = 5

	CommonLimit = 7

	SpecialRespawnInterval = 60
}


DirectorOptions <- clone SharedOptions
// Start with SharedOptions
{
}


//-----------------------------------------------------

// number of cans needed to escape. again. (Later moved to c1m4_atrium.nut)
NumCansNeeded <- 13

// fewer cans in single player since bots do not help much
if ( Director.IsSinglePlayerGame() )
{
	NumCansNeeded <- 8
}

// duration of delay stage.
DelayMin <- 10
DelayMax <- 20

// Number of touches and/or pours allowed before a delay is aborted.
DelayPourThreshold <- 1
DelayTouchedOrPouredThreshold <- 2


// Once the delay is aborted, amount of time before it progresses to next stage.
AbortDelayMin <- 1
AbortDelayMax <- 3

// Number of touches and pours it takes to transition out of c1m4_finale_wave_1
GimmeThreshold <- 4


// console overrides
if ( Director.IsPlayingOnConsole() )
{
	DelayMin <- 20
	DelayMax <- 30

	// Number of touches and/or pours allowed before a delay is aborted.
	DelayPourThreshold <- 2
	DelayTouchedOrPouredThreshold <- 4

	TankOptions.ShouldAllowSpecialsWithTank = false

}
//-----------------------------------------------------
//      INIT
//-----------------------------------------------------

GasCansTouched          <- 0
GasCansPoured           <- 0
DelayTouchedOrPoured    <- 0
DelayPoured             <- 0

EntFire( "timer_delay_end", "LowerRandomBound", DelayMin )
EntFire( "timer_delay_end", "UpperRandomBound", DelayMax )
EntFire( "timer_delay_abort", "LowerRandomBound", AbortDelayMin )
EntFire( "timer_delay_abort", "UpperRandomBound", AbortDelayMax )

// this is occurs too late. moved to c1m4_atrium.nut
//EntFire( "progress_display", "SetTotalItems", NumCansNeeded )

function AbortDelay(){}  	// only defined during a delay, in c1m4_delay.nut
function EndDelay(){}		// only defined during a delay, in c1m4_delay.nut

NavMesh.UnblockRescueVehicleNav() // This is redundant since it was already done once

//-----------------------------------------------------

function GasCanTouched()
// This is called by weapon_scavenge_item_spawn OnItemPickedUp
{
    GasCansTouched++
    Msg(" Touched: " + GasCansTouched + "\n")

    EvalGasCansPouredOrTouched()
}

function GasCanPoured()
// In this map, it is called by the director OnTeamScored
{
    GasCansPoured++
    DelayPoured++
    Msg(" Poured: " + GasCansPoured + "\n")

    if ( GasCansPoured == NumCansNeeded )
    {
        Msg(" needed: " + NumCansNeeded + "\n")
        EntFire( "relay_car_ready", "trigger" )
    }

    EvalGasCansPouredOrTouched()
}

function EvalGasCansPouredOrTouched()
// Evaluate the number of times gas cans poured or touched
{
    TouchedOrPoured <- GasCansPoured + GasCansTouched
    Msg(" Poured or touched: " + TouchedOrPoured + "\n")

    DelayTouchedOrPoured++
    Msg(" DelayTouchedOrPoured: " + DelayTouchedOrPoured + "\n")
    Msg(" DelayPoured: " + DelayPoured + "\n")

    if (( DelayTouchedOrPoured >= DelayTouchedOrPouredThreshold ) || ( DelayPoured >= DelayPourThreshold ))
    // This is for c1m4_delay.nut (c1m4_delay.nut also resets the counter for Poured and TouchOrPoured)
    {
        AbortDelay()
    }

    switch( TouchedOrPoured ) //For stopping the InitialOnslaught (first stage)
    {
        case GimmeThreshold:
            EntFire( "@director", "EndCustomScriptedStage" )
            break
    }
}
//-----------------------------------------------------

function AddTableToTable( dest, src )
// This function is used to move table keys and values to other tables
{
	foreach( key, val in src )
	{
		dest[key] <- val
	}
}

function OnBeginCustomFinaleStage( num, type )
// Special Function every time a finale stage starts.
// Instructions in this function set DirectorOptions for PANIC and TANK
{
	printl( "Beginning custom finale stage " + num + " of type " + type );

	local waveOptions = null
	if ( num == 1 )
	{
		waveOptions = InitialOnslaughtOptions
	}
	else if ( type == PANIC )
	{
		waveOptions = PanicOptions
		waveOptions.MegaMobSize = PanicOptions.MegaMobMinSize + rand()%( PanicOptions.MegaMobMaxSize - PanicOptions.MegaMobMinSize )

		Msg("*************************" + waveOptions.MegaMobSize + "\n")

	}
	else if ( type == TANK )
	{
		waveOptions = TankOptions
	}

	//---------------------------------


	MapScript.DirectorOptions.clear()


	AddTableToTable( MapScript.DirectorOptions, SharedOptions );

	if ( waveOptions != null )
	{
		AddTableToTable( MapScript.DirectorOptions, waveOptions );
	}


	Director.ResetMobTimer()

	if ( developer() > 0 )
	{
		Msg( "\n*****\nMapScript.DirectorOptions:\n" );
		foreach( key, value in MapScript.DirectorOptions )
		{
			Msg( "    " + key + " = " + value + "\n" );
		}

		if ( LocalScript.rawin( "DirectorOptions" ) )
		{
			Msg( "\n*****\nLocalScript.DirectorOptions:\n" );
			foreach( key, value in LocalScript.DirectorOptions )
			{
				Msg( "    " + key + " = " + value + "\n" );
			}
		}
	}
}

//-----------------------------------------------------


if ( Director.GetGameMode() == "coop" )
{
}
else if ( Director.GetGameMode() == "versus" ) // Allow tanks and witches in VS
{
	SharedOptions.ProhibitBosses = false
}
c1m4_delay.nut
This script is loaded whenever an onslaught stage is started, with the exception of the first one.
- Calls logic_timer entities to start a timer to move onto the next stage
- The stage ends either by expired time (timer_delay_end) or gas can pour and touch (timer_delay_abort)
Msg("**Delay started**\n")

DirectorOptions <-
{
	MobMinSize = 2
	MobMaxSize = 3

	BoomerLimit = 0
	SmokerLimit = 0
	HunterLimit = 0
	SpitterLimit = 0
	JockeyLimit = 0
	ChargerLimit = 0

	MinimumStageTime = 15

	CommonLimit = 5
}

Director.ResetMobTimer() //Start the above onslaught settings immediately


// start the delay timer
EntFire( "timer_delay_end", "enable" )

//reset for this stage (PANIC and TANK depend on other factors)
DelayTouchedOrPoured   <- 0
DelayPoured            <- 0
//-------------------------------------------------


// abort the delay if a survivor picks up or pours a gas can
// Function called by c1m4_atrium_finale.nut
function AbortDelay()
{
    Msg("**Delay aborted early**\n")
    EntFire( "timer_delay_abort", "enable" )
}

// called by the timers themselves
// These EntFired timers MUST be the same targetname in the map!
function EndDelay()
{
        Msg("**Delay ended**\n")
        EntFire( "timer_delay_end", "Disable" )
        EntFire( "timer_delay_end", "ResetTimer" )
        EntFire( "timer_delay_abort", "Disable" )
        EntFire( "timer_delay_abort", "ResetTimer" )
        EntFire( "@director", "EndCustomScriptedStage" )
}


