Criando Entidades de Brush
This page either contains information that is only partially or incorrectly translated, or there isn't a translation yet.
If this page cannot be translated for some reason, or is left untranslated for an extended period of time after this notice is posted, the page should be requested to be deleted.
Also, please make sure the article complies with the alternate languages guide.
As a courtesy, please do not edit this while this message is displayed.
If this page has not been edited for at least several hours to a few days, please remove this template. This message is intended to help reduce edit conflicts; please remove it between editing sessions to allow others to edit the page.
The person who added this notice will be listed in its edit history should you wish to contact them.
Já criamos brushes. Há um outro lado deles: as entidades de brush
Neste exemplo, criaremos um brush que funciona como uma porta deslizante. Quando o jogador tocar o brush, ele se elevará no ar e permitirá a passagem.

Construção
- Selecione o bloco Block tool
 e crie um novo brush. 128×128×16 é um bom tamanho, mas qualquer tamanho serve.
  Dica:Se a grade do Hammer for muito grande para ser reduzida a 16 unidades, pressione [ ou clique em Smaller Grid'
  para reduzi-la. Nunca desative o encaixe a menos que você realmente precise!
 - Mova o brush para uma entidade (também conhecido como “amarrar” a uma entidade) usando Ctrl+T ou o botão toEntity:
 Dica:Se você tiver desmarcado o brush ao qual deseja vincular a entidade, será necessário selecionar novamente, caso contrário, o botão toEntity não funcionará quando você clicar nele
 - Isso abrirá a caixa de diálogo Propiedades do Objeto:
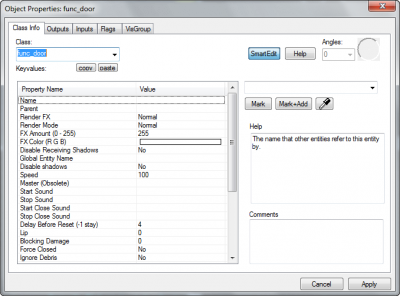 Dica:Se você precisar acessar a caixa de diálogo novamente mais tarde, selecione o brush e pressione Alt+Enter.
 - Select func_door from the “Class” drop-down menu in the top left (you can search by typing into the box) and hit “Apply”.
- Near the bottom of the main “Keyvalues” list, find “Move Direction”. Either change its value to read “
-90 0 0” or select “Up” from the drop-down list to the left of the black circle. - Click “Apply” again, then close the Object Properties dialog.

Agora você deve conseguir compilar o mapa e ver a porta funcionando.
Finishing
Open the Texture Browser and filter for “door”. Choose a material that you like and apply it to your brush as you would normally. You might also want to build a wall that connects the door to the edges of your map.

Destroying
To make a brush entity back into a regular one, select it and press Ctrl+Shift+W, or ToWorld, right next to the ToEntity button you clicked earlier.