Adding Prop Models: Difference between revisions
m (Temp save. Still working on this, but wanted to comment on another thing first.) |
m (bug notice hidetested=1 param on page where it might not make sense) |
||
| (45 intermediate revisions by 23 users not shown) | |||
| Line 1: | Line 1: | ||
{{LanguageBar}} | |||
{{first room menu}} | {{first room menu}} | ||
Prop models are geometry files created in a modeling program such as Softimage | Prop models are geometry files created in a modeling program such as [[Softimage Mod Tool]]. You can place these prop models in maps like adding props to a movie set. | ||
There are basically three types of props: | There are basically three types of props: | ||
* ''Static'' props will always be stationary in the map. | * ''Static'' props will always be stationary in the map. | ||
* ''Dynamic'' props are props that can be animated. | * ''Dynamic'' props are props that can be animated and/or can move with another object. | ||
* ''Physics'' props are props that can be tossed about (obeying physics like gravity). | * ''Physics'' props are props that can be tossed about (obeying physics like gravity). | ||
You will learn how to place and position two of these types in this tutorial. | |||
==== Known bugs in the model browser: ==== | |||
{{bug|hidetested=1|When using the filter (search function) the text typed will be typed backwards if the mouse cursor is outside of the model browser. Example: Typing "sign" will be shown as "ngis".}} | |||
{{clr}} | |||
[[File:hammer_pickpropstatic.png|thumb|left|200px|Select [[prop_static]] from the drop-down list.]] | |||
[[File:hammer_placepropstatic.png|thumb|right|300px|Place the ''prop_static'' entity on the floor by clicking in the 3D View.]] | |||
We will start by adding a static prop. | |||
All props are entities, and handled as such, so switch to the '''Entity Tool''' again. | |||
Then pick [[prop_static]] from the entity list in the '''Objects Toolbar'''. | |||
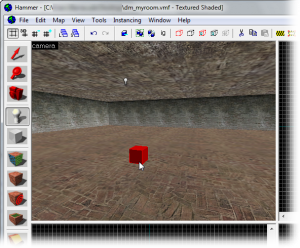
Place the ''prop_static'' in the map by clicking on the floor brush in the 3D view. | |||
The result is a little red box. That’s because we haven’t decided what the prop will look like yet. | |||
We will | We will have to choose a model for this prop to do that. | ||
{{clr}} | |||
[[File:hammer_pickworldmodel.png|thumb|right|400px|Switch to the World Model field.]] | |||
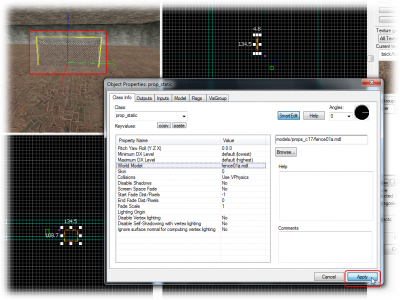
Switch to the Selection Tool and double-click the ''prop_static'' to bring up its properties. | |||
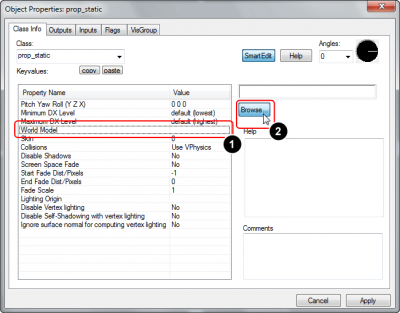
# Click the '''World Model''' field in the '''Object Properties''' dialog. | |||
# Click the '''Browse...''' button and wait patiently while the '''Model Browser''' list populates. (You will only have to wait once; after that, the list will be cached for future searches.) | |||
{{note|There are currently two types of model browsers in Hammer, depending of whether the ''Use VGUI model browser'' flag is checked in the Hammer options. This tutorial will only focus on the new and default VGUI model browser. The older browser is similar to a normal Windows file explorer.}} | |||
{{clr}} | |||
[[File:Hammer_ModelBrowser_PickFolder.jpg|thumb|right|400px|Click a folder to change to that sub-directory.]] | |||
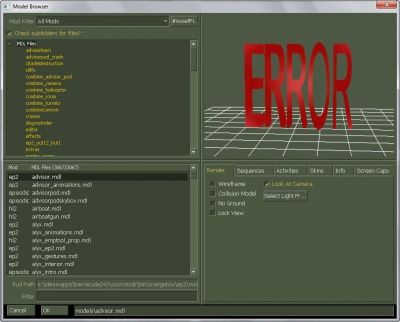
Don’t worry that it says “ERROR” in big red letters in the preview window of the Model Browser. That’s just because we haven’t chosen any model to preview yet. | |||
Click the ''props_c17'' folder in the model browser to list its models in the lower left window. | |||
{{clr}} | |||
[[File:Hammer_ModelBrowser_PickFence.jpg|thumb|right|400px|Click the ''fence01a'' model to select it, and then click ''OK'' to close the browser.]] | |||
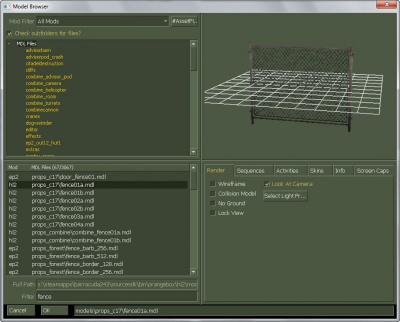
There are a lot of models in this folder, so instead of scrolling through the entire list, we can simply filter the content like we did with the texture browser, by typing in “<code>fence</code>” in the text box just beneath the list. | |||
Click the model file <code>fence01a.mdl</code> to select it. | |||
A preview of the model will be displayed in the preview window. You can drag your mouse in that window to freely rotate the model. | |||
When you’re done with inspecting the preview, confirm your model choice by clicking ''OK''. | |||
The Model Browser will close and the ''fence01a'' model will be selected as the model for the ''prop_static'' entity. | |||
[[File:hammer_pickapply_sm.png|thumb|right|400px|Click the ''Apply'' button to confirm your changes.]] | |||
Click the ''Apply'' button to commit the changes. | |||
The ''prop_static'' will now change into displaying the fence model you selected in the 3D view. | |||
You can also change the direction the fence faces by changing the pitch yaw and roll settings or using the angle circle and typing in a value between 0 and 360. | |||
{{clr}} | |||
[[ | [[File:hammer_pickpropphysics.jpg|thumb|left|100px|Choose the appropriate physics prop entity.]] | ||
[[File:hammer_placepropphysics.png|thumb|right|300px|Place the physics prop entity by clicking the floor in the 3D view.]] | |||
Now let’s add a prop model with physics properties. | |||
Switch to the '''Entity Tool'''. | |||
The type of prop_physics entity we’ll need depends on your game choice. | |||
[[ | * If you are mapping for [[Half-Life 2]]: Single Player, choose the [[prop_physics]] entity. | ||
* If you are mapping for [[Half-Life 2: Deathmatch]], choose the [[prop_physics]]/[[prop_physics_respawnable]] entity. (Do '''NOT''' choose the [[prop_physics_multiplayer]] entity, because gravity gun can’t interact with it.) | |||
* If you are mapping for [[Counter-Strike: Source]], choose the [[prop_physics_multiplayer]] entity. | |||
Choose the appropriate entity from the entity list in the ''Object Toolbar''. | |||
Place the physics prop entity somewhere on the floor of the room. | |||
Re-open the '''Object Properties''' dialog if you’ve closed it to display the properties of the physics prop. Otherwise the dialog will automatically have changed to display its properties. | |||
{{clr}} | |||
[[File:Hammer_ModelBrowser_PickOildrum.jpg|thumb|right|400px|After opening the browser, search for <code>oildrum</code>, choose the ''oildrum001'' model, and click ''OK''.]] | |||
Again click the '''Browse...''' button in the '''World Model''' field in the '''Object Properties''' dialog to load up the model browser. | |||
# Instead of “<code>fence</code>”, search for “<code>oildrum</code>”. | |||
# Pick the <code>oildrum001.mdl</code>. | |||
# Close the browser with ''OK''. | |||
{{clr}} | |||
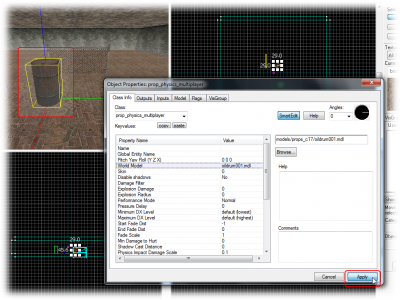
[[File:hammer_pickapply_sm2.png|thumb|right|400px|Click ''Apply'' to make the change and update the 3D view.]] | |||
Click the '''Apply''' button to confirm your changes, and the physics prop will change to the barrel model you selected. | |||
{{clr}} | |||
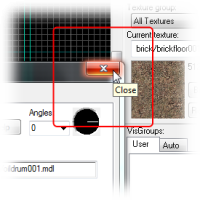
[[ | [[File:hammer_closeprop.png|thumb|right|200px|Close the '''Object Properties''' dialog.]] | ||
Close the '''Object Properties''' dialog. | |||
{{clr}} | |||
== Moving objects == | |||
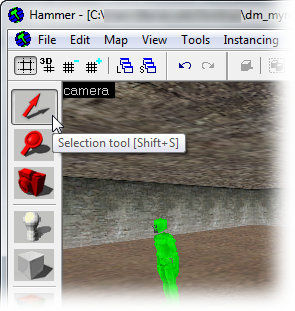
[[File:hammer_pickselect.png|frame|right|Switch to the Selection Tool.]] | |||
Right now the fence model is stuck half-way into the floor. Let’s move it up. | |||
Entities are moved just like brushes are: | |||
Switch to the '''Selection Tool''' and click on the fence to select it. | |||
Then select the fence model by clicking on it in the 3D view. | |||
A box will appear around the model in all the views, showing that it has been selected. | |||
To move something along the z axis (up or down), you’ll need to move it in one of the lower views (named ''front (y/z)'' or ''side (x/z)''). | |||
Click inside the red bounding box in one of these 2D views, and then drag the fence upward until it’s closer to the floor. | |||
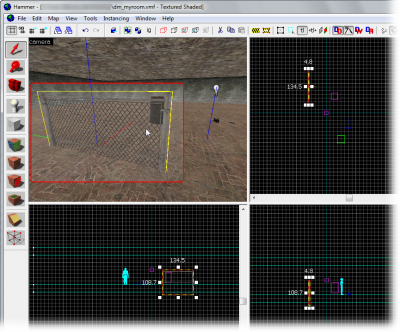
[[File:hammer_selectfence_sm.png|thumb|left|400px|Select the fence model in the 3D view by clicking it, and then click and drag the fence in one of the lower views to move it.]] | |||
{{clr}} | |||
[[ | [[File:hammer_picksmgrid.png|frame|right|Decrease the size of the grid so the objects can be moved in finer steps.]] | ||
You may find that you can’t quite line up the bottom of the model with the floor because the current size of the grid prevents it. It won’t matter that much if the fence sticks somewhat into the floor, but if you want it exactly aligned you will need to decrease the grid size: | |||
# Click the '''Smaller Grid''' button in the grid toolbar in the upper left corner of the Hammer window. | |||
# Zoom in a bit on where the fence meets the floor, so that you can see better. | |||
# Adjust the height of the fence. | |||
# Repeat steps 1–3 until you’re satisfied. (For a perfect fit, you will need to decrease the grid size to 2.) | |||
{{note|Alternatively, you can use the shortcut key {{key|[}} to decrease the grid size, or the {{key|]}} key to increase it.}} | |||
[[File:hammer_movefence_sm.png|thumb|left|400px|With the grid size smaller, the fence can be lined up with the floor.]] | |||
{{clr}} | |||
Now you are finally done with the blueprints for this map. | |||
{{Navbar|Adding Light|Your First Map|Saving and Compiling}} | |||
[[Category:Level Design]] | |||
[[Category:Tutorials]] | |||
Latest revision as of 07:05, 20 May 2025
Prop models are geometry files created in a modeling program such as Softimage Mod Tool. You can place these prop models in maps like adding props to a movie set.
There are basically three types of props:
- Static props will always be stationary in the map.
- Dynamic props are props that can be animated and/or can move with another object.
- Physics props are props that can be tossed about (obeying physics like gravity).
You will learn how to place and position two of these types in this tutorial.
Known bugs in the model browser:
We will start by adding a static prop.
All props are entities, and handled as such, so switch to the Entity Tool again.
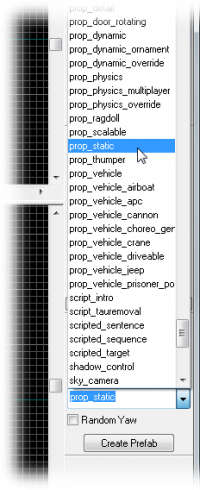
Then pick prop_static from the entity list in the Objects Toolbar.
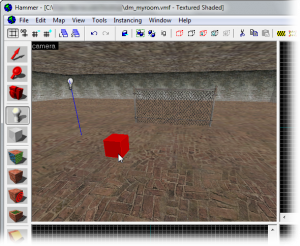
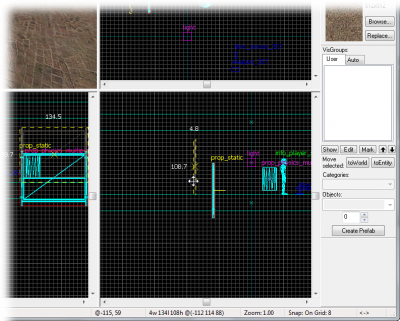
Place the prop_static in the map by clicking on the floor brush in the 3D view.
The result is a little red box. That’s because we haven’t decided what the prop will look like yet.
We will have to choose a model for this prop to do that.
Switch to the Selection Tool and double-click the prop_static to bring up its properties.
- Click the World Model field in the Object Properties dialog.
- Click the Browse... button and wait patiently while the Model Browser list populates. (You will only have to wait once; after that, the list will be cached for future searches.)
Don’t worry that it says “ERROR” in big red letters in the preview window of the Model Browser. That’s just because we haven’t chosen any model to preview yet.
Click the props_c17 folder in the model browser to list its models in the lower left window.
There are a lot of models in this folder, so instead of scrolling through the entire list, we can simply filter the content like we did with the texture browser, by typing in “fence” in the text box just beneath the list.
Click the model file fence01a.mdl to select it.
A preview of the model will be displayed in the preview window. You can drag your mouse in that window to freely rotate the model.
When you’re done with inspecting the preview, confirm your model choice by clicking OK.
The Model Browser will close and the fence01a model will be selected as the model for the prop_static entity.
Click the Apply button to commit the changes.
The prop_static will now change into displaying the fence model you selected in the 3D view.
You can also change the direction the fence faces by changing the pitch yaw and roll settings or using the angle circle and typing in a value between 0 and 360.
Now let’s add a prop model with physics properties.
Switch to the Entity Tool.
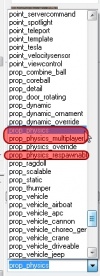
The type of prop_physics entity we’ll need depends on your game choice.
- If you are mapping for Half-Life 2: Single Player, choose the prop_physics entity.
- If you are mapping for Half-Life 2: Deathmatch, choose the prop_physics/prop_physics_respawnable entity. (Do NOT choose the prop_physics_multiplayer entity, because gravity gun can’t interact with it.)
- If you are mapping for Counter-Strike: Source, choose the prop_physics_multiplayer entity.
Choose the appropriate entity from the entity list in the Object Toolbar.
Place the physics prop entity somewhere on the floor of the room.
Re-open the Object Properties dialog if you’ve closed it to display the properties of the physics prop. Otherwise the dialog will automatically have changed to display its properties.
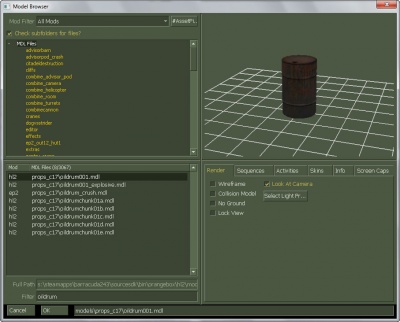
Again click the Browse... button in the World Model field in the Object Properties dialog to load up the model browser.
- Instead of “
fence”, search for “oildrum”. - Pick the
oildrum001.mdl. - Close the browser with OK.
Click the Apply button to confirm your changes, and the physics prop will change to the barrel model you selected.
Close the Object Properties dialog.
Moving objects
Right now the fence model is stuck half-way into the floor. Let’s move it up.
Entities are moved just like brushes are:
Switch to the Selection Tool and click on the fence to select it.
Then select the fence model by clicking on it in the 3D view.
A box will appear around the model in all the views, showing that it has been selected.
To move something along the z axis (up or down), you’ll need to move it in one of the lower views (named front (y/z) or side (x/z)).
Click inside the red bounding box in one of these 2D views, and then drag the fence upward until it’s closer to the floor.
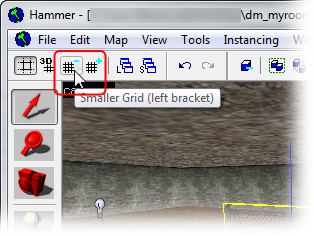
You may find that you can’t quite line up the bottom of the model with the floor because the current size of the grid prevents it. It won’t matter that much if the fence sticks somewhat into the floor, but if you want it exactly aligned you will need to decrease the grid size:
- Click the Smaller Grid button in the grid toolbar in the upper left corner of the Hammer window.
- Zoom in a bit on where the fence meets the floor, so that you can see better.
- Adjust the height of the fence.
- Repeat steps 1–3 until you’re satisfied. (For a perfect fit, you will need to decrease the grid size to 2.)
Now you are finally done with the blueprints for this map.
