|
|
| (23 intermediate revisions by 11 users not shown) |
| Line 1: |
Line 1: |
| {{first room menu}} | | {{LanguageBar|title = 添加道具}} |
|
| |
|
| Prop models are geometry files created in a modeling program such as [[XSI Mod Tool]]. You can place these prop models in maps like adding props to a movie set.
| | {{first room menu:zh-cn}} |
| | 道具模型是一种由与{{L|XSI Mod Tool}}类似的模型制作工具创建的几何文件。你可以想给电影添加道具一样把这些道具模型添加到地图中。 |
|
| |
|
| There are basically three types of props:
| | 有三种最基本的道具类型: |
| * ''Static'' props will always be stationary in the map. | | * ''静态'' 此类道具将永远在地图中不会产生变化。 |
| * ''Dynamic'' props are props that can be animated and/or move with another object. | | * ''动态'' 此类道具可以播放动画或者与其他对象一起移动。 |
| * ''Physics'' props are props that can be tossed about (obeying physics like gravity). | | * ''物理'' 此类道具可以被随意摆弄(遵循物理规则,如重力)。 |
|
| |
|
| You will learn how to place and position two of these types in this tutorial.
| | 在此教程中你将学习如何放置其中两种类型并了解它们的作用范围。 |
|
| |
|
| <br clear="both">
| | {{clr}} |
|
| |
|
| [[Image:hammer_pickpropstatic.jpg |thumb|left|200px| Select [[prop_static]] from the drop-down list.]] | | [[File:hammer_pickpropstatic.png|thumb|left|200px|从下拉列表里选择{{L|prop_static}}。]] |
| [[Image:hammer_placepropstatic.jpg |thumb|right|200px| Place the ''prop_static'' entity on the floor by clicking in the 3D View.]] | | [[File:hammer_placepropstatic.png|thumb|right|200px|在三维视图中点击,将''prop_static''实体放到地板上。]] |
|
| |
|
| We will start by adding a static prop.
| | 我们将先从添加静态道具开始。 |
|
| |
|
| All props are entities, and handled as such, so switch to the '''Entity Tool''' again.
| | 所有道具都是实体,操作也相同,因此再切换回'''实体工具'''。 |
|
| |
|
| Then pick [[prop_static]] from the entity list in the '''Objects Toolbar'''.
| | 接着在'''对象工具栏'''的实体列表中选择{{L|prop_static}}。 |
|
| |
|
| Place the ''prop_static'' in the map by clicking on the floor brush in the 3D view.
| | 在三维视图中点击鼠标将''prop_static''放到地板固体之上。 |
|
| |
|
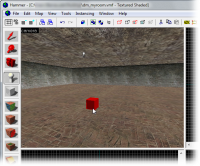
| The result is a little red box. That’s because we haven't decided what the prop will look like yet.
| | 会出现一只红色小盒子。这是因为我们现在还没决定这个道具将会是什么样子的。 |
|
| |
|
| We will have to choose a model for this prop to do that.
| | 为此我们要给这样道具选择一只模型。 |
|
| |
|
| <br clear="both">
| | {{clr}} |
|
| |
|
| [[Image:hammer_pickworldmodel.gif |thumb|right|500px| Switch to the World Model field.]] | | [[File:hammer_pickworldmodel.png|thumb|right|500px| 切换到外界模型项。]] |
|
| |
|
| Switch to the Selection Tool and double-click the ''prop_static'' to bring up its properties.
| | 切换至选取工具并双击''prop_static''打开属性页。 |
|
| |
|
| # Click the '''World Model''' field in the '''Object Properties''' dialog. | | # 在'''对象属性'''对话框中点击'''外部模型'''项。 |
| # Click the '''Browse...''' button and wait patiently while the '''Model Browser''' list populates. (You will only have to wait once; after that, the list will be cached for future searches.) | | # 点击'''浏览...'''按钮并耐心等待'''模型浏览器'''中的列表准备完。(你只需等待一次;因为列表已经为未来的搜索创建了缓存。) |
|
| |
|
| {{note|There are currently two types of model browsers in Hammer, depending of whether the ''Use VGUI model browser'' flag is checked in the Hammer options. This tutorial will only focus on the new and default VGUI model browser. The older browser functions a lot like a normal Windows file explorer does.}} | | {{Note|目前Hammer的模型浏览器有两种,取决于是否在Hammer的选项中勾选了''使用图形化模型浏览器''标签。本教程主要以新的图形化模型浏览器讲解。老版本的浏览器就和普通的文件窗口差不多。}} |
|
| |
|
| <br clear="both">
| | {{clr}} |
|
| |
|
| [[Image:Hammer_ModelBrowser_PickFolder.jpg |thumb|right|400px| Click a folder to change to that sub-directory.]] | | [[File:Hammer_ModelBrowser_PickFolder.jpg|thumb|right|400px|点击一只文件夹可以转换到子目录。]] |
|
| |
|
| Don't worry that it says “ERROR” in big red letters in the preview window of the Model Browser. That’s just because we haven't chosen any model to preview yet.
| | 虽然模型浏览器的预览窗口中有大大的红色“ERROR”字样,但请不要担心。那只是因为我们现在还没选定要预览的模型。 |
|
| |
|
| Click the ''props_c17'' folder in the model browser to list the models in it in the lower right window.
| | 点击模型浏览器里的''props_c17''文件夹,列出其下的模型。 |
|
| |
|
| <br clear="both">
| | {{clr}} |
|
| |
|
| [[Image:Hammer_ModelBrowser_PickFence.jpg |thumb|right|400px| Click the ''fence01a'' model to select it, and then click ''OK'' to close the browser.]] | | [[File:Hammer_ModelBrowser_PickFence.jpg|thumb|right|400px| 点选模型''fence01a'',并点击''确认''关闭浏览器。]] |
|
| |
|
| There are a lot of models in this folder, so instead of scrolling through the entire list, we can simply filter the content like we did with the texture browser, by typing in "<code>fence</code>" in the text box just beneath the list.
| | 此文件夹下的模型非常多,但是我们不必滚动整个列表寻找目标,只需在列表下面的文本框中键入"<code>fence</code>"过滤出我们需要的内容,就像之前在纹理浏览器中做的那样。 |
|
| |
|
| Click the model file <code>fence01a.mdl</code> to select it.
| | 点选模型文件 <code>fence01a.mdl</code> 。 |
|
| |
|
| A preview of the model will be displayed in the preview window. You can drag your mouse in that window to freely rotate the model if you want.
| | 预览窗口中将显示此模型的预览。如果你愿意,可以在窗口中拖拽鼠标随意地旋转模型。 |
|
| |
|
| When you're done with inspecting the preview, confirm your choice of the model by clicking ''OK''.
| | 等你查看完预览模型后,点击''确认''确定你的选择。 |
|
| |
|
| The Model Browser will close and the ''fence01a'' model will be selected as the model for the ''prop_static'' entity.
| | 模型浏览器将关闭,而''fence01a''将成为你为''prop_static''实体所选定的模型。 |
|
| |
|
| [[Image:hammer_pickapply_sm.jpg |thumb|right|400px| Click the ''Apply'' button to confirm your changes.]] | | [[File:hammer_pickapply_sm.png|thumb|right|400px|点击''应用''按钮完成修改。]] |
|
| |
|
| Click the ''Apply'' button to commit the changes.
| | 点击''应用''按钮完成修改。 |
|
| |
|
| The ''prop_static'' will now change into displaying the fence model you selected in the 3D view.
| | 原先三维视图中的''prop_static''将转为显示你所选的防护围栏模型。 |
|
| |
|
| You can also change the direction the fence faces by changing the pitch yaw and roll settings or using the angle circle and typing in a value of 0 to 360.
| | 你也可以修改倾斜/偏转/滚动设置或者使用角度罗盘来改变防护围栏的方向。 |
|
| |
|
| | {{clr}} |
|
| |
|
| <br clear="both">
| | [[File:hammer_pickpropphysics.jpg|thumb|left|100px| 选择一个合适的物理模型实体。]] |
| | [[File:hammer_placepropphysics.png|thumb|right|200px| 点击三维视图将物理模型实体放置于地面上。]] |
|
| |
|
| [[Image:hammer_pickpropphysics.jpg |thumb|left|100px| Choose the appropriate physics prop entity.]]
| | 我们现在添加有物理性的道具模型。 |
| [[Image:hammer_placepropphysics.jpg |thumb|right|200px| Place the physics prop entity by clicking the floor in the 3D view.]]
| |
|
| |
|
| We will now add a prop model with physics properties.
| | 切换到'''实体工具'''。 |
|
| |
|
| Switch to the '''Entity Tool'''.
| | 选择什么类型的prop_physics实体取决与你要为什么游戏制作地图。 |
|
| |
|
| The type of prop_physics entity we are going to choose depends on what game your map is for.
| | * 如果你要为{{L|Half-Life 2|半条命2}}:单人游戏制作地图,请选{{L|prop_physics}}实体。 |
| | * 如果你要为{{L|Half-Life 2: Deathmatch|半条命2:死亡模式}}制作地图,请选{{L|prop_physics_multiplayer}}实体。 |
|
| |
|
| * If you are mapping for [[Half-Life 2]]: Single Player, choose the [[prop_physics]] entity.
| | 从''对象工具栏''的实体列表中选择一种合适的实体。 |
| * If you are mapping for [[Half-Life 2: Deathmatch]], choose the [[prop_physics_multiplayer]] entity.
| |
|
| |
|
| Choose the appropriate entity from the entity list in the ''Object Toolbar''.
| | 将物理道具实体放到房间地面上。 |
|
| |
|
| Place the physics prop entity somewhere on the floor of the room.
| | 为了显示物理道具的属性,如果你关闭了'''对象属性'''对话框那么请再次打开。 否则对话框将自动转为显示它的属性。 |
|
| |
|
| Re-open the '''Object Properties''' dialog if you've closed it, to display the properties of the physics prop. Otherwise the dialog will automatically have changed to display its properties.
| | {{clr}} |
|
| |
|
| <br clear="both"> | | [[File:Hammer_ModelBrowser_PickOildrum.jpg|thumb|right|400px| 打开浏览器后,搜索<code>oildrum</code>,选择模型''oildrum001'',之后点击''确认''。]] |
|
| |
|
| [[Image:Hammer_ModelBrowser_PickOildrum.jpg |thumb|right|400px| After having opened the browser, search for <code>oildrum</code>, choose the ''oildrum001'' model, and click ''OK''.]]
| | 再次点击'''对象属性'''对话框中'''外界模型'''项目里的'''浏览...'''按钮,打开模型浏览器。 |
|
| |
|
| Again click the '''Browse...''' button in the '''World Model''' field in the '''Object Properties''' dialog to load up the model browser.
| | # 搜索"<code>oildrum</code>"而不是"<code>fence</code>"。 |
| | # 选中<code>oildrum001.mdl</code>。 |
| | # 点击''确认''关闭浏览器。 |
|
| |
|
| # Instead of "<code>fence</code>", search for "<code>oildrum</code>".
| | {{clr}} |
| # Pick the <code>oildrum001.mdl</code>.
| |
| # Close the browser with ''OK''.
| |
|
| |
|
| <br clear="both">
| | [[File:hammer_pickapply_sm2.png|thumb|right|400px| 点击''应用''更改并更新三维视图。]] |
|
| |
|
| [[Image:hammer_pickapply_sm2.jpg |thumb|right|400px| Click ''Apply'' to make the change and update the 3D view.]]
| | 点击'''应用'''按钮使更改生效后物理道具将变成你所选的油桶的样子。 |
|
| |
|
| Click the '''Apply''' button to confirm your changes, and the physics prop will change to the barrel model you selected.
| | {{clr}} |
|
| |
|
| <br clear="both">
| | [[File:hammer_closeprop.png|thumb|right|200px| 关闭'''对象属性'''对话框。]] |
|
| |
|
| [[Image:hammer_closeprop.jpg |thumb|right|200px| Close the '''Object Properties''' dialog.]]
| | 关闭'''对象属性'''对话框。 |
|
| |
|
| Close the '''Object Properties''' dialog.
| | {{clr}} |
|
| |
|
| <br clear="both">
| | == 移动对象 == |
| | [[File:hammer_pickselect.png|frame|right| 切换至选取工具。]] |
|
| |
|
| == Moving objects ==
| | 你应该注意到防护围栏的模型有一半是陷在了地板里。我们现在就把它升上来。 |
| [[Image:hammer_pickselect.jpg |thumb|left|200px| Switch to the Selection Tool.]]
| |
| [[Image:hammer_selectfence_sm.jpg |thumb|right|400px| Select the fence model in the 3D view by clicking it, and then click and drag the fence in one of the lower views to move it.]]
| |
|
| |
|
| You may have noticed that the fence model is stuck half-way into the floor. We are going to move it up now.
| | 实体的移动与固体相同: |
|
| |
|
| Entities are moved just like brushes are:
| | 切换到'''选取工具'''。 |
|
| |
|
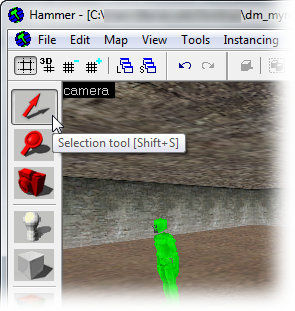
| Switch to the '''Selection Tool''' and click on the fence to select it.
| | 然后在三维视图中点选防护围栏模型。 |
|
| |
|
| Then select the fence model by clicking on it in the 3D view.
| | 此模型会在所有视图中一个方框框中,代表其已被选中。 |
|
| |
|
| A box will appear around the model in all the views, showing that it has been selected.
| | 要使某样东西在Z轴(上下)上移动,你必须在一种下级视图(称为''前视图(y/z)''或''侧视图(x/z)'')中移动它。 |
|
| |
|
| To move something along the z axis (up or down), you’ll need to move it in one of the lower views (named ''front (y/z)'' or ''side (x/z)'').
| | 在任意二位试图中的红色边框内点击,然后向上拖拽防护围栏直到它紧贴地板。 |
|
| |
|
| Click inside the red bounding box in one of these 2D views, and then drag the fence upward until it’s closer to the floor.
| | [[File:hammer_selectfence_sm.png|thumb|left|400px| 在三维视图中点击并选中防护围栏模型,然后在下级视图中点击并拖拽此模型将其移动。]] |
|
| |
|
| <br clear="both">
| | {{clr}} |
|
| |
|
| [[Image:hammer_movefence_sm.jpg |thumb|right|400px| Decrease the size of the grid so the objects can be moved in finer steps.]] | | [[File:hammer_picksmgrid.png|frame|right|减少网格大小使对象可以微小的间隔移动。]] |
|
| |
|
| You may find that you can’t quite line up the bottom of the model with the floor because the current size of the grid prevents it. It won’t matter that much if the fence sticks somewhat into the floor, but if you want it exactly aligned you will need to decrease the grid size:
| | 你应该会发现,模型底部很难与地板对齐,这是因为目前的网格大小使你无法做到这点。防护围栏有点陷在地里其实也没多大问题,但是你要是想让它更加整齐那就必须减小网格大小: |
|
| |
|
| # Click the '''Smaller Grid''' button in the grid toolbar in the upper left corner of the Hammer window. | | # 点击Hammer窗口左上角网格工具栏里的'''缩小网格'''按钮。 |
| {{note|Alternatively, you can use the shortcut key '''[''' to decrease the grid size, or the ''']''' key to increase the grid size}} | | {{Note|你可以用快捷键'''['''减少网格大小或是用''']'''键加大网格大小。}} |
| # Zoom in a bit on where the fence meets the floor, so that you can see better. | | # 放大防护围栏与地面相交的地方,这样才能看得更清楚。 |
| # Adjust the height of the fence. | | # 调节防护围栏的高度。 |
| # Repeat steps 1-3 until you're satisfied. (For a perfect fit, you will need to decrease the grid size to 2.) | | # 重复步骤1-3直到你觉得满意为止。(如果想天衣无缝,你要把网格大小减到2才行。) |
|
| |
|
| [[Image:hammer_picksmgrid.jpg |thumb|left|400px| With the grid size smaller, the fence can be lined up with the floor.]] | | [[File:hammer_movefence_sm.png|thumb|left|400px| 只有更小的网格才能让防护围栏与地面对齐。]] |
|
| |
|
| <br clear="both">
| | {{clr}} |
|
| |
|
| You are finally done with the blueprints for this map.
| | 你终于完成这张地图的设计草图了。 |
|
| |
|
| {{NavBar|Adding Light|Your First Map|Saving and Compiling}} | | {{Navbar|Adding Light|Your First Map|Saving and Compiling}} |
| | | {{ACategory|Level Design}} |
| {{otherlang:zh-cn}} | | {{ACategory|Tutorials}} |
| {{otherlang:zh-cn:en|Adding Prop Models}} | |
| | |
| [[Category:Level Design Tutorials]]
| |
道具模型是一种由与XSI Mod Tool(en)类似的模型制作工具创建的几何文件。你可以想给电影添加道具一样把这些道具模型添加到地图中。
有三种最基本的道具类型:
- 静态 此类道具将永远在地图中不会产生变化。
- 动态 此类道具可以播放动画或者与其他对象一起移动。
- 物理 此类道具可以被随意摆弄(遵循物理规则,如重力)。
在此教程中你将学习如何放置其中两种类型并了解它们的作用范围。
在三维视图中点击,将
prop_static实体放到地板上。
我们将先从添加静态道具开始。
所有道具都是实体,操作也相同,因此再切换回实体工具。
接着在对象工具栏的实体列表中选择prop_static(en)。
在三维视图中点击鼠标将prop_static放到地板固体之上。
会出现一只红色小盒子。这是因为我们现在还没决定这个道具将会是什么样子的。
为此我们要给这样道具选择一只模型。
切换至选取工具并双击prop_static打开属性页。
- 在对象属性对话框中点击外部模型项。
- 点击浏览...按钮并耐心等待模型浏览器中的列表准备完。(你只需等待一次;因为列表已经为未来的搜索创建了缓存。)
 注意:目前Hammer的模型浏览器有两种,取决于是否在Hammer的选项中勾选了使用图形化模型浏览器标签。本教程主要以新的图形化模型浏览器讲解。老版本的浏览器就和普通的文件窗口差不多。
虽然模型浏览器的预览窗口中有大大的红色“ERROR”字样,但请不要担心。那只是因为我们现在还没选定要预览的模型。
点击模型浏览器里的props_c17文件夹,列出其下的模型。
此文件夹下的模型非常多,但是我们不必滚动整个列表寻找目标,只需在列表下面的文本框中键入"fence"过滤出我们需要的内容,就像之前在纹理浏览器中做的那样。
点选模型文件 fence01a.mdl 。
预览窗口中将显示此模型的预览。如果你愿意,可以在窗口中拖拽鼠标随意地旋转模型。
等你查看完预览模型后,点击确认确定你的选择。
模型浏览器将关闭,而fence01a将成为你为prop_static实体所选定的模型。
点击应用按钮完成修改。
原先三维视图中的prop_static将转为显示你所选的防护围栏模型。
你也可以修改倾斜/偏转/滚动设置或者使用角度罗盘来改变防护围栏的方向。
我们现在添加有物理性的道具模型。
切换到实体工具。
选择什么类型的prop_physics实体取决与你要为什么游戏制作地图。
从对象工具栏的实体列表中选择一种合适的实体。
将物理道具实体放到房间地面上。
为了显示物理道具的属性,如果你关闭了对象属性对话框那么请再次打开。 否则对话框将自动转为显示它的属性。
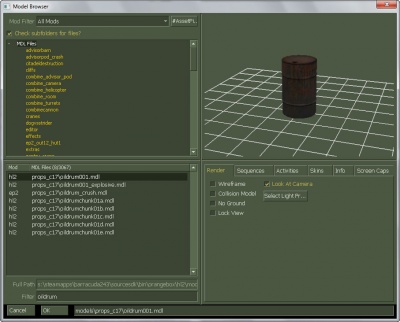
打开浏览器后,搜索
oildrum,选择模型
oildrum001,之后点击
确认。
再次点击对象属性对话框中外界模型项目里的浏览...按钮,打开模型浏览器。
- 搜索"
oildrum"而不是"fence"。
- 选中
oildrum001.mdl。
- 点击确认关闭浏览器。
点击应用按钮使更改生效后物理道具将变成你所选的油桶的样子。
关闭对象属性对话框。
移动对象
切换至选取工具。
你应该注意到防护围栏的模型有一半是陷在了地板里。我们现在就把它升上来。
实体的移动与固体相同:
切换到选取工具。
然后在三维视图中点选防护围栏模型。
此模型会在所有视图中一个方框框中,代表其已被选中。
要使某样东西在Z轴(上下)上移动,你必须在一种下级视图(称为前视图(y/z)或侧视图(x/z))中移动它。
在任意二位试图中的红色边框内点击,然后向上拖拽防护围栏直到它紧贴地板。
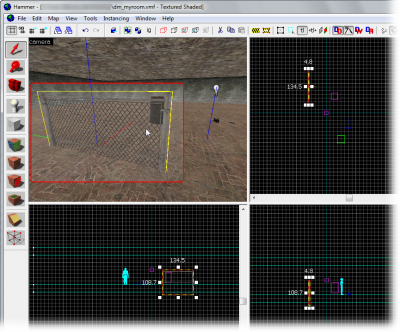
在三维视图中点击并选中防护围栏模型,然后在下级视图中点击并拖拽此模型将其移动。
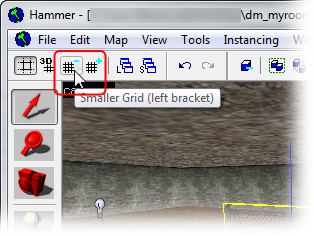
减少网格大小使对象可以微小的间隔移动。
你应该会发现,模型底部很难与地板对齐,这是因为目前的网格大小使你无法做到这点。防护围栏有点陷在地里其实也没多大问题,但是你要是想让它更加整齐那就必须减小网格大小:
- 点击Hammer窗口左上角网格工具栏里的缩小网格按钮。
注意:你可以用快捷键[减少网格大小或是用]键加大网格大小。
- 放大防护围栏与地面相交的地方,这样才能看得更清楚。
- 调节防护围栏的高度。
- 重复步骤1-3直到你觉得满意为止。(如果想天衣无缝,你要把网格大小减到2才行。)
你终于完成这张地图的设计草图了。


