Zh/Adding Light: Difference between revisions

From Valve Developer Community
< Zh
Jump to navigation Jump to search
No edit summary
 
m (Multipage removal)
 
(21 intermediate revisions by 12 users not shown)
Line 1: Line 1:
{{LanguageBar|title = 添加光源}}
{{first room menu:zh-cn}}


Now we’ll add some lighting to the room. If no lights are placed, the map will automatically be evenly lit when it is loaded in the game, but setting the lighting will look more realistic. Also, if no lights are placed then the <code>mat_fullbright</code> cvar will be set to 1.  In order to see lighting in a map which was previously loaded in the game without lights then you must either close the game and reopen it, or set <code>mat_fullbright</code> to "<code>0</code>".
现在我们将给房间'''添加光源'''。如果没有布置灯光,那么地图载入后会变成「全亮」,效果完全不理想。设置光源的话会让地图看起来更加真实。
{{clr}}
[[Image:hammer_picklight.jpg|thumb|left|200px|Pick the [[light]] entity from the entity list.]]
 
Lights are entities too.
 
Pick the [[light]] entity from the entity drop-down list in the '''Object Toolbar'''.
 
This is the most basic lighting entity.
 
Place the ''light'' entity in the center area of the ceiling by clicking there in the 3D view.
 
{{clr}}
[[Image:hammer_placelight.jpg|thumb|right|400px|Place the [[light]].]]
 
[[Image:hammer_openprop_sm.jpg|thumb|right|400px|Double-click an object in the 3D View to open the ''Object Properties'' dialog.]]
 
We are now going to edit the characteristics of this light.
 
Switch back to the '''Selection Tool''', and then double-click on the ''light'' entity in the 3D View to open the '''Object Properties''' dialog containing its properties.
{{clr}}
 
[[Image:hammer_pickbrightness.gif|thumb|right|400px|Select the ''Brightness'' field, then click the ''Pick color'' button.]]
 
# To bring up the setting for the ''Brightness'' property of the light, click on the ''Brightness'' field in this dialog.
# To open up the dialog for picking a color, click the ''Pick color'' button just beneath the settings values.
{{clr}}
 
[[Image:hammer_setcolor.gif|thumb|right|400px|Change the hue and luminance of the light, then click ''OK''.]]
 
The ''Color'' dialog will now appear, letting us change the color of the light:
 
# Change the hue color by clicking on the desired color in the large color spectrum area to the right.
# Because the luminance is set to max, the color will still be white, so we'll need to lower the luminance to change the color from bright white to the hue value you picked. You can see how the color changes in the preview square at the bottom of the dialog to something more colorful, instead of white.
# Then Click the ''OK'' button to confirm your color choice.
{{clr}}
 
[[Image:hammer_setcolor800.jpg|thumb|right|400px|Raise the brightness of the light by increasing this number, then click ''Apply''.]]
 
We have now set the color of the light, described by the first three numbers in the ''Brightness'' setting, so what's left is to increase its intensity—how bright it will shine. This is altered manually, through changing the fourth value in the setting.
 
# Mark this number (saying <code>200</code>) with the mouse, and enter <code>800</code> instead, to have the light shine four times as intense.
# Also if you wish to add an [[HDR]] value toward the light copy the Brightness field and paste it at the HDR Brightness field.
# Now that we’ve made changes to the parameters, we need to apply them to the light entity. Hit the ''Apply'' button to commit the changes.


The color of the bulb will change to the color you have selected for it.
{{Note|如果你加载过没有放置灯光的地图,你可能需要打开{{L|Developer Console|控制台}}把<code>mat_fullbright</code>设置为「<code>0</code>」。}}
{{clr}}


We are done with these properties now, so close the property dialog by clicking the closing button in the upper right corner.
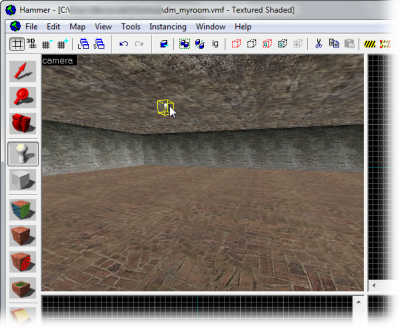
# 光源也是实体。从[[:File:Hammer picklight.jpg|'''对象工具栏'''的实体下拉列表]]中选中{{L|light}}实体。这是最基础的光源实体,它是一个不可见的点,产生射向所有方向的光线。在三维视图中点击,将''灯光''实体放在天花板的中央。<p>[[File:Hammer placelight.png|400px|放置{{L|light}}.]]</p>
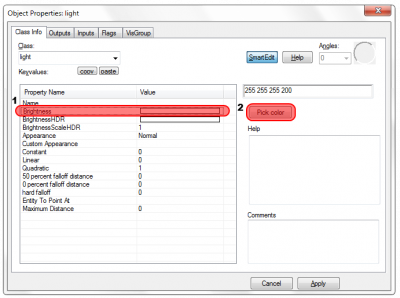
# 现在我们将编辑此灯光的颜色和亮度。换回'''选择工具''',然后在三维视图中双击light实体打开'''对象属性'''对话框,其中包含了它的属性。点击对话框中的''亮度''{{L|Keyvalues|键值}}可以调出灯光的''亮度''属性设置。
# 要调出拾取色彩的对话框,只需点击属性值下方的''拾取色彩''按钮。{{clr}}[[File:hammer_pickbrightness.png|400px|选择''亮度''项,然后点击''拾取色彩''按钮。]][[File:hammer_setcolor.png|400px|调整灯光的亮度和色调,然后点击''确认''。]]
# ''色彩''对话框应该已经显示出来了,下面我们试着改变目前灯光的颜色:
## 在右面巨大的光谱区中点选你想要的色彩可以改变色调。
## 因为亮度被设置为最高的原因,色彩仍是白色,因此我们必须降低亮度以达到你所期望的效果。你可以在对话框下方的预览窗格中看到它是如何从纯白变成更鲜艳的色彩。
## 然后点击''确认''按钮使你的选择生效。{{clr}}[[File:hammer_setcolor800.png|400px|增加此数值可以提高灯光亮度,然后点击''应用''。]]
# 现在我们已经设好了灯光的色彩,在''亮度''设置项中表示为前三个数字,剩下的这个值则用来表示它所放出的光线的强度。此处须手动修改选项中第四个值,用鼠标将这个数选中(当前是<code>200</code>),改为<code>800</code>,让灯光比之前亮四倍。{{clr}}{{tip|如果你愿意也可以为灯光添加{{L|HDR}}值,将亮度项中的内容复制粘贴到HDR亮度项中即可。}}
# 现在我们已经修改了参数,所以我们需要把它们应用至灯光实体。点击''应用''按钮提交更改。灯泡的颜色会改为你为它选择的颜色。点击属性对话框右下角的关闭按钮将其关闭。


== See also ==
== 结果 ==
* [[Intermediate Lighting]]
* [[Advanced Lighting]]


=== Entity types ===
编译完毕后,你会看到光线照射到墙上,离实体越近的地方越亮,离实体越远的地方越暗。必要的话记得关闭<code>mat_fullbright</code>。
* [[light]] - a basic light source.
* [[light_dynamic]] - a light source that can be changed and moved.
* [[light_spot]] - a directed light.
* [[light_environment]] - the controller for light cast from a skybox.


{{NavBar|Adding Entities:zh-cn|Your First Map:zh-cn|Adding Prop Models:zh-cn}}
然而你的光线并不会有可见的来源——看起来空穴来风。这一问题将在下一篇教程中解决。


[[Category:Chinese]]
== 参见 ==
* {{L|Intermediate Lighting|中级照明}}
* {{L|Advanced Lighting|高级照明}}


{{otherlang:zh-cn}}
=== 光源实体 ===
{{otherlang:zh-cn:en|Adding Light}}
* {{ent|light}}——基础光源。
* {{ent|light_spot}}——方向性的光源。
* {{ent:zh-cn|light_environment}}——控制来自{{L|Skybox|天空盒}}的全局照明。
* {{ent|light_dynamic}}——可变化、可移动的动态光源。
* {{ent:zh-cn|env_projectedtexture}}——类似light_dynamic的动态光源,也可以投射动态阴影。


[[Category:Level Design Tutorials]]
{{Navbar|Adding Point Entities|Your First Map|Adding Prop Models}}
{{ACategory|Level Design}}
{{ACategory|Lighting}}
{{ACategory|Tutorials}}

Latest revision as of 03:58, 12 July 2024

English (en)Français (fr)日本語 (ja)Português do Brasil (pt-br)Русский (ru)中文 (zh)Translate (Translate)

现在我们将给房间添加光源。如果没有布置灯光,那么地图载入后会变成「全亮」,效果完全不理想。设置光源的话会让地图看起来更加真实。

Note.png注意:如果你加载过没有放置灯光的地图,你可能需要打开控制台(en)mat_fullbright设置为「0」。
  1. 光源也是实体。从对象工具栏的实体下拉列表中选中light(en)实体。这是最基础的光源实体,它是一个不可见的点,产生射向所有方向的光线。在三维视图中点击,将灯光实体放在天花板的中央。

    放置light(en).

  2. 现在我们将编辑此灯光的颜色和亮度。换回选择工具,然后在三维视图中双击light实体打开对象属性对话框,其中包含了它的属性。点击对话框中的亮度键值(en)可以调出灯光的亮度属性设置。
  3. 要调出拾取色彩的对话框,只需点击属性值下方的拾取色彩按钮。
    选择亮度项,然后点击拾取色彩按钮。调整灯光的亮度和色调,然后点击确认。
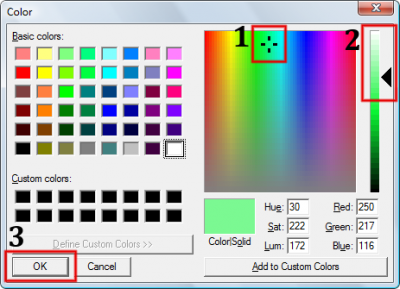
  4. 色彩对话框应该已经显示出来了,下面我们试着改变目前灯光的颜色:
    1. 在右面巨大的光谱区中点选你想要的色彩可以改变色调。
    2. 因为亮度被设置为最高的原因,色彩仍是白色,因此我们必须降低亮度以达到你所期望的效果。你可以在对话框下方的预览窗格中看到它是如何从纯白变成更鲜艳的色彩。
    3. 然后点击确认按钮使你的选择生效。
      增加此数值可以提高灯光亮度,然后点击应用。
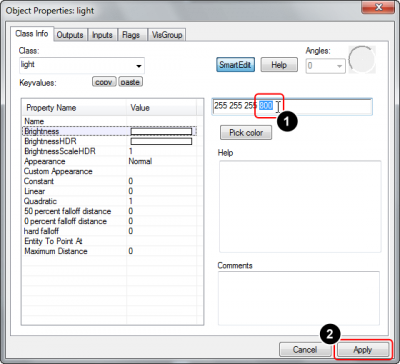
  5. 现在我们已经设好了灯光的色彩,在亮度设置项中表示为前三个数字,剩下的这个值则用来表示它所放出的光线的强度。此处须手动修改选项中第四个值,用鼠标将这个数选中(当前是200),改为800,让灯光比之前亮四倍。
    Tip.png提示:如果你愿意也可以为灯光添加HDR(en)值,将亮度项中的内容复制粘贴到HDR亮度项中即可。
  6. 现在我们已经修改了参数,所以我们需要把它们应用至灯光实体。点击应用按钮提交更改。灯泡的颜色会改为你为它选择的颜色。点击属性对话框右下角的关闭按钮将其关闭。

结果

编译完毕后,你会看到光线照射到墙上,离实体越近的地方越亮,离实体越远的地方越暗。必要的话记得关闭mat_fullbright

然而你的光线并不会有可见的来源——看起来空穴来风。这一问题将在下一篇教程中解决。

参见

光源实体