你的第一个关卡(Portal 2)
brush(刷子)是在Hammer中用Block工具创建的3D物体。Brush用来创建天花板和地板之类大块的表面的。我们将使用brush来创建一个房间。
用brush创建地板
- 在左边的Tool工具栏中, 选择
 Block Tool.
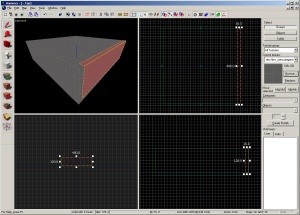
 - 然后,在Top 2D view(顶视图)中,单击左键并向右下拖动。如图所示。
- 你应该可以看到你拖动出来的一个虚线的矩形框。
- 创建一个512x512单位大小的方块.
- 按键盘上的 ↵ Enter 键创建出brush。
回到选择模式:点击工具栏上的![]() Selection tool 图标或者按 Esc 键.
Selection tool 图标或者按 Esc 键.
在选择模式中,选中刚才的那个brush,左键单击边缘的小方块可以改变brush的大小。
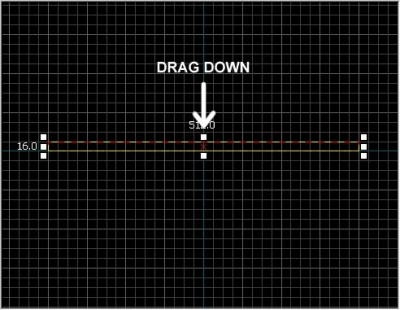
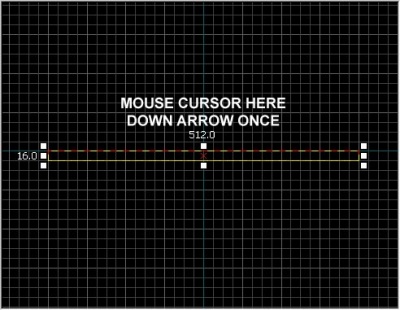
现在我们来调整这个brush的厚度(为了用来做地板),从64单位调整到16。但首先要调整grid(网格)的大小。
关于网格
grid出现在每个2D视图。默认情况下,任何物体都会对齐到网格(grid)。虽然你可以关闭对齐到网格,但是还是留着比较好,以防止在地图中出现泄漏(leak)之类的错误。
默认网格大小是64单位, 也就是说线之间的间隔是64单位。当前网格大小在Hammer窗口的下面状态栏中显示着。
按 [ 键两次,使网格缩小到16单位。确保Hammer窗口状态栏中显示的是Grid: 16。如果不是的话,按 [ 或 ] 键来调整。
调整地板的大小
现在网格应该足够小了。
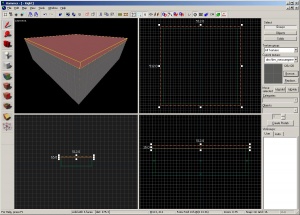
看右下方的视图。鼠标移上去的时候,应该显示Side标签。拖动brush的上边缘,令它的厚度为16单位。
移动brush
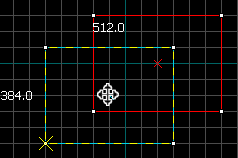
你可以移动创建出来的brush。选择 Selection Tool ![]() (选择工具),鼠标移动到2D视图中的brush上。光标会变成一个四方向箭头
(选择工具),鼠标移动到2D视图中的brush上。光标会变成一个四方向箭头![]() ,以表示可以移动物体。
,以表示可以移动物体。
在2D视图中点击并拖动brush。一旦释放,brush就移动到新的位置了。
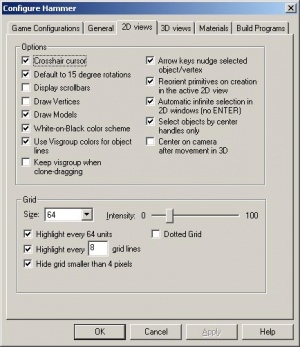
也可以使用方向键移动物体。但首先要设置一下Hammer的选项,方法如下:
- 在 Tools 菜单选择 Options,出现 Configure Hammer 对话框。
- 选择 2D Views 面板.
- 设置选项有很多,无视之。选中 Arrow keys nudge selected object/vertex。
- 按 OK 确认。
现在把这个地板brush,在Side视图中向下移动16单位。(按 ↓ 一次)
在2D视图中导航
- 滚动条可以平移视图。
- 更好的方法是,按住 Space 键,单击左键并平移。
- 使用鼠标滚轮来缩放。
材质
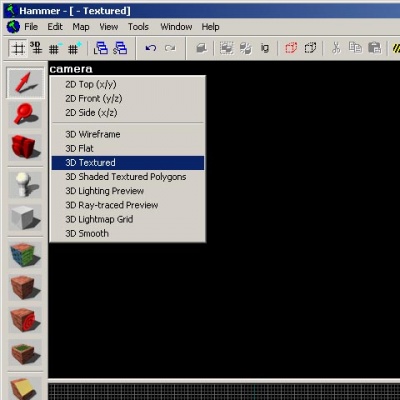
要在3D Camera视图中看到贴图, 右击3D Camera视图上 camera 文本,选择 3D Textured。
在3D Camera视图中导航
在3D中移动和2D视图中有所不同:
- 按住 Space 键,并拖动鼠标左键旋转镜头。
- 按住 Space 键,并拖动鼠标右键,用来上下和左右移动镜头。
- 按住 Space 键,并同时按住鼠标左右键进行拖动,来前后移动镜头。
- 按住 Space 键时,也可以用 W, A, S, 和 D 键,来移动镜头。
- Z 键,用来开关 "mouse look" 模式。切换到3D Camera视图,并按下 Z 键。就可以像在游戏中那样用鼠标控制镜头了。
在 3D Camera 视图中向上移动,并查看你刚才创建的地板。
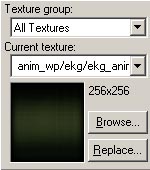
你会看到地板的贴图是默认的。 改变贴图的方法是,点击在 Texture 面板的 Browse按钮。
会打开 Texture Browser 窗口。
在底部的 Filter 栏,可以按照名字来过滤贴图。在这个教程中,输入 "dev_measure"(包含下划线)。就会有一堆“开发者”贴图,来辅助创建东西。
选择 dev/dev_measuregeneric01b 并双击。
这应该返回编辑器的4个视图,并将通用的开发人员纹理作为当前的纹理放在Texture面板中。
选择地板brush,如果它还没有被选中,通过在相机视窗点击它。 它应该变红。
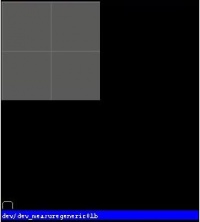
选择brush后, 点击Tool面板上的![]() Apply current texture 图标将当前纹理应用于选区。 灰色开发者纹理应该出现在地板上,如图所示。
Apply current texture 图标将当前纹理应用于选区。 灰色开发者纹理应该出现在地板上,如图所示。
创建墙壁和天花板
现在让我们来看看如何创建墙壁和天花板。最简单的方法是复制地板brush。
复制
你也可以选择一个现有的brush并复制它来创建它们。
复制:
- 选择您创建的地板brush。
- 将光标移到Side 视图.
- 按住⇧ Shift键,并按↑键创建一个副本,并向上移动一个网格单元。
这将在现有地板的顶部创建与地板完全相同的brush。
现在,您可以更改此新brush的大小和尺寸,以创建一堵墙,抓住brush上的角柄并将其拖动到所需的大小。 让我们将墙高128单位,厚16单位。
现在再将墙壁重复3次以勾勒地板轮廓。
再将地板brush复制一遍,然后将其抬起成为天花板。
删除笔刷
要删除一个brush, 用 Selection Tool ![]() 选中它并按下 Delete 键.
选中它并按下 Delete 键.
多选
您会注意到,在“Camera”视口中,如果您在房间内导航,由于所有的墙壁,地板和天花板都具有相同的纹理,因此很难分辨发生了什么。 接下来,我们将墙壁更改为其他纹理。
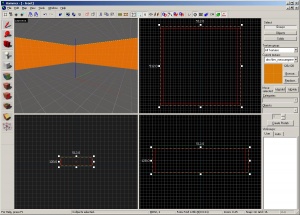
通过按住Ctrl键,你可以在“Camera”视口中每次单击一个来选择所有墙。 您还必须使用SPACE键与鼠标左键来控制摄像头旋转,以便可以看到并选择每个墙。
选中所有墙后,单击“Current texture”栏中的“Browse”按钮。 这次,选择当前纹理旁边的橙色纹理,标签为dev/dev_measuregeneric01。双击将其选中,浏览窗口会自动关闭。
文件保存
想要保存文件, 你可以用快捷键Ctrl+S或者在File菜单栏里找到Save。
你得给地图取一个名字,并选择放置它的目录。
在本教材中将文件命名为"tutorial01"并将其保存到mapsrc目录中,默认位于
C:\Program Files\Steam\steamapps\common\portal 2\sdk_content\maps\
路径可能和默认给出的略有不同,具体取决于Steam安装位置。
示例地图
当你保存地图时,你也许注意到maps路径下的其他文件。 Portal 2创作工具附带了一些示例地图来帮助。
| Directory | Contents |
|---|---|
maps\mp_coop_doors |
简单的合作地图。 |
maps\mp_coop_paint_red_racer |
带有推进凝胶的合作地图。 |
maps\sp_a2_column_blocker |
带有强光桥和一些其他的东西的单人地图。 |
maps\sp_a2_trust_fling |
有空中信仰板的单人地图 |
maps\sp_a3_speed_ramp |
含推进凝胶单人地图。 |
maps\sp_a4_laser_catapult |
带旋涡、激光和空中信仰板的单人地图。 |
maps\zoo_mechanics |
包含《传送门2》中大部分游戏机制的地图。 |
放置实体
接下来,我们该在地图里放第一个实体了:
- 在工具栏里按下
 实体工具。
实体工具。 - 启用实体工具后, 对象栏上的实体选择列表将变为活动状态。(看左图)
- 保持Categories那一栏是Entities。(看左图)
- 单击Objects的下拉列表并选择
info_player_start。(一般Hammer默认就是这实体, 若不是自己找) - 现在, 在3D视口中来到房间内部的中间。
- 左键单击地面以放置实体
这样, 一个info_player_start实体就出现在房间中央了。
放置一个光源
现在我们将在地图上放置一个光源:
- 再次选择 Entity Tool 。
- 在对象栏的Objects的下拉列表里面找到
light(点光源实体)。 - 现在将光源放到天花板下边 (高于玩家头顶)。
- 在工具栏点击
 选择工具回到选择模式或者按下Esc键。
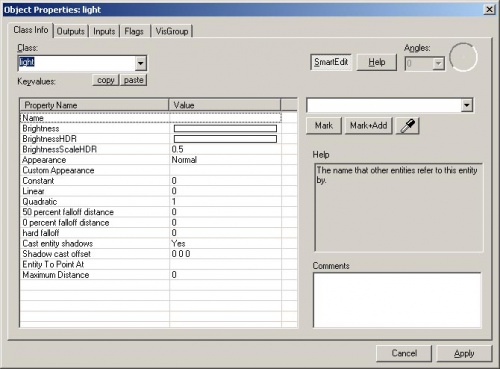
接下来我们要在灯上动一些设置了。 通过在3D视口双击它或先选中(左键单击)并按下Alt+↵ Enter来查看灯的属性。 其实是打开对象属性对话框(或直接叫它属性面板)。
在属性面板中, 你可以改变实体的各种属性。 比如你可以更改灯的Brightness(用来控制光的颜色和强度)。 点击Keyvalues下面的Brightness那行, 然后你可以看见右侧菜单上的一组数字, 默认是 255 255 255 200。 前三个数字表示RGB值( R红 G绿 B蓝 ), 最后一个数字表示光的强度。
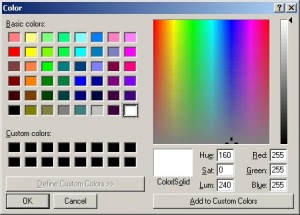
单击"选择颜色"按钮来选择颜色, 比直接输入数字更方便直观。
找到你最想要的灯光颜色, 然后点击"OK"。
这时你会回到光源的属性面板。 如果选择了"Brightness"那一行, 你应该可以看到右侧菜单你对亮度所做的任何更改。
单击“Apply”按钮设置对实体的更改,然后单击窗口右上角的"X"关闭对话框。(有时候按↵ Enter比Apply方便些)
放置一个 prop_static
实体当然还包括家具、装饰和建筑复杂部分等道具, 且有各种不同类型的道具。 Prop_static实体是静态的道具 – 它们不可以移动、加入动画、打开或关闭。 它的"反义实体"prop_dynamic实体可以移动、设置动画、激活或关闭。 而prop_physics实体可以使玩家像在现实世界中一样与他们互动并表现出物理特性。
放置一个道具:
- 再一次选择实体工具。
- 去对象栏并改变Objects成
prop_static。 - 指向Francis模型前面的地板,然后左键单击以放置prop_static。 你将看到一个红色立方体, 意为没上模型前的
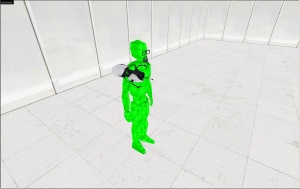
prop_static。(Francis是求生之路角色之一, 是玩家出生点实体hammer显示模型,也许是官方直接复制求生之路教程忘记改了, 不用管,传送门2是你的小绿人。另外, 如果prop_static没上模型, 实体在游戏里不可见; 模型错误会显示传送门2特有的蓝ERROR) - 还是在工具栏点击
 选择工具或者按下Esc键。
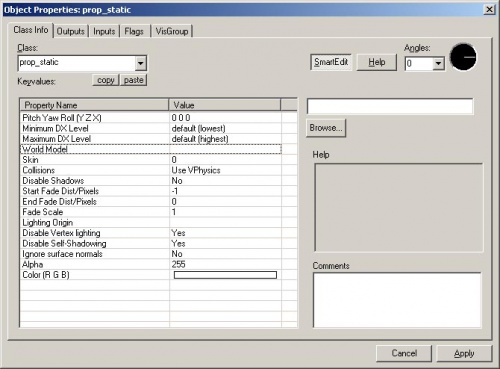
 - 双击红色方块打开属性面板或选中后按下Alt+↵ Enter。
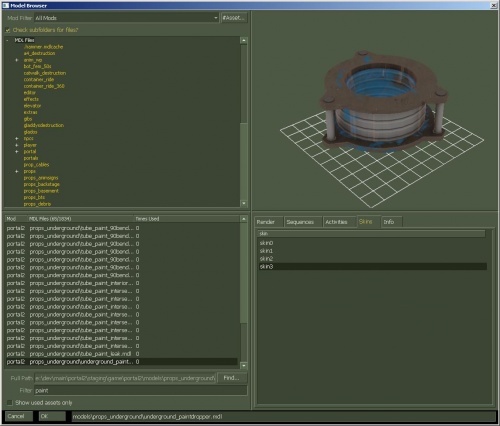
- 双击 World Model以打开模型浏览器.
选择模型:
- 在模型浏览器底部的Filter(筛选器)中写"
paint", 这样就只显示名称中有"paint"一词的所有模型。 - 向下滚动找到一个模型:
- "
props_underground\underground_paintdropper.mdl". - 如果没有出意外, 它应该长得和所示图像一样。
- "
- 单击OK选择这个模型并关闭模型浏览器, 然后返回属性面板对话框。 你现在应该可以在“World Model”中看到模型名称。
- 单击“Apply”按钮以设置对实体的更改。
- 关闭属性面板。
你可以在编辑器中的任何视口中看到刚才放置在房间中的凝胶滴落器。
移动实体
你可以像搬家一样移动像凝胶滴落器这样的实体。 在选定实体的边界框内单击并拖动,用鼠标移动它,或将鼠标放在任何视口上,然后使用键盘上的箭头键移动它们。在Hammer++中支持3D视口实体的移动。
旋转实体
要旋转对象,只需使用选择工具 ![]() 并单击对象一次。 你理论上可以看到物体的四个角变成了空心圆(○), 之后将鼠标悬停在任何2D视口中的圆上,然后按住并拖动以旋转对象。
并单击对象一次。 你理论上可以看到物体的四个角变成了空心圆(○), 之后将鼠标悬停在任何2D视口中的圆上,然后按住并拖动以旋转对象。
使用鼠标滚轮放大前视口, 在凝胶滴落器模型的边界框内单击一次, 使其四个角都用圆圈突出显示。
左键单击并逆时针拖动, 以旋转凝胶滴落器, 使其可以从天花板上滴落凝胶。
在游戏中加载场景
即使你已保存了地图, 但在游戏引擎打开之前, 你还得编译地图。
编译地图时, 它会从刚保存的原始 .VMF 文件转换为游戏引擎使用的 .BSP 格式。经过几何处理, 并使用多个编译程序预先计算出适当的照明和阴影。
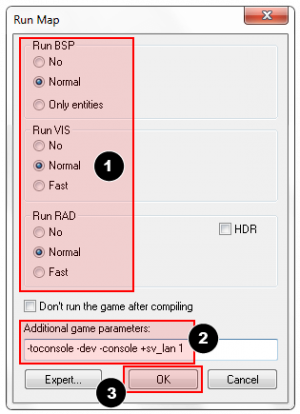
- 打开File菜单,并点击Run Map..., 或按下F9键。
- Run Map对话框打开。
- 这个对话框是用于设置一些基本的编译参数。
- 确保Run BSP,Run VIS和Run RAD设置选择了normal。
- 确保Additional game parameters:下面有以下几个设置, 若没有请打入:
-toconsole -dev -console +sv_lan 1(在传送门2中有点过于繁琐, 你甚至不需要这些设置,-toconsole和-console是打开控制台,-dev是开发者模式, +sv_lan 1是仅局域网, 译者注)
- 现在点击OK按钮开始编译地图。
编译进程窗口将显示编译的进度。编译完成后, 您正在映射的游戏将自动启动, 并将您的地图加载到引擎中。
编译完成后, 游戏中应该会加载地图, 可能需要一两分钟。
开发者控制台
为Portal 2做关卡有时需要开发者控制台命令辅助。 控制台可以用来做一些特别的事情, 比如生成立方体和炮塔来测试你的关卡。
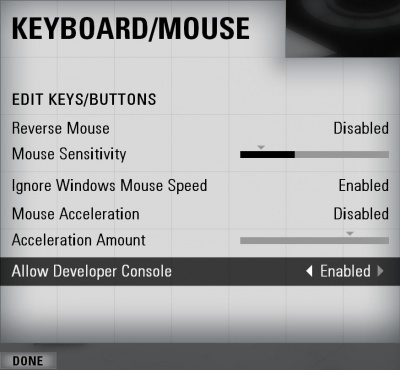
如果你还没有启用控制台, 请按照以下步骤做:
- 在游戏中按下Esc。
- 点击选项, 之后按键盘/鼠标。
- 点击允许使用开发者控制台并选择"已启用"。(游戏内的翻译还是差点味)
- 点击完成按钮。
- 点击返回。
使用开发者控制台:
- 按`打开控制台(波浪键)。
- 输入控制台命令,然后按↵ Enter键。
- 再次按`隐藏控制台。
穿墙模式
记一个非常有用的控制台命令noclip。这是一种可以让你在水平面上飞行的模式, 而不会被水平面上的任何东西阻挡。跳关这块, 非常好用。(此命令需要sv_cheats 1)
进入noclip模式:
- 按下`打开控制台。
- 在控制台里输入
sv_cheats 1并按下↵ Enter。(进入游戏只需要输入一次, 目的在于设置服务器可以开启作弊, 若noclip失效再输入此命令尝试) - 在控制台里输入
noclip并按下↵ Enter。 - 在关卡附近飞飞。
- 再次输入
noclip退出穿墙模式并正常地在关卡里走走。 - 您可以通过按下绑定控制台命令中的按钮来切换穿墙。 比如按下鼠标中间切换穿墙指令
bind mouse3 noclip。
一些有用的控制台命令
有很多可以使用的控制台指令,下面是一些例子:
- sv_cheats 1
- 打开作弊,这样就可以使用很多平时不能使用的指令。
- map <地图名>
- 打开一个地图。
- changelevel <地图名>
- 在已有的会话(通俗点说就是不关闭服务器)的情况下更换地图。
- god
- 开启/关闭无敌。
- noclip
- 开启/关闭穿墙飞行。(需要sv_cheats 1)
