Pálya szerkeztés/Az első pályád (Portal 2)
A brush az egy egyszerű 3D alakzat, amit a Hammer Block eszközével készitünk. A Brush-okat lényegesen nagy felületek megalkotására alkalmazzuk, szó szerint a pálya támfalait hozzuk vele létre. Mind a padlót, a falakat, a plafont Brush-okkal hozzuk létre, szóval első lépésként nekünk is most ezzel kell kezdenünk.
Padló készités
- A baloldali Tool bar-ból, kiválasztjuk a
 Block Tool-t.
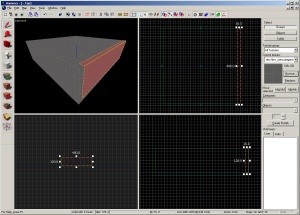
 - Most, a jobbfelső 2D nézetben Bal-klikket tartva és átlósan lefelé húzva az egeret létrehozunk egy Brush-t (pont úgy ahogy a kép mutatja).
- Megfigyelheted ahogy húzod átlósan a kurzort, úgy lesz egyre nagyobb a szagatott vonalas négyzet a képernyőn.
- Készíts egy 512x512 egységnyi (unit) nagyságú Brush-t és engedd el a bal egérgombot.
- Nyomd meg az ↵ Enter-t a billentyűzeten hogy véglegesitsd a műveletet.
Hogy visszatérj az alapértelmezet selection módba, kattints a ![]() Selection tool iconra a Tool bar-on vagy nyomd meg a Esc gombot.
Selection tool iconra a Tool bar-on vagy nyomd meg a Esc gombot.
Ha selection módban vagy, akkor a Brush-t bal klikkel kiválasztva bármikor újra méretezheted, a 2D nézetben lévő kis fehér négyzetek segítségével.
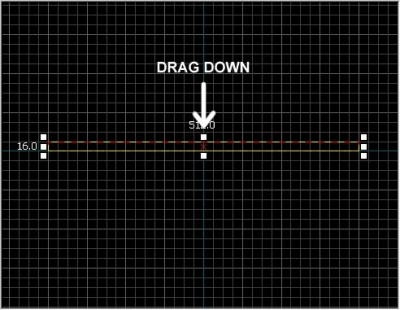
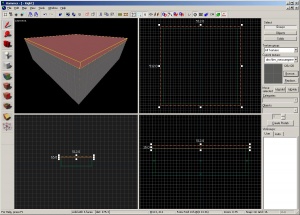
Csökkentsünk egy kicsit a Brush vastagságán (amiből később a padlónk lesz). Szeretnénk a jelenlegi 64 egységről 16 egységre csökkenteni a vastagságot, ehhez lejebb kell vennünk a Rács-méretet.
A Rács
A rács vagy ahogy a program hívja grid, mindegyik 2D ablakban látható. Alapból minden objektum a rácshoz képest helyezkedik el, habár ezt a funkciót ki lehet kapcsolni, de ajánlot ezt nem piszkálni, mert nagyban megkönnyíti azt hogy minden egymáshoz simuljon és ne okozzon a pályán lékeket.
Az alapértelmezet rácsméret 64 egység, ami azt jelenti hogy a rács vonalai egymástól 64 egységre vannak. A rácsméretet a Hammer mindig a képernyő jobb alsó oldalán jelöli.
- A Smaller Grid iconra kattintva
 a rácsméretet feleakorára fog csökkenni, finomab elhelyezés érdekében. Ugyanígy változthatható a rácsméret a [ gyorsbillenytyű segítségével.
 - A Larger Grid iconra kattintva
 a rácsméretet duplájára fog nőni, durvább elhelyezés érdekében. Ugyanígy változthatható a rácsméret a ] gyorsbillenytyű segítségével.
Hogy levigyük a rácsméretet 16 egységre, nyomd meg a ![]() gombot kétszer. közbe figyeld, hogy a Status bar a jobb alsó sarokban Grid: 16 írjon. Ha nem annyit ír, akkor addig nyomd a
gombot kétszer. közbe figyeld, hogy a Status bar a jobb alsó sarokban Grid: 16 írjon. Ha nem annyit ír, akkor addig nyomd a ![]() és
és ![]() gombokat, amíg a Grid: 16 nem lesz.
gombokat, amíg a Grid: 16 nem lesz.
A padló méretezése
Mostmár a rács elég kicsi a művelethez.
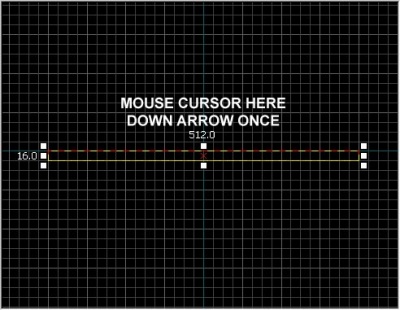
Most vigyük át a kurzort a bal alsó ablakra, mikor átér oda az egérmutató, akkor egy Side feliratnak kellene megjelennie a nézet felső sarkában. Ezután a Brush felső részét húzd addig lefele amíg 16 egység vastag nem lesz.
Brushok mozgatása
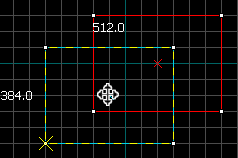
Amint létrehoztunk egy brush-t, az onnantól mozgathatóvá válik. Válazd ki a Selection Tool-t ![]() és vidd az egeret az eggyik 2D nézetre. Mikor az alakzat közepére értünk a kurzor nyilakká változik, amik különböző irányba mutatnak
és vidd az egeret az eggyik 2D nézetre. Mikor az alakzat közepére értünk a kurzor nyilakká változik, amik különböző irányba mutatnak ![]() , jelezvén hogy az objektumot mozgatni fogja.
, jelezvén hogy az objektumot mozgatni fogja.
A balklikket tartva tudod mozgatni a Brush-t a síkon bármerre, ha elengeded az egeret a brush abban a pozícióban marad.
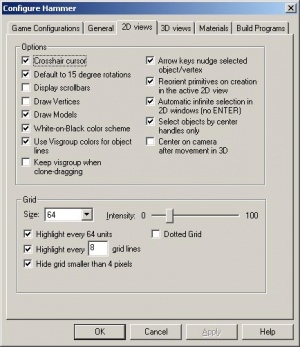
Ugyanígy tudod mozgatni az objectumokat a kurzorbillentyűkkel. Ehhez, be kell állítanod az opciókban ezt a funkciót:
- Kattints a Tools fülnél az Options gombra, hogy megnyisd a Configure Hammer box-ot.
- kattints a 2D Views fülre.
- Vannak itt egyéb beállítások is, de ami most nekünk kell az a Arrow keys nudge selected object/vertex.
- Nyomj egy OK-t, hogy elfogad a változtatásokat.
Most mozgassuk a padlónkat 16 egységgel lefele, úgy. hogy kiválasztjuk és a kurzort a Side nézetre visszük, majd megnyomjuk a Down_arrow gombot egyszer.
- Az egérgörgő megnyomásával képesek mozogni a 2D nézeten belül.
- Ennek egy alternatív módja, ha a Space gombot tartva, bal klikkel benyomva mozgatjuk a 2D nézetben az egeret.
- Az egérgörgő fel-le mozgatásával pedig Zoomolni tudunk.
Textúrák
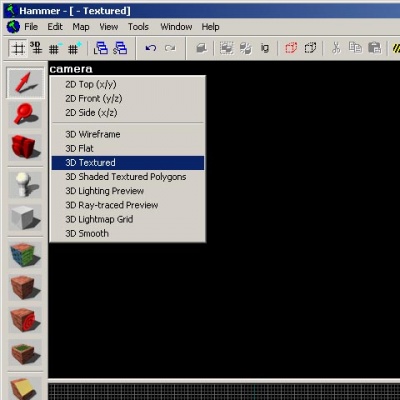
Ahhoz hogy a 3D Kamera nézetben textúrákat is lássunk, jobb klikkel kattints a Kamera szövegre és válazd ki a 3D Textured opciót.
A 3D nézetben való mozgás egy kicsit eltér a 2D-jével szenben:
- Tartsd a Space gombot és a bal klikket, hogy forgasd a kamerát.
- Tartsd a Space gombot és a bal klikket, hogy mozogj fel/le és jobbra/balra.
- Tartsd a Space gombot és a bal és jobb klikket, az előre és hátra mozgáshoz.
- Ugyanígy használhatóak a W, A, S, és D gombok, hogy előre,hátra,jobbraésbalra mozogj.
- A Z gombot használva pedig "mouse lock" módra váltasz. Vidd az egeret a 3D kamera nézetre és nyomd meg a Z gombot, ekkor egészen addig amíg újra meg nem nyomod a nézet úgy viselkedik mintha játékban lennél.
A 3D Kamera nézetben tolass egy kicsit hátra, hogy lásd a brush-t amit készitettél.
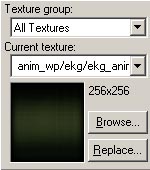
Most feltünhet neked az alap textúra a padlódon, nos ezt nagy esélyel le majd szeretnéd cserélni. Ehhez kattints a Browse gombra a Texture Box-on.
Ez fel fogja hozni a Textúra Böngésző ablakot.
Lent a Filter mezőben tudsz szűrni (nevük szerint) a textúrákon. Most írd be a "dev_measure" (alsóvonallal együtt) textúranevet a keresőbe, hogy felhozd a fejlesztői textúrákat, egyenlőre ezek most bőven meg fognak felelni a feladatnak.
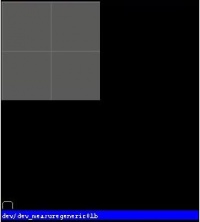
Válazd ki a dev/dev_measuregeneric01b nevű textúrát, úgy hogy duplán ráklikkelsz.
Ezután bezáródik magától a Textúra Böngésző ablak, és a kiválasztott textúrádat fogja mutatni a jobb oldali kicsi négyzetben a Hammer.
Válazd ki a padlót a 3D kamera nézetben, ami után pirosas árnyalatot fog kapni, jelezvén, hogy kijelölted.
Miután a padlót kiválasztottad, kattints a ![]() Apply current texture gombra a bal oldalon, ha mindent jól csináltál, akkor sikeresen átálítottad a kiválasztott textúrára a objektumot.
Apply current texture gombra a bal oldalon, ha mindent jól csináltál, akkor sikeresen átálítottad a kiválasztott textúrára a objektumot.
Falak és a plafon létrehozása
Itt az ideje, hogy végleges formát adjunk a pályánknak. Ezt úgy a legkönnyebb megvalósítani, ha Duplikáljuk a előbb elkészült padlónkat.
Duplikálás
Bármikor lemásolhatunk egy, már meglévő Brush-t, hogy felgyorsítsunk a munkamenetünket.
Hogy duplikálj:
- Válszd ki a Brush-t amit az előbb csináltál.
- Vidd a kurzort a Side nézetre.
- Tarsd a ⇧ Shift billentyűt, majd nyomd meg a Up_arrow, hogy duplikáld a Brush-t 1 egységgel felfelé.
Ezzel lett egy tökéletes másolat a padlonkról, közvetlen 1 egységgel felette.
Mostmár átméretezheted a duplikált formát az oldalsó, és felső nézetekben, úgy hogy a formát a közepénél fogva elhúzod a padló eggyik szélére és egy 128 egység hosszú 16 egység széles falat csinálsz belőle.
Most ismételd meg ezt háromszor, a padló minden eggyes oldalára ugyan ezt, közben ügyelj, hogy a falak közvetlenül rajta feküdjenek a padlón. Kerüld el, hogy véletlenül se legyen lyuk a pályán.
Mégegyszer másold le a padlót, hogy a falakra fektetve plafont csinálj.
Brush-ok törlése
Hogy törölj egy brush-t, válazd ki a Selection Tool-al ![]() és nyomd meg a Delete billentyűt.
és nyomd meg a Delete billentyűt.
Többszörös kiválasztás
Mikror kamera nézetben mozogsz, kissé zavaró tud lenni, hogy minden textúra egyforma. Ezért következőként kicseréljük a falak textúráját, hogy a pályánkon a navigációt megkönnyítsük.
Válazd ki az összes falat kamera nézetben az egérrel, miközben tartod a Ctrl billentyűt. Ahhoz, hogy foroghas a kamerával tarsd lenyomva a SPACE billentyűt, vagy vidd a kameranézetet "mouse lock" módba a z billentyűvel.
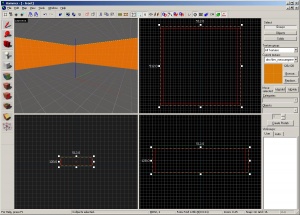
Mikor kiválasztottad az összes változtatni kívánt felületet, kattints a Browse gombra a jobb oldali Texture felületen. Ezúttal, válazd ki a narancssárga textúrát a jelenlegi mellet, dev/dev_measuregeneric01 néven. Kattints rá duplán, hogy kiválazd, és bezárd a böngésző ablakot.
Kattints a ![]() gombra a baloldali Tool felülete, ahhoz hogy megváltozzon a falak textúrája.
gombra a baloldali Tool felülete, ahhoz hogy megváltozzon a falak textúrája.
A fájl elmentése
Hogy elmentsd a pályád, használd a Ctrl+S parancsot, vagy a or File fülön belül kattints a Save-re.
Mikor elsőként mentesz a pályádon akkor a program meg fog kérni téged, hogy neved el a fájlt amit csináltál.
Ezt a pályát most szimplán nevezzük el "tutorial01" néven. Amit a program ebbe a mappába fog elmenteni:
C:\Program Files\Steam\steamapps\common\portal 2\sdk_content\maps\
Ettől egy kicsit eltérhet a te mappád helye, ez igazából attól függ hová installáltad annó a Steam-et.
Mikor elnevezel egy pályát, ne adj neki hosszú nevet, előfordúlhat, hogy emiatt a játék nem indítja majd el.
sp_a1_", "sp_a2_", "sp_a3_", "sp_a4_", azzal meg tudod változtatni a pálya elején a töltőképernyőt.Csatolt sablonpályák
Mikor elmented a pályád, feltűnhet neked, hogy a mappában nem csak a te alkotásaid kaptak helyet. Ezek a sablonpályák vagy magából a játékból, vagy külön azzal a céllal készültek, hogy bármikor a segítségedre legyenek. (A Portal 2 pályák bármelyike megnyitható, ha egy BSPSource nevű programmal decompile-olod, és utána Hammer-ben futtatod őket.)
| Név | Tartalma | Mit tanulhatsz belőle |
|---|---|---|
maps\mp_coop_doors |
Egy szimpla együtműködő pálya. | Hogyan kezdj el és zárj le egy együtmüködő pályát; hogyan készíts ablakokat együtműködő pályán. |
maps\mp_coop_paint_red_racer |
Földalatti Együtműködő pálya propulziós géllel. | Hogyan kezdj el és zárj le egy együtmüködő pályát, földalatti kinézettel; turretek működése, lézerek és gél működése együtműködő módban. |
maps\sp_a2_column_blocker |
Egyjátékos pálya szilárd fényhíddal, meg egyébbel. | Fényhidak, lézerek, lézer vevők, lézer kibocsájtók, panelek, turretek, ablakok, rácsok, halálos trutyi, és hajítópadok működése portal 2 pályán belül. |
maps\sp_a2_trust_fling |
Egyjátékos pálya hajítópadokkal. | Hajítópadokkal kapcsolatos tudnivalók egy rekonstruált pályán. |
maps\sp_a3_speed_ramp |
Egyjátékos pálya a földalatt, propulziós és repulziós gélel. | Hogyan készíts rendes földalatti témájú pályákat. |
maps\sp_a4_laser_catapult |
Egyjátékos pálya utazócsatornákkal, lézerrel, és pár dugattyús platformal. | Hogyan helyezz el rendesen utazócsatornákat, és dugattyús platformokat egy Wheatley témájú pályán. |
maps\zoo_mechanics |
Gyakori pályaelemeket tartalmazó, egyszerű felépítésű sablonpálya. | Részletes információk a utazócsatornák, adagolók, gélek, és halálos trutyikról, stb. |
Entitások elhelyezése
Következő lépésként most elhelyezünk egy entitást a pályánkon:
- Válaszd ki a
 Entitás eszközt az eszközök közül.
 - Miután kiválasztottad az Entitás eszköz, az Entitás lista elérhető lesz az Objektumok ablakban.
- Ügyelj hogy a Kategória fül maradjon Entitások-ra állítva.
- Objektumok-on belül kattints a lenyíló fülre és válaszd ki a
info_player_startentitást. - Ezután 3D néztben navigálj a szoba közepére.
- Majd Bal klikk-el helyezd le a kiválasztott entitást.
- A fenti lépéseket ismételd meg a
weapon_portalgunentitással és helyezd le a szoba közepére úgy hogy hozzáér ainfo_player_start-hoz.
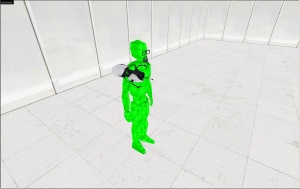
Így mikor elindúl a pálya a info_player_start entitás helyére fogol Spawnolni, illetve automatikusan fel is veszed a portál puskát.
Világítás elhelyezése
Most elhelyezünk egy fényforrást a pályánkon:
- Válaszd ki ismét az Entitás eszköz-t.
- Keresd ki a
lightopciót az Objektumok közül. - Majd helyez el egy fényforrást a plafonra (Közvetlen a játékos feje felé).
- Hogy visszatérj az alapértelmezet selection módba, kattints a
 Selection Tool gombra, vagy nyomd meg a Esc gombot.
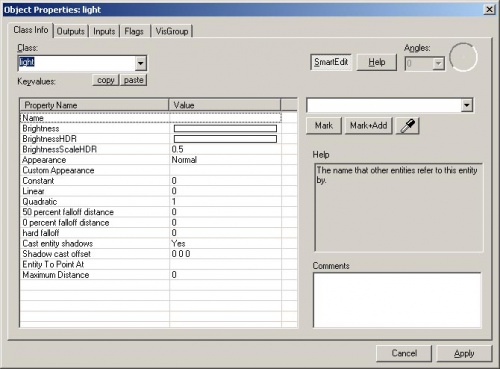
Következő lépésként átállítunk néhány tulajdonságot a fényforráson. Nyisd meg a fényforrás objektum tulajdonságait úgy, hogy duplán rákattintasz a entitásra 3D nézetben. Szintén felugrik ez az ablak ha a kiválasztott entitást követően megynomod a Alt+↵ Enter gombokat.
Az Objektum tulajdonságok ablakon belül át tudod állítani a fényforrás különböző perifériáit. Például a Brightness értékén változtatol azzal állítasz a fényerősségen és a fény színén. Kattints a Brightnessmeletti érték mezőre bal klikkel, ezután egy számsor lesz olvasható. Az alapértéka fénynek 255 255 255 200 ahol az első 3 szám RGB (szín) értékeknek felel meg, míg az utolsó a fény erősségét mutatja.
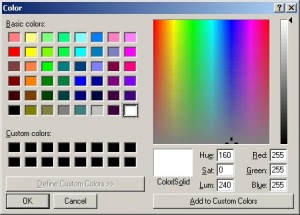
A Pick Color gombra kattintva egy színkeverő segítségével választhatól színt.
Szimplán kattints arra a színre amire szeretnél majd kattints az OK gombra.
Ezzel visszatérsz az előző Objektum tulajdonságok ablakra. Ha sikeresen változtattál az értéken akkor az alapérték helyett a te általad megadod szín és fényerősség olvasható.
Kattints a Apply gomra, hogy elments a változtatásaid, majd az ablak sarkában az "X" gomra kattintva bezárhatod azt.
Prop_static elhelyezése
Az entitások közé szintén beletartoznak az olyan "prop"-ok mint a bútorzatok, dekorációk és komplex architektúrák. Számos típusú prop létezik. Prop_static entitások olyan proppok amik statikusak – nem képesek mozogni, animációt végrehajtani, vagy ki-be kapcsolni (láthatatlanná válni). A prop_dynamic entitások ezzel szemben képesek mozgni, animációt végre hajtani, és adhatunk nekik különböző parancsokat mint például a ki-be kapcsolás (láthatatlanná válás). prop_physics entitások pedig fizikai tulajdonságokkal rendelkeznek és interakcióba lehet velük lépni (felvenni/eldobni őket).
Hogy elhelyezz egy proppot:
- Válaszd ki az Entitás eszközt.
- Állísd át az Objektum fülnél a
prop_statictípusú entitást. - Majd 3D nézetben a bal kikket használva helyezd le a kiválasztott entitást a
info_player_startelé. Ha minden jól ment egy piros kockát fogsz látni ott ahova katintottál. - Menj vissza a Selection módba
 , vagy csak nyomd meg a Esc gombot.
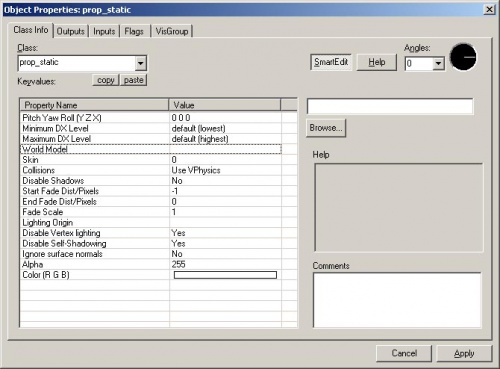
 - Kattints duplán a lerakott piros kockára, hogy láthatóvá tedd a tulajdonságait.
- Keresd meg a World Model mezőt és kattints rá duplán hogy felhozd a Model böngészőt.
Model kiválasztása
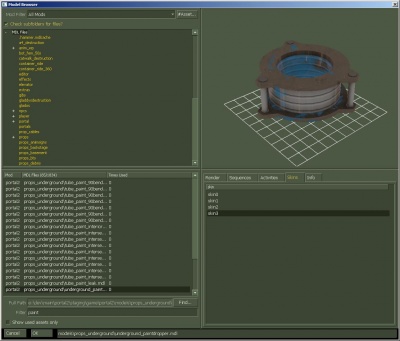
- Az ablak aljánál a Filter mezőbe írd be a "
paint" szót. Így csak azok a modellek lesznek láthatóak amiknek a nevében benne van a "paint" szó. - Keresd ki a következő modelt:
- "
props_underground\underground_paintdropper.mdl". - Ha jól írtad be akkor azt látod mint ami a csatolt képen van.
- "
- Kattints az OK gombra, hogy kiválaszd a modelt és visszatérj az előző ablakra. Ha mindent jól csináltál akkor most a World Model mezőnél olvasható a kiválasztott model neve.
- Kattints az Apply gomra, hogy elmesd a változtatásaid a modellen.
- Majd zárd be a Objektum tulajdonságok ablakot.
Ezután 3D nézetben látható lesz a kiválasztott festék adagoló model.
Entitások mozgatása
Ahogyan a "brush"-okat úgy az entitásokat is képes vagy a pályán bárhova húzni, mint például az előbb lerakott festék adagolót.3D nézetben válaszd ki az entitást, majd bármelyik 2D nézetben kezd el húzni azt miközben tartod a bal klikket, vagy egér helyett használd a billentyűzeten a nyíl gombokat.
Entitások forgatása
Hogy egy objektumot forgatni tudj, a Selection Tool ![]() segítségével válaszd ki amit meg szeretnél forgatni, majd kattints ismét a objektumra (2D nézetben). Ezután az objektum sarkainál körök lesznek láthatóak. Mozgasd a kurzort bármelyik körre bármelyik 2D nézetben, majd a bal klikk segítségével ragad meg az objektumot és forgasd amerre szeretnéd.
segítségével válaszd ki amit meg szeretnél forgatni, majd kattints ismét a objektumra (2D nézetben). Ezután az objektum sarkainál körök lesznek láthatóak. Mozgasd a kurzort bármelyik körre bármelyik 2D nézetben, majd a bal klikk segítségével ragad meg az objektumot és forgasd amerre szeretnéd.
Az egérgörgőt használva zoom-olj be a Front nézetbe és klikkelj kétszer a festékadagoló modlejébe, hogy kijelöld majd forgatni tudd azt.
Bal klikkel fogd meg bármelyik kicsi karikát a model sarkainál (2D nézetben) és óramutató járásával ellenkezőleg kezd el forgatni a festékadagoló modelt. Helyezd el úgy a festékadagolót hogy a plafonról tudjon belőle folyni majd a festék.
Running your level in the game
You have saved your map, but you will also need to compile it before it can be played in the game engine.
When a map is compiled, it is converted from the raw .VMF file that you just saved, into the .BSP format used by the game engine. The geometry is processed and the proper lighting and shadows are pre-calculated with several compile programs.
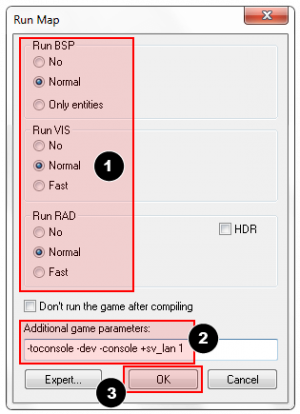
- Open the File menu, and choose Run Map... or press the F9 key.
- The Run Map dialog will open.
- This dialog is used to set some basic compile parameters.
- Make sure that Normal is set under the Run BSP, Run VIS, and Run RAD settings.
- Under Additional game parameters:, make sure these settings are present, and type them in if not:
-toconsole -dev -console +sv_lan 1
- You may wish to check "Wait for keypress" so that you can see any error messages that occur.
- Now click the OK button to start the map compile process.
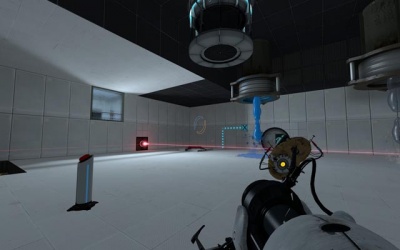
The Compile Process Window will show the progress of the compile. When the compilation is done, the game you are mapping for will automatically launch, and load your map in the engine.
Your level in the game should load up after compiling. It may take a minute or two.
Next time you compile, you may wish to check the "Don't run the game after compiling" checkbox. Otherwise, it will complain that only one instance of the game can run at once. Instead of exiting and relaunching the game (slow!), you can simply recompile the map (F9) and then type map myMapFileName in the developer console to reload the map.
The Developer console
Making levels for Portal 2 sometimes involves using commands typed into the Developer Console window. The console can also be used to do things like spawn cubes and turrets to test your level.
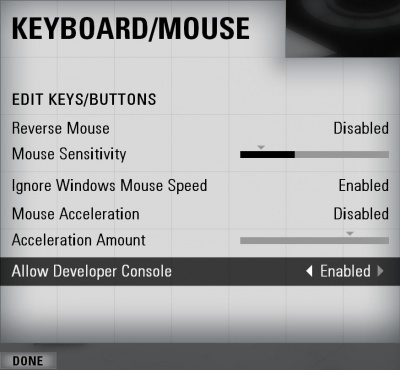
If you haven't already, make sure the console is enabled in the game:
- Press the Esc key in the game.
- Click on Options, then Keyboard/Mouse.
- Click on the Allow Developer Console and select "Enabled".
- Click on the Done Button.
- Click on Return to Game.
Using the developer console:
- Bring down your developer console ` (tilde).
- Type any console command and press the ↵ Enter key.
- Hide the console again with `.
Noclip mode
One console command you'll find constantly useful is noclip mode. This is a mode that let's you fly around the level without being stopped ("clipped") by anything in the level. It's useful to get around large levels quickly.
To enter noclip mode:
- Press ` to enter the console.
- Type
noclipin the console and press ↵ Enter. - Fly around the level.
- Type
noclipagain to leave noclip and walk around the level normally. - You can toggle noclip with the press of a button with the bind console command. For example,
bind mouse3 noclipfor the middle mouse button.
Some useful console commands
There are lots of console commands available. Here is a very small sampling:
- sv_cheats 1
- Turns on cheats. Necessary for many console commands.
- map <name of map>
- Loads a map or reloads the level you're in.
- changelevel <name of map>
- Loads a map while continuing the session.
- god 1
- Turns on god mode for all players. The players are invulnerable.
- noclip
- Allows you to fly through the world.
