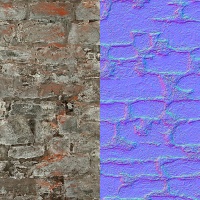
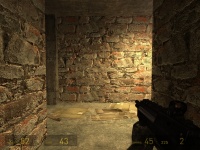
Bump map

Textures often called Bump Maps, or Normal Maps are used to simulate three-dimensional details on a two-dimensional surface by manipulating its lighting.
- Static props using bump maps can not be lit per-vertex, except in
 . $lightmap is also incompatible with $bumpmap.
 - Bump maps cannot be used on normal decals and overlays, except in
 . In order for these to function properly, the surface that they are placed on must also have a bumpmap. Bumped "decals" can be created in any engine branch, regardless of underlying geometry, by using a brush or displacement with a $decal material instead.
Format
Each pixel in a bump map contains the (x, y, z) coordinates that define a normalized vector.
Because of this each color channel in a bump map has a meaning:
- Red
- Horizontal facing (X axis)
- 0 = left
- 128 = forward, or facing viewer
- 255 = right
- Green
- Vertical facing (Y axis)
- 0 = up
- 128 = forward, or facing viewer
- 255 = down
- Blue
- Height (Z axis).
- 0 = facing 'in' to the texture, away from the viewer. This is a 'bad' value. Anything under 128 means that the surface should be facing away from the player, which is not possible.
- 128 = maximum depth capable of receiving dynamic light. It's a bad idea to go under this.
- 255 = facing 'out' of the texture towards the viewer.
dev/flat_normal is a flat bump map present in every game.The three channels represent a normal vector for every pixel which represents the direction that the pixel is facing in 3D space. This allows the engine to generate shadows and highlights on a two-dimensional surface, or give a 3D model more detail.
A bump map is largely useless for really flat surfaces like smooth concrete or metal, but even smooth concrete sometimes has enough depth to it to make one worthwhile, especially if used in conjunction with a cubemap.
Creation
A bump map should be rendered in Tangent space and use vector directions X+ Y- Z+.
Programs
Various programs can automate the creation of bump maps, either by image analysis or by using 3D geometry the user provides.
- 2D
- Photoshop or Paint Shop Pro
- Substance Designer
- The GIMP
- nDo
- Filter Forge
 XBLAH's Modding Tool
- nJob
- 3D
- XSI
- ZBrush
- Lightwave
- 3ds Max
- Maya
- Blender
- Materialize
- NVIDIA Melody
- Cinema 4D
- NormalMapper
- xNormal
- Other
- NormalMap Online: A website for generating normal maps online.
- SSBump Generator 5.3: Despite the name, it can also be used to generate bumpmaps, not just self-shadowing bump maps.
- Substance B2M3: Previously known as BitMap2Material.
- InsaneBump: Specifically made to be a free alternative to the now-superseded software "CrazyBump" (may trip antiviruses due to incompatibility)
Conversion
In VTFEdit
When converting your texture:
- Choose your image format. Uncompressed formats like BGR888 are higher-quality than compressed formats like DXT1, but be wary of file size.
- Check the "Normal map" box in the texture's flags list after the import is complete. It's about 1/5 of the way down the list.
In Vtex
- Save your normal map as a TGA. Give it a name that ends in _normal. The _normal at the end of the name will affect how Vtex converts it. For the brick wall example, we would name the file
brickwall_normal.tga. - Add
nocompress 1andnormal 1to <texture filename>.txt in the same folder as your texture, then compile.
Implementation
Normal maps can be generated from a basetexture, using the Sobel Operator, by sampling the HSB Brightness of each pixel and adjoining pixel to determine the scale of the output Hue and Saturation values that are subsequently converted to RGB for the SetPixel operation.
Bitmap image = (Bitmap) Bitmap.FromFile(@"yourpath/yourimage.jpg");
int w = image.Width - 1;
int h = image.Height - 1;
float sample_l;
float sample_r;
float sample_u;
float sample_d;
float x_vector;
float y_vector;
Bitmap normal = new Bitmap(image.Width, image.Height);
for (int y = 0; y < w + 1; y++)
{
	for (int x = 0; x < h + 1; x++)
	{
		if (x > 0) { sample_l = image.GetPixel(x - 1, y).GetBrightness(); }
		else { sample_l = image.GetPixel(x, y).GetBrightness(); }
		if (x < w) { sample_r = image.GetPixel(x + 1, y).GetBrightness(); }
		else { sample_r = image.GetPixel(x, y).GetBrightness(); }
		if (y > 1) { sample_u = image.GetPixel(x, y - 1).GetBrightness(); }
		else { sample_u = image.GetPixel(x, y).GetBrightness(); }
		if (y < h) { sample_d = image.GetPixel(x, y + 1).GetBrightness(); }
		else { sample_d = image.GetPixel(x, y).GetBrightness(); }
		x_vector = (((sample_l - sample_r) + 1) * .5f) * 255;
		y_vector = (((sample_u - sample_d) + 1) * .5f) * 255;
		Color col = Color.FromArgb(255, (int)x_vector, (int)y_vector, 255);
		normal.SetPixel(x, y, col);
		}
	}
See $bumpmap.
See also
- $ssbump: creation and usage of Valve's new self-shadowing bump maps.
- An old article that explains normal mapping quite well
- Polycount wiki page about normal maps
- Creating a Material


