此地图的特点是中间的电梯必定会被触发。扯淡,这“噪音”会引来一大群尸潮啊。这用于划分地图为两半并限定游戏性到各个区域。当线性地图部分在合作模式下是不错的,清道夫的游戏性是更多偏向竞技。那么我们要让地图以清道夫模式启动会表现得与众不同。
在可见组面板中,单击“+SCAVENGE”可视组旁边的复选框以显示和隐藏它。你会看到所有特定于清道夫的内容被激活和停用。这个 visgroup 中只有一个 func_instance,它引用了以下文件:
Hammer 将打开实例引用的清道夫地图元素的 VMF 文件进行编辑。现在我们只能看到与清道夫地图元素相关的物品:起始区域、发电机、武器和一些改变地图和导航的障碍物。
不过,有点复杂。一些元素只需要在清道夫模式下生成,如果地图运行任何非清道夫模式,则必须移除其他元素。请记住,在 Hammer 中,可视组和实例是唯一的意义所在。一旦你编译你的地图,VBSP 进程会读取所有的实例并编译到地图中,就意味着所有模式的元素都集中到了一块,并且被隐藏的可见组将被 VBSP 忽略。所以我们需要一种在游戏中控制地图中的游戏元素的机制。这就是 info_gamemode 实体的用武之地。

info_gamemode entity
In L4D2, You can use the new info_gamemode entity to trigger different events depending on the game mode in which a map is played. This includes variant map appearance, path arrangement, item placement, or any other logic.
The most direct benefit is that you no longer have to ship multiple versions of the same level. A single .BSP can support all gamemodes, thus dramatically reducing the size of your add-on.
If there is a drawback, it is certainly in the increased complexity of your VMF file. However, as we shall see, this can be easily managed using visgroups and the new .VMF instance functionality described previously.
Learning by example
Let's look at how gamemode logic can be used to add scavenge in an existing map, in this case one from the Deadline add-on campaign.
First, open the source file for the second map of Deadline 2:
Steam\steamapps\common\left 4 dead 2\sdk_content\DeadLine2\mapsrc\deadline02.vmf
Overall structure
The scavenge-specific entities are in their own instance, which also lives in its own visgroup.
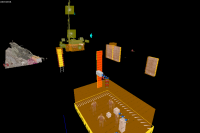
One of the features of this map is a lift in the center that must be triggered. Fictionally, the "noise" also creates a horde panic event. This is used to create two halves of the map and limit gameplay to each area. While this is desirable in co-op, where maps are very linear, scavenge gameplay is much more arena-oriented. So we'll need to have the map behave differently when launched in scavenge mode.
Let's look at how this is set up:
In the visgroup panel, click on the checkbox next to the "+SCAVENGE" visgroup to turn it on and off. You'll see all the scavenge-specific content activate and deactivate. There is just one func_instance in this visgroup, and it references the following file:
"instance/l4d_deadline02_scavenge.vmf"
The idea here is to have all the elements that are common to all gamemodes in the main map source file: "
deadline02.vmf" and to have elements that are gamemode-specific each live in their own separate .VMF files, and have them be referenced into the main map as instances. The L4D2 level designers find it easier to manage everything this way, and depending on the complexity of your map, you may find it easier as well.
Examining the instance
Editing the Scavenge instance.
Click on the Scavenge instance with the selection tool and open up its properties dialog. At the bottom left, click the Edit Instance button.
Hammer opens up the scavenge .VMF for editing. Now we can see just the scavenge-related items: The starting areas, the generator, weapons, and some obstacles that alter the map and navigation.
It's a little more complicated, though. Some elements need to be spawned only in scavenge mode, and others must be killed if the map is run anything but scavenge mode. Remember that visgroups and instances are only meaningful in Hammer. Once you run your map, the
VBSP process collapses all the instances, which means everything gets lumped together, and disabled visgroups are ignored. So we need a mechanism for controlling these in game. This is where the
info_gamemode entity comes in.
info_gamemode settings
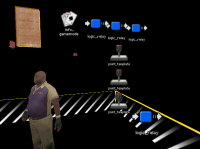
The gamemode logic entities.
The icon looks like a set of playing cards.
 提示:You can also use Map > Entity Report to find it. Enable filter by class, and type in "
info_gamemode".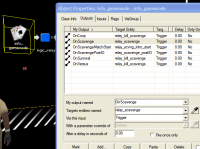
Outputs that fire depending on gamemode.
Select it and click on the Properties button. The class info is pretty sparse, but let's look at the Outputs tab. That's where all the action is.
Here you can see that if the map loads in any gamemode other than scavenge, it fires off a logic_relay named "relay_kill_scavenge" that kills all of the scavenge-specific items in this map.
That takes care of removing everything, which is the easy scenario. Adding things, however, needs to be done in stages, so we have broken things out into their own logic_relay entities.
When the map is first loaded in scavenge mode, it fires off the "OnScavenge" event. At this point, the Director is still getting ready, and it's important not to spawn or kill entities until it is finished initializing.
After the map has been set up and the Director has been initialized, it fires off "OnScavengePostIO". We do several things here:
- First, we do any point_template spawning that we need to do. This example map has templates for scavenge-specific weapons, items, and the generator with the fill point.
- It also actuates the lift automatically, thus raising the ladder and disarming the call button.
- The last thing we do in post IO is adjust navigation. We've blocked some paths to balance the map, and the nav blockers are set to block.
"OnScavengeMatchStart" is, as I'm sure you've guessed, fired off for each match.
One of the nice things about the
info_gamemode is that you can have several of them in a map. Instead of relying on a single one to do everything, the Deadline 2 map uses one in each game mode instance file. Each one is responsible for spawning and killing stuff related to that particular gamemode alone. This takes a bit more effort to set up, but it helps keep things a little simpler when you're editing. And keeping things in their own "buckets" really helps when you resume editing a map that you haven't touched for a while.
Using info_director
In some cases, you will not be able to fully compartmentalize a gamemode. For example, scavenge maps require that the info_director, which is in the main map because it is used by all game modes, have certain outputs mapped as shown to the right.
You'll notice that survival has its own instance as well, with coop and versus modes are combined together into their own. Of course, you may organize your map and support gamemodes as you see fit, with or without instances.


