
info_gamemode entity
В L4D2 вы можете использовать новый объект info_gamemode (переведено) для запуска различных событий в зависимости от режима игры, в котором играется карта. Это включает в себя внешний вид карты, расположение пути, размещение позиций или любую другую логику. Самое важное преимущество в том, что вам больше не нужно создавать несколько версий одного уровня. Один .BSP может поддерживать все gamemode, таким образом резко уменьшая размер вашего дополнения.Есть один недостаток, это, безусловно, повышение сложности вашего файла VMF. Однако, как мы увидим, этим можно легко управлять с помощью команд visgroups и новых функций экземпляра .VMF, описанных ранее.
Изучение на примере
Давайте посмотрим, как использовать gamemode-логику для добавления выделения в существующую карту, в этом случае одну из кампании Deadline.
Сначала откройте исходный файл для второй карты Deadline 2:
Steam\steamapps\common\left 4 dead 2\sdk_content\DeadLine2\mapsrc\deadline02.vmf
Общая структура
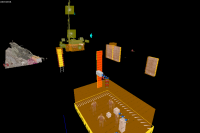
The scavenge-specific entities are in their own instance, which also lives in its own visgroup.
Одной из особенностей этой карты является подъем в центре, который должен быть запущен. Судя по всему, «шум» также создает событие паники орды. Это используется для создания двух половинок карты и ограничения игрового процесса в каждой области. Хотя это желательно в кооперативе, где карты очень линейные, увлекательный геймплей гораздо более ориентирован на арену. Таким образом, нам нужно, чтобы карта работала по-разному при запуске в режиме scavenge.
Давайте посмотрим, как это устроено:
На панели visgroup установите флажок рядом с висгруппой «+ SCAVENGE», чтобы включить и выключить ее. Вы увидите, что всё специфический связанное с scavenge активируются и деактивируются. В этой visgroup есть только один func_instance, и он ссылается на следующий файл:
"instance/l4d_deadline02_scavenge.vmf"
Идея здесь состоит в том, чтобы иметь все элементы, которые являются общими для всех игровых мод в главном файле исходного файла карты: "deadline02.vmf" и иметь элементы, специфичные для каждого gamemode, в отдельности как VMF-файлы и привязать их к основной карте в качестве экземпляров. Дизайнерам уровня L4D2 легко управлять всеми этими приспособлениями, и в зависимости от сложности разнообразность карты вам может быть легче.
Изучение экземпляра
Editing the Scavenge instance.
Нажмите на экземпляр Scavenge с помощью инструмента выделения и откройте диалог свойств. В левом нижнем углу нажмите кнопку Edit Instance.
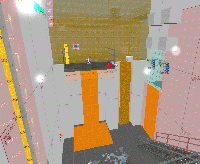
Hammer откроет .VMF для редактирования. Теперь мы можем видеть только предметы, связанные с ущельем: начальные области, генератор, оружие и некоторые препятствия, которые изменяют карту и навигацию.
Однако это немного сложнее. Некоторые элементы должны быть созданы только в режиме scavenge, а другие должны быть уничтожены, если на карте выполняется что-либо, кроме режима scavenge. Помните, что visgroups и экземпляры имеют смысл только в Hammer. После запуска вашей карты процесс VBSP разрушает все экземпляры, что означает, что все объединяется, а отключенные visgroups игнорируются. Поэтому нам нужен механизм для управления ими в игре. Здесь появляется объект info_gamemode.
Настройки info_gamemode
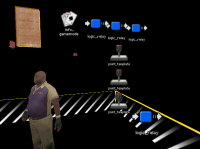
The gamemode logic entities.
Значок выглядит как набор игральных карт.
 Совет:Вы также можете использовать Map > Entity Report, чтобы найти его. включите filter by class, и введите "
info_gamemode".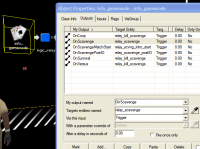
Outputs that fire depending on gamemode.
Выберите его и нажмите кнопку Properties. Информация о классе довольно расплывчета, но давайте посмотрим на вкладку Outputs. Вот где все действие.
Здесь вы можете видеть, что если карта загружается в любой игровой режим, отличный от scavenge, он запускает logic_relay с именем "relay_kill_scavenge", который убивает все элементы, относящиеся к режиму scavenge на этой карте.
Это позаботится о том, чтобы удалить все, что является простым сценарием. Однако добавление вещей должно выполняться поэтапно, чтобы мы не имели сломанных вещий относящиеся к logic_relay.
Когда карта загружается в режиме scavenge, она запускает событие "OnScavenge". На данный момент Директор все еще готов, и важно не создавать и не убивать объекты, пока они не будут завершены.
После того, как карта была настроена и Директор был инициализирован, он отключается "OnScavengePostIO". Мы делаем несколько вещей здесь:
- Во-первых, мы делаем все point_template спавнеры, которые нам необходимы. Эта карта примеров содержит шаблоны для оружия, предметов и генератора с точкой заливки.
- Он также автоматически поднимает подъемник, поднимая лестницу и снимая с охраны кнопку вызова.
- Последнее, что мы делаем в post IO, - это настройка навигации. Мы заблокировали некоторые пути, чтобы сбалансировать карту, и блокировщики вторжения настроены на блокировку.
"OnScavengeMatchStart", как я уверен, вы догадались, fired off for each match.
Одна из приятных вещей о info_gamemode заключается в том, что вы можете иметь несколько таких на карте. Вместо того, чтобы полагаться на одного, чтобы сделать все, карта Deadline 2 использует один в каждом экземпляре файла режима игры. Каждый из них несет ответственность за спавн и уничтожение материала, связанного только с этом конкретным gamemode. Это требует немного больше усилий, чтобы настроить, но это помогает немного упростить процесс, когда вы редактируете. И сохранение вещей в их собственных «ведрах» действительно помогает, когда вы возобновляете редактирование карты, которую не косались какое-то время.
Использование info_director
В некоторых случаях вы не сможете полностью разделить игровой режим. Например, карты scavenge требуют, чтобы info_director, который находится на главной карте, к тому же используемый всеми игровыми режимами, имеет определенные выходы, отображаемые справа.
Вы заметите, что survival имеет свой собственный пример, а coop и versus объединяются в свои собственные. Конечно, вы можете организовать свою карту и поддерживать игровые модели, как вам удобно, с или без экземпляров.
info_gamemode entity
In L4D2, You can use the new info_gamemode entity to trigger different events depending on the game mode in which a map is played. This includes variant map appearance, path arrangement, item placement, or any other logic.
The most direct benefit is that you no longer have to ship multiple versions of the same level. A single .BSP can support all gamemodes, thus dramatically reducing the size of your add-on.
If there is a drawback, it is certainly in the increased complexity of your VMF file. However, as we shall see, this can be easily managed using visgroups and the new .VMF instance functionality described previously.
Learning by example
Let's look at how gamemode logic can be used to add scavenge in an existing map, in this case one from the Deadline add-on campaign.
First, open the source file for the second map of Deadline 2:
Steam\steamapps\common\left 4 dead 2\sdk_content\DeadLine2\mapsrc\deadline02.vmf
Overall structure
The scavenge-specific entities are in their own instance, which also lives in its own visgroup.
One of the features of this map is a lift in the center that must be triggered. Fictionally, the "noise" also creates a horde panic event. This is used to create two halves of the map and limit gameplay to each area. While this is desirable in co-op, where maps are very linear, scavenge gameplay is much more arena-oriented. So we'll need to have the map behave differently when launched in scavenge mode.
Let's look at how this is set up:
In the visgroup panel, click on the checkbox next to the "+SCAVENGE" visgroup to turn it on and off. You'll see all the scavenge-specific content activate and deactivate. There is just one func_instance in this visgroup, and it references the following file:
"instance/l4d_deadline02_scavenge.vmf"
The idea here is to have all the elements that are common to all gamemodes in the main map source file: "
deadline02.vmf" and to have elements that are gamemode-specific each live in their own separate .VMF files, and have them be referenced into the main map as instances. The L4D2 level designers find it easier to manage everything this way, and depending on the complexity of your map, you may find it easier as well.
Examining the instance
Editing the Scavenge instance.
Click on the Scavenge instance with the selection tool and open up its properties dialog. At the bottom left, click the Edit Instance button.
Hammer opens up the scavenge .VMF for editing. Now we can see just the scavenge-related items: The starting areas, the generator, weapons, and some obstacles that alter the map and navigation.
It's a little more complicated, though. Some elements need to be spawned only in scavenge mode, and others must be killed if the map is run anything but scavenge mode. Remember that visgroups and instances are only meaningful in Hammer. Once you run your map, the
VBSP process collapses all the instances, which means everything gets lumped together, and disabled visgroups are ignored. So we need a mechanism for controlling these in game. This is where the
info_gamemode entity comes in.
info_gamemode settings
The gamemode logic entities.
The icon looks like a set of playing cards.
Совет:You can also use Map > Entity Report to find it. Enable filter by class, and type in "info_gamemode".
Outputs that fire depending on gamemode.
Select it and click on the Properties button. The class info is pretty sparse, but let's look at the Outputs tab. That's where all the action is.
Here you can see that if the map loads in any gamemode other than scavenge, it fires off a logic_relay named "relay_kill_scavenge" that kills all of the scavenge-specific items in this map.
That takes care of removing everything, which is the easy scenario. Adding things, however, needs to be done in stages, so we have broken things out into their own logic_relay entities.
When the map is first loaded in scavenge mode, it fires off the "OnScavenge" event. At this point, the Director is still getting ready, and it's important not to spawn or kill entities until it is finished initializing.
After the map has been set up and the Director has been initialized, it fires off "OnScavengePostIO". We do several things here:
- First, we do any point_template spawning that we need to do. This example map has templates for scavenge-specific weapons, items, and the generator with the fill point.
- It also actuates the lift automatically, thus raising the ladder and disarming the call button.
- The last thing we do in post IO is adjust navigation. We've blocked some paths to balance the map, and the nav blockers are set to block.
"OnScavengeMatchStart" is, as I'm sure you've guessed, fired off for each match.
One of the nice things about the
info_gamemode is that you can have several of them in a map. Instead of relying on a single one to do everything, the Deadline 2 map uses one in each game mode instance file. Each one is responsible for spawning and killing stuff related to that particular gamemode alone. This takes a bit more effort to set up, but it helps keep things a little simpler when you're editing. And keeping things in their own "buckets" really helps when you resume editing a map that you haven't touched for a while.
Using info_director
In some cases, you will not be able to fully compartmentalize a gamemode. For example, scavenge maps require that the info_director, which is in the main map because it is used by all game modes, have certain outputs mapped as shown to the right.
You'll notice that survival has its own instance as well, with coop and versus modes are combined together into their own. Of course, you may organize your map and support gamemodes as you see fit, with or without instances.


