Portal - Tutorial - Automatic Portals
This guide will show you how to create auto portals.
Stationary Auto Portals
Walk through Auto Portals
The Frame
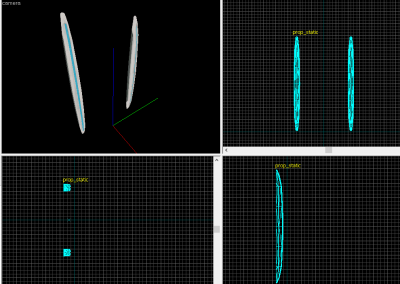
Create a prop_static entity and set it's World Model to models/props/autoportal_frame/autoportal_frame.mdl
The Portal
Create a prop_portal entity and enter the following properties:
| Property Name | Value |
|---|---|
| Name | portal |
| Start Activated | Inactive |
| Portal Number | Portal Number Here |
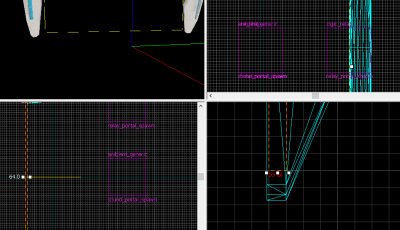
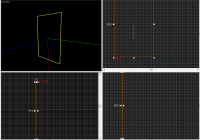
Position the prop_portal2 units above the bottom of the portal frame (prop_static entity). Now center it based off the "bars" of the portal frame using the "top (x/y) view".
Portal Spawn Sound
Create an ambient_generic entity and enter the following properties:
| Property Name | Value |
|---|---|
| Name | sound_portal_spawn
|
| Sound Name | Portal.open_blue or Portal.open_red
|
| Max Audible Distance | 333 |
| Source Entity Name | portal
|
Go to flags and modify the following:
| Flag | ||||
| Start Silent | ||||
Portal Spawn Shake
Create an env_shake entity and name it to shake_portal_spawn.
Put this entity fairly close to where the player triggers it if the player is near by the portal. There isn't a specific spot to put it at.
Optional (Recommended)
If you want to make this a prefab, following these steps to will make things easier
Create a logic_relay and set its name to relay_portal_spawn
Add the outputs:
Centered Auto Portals
Centered Auto Portals are used for floors, ceilings, and portals that you don't "walk through"
Aligning the portal
Do your best to perfectly center the portal with the auto-portal frame.
Rotating
Simply rotate the entire portal and make further corrections afterwards.
prop_portalwill make the portal look like it is in the same position in Hammer, you will have to rely on which direction the origin (yellow line in 2d view) is facingImplementation
Make the Portal spawn
Make some entity trigger the relay_portal_spawn
For example with trigger_once:
| My Output | Target Entity | Target Input | Parameter | Delay | Only Once | |
|---|---|---|---|---|---|---|
| OnTrigger | relay_portal_spawn | Trigger | 0.00 | No |
Making the Portal close
To make the portal close, you set the active state to 0,
here's in example with trigger_once:
| My Output | Target Entity | Target Input | Parameter | Delay | Only Once | |
|---|---|---|---|---|---|---|
| OnTrigger | portal | SetActivatedState | 0 | 0.00 | No |
Looped Automatic Portals
For help, see the VDC Editing Help and Wikipedia cleanup process. Also, remember to check for any notes left by the tagger at this article's talk page.
Construction
Step 1: Portal Frame
To start, select the ![]() entity tool, and create a prop_static for each portal you intend to have in your map. Set the model to "
entity tool, and create a prop_static for each portal you intend to have in your map. Set the model to "models/props/autoportal_frame/autoportal_frame.mdl" for each one.
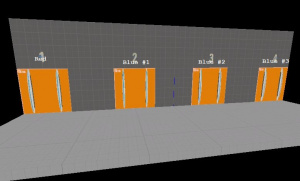
The models should be placed and arranged at the locations the portals themselves will be.
Step 2: Creating the Portals
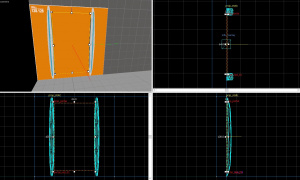
Next, create a prop_portal for each of your portals, one for your red portal, and then any additional ones for your blue portals. For the sake of this tutorial, we will be creating 3 blue portals.
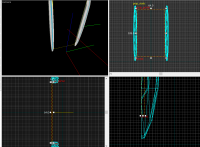
These prop_portals need to be positioned in the center of each portal frame, similar to the screenshot provided. They will also need to be rotated to be facing outward from the wall.
Name your red portal “portal_red_0”, and name the three blue portals “portal_blue_0”, “portal_blue_1”, and “portal_blue_2”. If you have extra auto portals in your map, you can increase the number in the name.
For the red portal, change its properties to the following settings:
| Property Name | Value |
|---|---|
| Start Activated | Inactive |
| Portal Number | 2 |
For the blue portals, change their properties to the following settings:
| Property Name | Value |
|---|---|
| Start Activated | Inactive |
| Portal Number | 1 |
Step 3: Creating the Logic Relays
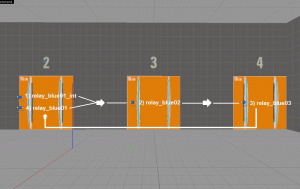
In order to make our sequential auto portals work, we will be employing the use of several logic and math entities. The one we will begin with is logic_relay.
To start, we are going to want to create four logic_relay entities for our blue portals:
- 2 relays for the first blue portal. The first relay will be used to initialize the portal opening/closing sequence, while the second relay will open the first portal after the last portal has fizzled.
- 1 relay for each of the remaining portals in the sequence.
For first portal’s initial relay, name it “relay_blue_0_int”, and give it the following I/O:
| My Output | Target Entity | Target Input | Parameter | Delay | Only Once | |
|---|---|---|---|---|---|---|
| OnTrigger | portal_blue_0 | SetActivatedState | 1 | 0.00 | No |
For the remaining relays, you will want to add an additional I/O to fizzle the previous blue portal as well. Name these relays “relay_blue_1”, “relay_blue_2”, and “relay_blue_3” respectively.
The I/Os for these should look like this:
relay_blue_1
| My Output | Target Entity | Target Input | Parameter | Delay | Only Once | |
|---|---|---|---|---|---|---|
| OnTrigger | portal_blue_1 | SetActivatedState | 0.00 | No | ||
| OnTrigger | portal_blue_0 | Fizzle | 0.00 | No |
relay_blue_2
| My Output | Target Entity | Target Input | Parameter | Delay | Only Once | |
|---|---|---|---|---|---|---|
| OnTrigger | portal_blue_2 | SetActivatedState | 0.00 | No | ||
| OnTrigger | portal_blue_1 | Fizzle | 0.00 | No |
relay_blue_3
| My Output | Target Entity | Target Input | Parameter | Delay | Only Once | |
|---|---|---|---|---|---|---|
| OnTrigger | portal_blue_0 | SetActivatedState | 0.00 | No | ||
| OnTrigger | portal_blue_2 | Fizzle | 0.00 | No |
Step 4: Create the Logic_Case Entity
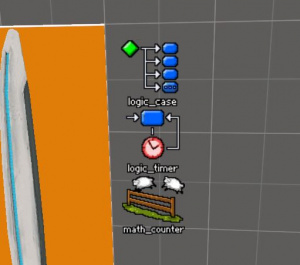
Now that we have our relays set up, we can move onto adding the remaining logic entities we’ll need to make this work. The entities in question are:
The first one we’ll create is the logic_case. This entity will be responsible for triggering the relays on each portal. Create the logic_case entity, and give it the following parameters:
| Property Name | Value |
|---|---|
| Name | case_spawn_portals |
| Case 01 | 1 |
| Case 02 | 2 |
| Case 03 | 3 |
| Case 04 | 4 |
Next, you will need to give it the following I/Os:
Step 5: Create the Logic_Timer Entity
Next, we will make the logic_timer entity. Place one in your map, and give it the following parameters:
| Property Name | Value |
|---|---|
| Name | portals_timer |
| Start Disabled | Yes |
| Use Random Time | No |
| Refire Interval | 5 |
Then, give it the following I/O:
| My Output | Target Entity | Target Input | Parameter | Delay | Only Once | |
|---|---|---|---|---|---|---|
| OnTimer | portals_counter | Add | 1 | 0.00 | No |
Step 6: Create the Math_Counter Entity
Finally, we add a math_counter entity, which will allow our setup cycle through the portals every time it has a value added to it (via the logic_timer).
Place one in your map, and give it the following parameters:
| Property Name | Value |
|---|---|
| Name | portals_counter |
| Start Disabled | No |
| Initial Value | 0 |
| Minimum Legal Value | 0 |
| Maximum Legal Value | 5 |
The reason we set the maximum value to five is to allow a looping point in the portal opening/closing sequence.
- A value of 1 triggers the initial relay for the first blue portal.
- A value of 2 triggers the relay for the second blue portal.
- A value of 3 triggers the relay for the third blue portal.
- A value of 4 trigger the second relay for the first blue portal.
- Finally, value of 5 triggers a self-reset of the counter, with the reset value being set to 2.
To sum up, you will want to set the “Maximum Legal Value” to how many relays you have set up, +1 to act as a looping point. This sequence will be kept running thanks to our logic_timer entity.
Add the following I/Os to the math_counter entity:
| My Output | Target Entity | Target Input | Parameter | Delay | Only Once | |
|---|---|---|---|---|---|---|
| OnHitMax | !self | SetValue | 2 | 0.00 | No | |
| OutValue | portals_case | InValue | 0.00 | No |
Implementation
Assuming that you have your auto-portals in their places (and have their entities set up), you can now make a trigger the player will walk into to start the sequence.
Trigger the Auto-Portal Sequence
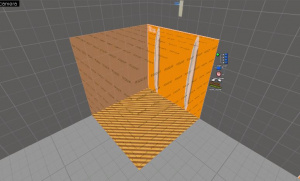
Create a brush textured with tools/toolstrigger, and press Ctrl + T to turn it into a brush entity. Change this entity into a trigger_once, and give it the following I/Os:
| My Output | Target Entity | Target Input | Parameter | Delay | Only Once | |
|---|---|---|---|---|---|---|
| OnStartTouch | portal_red_0 | SetActivatedState | 1 | 0.00 | No | |
| OnStartTouch | portals_timer | Enable | 0.00 | No |
When the player walks into the trigger’s volume, it will activate the red portal first, then after 5 seconds, the blue portals will open and close in a looped sequence.
Fizzling the Auto-Portals
Normally when you go through a cleanser field in-game, the portals you places with fizzle out. However, because of the particular way these auto portals are set up, walking through a a cleanser will not fizzle them. Because of this, we will need to create a workaround solution.
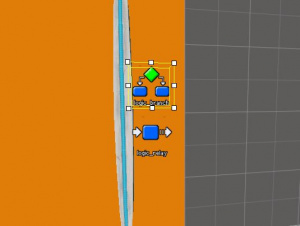
Fizzling the red portal is no issue, it can easily be fizzled on it’s own with a trigger brush. However, the blue portals will be more complicated, as simply making them fizzle with the aforementioned trigger with cause all of them to fizzle, regardless of whether they are active or not. The timer that runs the loop will also continue running if there isn’t something to disable it. To tackle the blue portals, we’ll need to employ the use of relays and logic_branches..
To start, place a logic_branch near each of the blue portals you have placed down. Then, place an extra relay next to them as well. Name the branch entities "branch_blue_0", "branch_blue_1", and "branch_blue_2". Name the new relays "relay_blue_0_fizzle", "relay_blue_1_fizzle", and "relay_blue_2_fizzle".
- We will use the branch entities as a means of either enabling or disabling an accompanying relay.
For each portal’s branch, leave them with their default parameters, and give each of them I/Os similar to this:
| My Output | Target Entity | Target Input | Parameter | Delay | Only Once | |
|---|---|---|---|---|---|---|
| OnFalse | relay_blue_0_fizzle | Disable | 0.00 | No | ||
| OnTrue | relay_blue_0_fizzle | Enable | 0.00 | No |
For the relays themselves, change the following parameter:
| Property Name | Value |
|---|---|
| Start Disabled | Yes |
Then, add an I/O that looks similar to this to each of them:
| My Output | Target Entity | Target Input | Parameter | Delay | Only Once | |
|---|---|---|---|---|---|---|
| OnTrigger | portal_blue_0 | Fizzle | 0.00 | No |
With this all set up, the you can now connect these relays to a trigger of your choosing. In this case, we’ll be connecting them to a trigger_portal_cleanser.
To learn how to make a portal cleanser, go to this page for more information.
Once you have created your portal cleanser, you’ll now be ready connect your relays and timer. To do this, insert the following I/Os into the trigger_portal_cleanser:
With this all added, your auto-portals should now fizzle out properly, depending on which ones are open and which ones are closed.
