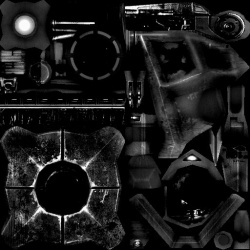
$envmapmask
< Zh
Jump to navigation
Jump to search
This page is Machine translated
It is not recommended to use machine translation without any corrections.
If the article is not corrected in the long term, it will be removed.
Also, please make sure the article complies with the alternate languages guide.
It is not recommended to use machine translation without any corrections.
If the article is not corrected in the long term, it will be removed.
Also, please make sure the article complies with the alternate languages guide.
$envmapmask是一个材质着色器参数,可在所有的 ![]() 起源 游戏中使用。 它定义了高光遮罩,用于控制材质的每个像素对$envmap光线的反射强度。遮罩应为灰度图像,其中纯白区域表示完全反射,纯黑区域表示无反射。对于不依赖
起源 游戏中使用。 它定义了高光遮罩,用于控制材质的每个像素对$envmap光线的反射强度。遮罩应为灰度图像,其中纯白区域表示完全反射,纯黑区域表示无反射。对于不依赖$envmap的漫反射类型高光,请参见$phong。
$envmapmask未存储在子文件夹中,将导致纹理无法在游戏中加载。$envmapmask完全无法与使用$phong的材质共同工作。默认情况下,它会使用$basetexture的alpha通道作为环境贴图遮罩。VMT语法示例
$envmapmask <纹理路径>
VertexLitGeneric { $envmap env_cubemap $envmapmask "props/tvscreen_test" }
附加参数

npc_cscanner的遮罩效果
$envmapmasktransform
$envmapmaskscale
$envmapmaskframe
CS:GO WorldVertexTransition专用参数
$envmapmask2
$envmapmasktransform2
$envmapframe2
替代方法
无需为高光遮罩创建全新纹理,可将其嵌入$basetexture或$bumpmap的alpha通道中。使用$bumpmap的模型材质必须采用此方法。但请注意,这不会降低内存占用。
若使用以下命令,应用于$basetexture / $bumpmap的变换及其他参数将同时影响高光遮罩。
- 嵌入
$basetexture的alpha通道作用相反:透明区域反光,不透明区域哑光。这是因为(例如)窗户纹理的alpha遮罩通常为黑色以实现透明效果——而黑色遮罩区域恰好应是高反光区域。为避免仅为反转alpha遮罩而复制纹理文件,可使用此材质参数。 - 在
 起源2007和
 反恐精英:全球攻势中,模型的alpha通道不会反转,但笔刷材质的alpha通道会反转!
- 在
 中,模型的alpha通道仅在
$phong禁用时反转!
- 在
- 在CSGO中,此参数会破坏使用$translucent的材质。请改用
$envmapmask或$normalmapalphaenvmapmask。
- 在以下引擎中:


 的VertexLitGeneric(未启用$phong)、WorldVertexTransition和LightmappedGeneric材质上,
$basealphaenvmapmask无法与$bumpmap共用。
- 在以下引擎中:


 的LightmappedGeneric和WorldVertexTransition材质上,
$basealphaenvmapmask无法与$selfillum、$seamless_detail或$distancealpha共用。
- 在
 的LightmappedGeneric和WorldVertexTransition材质上,
$basealphaenvmapmask无法与$detailblendmode "9"或$envmapanisotropy共用。
- 在
 的Lightmapped_4WayBlend材质上,
$basealphaenvmapmask无法与$selfillum共用。 - 在LightmappedGeneric材质上无法与$bumpmap共用
- 在以下引擎中:


 的VertexLitGeneric(未启用$phong)材质上,
$normalmapalphaenvmapmask无法与$selfillumfresnel共用。
 注意: 在$phong和$selfillumfresnel共同作用时使用
$normalmapalphaenvmapmask有特殊限制,请查阅$phong条目获取详情。
- 在
 的LightmappedGeneric和WorldVertexTransition材质上,
$normalmapalphaenvmapmask无法与$detailblendmode "9"或$envmapanisotropy共用。 [todo tested in ?]
$selfillum_envmapmask_alpha
$envmapmaskintintmasktexture
在3ds Max中将高光层级合并至法线贴图Alpha通道
要将高光层级贴图合并到法线贴图的Alpha通道,可创建复合贴图节点:法线贴图置于图层1,高光贴图置于遮罩1。右键点击复合贴图,选择"渲染贴图"并将新图像保存为文件(保存时需保持Gamma值为1.0,并选择32位/像素)。
Wall Worm 2.72+中的[Alpha Spec工具](http://dev.wallworm.com/topic/34/alpha_spec.html)可自动完成此流程。
另请参阅
- $basetexture
- $envmap(环境贴图)
- $phong(漫反射)
- $selfillum(自发光)