|
|
| (24 intermediate revisions by 12 users not shown) |
| Line 1: |
Line 1: |
| | {{LanguageBar|title = 建造房间}} |
| | |
| {{first room menu:zh-cn}} | | {{first room menu:zh-cn}} |
|
| |
|
| == Sealed rooms == | | == 封闭的房间 == |
| All serious maps consist completely of rooms one way or another. Even outdoor maps are surrounded by [[skybox]]es which seal the map. These rooms and boxes are very carefully sealed off from the black void surrounding them to allow the map to compile properly. If there are any holes, the map will not compile properly. The data that is not compiled is essential to a high FPS and proper lighting as it controls the visibility of objects within levels.
| | 所有正式的地图都必须完全由房间构成。就算是户外地图也要用{{L|skybox|天空盒}}进行密封。为了正确的编译地图,必须小心地将这些房间与盒子从黑色的外层空间中隔离出来。如有任何的漏洞,地图就不会被正确的编译。编译的数据控制着关卡中的对象是否可见,这对提高FPS和照明正确性很重要。 |
| A simple room consists of six brushes: The floor, the ceiling, and the four walls—completely sealing what is within from the void outside.
| | 最简单的房间由6块固体构成:地板、天花板和四面墙完全将内部与外层空间隔离开。 |
| | |
| | 为了简单快速的制作房间,你需要先了解一些简单的固体操作技术。: |
|
| |
|
| In order to make a room quickly and easily, you’ll first need to know a few more easy brush handling techniques:
| | == 移动固体 == |
| | 在一个二维视图中使用{{L|Hammer Selection Tool|选择工具}} [[File:hammer_select.png|28px]]并把鼠标移动到固体上,避免与操作柄接触。此时指针应该变成了四方向箭头[[File:fourArrows.png]]的形状,指示现在可以移动对象。 |
|
| |
|
| == Moving brushes ==
| | 在任意二维视图中点击并拖拽固体。然后松开,固体就会地动到该点。 |
| Select the [[Hammer Selection Tool|Selection Tool]] [[Image:hammer_select.png|28px]] and mouse over the brush in one of the 2D views, staying clear of the corner handles. The pointer will change into four arrows pointing in all four directions [[Image:fourArrows.png]], indicating the option to move the object.
| |
|
| |
|
| Click and drag the brush to move the brush in any of the 2D views. Upon release, the brush will be moved to that position.
| | [[File:hammer_movingBrushes.png|thumb|238px|left|在任意二维视图中点击并拖拽固体。]] |
| | {{clr}} |
|
| |
|
| [[Image:hammer_movingBrushes.png|thumb|238px|left|Click & drag in any 2D view to move a brush.]] | | == 克隆固体 == |
| <br style="clear:both">
| | [[File:hammer_cloningBrushes.png|thumb|130px|left|Shift+拖拽可克隆固体。]] |
| | 为了不必每次都用{{L|Hammer_Block_Tool|固体工具}}创建新固体,你可以按住'''Shift'''键并移动固体制作已知固体的复制品。原先的固体还在原地而复制品会出现在你用'''Shift'''拖拽到的位置。 |
|
| |
|
| == Cloning brushes ==
| | 等你学会这个技术后,就不一定要再用{{L|Hammer_Block_Tool|固体工具}}创建基础固体,你只需在你想要的时候克隆已知的固体来创建一个新的。 |
| [[Image:hammer_cloningBrushes.png|thumb|130px|left|Shift+Drag to clone a brush.]]
| |
| Instead of having to create new brushes with the [[Hammer_Block_Tool|Block Tool]] [[Image:hammer_block.png|28px]] every time, you can make a copy of an already existing brush by holding down the '''Shift''' key while moving the brush. The brush will remain in its place while the copy will end up at the position you '''Shift'''-dragged the brush to.
| |
|
| |
|
| Once you learn this technique, you will rarely have to use the [[Hammer_Block_Tool|Block Tool]] to create basic brushes—you will just clone one of the existing brushes when you want a new one.
| | {{clr}} |
|
| |
|
| <br style="clear:both">
| | == 删除固体 == |
| == Deleting brushes == | | 要删除一块固体,先用{{L|Hammer Selection Tool|选择工具}}选择它[[File:hammer_select.png|28px]]然后按下你键盘上的删除键(Delete)。 |
| To delete a brush, select it with the [[Hammer Selection Tool|Selection Tool]] [[Image:hammer_select.png|28px]] and press the Delete key on your keyboard.
| |
|
| |
|
| == Building the room == | | == 创建房间 == |
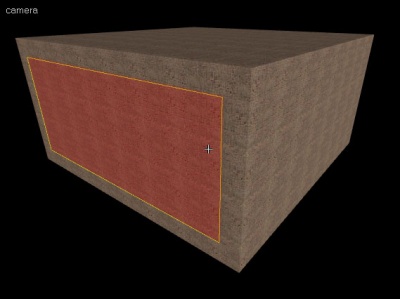
| [[Image:roomcomplete.jpg|400px|thumb|right|A 3D camera view (shaded textured polygons) with one wall brush selected. Note that the wall here is "between" or "supporting" the floor, ceiling, and neighboring walls.]] | | [[File:roomcomplete.jpg|400px|thumb|right|三维相机视图(光影 纹理 多边形)中被选择的一面墙。注意此处的墙是“连接”或“支撑”天花板、地面和其他墙壁的。]] |
|
| |
|
| In this next section, we will learn to build a room. Make sure it is a large room, as it will contain the whole level for this example. A total area of about 1024(L) x 1024(W) x 512(H) units will do fine.
| | 在下一个段落,我们将学习房间的建造。为了容纳此教程中将会出现的所有内容,房间一定要够大才行。 总面积大约有 1024(长) x 1024(宽) x 512(高)单位就可以了。 |
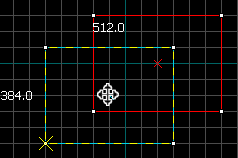
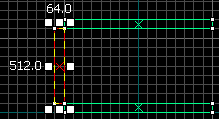
| # Using the [[Hammer_Block_Tool|Block Tool]] [[Image:hammer_block.png|28px]], make a brush to use as the floor (about 1024L x 1024W x 64H). | | # 利用{{L|Hammer_Block_Tool|固体工具}} [[File:hammer_block.png|28px]]做一个固体当作地板(大约 1024长 x 1024宽 x 64高). |
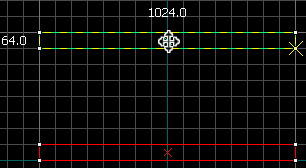
| # Using the [[Hammer Selection Tool|Selection Tool]] [[Image:hammer_select.png|28px]], Shift+drag to clone the floor brush, and move it upwards to create a ceiling of equal size to the floor. [[Image:hammer_floorCeiling.png|thumb|306px|left|Shift+Drag to clone floor.]]<br style="clear:left"> | | # 使用{{L|Hammer Selection Tool|选取工具}} [[File:hammer_select.png|28px]], Shift+拖拽复制地板的固体, 然后把它向上移动,这样就创建了与地板大小相等的天花板。[[File:hammer_floorCeiling.png|thumb|306px|left|Shift+拖拽复制地板。]]<br style="clear:left"> |
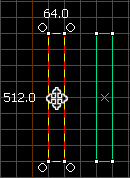
| # Clone another one of the brushes and resize it so that it connects the floor to the ceiling. You can either have the wall brushes on the outside edges of the floor and ceiling brushes, or between (supporting) them. (see associated note) [[Image:hammer_wall.png|thumb|219px|left|Connect the floor to the ceiling with a wall.]] <br style="clear:both"> | | # 复制其中一块固体并调整它的大小让地板与天花板连接起来。你可以让墙的固体在地板与天花板的外面或是在他们之间(支撑)。(参考相关注释)[[File:hammer_wall.png|thumb|219px|left|用墙连接地板与天花板]] {{clr}} |
| # Clone this wall brush and drag it to its opposite end. | | # 复制这面墙的固体并将其拖抓到另一端。 |
| # Again clone and resize a brush to create a third wall. | | # 再复制并缩放一块固体创建第三面墙。 |
| # Clone this brush to the opposite end of the room to create the final wall. [[Image:hammer_roomEnclosed.png|thumb|237px|right|Complete room with no leaks.]] | | # 复制这块固体到另一端创建最后一面墙。[[File:hammer_roomEnclosed.png|thumb|237px|right|完成的房间没有漏缝]] |
| # Check for any gaps. Make sure the room has been completely sealed. If you've been designing your room on a relatively large grid scale (e.g. 64 units), then any gaps will be apparent. Mouse-over the 3D view window and press Z to enter mouselook mode to carefully inspect your room. | | # 检查是否有缝隙。保证房间是完全密封的。如果你设计房间时使用了不见得的比例(比如64单位),那么任何缝隙都会相当明显。移动鼠标到三维视图窗口并按下Z键进入鼠标查看模式仔细检查你的房间。 |
|
| |
|
| : Alternatively, you can create a single brush the size of your room, then right click on it and select the Hollow option. Though quicker, this method makes it harder to size the room to your needs. | | : 另外,你可以创建一块大小与你的房间相等的固体,然后右击它选择挖空选项。虽然比较快,但是这种方法比较难得到你想要的房间大小。 |
|
| |
|
| {{note|One thing to take into consideration when deciding to have your walls "lean" against your floor and ceiling or "support" them is regarding later texturing. If you design your walls to "support" your floor and ceiling, for instance, if the "height" of your room is 256 units, and your walls are 256 units tall, it will be straightforward to make a texture that is 256 units tall, rather than having to worry about the top and bottom edges of the walls that are being covered by the edges of the floor and ceiling.}} | | {{Note|当决定让墙体“依仗”地板和天花板或“支撑物”时要先考虑到后面的纹理应用。假如你设计上是墙面包围地板和天花板,举个例子,你的房间的高度是256单位,而你的墙面也是256单位高,那么可以直接使用256单位高的纹理,而其他的情况则要担心墙体上下边缘被地板和天花板遮住的部分。}} |
|
| |
|
| {{clr}} | | {{clr}} |
|
| |
|
| {{NavBar|Basic Construction:zh-cn|Your First Map:zh-cn|Applying Textures:zh-cn}} | | {{Navbar|Basic Construction|Your First Map|Applying Textures}} |
| | | {{ACategory|Level Design}} |
| [[Category:Level Design Tutorials]]
| |
| | |
| [[Category:Chinese]]
| |
| | |
| {{otherlang:zh-cn}}
| |
| {{otherlang:zh-cn:en|Creating_a_Room}} | |
![]() 并把鼠标移动到固体上,避免与操作柄接触。此时指针应该变成了四方向箭头
并把鼠标移动到固体上,避免与操作柄接触。此时指针应该变成了四方向箭头![]() 的形状,指示现在可以移动对象。
的形状,指示现在可以移动对象。
![]() 然后按下你键盘上的删除键(Delete)。
然后按下你键盘上的删除键(Delete)。
 做一个固体当作地板(大约 1024长 x 1024宽 x 64高).
 , Shift+拖拽复制地板的固体, 然后把它向上移动,这样就创建了与地板大小相等的天花板。