Pt-br/Creating Brush Entities: Difference between revisions
< Pt-br
Jump to navigation
Jump to search
(Created page with "{{subst:#if: CREATING TRANSLATION OF 'Creating Brush Entities' to 'português do Brasil' VIA Template:LanguageBar BUTTONS...") |
mNo edit summary |
||
| (13 intermediate revisions by 3 users not shown) | |||
| Line 1: | Line 1: | ||
{{LanguageBar |title = Criando Entidades de Brush}} | |||
{{LanguageBar}} | |||
{{Goldsource topicon}}{{source topicon}} | {{Goldsource topicon}}{{source topicon}} | ||
{{first room menu}} | {{first room menu}} | ||
Já [[Basic Construction|criamos brushes]]. Há um outro lado deles: as '''[[brush entity|entidades de brush]]''' | |||
Neste exemplo, criaremos um brush que funciona como uma porta deslizante. Quando o jogador tocar o brush, ele se elevará no ar e permitirá a passagem. | |||
[[File:Door basic.png|thumb|none| | [[File:Door basic.png|thumb|none|Uma {{ent|func_door}} básica]] | ||
== | == Construção == | ||
# | # Selecione o bloco {{hammer block}} e crie um novo brush. 128×128×16 é um bom tamanho, mas qualquer tamanho serve. {{tip|Se a grade do Hammer for muito grande para ser reduzida a 16 unidades, pressione {{key|[}} ou clique em '''Smaller Grid'''' [[File:Hammer SmallerGrid.png|link=]] para reduzi-la. Nunca desative o encaixe a menos que você realmente precise!}} | ||
# | # Mova o brush para uma entidade (também conhecido como “amarrar” a uma entidade) usando {{key|Ctrl+T}} ou o botão [[Hammer New Objects Toolbar#toEntity_(Ctrl+T)|toEntity]]:<p>[[File:Hammer toEntityButton.png|border|Botão Hammer toEntity|link=]]</p> {{tip|Se você tiver desmarcado o brush ao qual deseja vincular a entidade, será necessário selecionar novamente, caso contrário, o botão toEntity não funcionará quando você clicar nele}} | ||
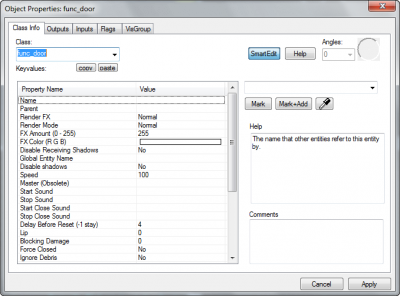
# | # Isso abrirá a caixa de diálogo [[Hammer Object Properties Dialog|Propiedades do Objeto]]:<p>[[File:Hammer object properties.png|400px|Dialogo de Propriedades do Objeto]]</p> {{tip|Se você precisar acessar a caixa de diálogo novamente mais tarde, selecione o brush e pressione {{key|Alt+Enter}}.}} | ||
# Select [[func_door]] from the “Class” drop-down menu in the top left (you can search by typing into the box) and hit “Apply”. | # Select [[func_door]] from the “Class” drop-down menu in the top left (you can search by typing into the box) and hit “Apply”. | ||
# Near the bottom of the main “Keyvalues” list, find “Move Direction”. Either change its value to read “<code>-90 0 0</code>” or select “Up” from the drop-down list to the left of the black circle. | # Near the bottom of the main “Keyvalues” list, find “Move Direction”. Either change its value to read “<code>-90 0 0</code>” or select “Up” from the drop-down list to the left of the black circle. | ||
# Click “Apply” again, then close the Object Properties dialog. | # Click “Apply” again, then close the Object Properties dialog. | ||
Agora você deve conseguir compilar o mapa e ver a porta funcionando. | |||
== | == Terminando == | ||
Abra o [[Hammer Texture Browser|Texture Browser]] e [[Hammer Texture Browser#Filter|filtro]] para “porta”. Escolha um material que você goste e aplique-o ao brush como faria normalmente. Talvez você também queira construir uma parede que conecte a porta às bordas do mapa. | |||
[[File:Decorated door.jpg|400px|thumb|none| | [[File:Decorated door.jpg|400px|thumb|none|Mas não se empolgue muito!]] | ||
== | ==Destruindo== | ||
Para transformar uma entidade de pincel em uma entidade normal, selecione-a e pressione {{key|Ctrl+Shift+W}}, ou '''ToWorld'''', ao lado do botão ToEntity que você clicou anteriormente. | |||
{{Navbar|Adding Point Entities|Your First Map|Adding Light}} | {{Navbar | ||
| 1 = Adding Point Entities | alt1 = Adicionando pontos de entidades | |||
| 2 = Your First Map | alt2 = Seu primeiro mapa | |||
| 3 = Adding Light | alt3 = Adicionando luz | |||
}} | |||
{{ACategory|Hammer}} | |||
{{ACategory|Level Design}} | |||
{{stub}} | {{stub}} | ||
Latest revision as of 11:33, 23 May 2025
Já criamos brushes. Há um outro lado deles: as entidades de brush
Neste exemplo, criaremos um brush que funciona como uma porta deslizante. Quando o jogador tocar o brush, ele se elevará no ar e permitirá a passagem.

Uma func_door básica
Construção
- Selecione o bloco Block tool
 e crie um novo brush. 128×128×16 é um bom tamanho, mas qualquer tamanho serve.
  Dica:Se a grade do Hammer for muito grande para ser reduzida a 16 unidades, pressione [ ou clique em Smaller Grid'
  para reduzi-la. Nunca desative o encaixe a menos que você realmente precise!
 - Mova o brush para uma entidade (também conhecido como “amarrar” a uma entidade) usando Ctrl+T ou o botão toEntity:
 Dica:Se você tiver desmarcado o brush ao qual deseja vincular a entidade, será necessário selecionar novamente, caso contrário, o botão toEntity não funcionará quando você clicar nele
 - Isso abrirá a caixa de diálogo Propiedades do Objeto:
 Dica:Se você precisar acessar a caixa de diálogo novamente mais tarde, selecione o brush e pressione Alt+Enter.
 - Select func_door from the “Class” drop-down menu in the top left (you can search by typing into the box) and hit “Apply”.
- Near the bottom of the main “Keyvalues” list, find “Move Direction”. Either change its value to read “
-90 0 0” or select “Up” from the drop-down list to the left of the black circle. - Click “Apply” again, then close the Object Properties dialog.

Agora você deve conseguir compilar o mapa e ver a porta funcionando.
Terminando
Abra o Texture Browser e filtro para “porta”. Escolha um material que você goste e aplique-o ao brush como faria normalmente. Talvez você também queira construir uma parede que conecte a porta às bordas do mapa.

Destruindo
Para transformar uma entidade de pincel em uma entidade normal, selecione-a e pressione Ctrl+Shift+W, ou ToWorld', ao lado do botão ToEntity que você clicou anteriormente.