Zh/BTS Light Sources: Difference between revisions
(BTS LS汉化) |
m (Multipage removal) |
||
| (5 intermediate revisions by 3 users not shown) | |||
| Line 1: | Line 1: | ||
{{ | {{LanguageBar|title = 幕后教程-光源}} | ||
{{back | Portal Level Creation|传送门关卡制作}}{{Morescreenshots}}{{Tutorial Skill Level | skill=2}} | |||
==介绍== | ==介绍== | ||
本页将展示并教您如何创建幕后区域中的光源。幕后区域与测试室形成鲜明对比的很大一部分原因是照明的不同。 | 本页将展示并教您如何创建幕后区域中的光源。幕后区域与测试室形成鲜明对比的很大一部分原因是照明的不同。 | ||
一个常见的误解是,幕后部分的大部分照明都是红橙色的,这是错误的,因为大多数区域都是暖白色。在 | 一个常见的误解是,幕后部分的大部分照明都是红橙色的,这是错误的,因为大多数区域都是暖白色。在 {{portal}}{{L|Portal}} 中,红橙色通常用作重点照明,但也可以作为狭窄和狭窄区域的主要光源。 | ||
==聚光灯== | ==聚光灯== | ||
| Line 10: | Line 11: | ||
[[File:bts_light_sources_big_lamp_hammer.jpg|thumb|right|300px|The point_spotlight and light_spot are placed in front of the model]] | [[File:bts_light_sources_big_lamp_hammer.jpg|thumb|right|300px|The point_spotlight and light_spot are placed in front of the model]] | ||
===大灯=== | ===大灯=== | ||
创建一个<code> | 创建一个<code>{{L|prop_static}}</code>实体并将其模型设定为<code>models/props_wasteland/light_spotlight01_lamp.mdl</code>,这个模型就是灯本身。基本模型是<code>models/props_wasteland/light_spotlight01_base.mdl</code> | ||
{{Note|记得禁用这两个模型的阴影}} | {{Note|记得禁用这两个模型的阴影}} | ||
创建一个<code> | 创建一个<code>{{L|point_spotlight}}</code>并输入以下属性: | ||
{| class=standard-table | {| class=standard-table | ||
! Property Name || Value | ! Property Name || Value | ||
| Line 26: | Line 27: | ||
|} | |} | ||
创建一个<code> | 创建一个<code>{{L|light_spot}}</code>并输入以下属性: | ||
{| class=standard-table | {| class=standard-table | ||
! Property Name || Value | ! Property Name || Value | ||
| Line 36: | Line 37: | ||
===小灯=== | ===小灯=== | ||
创建一个<code> | 创建一个<code>{{L|prop_static}}</code>实体并将其模型设定为<code>models/props_wasteland/light_spotlight02_lamp.mdl</code>,它是灯本身。基本模型是<code>models/props_wasteland/light_spotlight02_base.mdl</code> disable shadows for both props. | ||
创建一个<code> | 创建一个<code>{{L|point_spotlight}}</code>并输入以下属性: | ||
{| class=standard-table | {| class=standard-table | ||
! Property Name || Value | ! Property Name || Value | ||
| Line 51: | Line 52: | ||
|} | |} | ||
创建一个<code> | 创建一个<code>{{L|light_spot}}</code>输入以下属性: | ||
{| class=standard-table | {| class=standard-table | ||
! Property Name || Value | ! Property Name || Value | ||
| Line 68: | Line 69: | ||
===吊灯=== | ===吊灯=== | ||
创建一个<code> | 创建一个<code>{{L|prop_static}}</code>实体并将其模型设定为<code>models/props_bts/cage_light.mdl</code>. | ||
放一个<code> | 放一个<code>{{L|env_sprite}}</code>到模型内部,然后依旧是输入以下属性: | ||
{| class=standard-table | {| class=standard-table | ||
! Property Name || Value | ! Property Name || Value | ||
| Line 85: | Line 86: | ||
|} | |} | ||
接下来,在模型下方创建一个<code> | 接下来,在模型下方创建一个<code>{{L|Light_spot}}</code>。还是输入以下属性: | ||
{| class=standard-table | {| class=standard-table | ||
! Property Name || Value | ! Property Name || Value | ||
| Line 100: | Line 101: | ||
然后,在你的房间里创建一个电缆系统,如果还没有的话。把吊灯挂在上面,你可以尝试对齐顶部的小钩子,使其看起来像悬挂在电缆上,也可以将其连接到绳索相交的天花板上。 | 然后,在你的房间里创建一个电缆系统,如果还没有的话。把吊灯挂在上面,你可以尝试对齐顶部的小钩子,使其看起来像悬挂在电缆上,也可以将其连接到绳索相交的天花板上。 | ||
{{todo| 这些灯真的应该存在吗?escape_00泄露的 vmf 文件中有很多这样的灯,但只有在勾选 <code>_art_removals</code> | {{todo| 这些灯真的应该存在吗?escape_00泄露的 vmf 文件中有很多这样的灯,但只有在勾选 <code>_art_removals</code> {{L|visgroup}}时才能找到。这些灯只存在于testchmb_a_11中,只能被错误地保留下来。}} | ||
===挂壁式=== | ===挂壁式=== | ||
| Line 106: | Line 107: | ||
{{Note|如果你看不懂这里的翻译,请对照上面的内容,至于为什么,因为创建一个创建一个创建一个创建一个......}} | {{Note|如果你看不懂这里的翻译,请对照上面的内容,至于为什么,因为创建一个创建一个创建一个创建一个......}} | ||
创个<code> | 创个<code>{{L|prop_static}}</code>然后模型用<code>models/props_c17/light_cagelight02_on.mdl</code>。 | ||
放个<code> | 放个<code>{{L|env_sprite}}</code>在模型里,输入下列: | ||
{| class=standard-table | {| class=standard-table | ||
! Property Name || Value | ! Property Name || Value | ||
| Line 123: | Line 124: | ||
|} | |} | ||
然后创建<code> | 然后创建<code>{{L|Light_spot}}</code>输入属性: | ||
{| class=standard-table | {| class=standard-table | ||
! Property Name || Value | ! Property Name || Value | ||
| Line 136: | Line 137: | ||
|} | |} | ||
同样,你可以以最适合该区域的方式修改强度和角度;确保将<code> | 同样,你可以以最适合该区域的方式修改强度和角度;确保将<code>{{L|Light_spot}}</code>放置在靠近<code>{{L|prop_static}}</code>的地方,以便它看起来像模型正在发光。不要忘记将固定装置与墙壁齐平。 | ||
{{note| 些灯只存在于下水道区域。(即<code>escape_02's</code>)}} | {{note| 些灯只存在于下水道区域。(即<code>escape_02's</code>)}} | ||
==其他光源列表== | ==其他光源列表== | ||
* | * {{L|Creating BTS Fans|风扇}} | ||
* | * {{L|Creating Portal Vents|通风口}} | ||
* [[Detailing BTS Wall Pipes#Detailed Wall Pipes| 墙面管道]] | * [[Detailing BTS Wall Pipes#Detailed Wall Pipes| 墙面管道]] | ||
{{todo|请添加别的光源}} | {{todo|请添加别的光源}} | ||
{{ACategory|Portal}} | |||
{{ACategory|Level Design}} | |||
{{ACategory|Tutorials}} | |||
Latest revision as of 04:05, 12 July 2024

You can upload screenshots at Special:Upload. For help, see the Help:Images.
| Skill Level
This tutorial expects you to have this amount of knowledge within the topic to follow along smoothly. | |||||
|---|---|---|---|---|---|
| Novice | Familiar | Competent | Proficient | Expert | |
介绍
本页将展示并教您如何创建幕后区域中的光源。幕后区域与测试室形成鲜明对比的很大一部分原因是照明的不同。
一个常见的误解是,幕后部分的大部分照明都是红橙色的,这是错误的,因为大多数区域都是暖白色。在 ![]() Portal 中,红橙色通常用作重点照明,但也可以作为狭窄和狭窄区域的主要光源。
Portal 中,红橙色通常用作重点照明,但也可以作为狭窄和狭窄区域的主要光源。
聚光灯
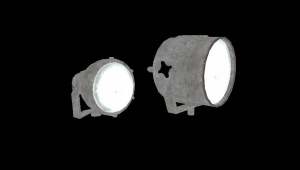
聚光灯附在墙壁、天花板上,有时也附在地板上。
大灯
创建一个prop_static实体并将其模型设定为models/props_wasteland/light_spotlight01_lamp.mdl,这个模型就是灯本身。基本模型是models/props_wasteland/light_spotlight01_base.mdl
创建一个point_spotlight并输入以下属性:
| Property Name | Value |
|---|---|
| Color | 250 240 205 |
| HDR color scale | .7 |
| Spotlight Width | 80 |
| Spotlight Length | Is how long the spotlight will go.
|
创建一个light_spot并输入以下属性:
| Property Name | Value |
|---|---|
| Brightness | 250 240 205 900 |
| Constant | 500000 |
小灯
创建一个prop_static实体并将其模型设定为models/props_wasteland/light_spotlight02_lamp.mdl,它是灯本身。基本模型是models/props_wasteland/light_spotlight02_base.mdl disable shadows for both props.
创建一个point_spotlight并输入以下属性:
| Property Name | Value |
|---|---|
| Color | 250 240 205 |
| HDR color scale | .7 |
| Spotlight Width | 32 |
| Spotlight Length | Is how long the spotlight will go.
|
创建一个light_spot输入以下属性:
| Property Name | Value |
|---|---|
| Brightness | 250 240 205 900 |
| Constant | 500000 |
| Inner (bright) Angle | 1 |
| Outside (fading) Angle | 25 |
| Focus | 0.5 |
吊灯
创建一个prop_static实体并将其模型设定为models/props_bts/cage_light.mdl.
放一个env_sprite到模型内部,然后依旧是输入以下属性:
| Property Name | Value |
|---|---|
| Render Mode | World Space Glow |
| FX Color (R G B) | 250 240 205 |
| Sprite Name | materials/Sprites/light_glow03.vmt
|
| Scale | .5 |
| Size of Glow Proxy Geometry | 4.0 |
接下来,在模型下方创建一个Light_spot。还是输入以下属性:
| Property Name | Value |
|---|---|
| Brightness | 250 240 205 400 |
| Inner (Bright) Angle | 15 |
| Outer (Fading) Angle | 30 |
你可能需要根据该区域的照明需求调整强度和角度。
然后,在你的房间里创建一个电缆系统,如果还没有的话。把吊灯挂在上面,你可以尝试对齐顶部的小钩子,使其看起来像悬挂在电缆上,也可以将其连接到绳索相交的天花板上。
_art_removals visgroup时才能找到。这些灯只存在于testchmb_a_11中,只能被错误地保留下来。挂壁式
创个prop_static然后模型用models/props_c17/light_cagelight02_on.mdl。
放个env_sprite在模型里,输入下列:
| Property Name | Value |
|---|---|
| Render Mode | World Space Glow |
| FX Color (R G B) | 254 216 146 |
| Sprite Name | materials/Sprites/light_glow03.vmt
|
| Scale | .75 |
| HDR color scale | .5 |
然后创建Light_spot输入属性:
| Property Name | Value |
|---|---|
| Brightness | 250 240 205 200 |
| Inner (Bright) Angle | 30 |
| Bightness Scale HDR | .5 |
| Outer (Fading) Angle | 70 |
同样,你可以以最适合该区域的方式修改强度和角度;确保将Light_spot放置在靠近prop_static的地方,以便它看起来像模型正在发光。不要忘记将固定装置与墙壁齐平。
escape_02's)
