Env lensflare: Difference between revisions
MyGamepedia (talk | contribs) No edit summary |
MyGamepedia (talk | contribs) (→BOW) |
||
| (137 intermediate revisions by 9 users not shown) | |||
| Line 1: | Line 1: | ||
{{ | {{CDA|CLensflare|CBaseEntity|}} | ||
{{this is a|point entity|name=env_lensflare|game=Black Mesa|sprite=Lensflare.png}} It creates a cinematic dynamic {{WP|lens flare}} that can be used to represent bright light sources. It has very flexible customization. | |||
[[File:Flare_image.jpg|thumb|right|320px|Example from bm_c4a2b.]] | |||
{{bug|hidetested=1| | |||
* Doesn't work with level transition if it is attached to an object. It will not transmit between levels. | |||
* Sun flare renders through [[3D Skybox]] objects. This happens because [[gbuffer]] doesn't include 3D Skybox in the render pass. | |||
:{{expand|title=Example| | |||
<gallery mode=packed heights=290px> | |||
File:cFLARESKYBUG1.jpg|Clear example (the missiles is [[3D Skybox]] objects). | |||
</gallery> | |||
}} | |||
* Can't be displayed in 3D Skybox if placed in 3D Skybox. | |||
* Doesn't render properly in ''-tools'' windowed mode. | |||
:{{expand|title=Example| | |||
<gallery mode=packed heights=290px> | |||
File:Flare_in_tools.jpg|Example (note that the tram flares is in the right position). | |||
</gallery> | |||
}} | |||
}} | |||
{{important|In graphics settings user can turn off all flares, keep in mind this to escape situations like in the picture. Add sprites or corresponding skins, paint sun on your skybox if don't plan to use {{ent|newLight_Dir}}. | |||
:{{expand|title=Example| | |||
<gallery mode=packed heights=290px> | |||
File:cXENWHEN.jpg| Option enabled. Dr. Rosenberg hold enabled flashlight, everything looks fine. | |||
File:cXEN2WHEN.jpg|Option disabled. Dr. Rosenberg still hold enabled flashlight, but flashlight looks disabled in fact. | |||
</gallery> | |||
}} | |||
}} | |||
{{note|Displayed behind {{ent|viewmodel}}, unlike [https://www.moddb.com/mods/inhuman Half-Life 2: Inhuman] implementation. | |||
:{{expand|title=Example| | |||
<gallery mode=packed heights=290px> | |||
File:bms_flare_viewmodel.jpg|Black Mesa | |||
File:inhuman_flare_viewmodel.jpg|Half-Life 2: Inhuman | |||
</gallery> | |||
}} | |||
}} | |||
==Keyvalues== | ==Keyvalues== | ||
{{KV|File|intn=FlareFile|string| | {{KV Targetname}} | ||
{{KV|Distance attenuation|intn=FlareAttenuation|float|Distance where | {{KV|File|intn=FlareFile|string|Only in [[FGD]], doesn't present in the code.|deprecated=1}} | ||
{{KV|Flare Type|intn=FlareType|Choices|Normal: | {{KV|Distance attenuation|intn=FlareAttenuation|float|Distance where lens flare will be invisible. 0.0 if not attenuation with distance.}} | ||
{{KV|Flare Type|intn=FlareType|Choices| | |||
*0: Normal - use [[origin]] position and display normally. | |||
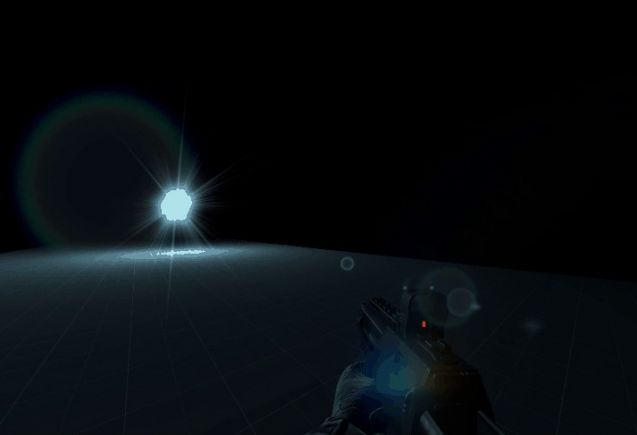
*1: Sun Flare - display in the [[skybox]] and use angle values for position in the skybox, similar to {{ent|env_sun}} or {{ent|newLight_Dir}}. | |||
{{expand|title=Examples| | |||
<gallery mode=packed heights=210px> | |||
File:cSUNF1.jpg| thumb | left | 510px | Flare Type - Normal | |||
File:cSUNF2.jpg| thumb | left | 510px | Flare Type - Sun Flare | |||
</gallery> | |||
}} | |||
{{warning|Never place more then 4 lens flares with sun flare type, otherwise game will crash on map launch with this message. | |||
{{expand|title=The message.| | |||
<gallery mode=packed heights=210px> | |||
File:SOURCEMOMENTXD.jpg| thumb | left | 510px | The error. | |||
</gallery> | |||
}} | |||
}} | |||
}} | |||
{{KV|Appearance|intn=FlareStyle|Choices| | {{KV|Appearance|intn=FlareStyle|Choices| | ||
{{ | {{Lightstyle presets}}}} | ||
{{KV|Size of Glow Proxy Geometry.|intn=GlowProxySize|float|Size of the glow to be rendered for visibility testing. Must be larger than the distance from the sprite center to empty space. So if this glow is inside geometry (like a light bulb), set this value to be bigger than the bulb's radius. Any time a sphere of this radius would be visible (poking through any nearby geometry), the glow will be rendered. | {{KV|Size of Glow Proxy Geometry.|intn=GlowProxySize|float|Size of the glow to be rendered for visibility testing. Must be larger than the distance from the sprite center to empty space. So if this glow is inside geometry (like a light bulb), set this value to be bigger than the bulb's radius. Any time a sphere of this radius would be visible (poking through any nearby geometry), the glow will be rendered. | ||
{{KV|Flare 01 texture|intn=Flare01_texture|to=Flare 20 texture|intn2=Flare20_texture|string| | {{Note|Richard's note : I noticed that value more than ~100 wont work correctly.}} | ||
{{KV|Flare 01 parameters|intn=Flare01_params|to=Flare 20 parameters|intn2=Flare20_params|string| | }} | ||
{{KV|Flare 01 intensity|intn=Flare01_intensity|to=Flare 20 intensity|intn2=Flare20_intensity|vector|intensity | {{KV|Flare 01 texture|intn=Flare01_texture|to=Flare 20 texture|intn2=Flare20_texture|string|Texture to use for the lens flare. If not specified - the lens flare will not exists. A path to a [[VMT]] file relative to the <code>materials</code> folder, without the file extension. Common flare materials are located in the <code>effects/lensflare/</code> folder. Any material can be used as a lens flare, but flare materials should preferably use {{ent|UnlitGeneric}} and be {{ent|$additive}}. | ||
{{KV|Flare 01 sizes|intn=Flare01_sizes|to=Flare 20 sizes|intn2=Flare20_sizes|vector| | }} | ||
{{KV|Flare 01 color|intn=Flare01_color|to=Flare 20 color|intn2=Flare20_color|color255|color | {{KV|Flare 01 parameters|intn=Flare01_params|to=Flare 20 parameters|intn2=Flare20_params|string|Sets function and values for it, this will define the lens flare behavior. See below for more details.}} | ||
{{KV|Flare 01 intensity|intn=Flare01_intensity|to=Flare 20 intensity|intn2=Flare20_intensity|vector|Sets scale of intensity in three independent numbers, used number depends on the player's camera deviation. | |||
: First number sets when player look at entity center. | |||
: Second number sets when player camera have slight deviation. | |||
: Third number sets when player look far away from entity center. | |||
[https://youtu.be/sbbbQKV6qeQ Example] in a short video with 3 different values. | |||
}} | |||
{{KV|Flare 01 sizes|intn=Flare01_sizes|to=Flare 20 sizes|intn2=Flare20_sizes|vector| | |||
Sets scale of size in three independent numbers, used number depends on the player's camera deviation. | |||
: First number sets when player look at entity center. | |||
: Second number sets when player camera have slight deviation. | |||
: Third number sets when player look far away from entity center. | |||
{{Note|Doesn't work with BOW function (see below).}} | |||
[https://youtu.be/mCS1vRauARI Example] in a short video with 3 different values. | |||
}} | |||
{{KV|Flare 01 color|intn=Flare01_color|to=Flare 20 color|intn2=Flare20_color|color255|The [[RGB]] color value of the flare.}} | |||
==Inputs== | ==Inputs== | ||
{{ | {{I|HideLensFlare|Hide the lensflare. Won't be drawn until the 'ShowLensFlare' input is received.}} | ||
{{I|ShowLensFlare|Show the lensflare.}} | |||
{{I|ToggleLensFlare|Toggle the lensflare between hidden and shown.}} | |||
{{I|ColorRedValue|deprecated=1|This is a leftover from {{ent|env_sprite}} entity code.}} | |||
{{I|ColorGreenValue|deprecated=1|This is a leftover from {{ent|env_sprite}} entity code.}} | |||
{{ | {{I|ColorBlueValue|deprecated=1|This is a leftover from {{ent|env_sprite}} entity code.}} | ||
{{ | {{I|SetScale|deprecated=1|Set the lensflare's scale (0 - 8.0). Only in [[FGD]], doesn't exists in the game. | ||
{{I | }} | ||
= | |||
{{ | |||
==Flags== | ==Flags== | ||
{{Fl|1|Start on}} | {{Fl|1|Start on|Show lens flare when spawned if this flag is checked. | ||
{{Fl|2|Play once}} | {{note|Doesn't affect anything if the entity doesn't have a [[targetname]], it will always show lens flare when spawned.}} | ||
}} | |||
{{Fl|2|Play once|deprecated=1|This is a leftover from {{ent|env_sprite}}, lens flare cannot be animated.}} | |||
==Lens Flare Properties== | ==Lens Flare Properties== | ||
An individual {{ent|env_lensflare}} can support up to 20 flares. Each flare have different properties that can be customized. | An individual {{ent|env_lensflare}} can support up to 20 flares. Each flare have different properties that can be customized. | ||
===Parameters=== | ===Parameters=== | ||
| Line 47: | Line 110: | ||
====DISK==== | ====DISK==== | ||
This effect moves away lens from entities center. Takes 3 numbers. | |||
The first number - how strong | The first number - defines how strong the image will move away from the screen center. With 1 it will be attached to the screen center. With 0 it will stay at {{ent|env_lensflare}} center. Negative number will mirror effect that do positive number. | ||
The second number - | The second number - distorts the image along the axis Y. Doesn't work with negative numbers. | ||
The third number - | The third number - distorts the image along the axis X. Doesn't work with negative numbers. | ||
[https:// | [https://youtu.be/ftoBu8NjRhg Example] with different values. | ||
{{note|This effect is also represented by '''CLA''' name.}} | |||
====BOW==== | ====BOW==== | ||
This effect distorts lens between player's screen center and entities [[origin]]. Takes only one number. | |||
The | The number changes the picture scale. | ||
[https:// | [https://youtu.be/85MZ4geJtUs Example] with different values. | ||
{{bug|Doesn't work with negative numbers.|hidetested=1}} | |||
====DISKH==== | ====DISKH==== | ||
This effect moves lens along the X axis. Takes 4 numbers. | |||
The first number - how strong the image will move away from screen center along the axis X | The first number - defines how strong the image will move away from screen center along the axis X. If number is 0 - it will stand at {{ent|env_lensflare}} center. With 1 it will be attached to the screen center. Negative number will mirror effect that do positive number. | ||
The second number - | The second number - distorts the image along the axis X. Doesn't work with negative numbers. | ||
The third number - | The third number - distorts the image along the axis Y. Doesn't work with negative numbers. | ||
The fourth number - | The fourth number - changes position of the image along the axis Y. Makes higher with positive number and lower with negative numbers. | ||
[https:// | [https://youtu.be/KuPOKwwAd90 Example] with different values. | ||
====RAY==== | ====RAY==== | ||
This effect makes static lens and scales it. Takes 2 numbers. Doesn't work with negative numbers. | |||
The first number - distorts the image along the axis Y. | |||
The second number - distorts the image along the axis X and Z. | |||
[https://youtu.be/vSARwaGkb1k Example] with different values. | |||
The | ===Lens flare creation tips=== | ||
There is no preview in [[Hammer]] for lens flares, there is also no UI editor for lens flares. The developers recommend to use their lens flares, or use their lens flares as base for your own. You can create your own lens flares from scratch by following these steps: | |||
* 1. Open the developer console. | |||
* 2. Enter in the console <code>sv_cheats 1</code>. | |||
* 3. Enter in the console <code>ent_fire YourLensFlareName addoutput "FlareNUMBER_params ParameterName VALUES"</code>. | |||
* 4. Save and load the save. | |||
After load save you will see changes, so, with this you don't need to recompile your level to see how the lens flare will look. | |||
[ | ==Dedicated [[ConVars]]== | ||
{{varcom|start}} | |||
{{varcom|bms_lf_enabled|1|[[Bool]]|Enable/disable lens flare rendering for the client.}} | |||
{{varcom|end}} | |||
{{ | == See also == | ||
* {{ent|newLight_Dir}} - directional sun light with godrays only. | |||
* {{ent|NewLights_Spawner}} - spawner of deferred point lights. | |||
* {{ent|newLight_Point}} - point deferred light entity. | |||
* {{ent|newLight_Spot}} - spot deferred light entity. | |||
* {{ent|newLights_settings}} - entity that changes deferred light settings. | |||
* {{ent|godrays_settings}} - entity that changes godrays settings. | |||
* {{ent|env_cascade_light}} - deferred cascade sun light entity. | |||
* [[New Lights Editor]] - in game deferred lights editor. | |||
* [[Effect flags]] - effects flags, some of them are dynamic light effects. | |||
* {{ent|newxog_global}} - screen space global xog. | |||
* [https://chetanjags.wordpress.com/2023/07/11/blackmesa-xenengine-part2-how-a-frame-is-rendered/ BlackMesa XenEngine: Part2 – How a Frame is Rendered] - page from Chetan (lead programmer for Black Mesa) about how a frame is rendered. | |||
* [https://chetanjags.wordpress.com/2022/06/01/blackmesa-xenengine-part1-a-heavily-modified-source-engine/ BlackMesa XenEngine: Part1 – Heavily Modified Source Engine] page from Chetan (lead programmer for Black Mesa) about {{xe|4}}. | |||
Latest revision as of 13:09, 4 September 2025
| CLensflare |

env_lensflare is a point entity available in ![]() Black Mesa. It creates a cinematic dynamic
Black Mesa. It creates a cinematic dynamic ![]() lens flare that can be used to represent bright light sources. It has very flexible customization.
lens flare that can be used to represent bright light sources. It has very flexible customization.

- Doesn't work with level transition if it is attached to an object. It will not transmit between levels.
- Sun flare renders through 3D Skybox objects. This happens because gbuffer doesn't include 3D Skybox in the render pass.
Example 
Clear example (the missiles is 3D Skybox objects).

- Can't be displayed in 3D Skybox if placed in 3D Skybox.
- Doesn't render properly in -tools windowed mode.
Example 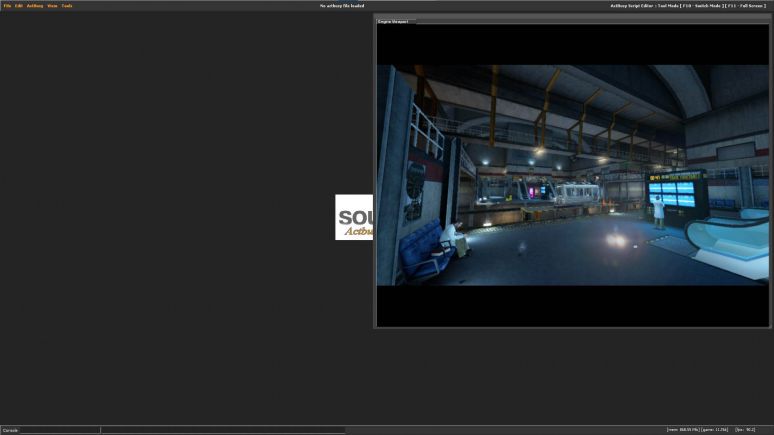
Example (note that the tram flares is in the right position).

Example 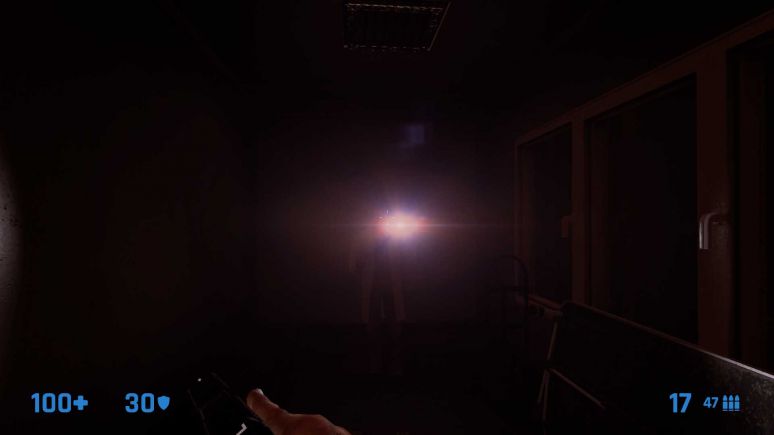
Option enabled. Dr. Rosenberg hold enabled flashlight, everything looks fine.

Option disabled. Dr. Rosenberg still hold enabled flashlight, but flashlight looks disabled in fact.


Example 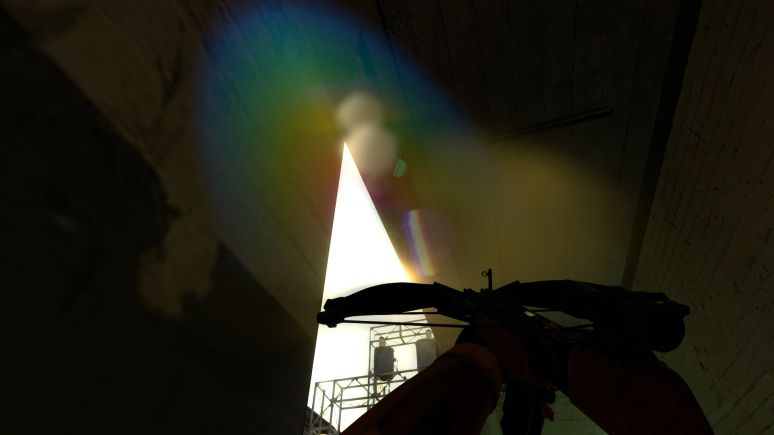
Black Mesa
Half-Life 2: Inhuman


Keyvalues
- Name (targetname) <string>
- The name that other entities refer to this entity by, via Inputs/Outputs or other keyvalues (e.g.
parentnameortarget).
Also displayed in Hammer's 2D views and Entity Report. - See also: Generic Keyvalues, Inputs and Outputs available to all entities
- Distance attenuation (FlareAttenuation) <float>
- Distance where lens flare will be invisible. 0.0 if not attenuation with distance.
- Flare Type (FlareType) <choices>
- 0: Normal - use origin position and display normally.
- 1: Sun Flare - display in the skybox and use angle values for position in the skybox, similar to env_sun or newLight_Dir.
|


|

- Appearance (FlareStyle) <choices>
Lightstyle presets (epilepsy warning) Literal Value Description Sequence Preview 0 Normal m 
10 Fluorescent flicker mmamammmmammamamaaamammma 
2 Slow, strong pulse abcdefghijklmnopqrstuvwxyzyxwvutsrqponmlkjihgfedcba 
11 Slow pulse, noblack abcdefghijklmnopqrrqponmlkjihgfedcba 
5 Gentle pulse jklmnopqrstuvwxyzyxwvutsrqponmlkj 
1 Flicker A mmnmmommommnonmmonqnmmo 
6 Flicker B nmonqnmomnmomomno 
3 Candle A mmmmmaaaaammmmmaaaaaabcdefgabcdefg 
7 Candle B mmmaaaabcdefgmmmmaaaammmaamm 
8 Candle C mmmaaammmaaammmabcdefaaaammmmabcdefmmmaaaa 
4 Fast strobe mamamamamama 
9 Slow strobe aaaaaaaazzzzzzzz 
12 Underwater light mutation mmnnmmnnnmmnn 
- Size of Glow Proxy Geometry. (GlowProxySize) <float>
- Size of the glow to be rendered for visibility testing. Must be larger than the distance from the sprite center to empty space. So if this glow is inside geometry (like a light bulb), set this value to be bigger than the bulb's radius. Any time a sphere of this radius would be visible (poking through any nearby geometry), the glow will be rendered.
- Flare 01 texture (Flare01_texture) to Flare 20 texture (Flare20_texture) <string>
- Texture to use for the lens flare. If not specified - the lens flare will not exists. A path to a VMT file relative to the
materialsfolder, without the file extension. Common flare materials are located in theeffects/lensflare/folder. Any material can be used as a lens flare, but flare materials should preferably use UnlitGeneric and be $additive.
- Flare 01 parameters (Flare01_params) to Flare 20 parameters (Flare20_params) <string>
- Sets function and values for it, this will define the lens flare behavior. See below for more details.
- Flare 01 intensity (Flare01_intensity) to Flare 20 intensity (Flare20_intensity) <vector>
- Sets scale of intensity in three independent numbers, used number depends on the player's camera deviation.
- First number sets when player look at entity center.
- Second number sets when player camera have slight deviation.
- Third number sets when player look far away from entity center.
Example in a short video with 3 different values.
- Flare 01 sizes (Flare01_sizes) to Flare 20 sizes (Flare20_sizes) <vector>
- Sets scale of size in three independent numbers, used number depends on the player's camera deviation.
- First number sets when player look at entity center.
- Second number sets when player camera have slight deviation.
- Third number sets when player look far away from entity center.
Example in a short video with 3 different values.
- Flare 01 color (Flare01_color) to Flare 20 color (Flare20_color) <color255>
- The RGB color value of the flare.
Inputs
- HideLensFlare
- Hide the lensflare. Won't be drawn until the 'ShowLensFlare' input is received.
- ShowLensFlare
- Show the lensflare.
- ToggleLensFlare
- Toggle the lensflare between hidden and shown.
ColorRedValue
- Deprecated.
This is a leftover from env_sprite entity code.
ColorGreenValue- Deprecated.
This is a leftover from env_sprite entity code.
ColorBlueValue- Deprecated.
This is a leftover from env_sprite entity code.
SetScale- Deprecated.
Set the lensflare's scale (0 - 8.0). Only in FGD, doesn't exists in the game.
Flags
- Start on : [1]
- Show lens flare when spawned if this flag is checked.
Play once : [2]- Deprecated.
This is a leftover from env_sprite, lens flare cannot be animated.
Lens Flare Properties
An individual env_lensflare can support up to 20 flares. Each flare have different properties that can be customized.
Parameters
The parameters property controls the appearance of the flare. Parameters take the following form:
TYPE parameters
The following lens flare types can be used:
DISK
This effect moves away lens from entities center. Takes 3 numbers.
The first number - defines how strong the image will move away from the screen center. With 1 it will be attached to the screen center. With 0 it will stay at env_lensflare center. Negative number will mirror effect that do positive number.
The second number - distorts the image along the axis Y. Doesn't work with negative numbers.
The third number - distorts the image along the axis X. Doesn't work with negative numbers.
Example with different values.
BOW
This effect distorts lens between player's screen center and entities origin. Takes only one number.
The number changes the picture scale.
Example with different values.
DISKH
This effect moves lens along the X axis. Takes 4 numbers.
The first number - defines how strong the image will move away from screen center along the axis X. If number is 0 - it will stand at env_lensflare center. With 1 it will be attached to the screen center. Negative number will mirror effect that do positive number.
The second number - distorts the image along the axis X. Doesn't work with negative numbers.
The third number - distorts the image along the axis Y. Doesn't work with negative numbers.
The fourth number - changes position of the image along the axis Y. Makes higher with positive number and lower with negative numbers.
Example with different values.
RAY
This effect makes static lens and scales it. Takes 2 numbers. Doesn't work with negative numbers.
The first number - distorts the image along the axis Y.
The second number - distorts the image along the axis X and Z.
Example with different values.
Lens flare creation tips
There is no preview in Hammer for lens flares, there is also no UI editor for lens flares. The developers recommend to use their lens flares, or use their lens flares as base for your own. You can create your own lens flares from scratch by following these steps:
- 1. Open the developer console.
- 2. Enter in the console
sv_cheats 1. - 3. Enter in the console
ent_fire YourLensFlareName addoutput "FlareNUMBER_params ParameterName VALUES". - 4. Save and load the save.
After load save you will see changes, so, with this you don't need to recompile your level to see how the lens flare will look.
Dedicated ConVars
| Cvar/Command | Parameters or default value | Descriptor | Effect |
|---|---|---|---|
| bms_lf_enabled | 1 | Bool | Enable/disable lens flare rendering for the client. |
See also
- newLight_Dir - directional sun light with godrays only.
- NewLights_Spawner - spawner of deferred point lights.
- newLight_Point - point deferred light entity.
- newLight_Spot - spot deferred light entity.
- newLights_settings - entity that changes deferred light settings.
- godrays_settings - entity that changes godrays settings.
- env_cascade_light - deferred cascade sun light entity.
- New Lights Editor - in game deferred lights editor.
- Effect flags - effects flags, some of them are dynamic light effects.
- newxog_global - screen space global xog.
- BlackMesa XenEngine: Part2 – How a Frame is Rendered - page from Chetan (lead programmer for Black Mesa) about how a frame is rendered.
- BlackMesa XenEngine: Part1 – Heavily Modified Source Engine page from Chetan (lead programmer for Black Mesa) about
 Xengine.