Zh/Gameinfo.txt: Difference between revisions
m (category fixes) |
No edit summary |
||
| (23 intermediate revisions by 10 users not shown) | |||
| Line 1: | Line 1: | ||
< | {{LanguageBar}} | ||
{{Source topicon}} | |||
<center style=color:white;font-size:20px;font-weight:bold;padding:5px>Game Definition Files</center> | |||
{{TabsBar|main=Gameinfo.txt}} | |||
{{seealso|[[:Category:Gameinfo]]}} | |||
:''关于HL1/{{L|GoldSrc}},请查阅{{L|The liblist.gam File Structure|liblist.gam}}.'' | |||
{{ | {{toc-right}} | ||
'''<code>gameinfo.txt</code>'''是一个描述起源游戏的配置文件。除了包含诸如模组名称或开发者网站链接之类的元数据外,它还定义了它所依赖的游戏/工具以及引擎用来读取资源的SearchPaths。它位于在MOD的根文件夹中。引擎、SDK工具和Steam都依赖于它。 | |||
SDK会在你开始制作一个MOD时,自动生成一个gameinfo文件. 这将会使得你有一个很好的开头, 但是别以为你可以一劳永逸,你还需要在适当的时候编辑它 | |||
{{ | {{Warning|金源游戏没有gameinfo.txt,使用Hammer 3.4版修改半条命地图}} | ||
{{Note|布尔值表示为0或1。}} | |||
{{Note|如果一个数值含有空格或者制表符,请使用 "引号"进行标注。}} | |||
== 界面设置 == | |||
=== 名字 === | |||
影响菜单及窗口标题的关键字 | |||
{{KV:zh-cn|Game|string|[[Wikipedia:ASCII|ASCII]]编码下Mod的名字。用于Steam和游戏窗口标题。只有当<code>Title</code>没有被指定时才用作主界面标题}} | |||
{{KV:zh-cn|Title|string|显示在你mod主界面的一串[[Wikipedia:Unicode|Unicode]]字符串。你也可以通过添加另一个同名的Title键来换行菜单文本,但要在其上附加2或更高的数字。{{Note|数字越大,文字就越靠后。}}}} | |||
; {{KV:zh-cn|GameLogo|boolean|在主界面显示<code>resource\GameLogo.res</code>里指定的图标而不是<code>Title</code>里的内容,详见{{L|Adding Your Logo to the Menu|在菜单上添加你的logo}}。|since=EP2}} | |||
=== 设置 === | |||
影响选项面板中显示选项卡和选项的关键字 | |||
{{KV:zh-cn|Type|string|这将决定在设置选项里是否会有单人和多人模式,该值一般为M<code>Singleplayer_Only</code>或<code>Multiplayer_Only</code>。如果您的模组同时具有单人和多人模式,请忽略此键值。}} | |||
{{KV:zh-cn|NoDifficulty|boolean|隐藏难度设置(如果你的mod是多人游戏的话,该键值将自动生成。)}} | |||
{{KV:zh-cn|HasPortals|boolean|显示传送门漏斗选项|since=EP2}} | |||
{{KV:zh-cn|NoCrosshair|boolean|隐藏多人游戏中的准星设置界面}} | |||
{{KV:zh-cn|AdvCrosshair|boolean|启用特殊的高级准星设置。{{Todo|如何使用?}} }} | |||
{{KV:zh-cn|NoModels|boolean|隐藏多人游戏的玩家模型设置界面}} | |||
{{KV:zh-cn|NoHIModel|boolean|隐藏在{{L|Goldsource|金源}}中使用的<code>cl_himodels</code> 切换复选框。只有在<code>cl_himodels</code>首先存在的情况下才会正常显示}} | |||
{{KV:zh-cn|Hidden_Maps|subkey|子键值中的地图名不会出现在“创建服务器”界面中。不过这并不阻止玩家通过控制台读取地图。语法为<code>地图名 1</code>,每行一个条目。不需要包括扩展名,请记住使用 { 和 } 开始和结束子键值。}} | |||
{{KV:zh-cn|CommandLine|subkey|mod的启动参数列表。语法为<code>-launchoption "value"</code>,每行一个参数。请记住使用 { 和 } 开始和结束子键值。|only=Mapbase}} | |||
== | === Steam游戏相关 === | ||
<code> | 影响你的游戏或MOD在Steam库上的显示方式的键值 | ||
{{KV:zh-cn|Developer|string|MOD的开发者。通常是MOD团队的名字,或者作者的名字。在目前的Steam版本上不起作用。|deprecated=1}} | |||
{{KV:zh-cn|Developer_URL|string|你的或者mod的主页链接。必须以<code><nowiki>http://</nowiki></code>为开头, 在目前的Steam版本上不起作用。|deprecated=1}} | |||
{{KV:zh-cn|Manual|string|模组手册的网址,也可以是一个本地文件。在目前的Steam版本上不起作用。|deprecated=1}} | |||
{{KV:zh-cn|Icon|string|一个未压缩的,位于游戏目录(通常相对于gameinfo.txt的目录)下的16x16像素大的TGA,该图标将在Steam中作为你的mod图标出现。不包括扩展名。在Steam的细节视图中出现的32像素大的图标应该位于同一目录,并称为<code><icon>_big.tga</code>。{{Note|为了使半透明部分正常显示,TGA必须在拥有Alpha通道的情况下以32位模式下保存。}} }} | |||
<code> | === 引擎及工具相关 === | ||
影响引擎/创作工具的键值和工具本身的一些属性。 | |||
{{KV:zh-cn|Nodegraph|boolean|是否为地图启用{{L|nodegraph|路径点}}生成(格式为.ain的文件)|since=EP2}} | |||
{{KV:zh-cn|GameData|string|{{L|FGD}}文件的路径,相对于{{L|Hammer}}的位置。必须指定该键值才能将{{L|Instances|实例}}编译进地图中,Hammer本身不使用它。}} | |||
{{KV:zh-cn|InstancePath|string|查找{{L|Instances|实例}}VMF的默认位置。|since=2013}} | |||
{{KV:zh-cn|SupportsDX8|boolean|当被禁用时,将阻止游戏在旧版{{L|DirectX_Versions|DirectX}}中运行,例如DX8及更低版本,因为它们不支持所有的视觉效果,还会阻止{{L|Studiomdl}}为模型生成<code>.sw.vtx</code>和<code>.dx80.vtx</code>文件,因为实际游戏并不需要它们|since=L4D}} | |||
{{KV:zh-cn|SupportsVR|boolean|游戏是否支持在VR模式下运行。|since=2013}} | |||
{{KV:zh-cn|SupportsXBox360|boolean|游戏是否支持 Xbox 360。{{Confirm|这是否能够让玩家在游戏中使用Xbox 360手柄?}}|since=L4D}} | |||
== 资源读取相关 == | |||
用于文件系统的键值 | |||
{{KV:zh-cn|SteamAppID|int|Mod本体的{{L|Steam Application IDs|Steam AppID}}。MOD可以访问该游戏/工具的所有内容,除非安装了被指定的游戏/工具,否则mod就无法运行,MOD也将和游戏本体同步运行。如果你正在将你的mod上传至Steam,则该键值应该为你mod的AppID。反之,如果你的mod本体是{{src13mp|4}},则该应为243750;如果你的mod本体是{{src13|4}},则应为243730;如果你的mod本体是{{as|4}},则应为630。如果你不进行源代码修改,则使用你mod的本体的AppID, | |||
{{Note|大多数年代久远的起源mod会使用Source 2006的AppID 215和Source 2007的AppID 218。如果你正在制作一个新mod,你不应该使用这些AppID,因为它们显然是已过时的起源引擎分支,已被Source 2013和Alien Swarm所取代。只能用它们来支持旧版的功能。}} | |||
{{Note|如果你的mod是单人游戏,则不会受到{{L|VAC}}的保护}} }} | |||
== | {{KV:zh-cn|AdditionalContentId|int|mod可以访问的另一游戏的AppID。此功能已添加到源代码中,但不知何故从未在V社的其他游戏中使用;您必须进行代码修改才能使用此键值。如果您需要使用它读取多个游戏的资源,请进行{{L|Mounting multiple games|以下更改}}。|deprecated=1}} | ||
{{Bug|游戏可以理解此键值,但SDK工具不能。目前,最好的解决方案是将游戏内容复制到电脑上的某个位置并在<code>SearchPath</code>部分中添加其绝对路径。记得在发布mod之前删除这些路径。}} | |||
{{KV:zh-cn|ToolsAppId|int|这是目前正在使用的SDK的AppID。|deprecated=1}} | |||
== 搜索路径 == | |||
<code>SearchPaths</code>是<code>FileSystem</code>中的一个子键值。它将每个搜索路径储存为一个键值。当引擎需要读取一个文件时,它会按顺序遍历搜索路径,在找到所需的文件后停止遍历,因此搜索路径的顺序非常重要。 | |||
{{Note|要记住的一点是,搜索路径的顺序很'''重要''',如果有2个同名的文件位于2个不同的搜索路径中,并且您将它们都写入了,则最顶部的搜索路径优先级最高}} | |||
=== 目录 === | |||
The directory, which is the value of the key, will either be relative to the <code>SteamAppID</code>'s root directory (i.e. where the executable of the game is located), relative to GameInfo.txt or absolute. A example of each one respectively would be this: | |||
Game |All_Source_Engine_Paths|HL2 // Go to the executable directory, and mount a folder called HL2 in it. | |||
Game |GameInfo_Path|. // Go to the directory of where GameInfo.txt is located, and mount the folder it's in. | |||
Game "C:\MyFolderOfContent\content" // Mount this absolute directory, useful for mounting content temporarily. | |||
{{Note|In order to mount a {{L|VPK}} file, you need to add the VPK's name at the end of the directory with the <code>.vpk</code> extension. If the VPK is a multi-chunck VPK, then put the name of the VPK in without the "_dir" or "_###" at the end.}} | |||
} | |||
The 2 variables above will start the search in a certain directory, <code>|All_Source_Engine_Paths|</code> will start the directory within the root folder, and <code>|GameInfo_Path|</code> will start it in the folder where GameInfo.txt is located. Both of these variables can be appended with any number of folders. There are also some special commands you can append in addition to the folders and variables, the known ones are: | |||
* <code> | * <code>../</code> <br> Goes back one folder, this will useful for mounting other games' content like {{L|Portal}}, since AdditionalContentID is deprecated. If you wanted to mount Portal, and your game is in, say for example <code>"<SteamFolder>\SteamApps\Common\MyGame\FolderWhereGameInfoIs"</code>, you would create a search path like this to mount it's content: | ||
// Start in the executable directory, then go back one folder so we're in Common, and then go into Portal/portal and mount portal_pak.vpk | |||
Game |All_Source_Engine_Paths|../Portal/portal/portal_pak.vpk | |||
Here is also an example of how to mount a {{L|Modification|SourceMod}}: | |||
// Start in the executable directory, then go back two folders so we're in SteamApps, and then go into SourceMods and mount the MySourceMod folder. | |||
Game |All_Source_Engine_Paths|../../SourceMods/MySourceMod | |||
* <code>.</code> <br> This stops the search in the current directory, this should only be used if you want to directly mount where <code>|All_Source_Engine_Paths|</code> or <code>|GameInfo_Path|</code> are. An example of both: | |||
// Mount both |All_Source_Engine_Paths| and |GameInfo_Path| variables' path. | |||
Game |All_Source_Engine_Paths|. | |||
Game |GameInfo_Path|. | |||
* <code>/*</code> <br> Mount every sub-folder and {{L|VPK}} in the current directory, this command is what makes the custom folder work in most update to date Source games. An example of it's use: | |||
// Mount the custom folder's sub-folders and VPKs. | |||
Game |GameInfo_Path|custom/* | |||
=== Keys === | |||
In most older Source games, the only keys for search pathing is <code>Game</code> and <code>Platform</code>, while these keys will suit most search pathing, in Source 2013 a few new keys where introduced that add more control. | |||
{{Tip|{{L|Insurgency}} and {{L|Day of Infamy}} use the same search pathing system as Source 2013, so commands and keys that work in Source 2013 will work for them as well!}} | |||
{{ | 目前已知的关键字是: | ||
{{ | |||
{{ | * <code>Game</code> <br> Adds the path as a simple search path. Will add any content it finds. Also writes sound.cache file in each Game directory. | ||
{{ | * <code>Game_Write</code> {{2013 add:zh-cn}} <br> Marks the search path as a Game write path. It marks the directory as the default directory for writing (what exactly?) for this game. {{confirm|Does this do anything?}} | ||
{{ | * <code>GameBin</code> {{2013 add:zh-cn}} <br> A special key that requires that the path lead to a game's binary files (where <code>Server.dll</code> and <code>Client.dll</code> are located), and will use any other DLL files it finds. This should lead to your own mod's <code>Bin</code> folder, or the game you're basing it off's <code>Bin</code> folder if you're not building your own DLLs. | ||
* <code>Platform</code> <br> Adds a special search path to the folder containing core engine files, this will usually lead to the game's <code>Platform</code> folder. | |||
* <code>Mod</code> {{2013 add:zh-cn}} <br> Marks the search path as a Mod path. This is usually where the game executable is. Essential for displaying chapter list in New Game menu, and probably for something else. | |||
* <code>Mod_Write</code> {{2013 add:zh-cn}} <br> Marks the search path as a Mod write path. This is usually where GameInfo.txt is. It marks the directory as the default directory for writing save files and downloadlists for this mod. | |||
* <code>Default_Write_Path</code> <br> Marks the search path as a Default write path. This is usually where GameInfo.txt is. It marks the directory as the default directory for writing config.cfg, node graphs, screenshots and some other files for this mod. Also a fallback for when either Mod_Write or Game_Write isn't specified. | |||
* <code>VPK</code> {{Contagion add:zh-cn}} <br> Used to mount a {{L|VPK}} by name. Do not put <code>.vpk</code> at the end. | |||
In Source 2013, you may also append keys to each other by separating each key name by a <code>+</code> sign, this way if you need to use one directory for multiple keys, instead of writing this: | |||
Game |GameInfo_Path|MyFolder | |||
Mod |GameInfo_Path|MyFolder | |||
It can instead be shortened like this: | |||
Game+Mod |GameInfo_Path|MyFolder | |||
This saves you time from having to retype the directory over again. | |||
=== 自动读取本地化文件 === | |||
Source automatically creates localized search paths. If you mount the folder <code>HL2</code>, then when your mod runs in French <code>HL2_French</code> is automatically mounted just above it, overriding any content in <code>HL2</code>. {{todo|Does this also apply for the mod folder?}} | |||
=== 示例 === | |||
一个能够正常在 {{src13|4}} 游戏中使用的 GameInfo.txt | |||
<source lang=ini> | |||
"GameInfo" | |||
{ | |||
game "HALF-LIFE 2" | |||
title "HALF-LIFE'" | |||
type singleplayer_only | |||
supportsvr 1 | |||
FileSystem | |||
{ | |||
SteamAppId 220 // This will mount all the GCFs we need (240=CS:S, 220=HL2). | |||
// | |||
// The code that loads this file automatically does a few things here: | |||
// | |||
// 1. For each "Game" search path, it adds a "GameBin" path, in <dir>\bin | |||
// 2. For each "Game" search path, it adds another "Game" path in front of it with _<langage> at the end. | |||
// For example: c:\hl2\cstrike on a french machine would get a c:\hl2\cstrike_french path added to it. | |||
// 3. For the first "Game" search path, it adds a search path called "MOD". | |||
// 4. For the first "Game" search path, it adds a search path called "DEFAULT_WRITE_PATH". | |||
// | |||
// | |||
// Search paths are relative to the base directory, which is where hl2.exe is found. | |||
// | |||
// |gameinfo_path| points at the directory where gameinfo.txt is. | |||
// We always want to mount that directory relative to gameinfo.txt, so | |||
// people can mount stuff in c:\mymod, and the main game resources are in | |||
// someplace like c:\program files\valve\steam\steamapps\half-life 2. | |||
// | |||
SearchPaths | |||
{ | |||
// First, mount all user customizations. This will search for VPKs and subfolders | |||
// and mount them in alphabetical order. The easiest way to distribute a mod is to | |||
// pack up the custom content into a VPK. To "install" a mod, just drop it in this | |||
// folder. | |||
// | |||
// Note that this folder is scanned only when the game is booted. | |||
game+mod hl2/custom/* | |||
// We search VPK files before ordinary folders, because most files will be found in | |||
// VPK and we can avoid making thousands of file system calls to attempt to open files | |||
// in folders where they don't exist. (Searching a VPK is much faster than making an operating | |||
// system call.) | |||
game_lv hl2/hl2_lv.vpk | |||
game+mod hl2/hl2_sound_vo_english.vpk | |||
game+mod hl2/hl2_pak.vpk | |||
game |all_source_engine_paths|hl2/hl2_textures.vpk | |||
game |all_source_engine_paths|hl2/hl2_sound_misc.vpk | |||
game |all_source_engine_paths|hl2/hl2_misc.vpk | |||
platform |all_source_engine_paths|platform/platform_misc.vpk | |||
// Now search loose files. We'll set the directory containing the gameinfo.txt file | |||
// as the first "mod" search path (after any user customizations). This is also the one | |||
// that's used when writing to the "mod" path. | |||
mod+mod_write+default_write_path |gameinfo_path|. | |||
// Add the HL2 directory as a game search path. This is also where where writes | |||
// to the "game" path go. | |||
game+game_write hl2 | |||
// Where the game's binaries are | |||
gamebin hl2/bin | |||
// Last, mount in shared HL2 loose files | |||
game |all_source_engine_paths|hl2 | |||
platform |all_source_engine_paths|platform | |||
} | |||
} | |||
} | |||
</source> | |||
== 使用 XBLAH's Modding Tool 编辑 GameInfo 文件== | |||
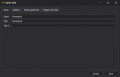
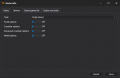
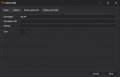
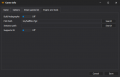
The mod information can be edited with {{L|XBLAH's Modding Tool}} through a comprehensive UI without requiring the modder to mess with text files. It includes all the major keys of Source SDK 2013 Single-player and Source SDK 2013 Multi-player, more than enough for the majority of Source modders. | |||
This can be accessed within the tool through '''Modding > Game info'''. | |||
<gallery> | |||
File:XBLAH's Modding Tool - Modding - Game info 1.png|Name | |||
File:XBLAH's Modding Tool - Modding - Game info 2.png|Options | |||
File:XBLAH's Modding Tool - Modding - Game info 3.png|Steam games list | |||
File:XBLAH's Modding Tool - Modding - Game info 4.png|Engine and tools | |||
</gallery> | |||
== 站外链接 == | |||
*[https://modding-assets.net/source/tools/modding/xblah-modding-tool/ XBLAH's Modding Tool Homepage] | |||
{{ACategory|File formats}} | |||
{{ACategory|Modding}} | |||
{{ACategory|Source SDK FAQ}} | |||
Latest revision as of 12:28, 6 April 2025
You can help by updating the translation.
Also, please make sure the article complies with the alternate languages guide.
This notice is put here by LanguageBar template and if you want to remove it after updating the translation you can do so on this page.
- 关于HL1/GoldSrc,请查阅liblist.gam.
gameinfo.txt是一个描述起源游戏的配置文件。除了包含诸如模组名称或开发者网站链接之类的元数据外,它还定义了它所依赖的游戏/工具以及引擎用来读取资源的SearchPaths。它位于在MOD的根文件夹中。引擎、SDK工具和Steam都依赖于它。
SDK会在你开始制作一个MOD时,自动生成一个gameinfo文件. 这将会使得你有一个很好的开头, 但是别以为你可以一劳永逸,你还需要在适当的时候编辑它
界面设置
名字
影响菜单及窗口标题的关键字
- Title <字符串>
- 显示在你mod主界面的一串Unicode字符串。你也可以通过添加另一个同名的Title键来换行菜单文本,但要在其上附加2或更高的数字。
 注意:数字越大,文字就越靠后。
 - GameLogo <布尔值> (存在于自
 以来)
以来) - 在主界面显示
resource\GameLogo.res里指定的图标而不是Title里的内容,详见在菜单上添加你的logo。
设置
影响选项面板中显示选项卡和选项的关键字
- Type <字符串>
- 这将决定在设置选项里是否会有单人和多人模式,该值一般为M
Singleplayer_Only或Multiplayer_Only。如果您的模组同时具有单人和多人模式,请忽略此键值。
- NoDifficulty <布尔值>
- 隐藏难度设置(如果你的mod是多人游戏的话,该键值将自动生成。)
- HasPortals <布尔值> (存在于自 以来)
- 显示传送门漏斗选项
- NoCrosshair <布尔值>
- 隐藏多人游戏中的准星设置界面
- AdvCrosshair <布尔值>
- 启用特殊的高级准星设置。待完善: 如何使用?
- NoModels <布尔值>
- 隐藏多人游戏的玩家模型设置界面
- Hidden_Maps <subkey>
- 子键值中的地图名不会出现在“创建服务器”界面中。不过这并不阻止玩家通过控制台读取地图。语法为
地图名 1,每行一个条目。不需要包括扩展名,请记住使用 { 和 } 开始和结束子键值。
- CommandLine <subkey> (仅存在于
 中)
中) - mod的启动参数列表。语法为
-launchoption "value",每行一个参数。请记住使用 { 和 } 开始和结束子键值。
Steam游戏相关
影响你的游戏或MOD在Steam库上的显示方式的键值
Developer <字符串>
- 已弃用。 MOD的开发者。通常是MOD团队的名字,或者作者的名字。在目前的Steam版本上不起作用。
Developer_URL <字符串>- 已弃用。 你的或者mod的主页链接。必须以
http://为开头, 在目前的Steam版本上不起作用。
Manual <字符串>- 已弃用。 模组手册的网址,也可以是一个本地文件。在目前的Steam版本上不起作用。
- Icon <字符串>
- 一个未压缩的,位于游戏目录(通常相对于gameinfo.txt的目录)下的16x16像素大的TGA,该图标将在Steam中作为你的mod图标出现。不包括扩展名。在Steam的细节视图中出现的32像素大的图标应该位于同一目录,并称为
<icon>_big.tga。注意:为了使半透明部分正常显示,TGA必须在拥有Alpha通道的情况下以32位模式下保存。
引擎及工具相关
影响引擎/创作工具的键值和工具本身的一些属性。
- SupportsDX8 <布尔值> (存在于自
 以来)
以来) - 当被禁用时,将阻止游戏在旧版DirectX中运行,例如DX8及更低版本,因为它们不支持所有的视觉效果,还会阻止Studiomdl为模型生成
.sw.vtx和.dx80.vtx文件,因为实际游戏并不需要它们
- SupportsVR <布尔值> (存在于自 2013 以来)
- 游戏是否支持在VR模式下运行。
- SupportsXBox360 <布尔值> (存在于自 以来)
- 游戏是否支持 Xbox 360。
 证实:这是否能够让玩家在游戏中使用Xbox 360手柄?
资源读取相关
用于文件系统的键值
- SteamAppID <整数>
- Mod本体的Steam AppID。MOD可以访问该游戏/工具的所有内容,除非安装了被指定的游戏/工具,否则mod就无法运行,MOD也将和游戏本体同步运行。如果你正在将你的mod上传至Steam,则该键值应该为你mod的AppID。反之,如果你的mod本体是
 起源2013 多人分支,则该应为243750;如果你的mod本体是
 起源2013,则应为243730;如果你的mod本体是
 异形丛生,则应为630。如果你不进行源代码修改,则使用你mod的本体的AppID,
AdditionalContentId <整数>- 已弃用。 mod可以访问的另一游戏的AppID。此功能已添加到源代码中,但不知何故从未在V社的其他游戏中使用;您必须进行代码修改才能使用此键值。如果您需要使用它读取多个游戏的资源,请进行以下更改。
SearchPath部分中添加其绝对路径。记得在发布mod之前删除这些路径。 [todo tested in ?]ToolsAppId <整数>- 已弃用。 这是目前正在使用的SDK的AppID。
搜索路径
SearchPaths是FileSystem中的一个子键值。它将每个搜索路径储存为一个键值。当引擎需要读取一个文件时,它会按顺序遍历搜索路径,在找到所需的文件后停止遍历,因此搜索路径的顺序非常重要。
目录
The directory, which is the value of the key, will either be relative to the SteamAppID's root directory (i.e. where the executable of the game is located), relative to GameInfo.txt or absolute. A example of each one respectively would be this:
Game       |All_Source_Engine_Paths|HL2 // Go to the executable directory, and mount a folder called HL2 in it.
Game       |GameInfo_Path|. // Go to the directory of where GameInfo.txt is located, and mount the folder it's in.
Game       "C:\MyFolderOfContent\content" // Mount this absolute directory, useful for mounting content temporarily.
.vpk extension. If the VPK is a multi-chunck VPK, then put the name of the VPK in without the "_dir" or "_###" at the end.The 2 variables above will start the search in a certain directory, |All_Source_Engine_Paths| will start the directory within the root folder, and |GameInfo_Path| will start it in the folder where GameInfo.txt is located. Both of these variables can be appended with any number of folders. There are also some special commands you can append in addition to the folders and variables, the known ones are:
../
Goes back one folder, this will useful for mounting other games' content like Portal, since AdditionalContentID is deprecated. If you wanted to mount Portal, and your game is in, say for example"<SteamFolder>\SteamApps\Common\MyGame\FolderWhereGameInfoIs", you would create a search path like this to mount it's content:
// Start in the executable directory, then go back one folder so we're in Common, and then go into Portal/portal and mount portal_pak.vpk
Game       |All_Source_Engine_Paths|../Portal/portal/portal_pak.vpk
Here is also an example of how to mount a SourceMod:
// Start in the executable directory, then go back two folders so we're in SteamApps, and then go into SourceMods and mount the MySourceMod folder.
Game       |All_Source_Engine_Paths|../../SourceMods/MySourceMod
.
This stops the search in the current directory, this should only be used if you want to directly mount where|All_Source_Engine_Paths|or|GameInfo_Path|are. An example of both:
// Mount both |All_Source_Engine_Paths| and |GameInfo_Path| variables' path.
Game       |All_Source_Engine_Paths|.
Game       |GameInfo_Path|.
/*
Mount every sub-folder and VPK in the current directory, this command is what makes the custom folder work in most update to date Source games. An example of it's use:
// Mount the custom folder's sub-folders and VPKs.
Game       |GameInfo_Path|custom/*
Keys
In most older Source games, the only keys for search pathing is Game and Platform, while these keys will suit most search pathing, in Source 2013 a few new keys where introduced that add more control.
目前已知的关键字是:
Game
Adds the path as a simple search path. Will add any content it finds. Also writes sound.cache file in each Game directory.Game_WriteTemplate:2013 add:zh-cn
Marks the search path as a Game write path. It marks the directory as the default directory for writing (what exactly?) for this game. 证实:Does this do anything?GameBinTemplate:2013 add:zh-cn
A special key that requires that the path lead to a game's binary files (whereServer.dllandClient.dllare located), and will use any other DLL files it finds. This should lead to your own mod'sBinfolder, or the game you're basing it off'sBinfolder if you're not building your own DLLs.Platform
Adds a special search path to the folder containing core engine files, this will usually lead to the game'sPlatformfolder.ModTemplate:2013 add:zh-cn
Marks the search path as a Mod path. This is usually where the game executable is. Essential for displaying chapter list in New Game menu, and probably for something else.Mod_WriteTemplate:2013 add:zh-cn
Marks the search path as a Mod write path. This is usually where GameInfo.txt is. It marks the directory as the default directory for writing save files and downloadlists for this mod.Default_Write_Path
Marks the search path as a Default write path. This is usually where GameInfo.txt is. It marks the directory as the default directory for writing config.cfg, node graphs, screenshots and some other files for this mod. Also a fallback for when either Mod_Write or Game_Write isn't specified.VPKTemplate:Contagion add:zh-cn
Used to mount a VPK by name. Do not put.vpkat the end.
In Source 2013, you may also append keys to each other by separating each key name by a + sign, this way if you need to use one directory for multiple keys, instead of writing this:
Game      |GameInfo_Path|MyFolder
Mod       |GameInfo_Path|MyFolder
It can instead be shortened like this:
Game+Mod |GameInfo_Path|MyFolder
This saves you time from having to retype the directory over again.
自动读取本地化文件
Source automatically creates localized search paths. If you mount the folder HL2, then when your mod runs in French HL2_French is automatically mounted just above it, overriding any content in HL2.
示例
一个能够正常在 ![]() 起源2013 游戏中使用的 GameInfo.txt
起源2013 游戏中使用的 GameInfo.txt
"GameInfo"
{
	game 		"HALF-LIFE 2"
	title 		"HALF-LIFE'"
	type		singleplayer_only
	supportsvr	1

	FileSystem
	{
		SteamAppId				220		// This will mount all the GCFs we need (240=CS:S, 220=HL2).

		//
		// The code that loads this file automatically does a few things here:
		//
		// 1. For each "Game" search path, it adds a "GameBin" path, in <dir>\bin
		// 2. For each "Game" search path, it adds another "Game" path in front of it with _<langage> at the end.
		//    For example: c:\hl2\cstrike on a french machine would get a c:\hl2\cstrike_french path added to it.
		// 3. For the first "Game" search path, it adds a search path called "MOD".
		// 4. For the first "Game" search path, it adds a search path called "DEFAULT_WRITE_PATH".
		//

		//
		// Search paths are relative to the base directory, which is where hl2.exe is found.
		//
		// |gameinfo_path| points at the directory where gameinfo.txt is.
		// We always want to mount that directory relative to gameinfo.txt, so
		// people can mount stuff in c:\mymod, and the main game resources are in
		// someplace like c:\program files\valve\steam\steamapps\half-life 2.
		//
		SearchPaths
		{
			// First, mount all user customizations.  This will search for VPKs and subfolders
			// and mount them in alphabetical order.  The easiest way to distribute a mod is to
			// pack up the custom content into a VPK.  To "install" a mod, just drop it in this
			// folder.
			//
			// Note that this folder is scanned only when the game is booted.
			game+mod			hl2/custom/*

			// We search VPK files before ordinary folders, because most files will be found in
			// VPK and we can avoid making thousands of file system calls to attempt to open files
			// in folders where they don't exist.  (Searching a VPK is much faster than making an operating
			// system call.)
			game_lv				hl2/hl2_lv.vpk
			game+mod			hl2/hl2_sound_vo_english.vpk
			game+mod			hl2/hl2_pak.vpk
			game				|all_source_engine_paths|hl2/hl2_textures.vpk
			game				|all_source_engine_paths|hl2/hl2_sound_misc.vpk
			game				|all_source_engine_paths|hl2/hl2_misc.vpk
			platform			|all_source_engine_paths|platform/platform_misc.vpk

			// Now search loose files.  We'll set the directory containing the gameinfo.txt file
			// as the first "mod" search path (after any user customizations).  This is also the one
			// that's used when writing to the "mod" path.
			mod+mod_write+default_write_path		|gameinfo_path|.

			// Add the HL2 directory as a game search path.  This is also where where writes
			// to the "game" path go.
			game+game_write		hl2

			// Where the game's binaries are
			gamebin				hl2/bin

			// Last, mount in shared HL2 loose files
			game				|all_source_engine_paths|hl2
			platform			|all_source_engine_paths|platform
		}
	}
}
使用 XBLAH's Modding Tool 编辑 GameInfo 文件
The mod information can be edited with XBLAH's Modding Tool through a comprehensive UI without requiring the modder to mess with text files. It includes all the major keys of Source SDK 2013 Single-player and Source SDK 2013 Multi-player, more than enough for the majority of Source modders.
This can be accessed within the tool through Modding > Game info.
Name
Options
Steam games list
Engine and tools


