Ru/Creating Brush Entities: Difference between revisions
< Ru
Jump to navigation
Jump to search
mNo edit summary |
m (Multipage removal) |
||
| (20 intermediate revisions by 8 users not shown) | |||
| Line 1: | Line 1: | ||
{{LanguageBar|title = Создание энтити брашей}} | |||
{{ | |||
| | |||
{{first room menu:ru}} | |||
{{ | |||
Мы уже {{L|Basic Construction|создавали браши}}. Существует и другой взгляд на браши: '''{{L|brush entity}}'''. | |||
В этом примере, мы будем создавать браш, который действует в качестве выдвигающейся двери. Когда игрок коснется браша, он (браш) поднимется в воздух, а затем опустится снова. | |||
[[File:Door basic.png|thumb|none|Базовая {{L|func_door}} энтити.]] | |||
{{ | |||
== Конструкции == | |||
[[ | # Выберите {{hammer block}} и создайте новый браш размерами 128x128x16. {{tip|Если сетка Hammer'а слишком большая, чтобы сделать браш размером 16 юнитов, нажмите {{key|[}} или кликните на '''Smaller Grid''' [[File:Hammer SmallerGrid.png|link=]], чтобы сделать ее меньше.}} | ||
# Сделайте ваш браш entity объектом, используя {{key|Ctrl+T}} или кнопку [[Hammer New Objects Toolbar#toEntity_(Ctrl+T)|toEntity]] <p>[[File:Hammer toEntityButton.png|border|Hammer toEntity button|link=]]</p> | |||
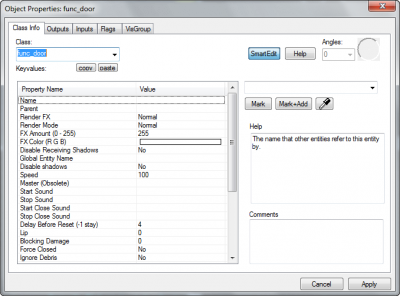
# Это действие откроет диалог {{L|Hammer Object Properties Dialog|Object Properties}}:<p>[[File:Hammer object properties.png|400px|Object properties dialog]]</p> {{tip|Если вам необходимо вызвать диалог снова, после его закрытия, выберите ваш браш и нажмите {{key|Alt+Enter}}.}} | |||
# Выберите {{L|func_door}} из выпадающего меню "Class", которое находится наверху-слева, и нажмите "Apply". | |||
# В нижней части основного "Keyvalues" списка, найдите "Move Direction". Измените значение на <code>-90 0 0</code> или выберите "Up" из выпадающего меню, расположенного слева от черного круга. | |||
# Нажмите "Apply" снова, затем закройте диалог Object Properties. | |||
Теперь вы можете скомпилировать карту и проверить как работают двери. | |||
== Завершение == | |||
Откройте {{L|Hammer Texture Browser|Texture Browser}} и найдите "door", используя [[Hammer Texture Browser#Filter|filter]]. Выберите материал который вам нравится, и примените его на браш. Кроме того, можно построить стену, которая соединяет дверь с краями вашей карты. | |||
[[File:Decorated door.jpg|400px|thumb|none|Но не стоит слишком увлекаться!]] | |||
{{Navbar otherlang|Adding Point Entities|Добавление Entity точек|Your First Map|Ваша первая карта|Adding Light|Добавления света}} | |||
{{ACategory|Hammer}} | |||
{{ACategory|Level Design}} | |||
{{stub}} | |||
Latest revision as of 06:01, 12 July 2024
Мы уже создавали браши. Существует и другой взгляд на браши: brush entity.
В этом примере, мы будем создавать браш, который действует в качестве выдвигающейся двери. Когда игрок коснется браша, он (браш) поднимется в воздух, а затем опустится снова.

Базовая func_door энтити.
Конструкции
- Выберите Block tool
 и создайте новый браш размерами 128x128x16.
  Совет:Если сетка Hammer'а слишком большая, чтобы сделать браш размером 16 юнитов, нажмите [ или кликните на Smaller Grid
  , чтобы сделать ее меньше.
 - Сделайте ваш браш entity объектом, используя Ctrl+T или кнопку toEntity

- Это действие откроет диалог Object Properties:
 Совет:Если вам необходимо вызвать диалог снова, после его закрытия, выберите ваш браш и нажмите Alt+Enter.
 - Выберите func_door из выпадающего меню "Class", которое находится наверху-слева, и нажмите "Apply".
- В нижней части основного "Keyvalues" списка, найдите "Move Direction". Измените значение на
-90 0 0или выберите "Up" из выпадающего меню, расположенного слева от черного круга. - Нажмите "Apply" снова, затем закройте диалог Object Properties.

Теперь вы можете скомпилировать карту и проверить как работают двери.
Завершение
Откройте Texture Browser и найдите "door", используя filter. Выберите материал который вам нравится, и примените его на браш. Кроме того, можно построить стену, которая соединяет дверь с краями вашей карты.
