Ru/Disc Room: Difference between revisions
| Line 46: | Line 46: | ||
=== Шаг 2 - воссоздание диска === | === Шаг 2 - воссоздание диска === | ||
Создадим шаблон, по которому диск будет восстановлен в случае его утери игроками. | Создадим шаблон, по которому диск будет восстановлен в случае его утери игроками. | ||
{{Note:ru|Этот шаг не является обязательным условием работы источника дисков, перейдите к шагу 3, если в вашей карте диск | {{Note:ru|Этот шаг не является обязательным условием работы источника дисков, перейдите к шагу 3, если в вашей карте диск нигде не потеряется.}} | ||
Создайте [[point_template]] со следующими свойствами: | Создайте [[point_template]] со следующими свойствами: | ||
Revision as of 06:20, 9 January 2014
![]() Комната с диском - последнее испытание в конце каждой серии тестов в кооперативном режиме. Она находится в части комплекса, которой ГЛэДОС управлять не может, и которая служила людям последним защитным рубежом от разрастающейся власти ГЛэДОС над комплексом.
Комната с диском - последнее испытание в конце каждой серии тестов в кооперативном режиме. Она находится в части комплекса, которой ГЛэДОС управлять не может, и которая служила людям последним защитным рубежом от разрастающейся власти ГЛэДОС над комплексом.
Источник дисков
Источник дисков - устройство, создающее диски. Оно восстанавливает копию диска, если он был утерян или растворён. Обычно оно находится рядом с получателем диска в конце последней камеры серии кооперативного режима. Однако, это совершенно не обязательно; если поместить источник в начале камеры, могут получиться интересные головоломки, в которых главной задачей станет не потерять диск.
Шаг 1 - настройка
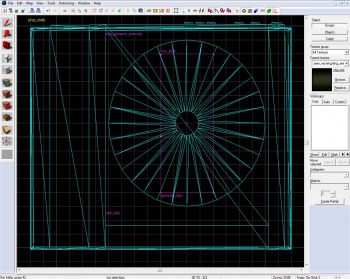
Создайте prop_static и выберите для неё модель models/props_gameplay/laser_disc_player.mdl и поместите её где-нибудь в комнате. Отсюда игроки будут брать диск.
Теперь создайте диск, это энтити prop_dynamic_override. Настройте её свойства так:
Свойство Значение Name start_disc Parent spawner_door World Model laser_disc.mdl Disable Shadows Yes
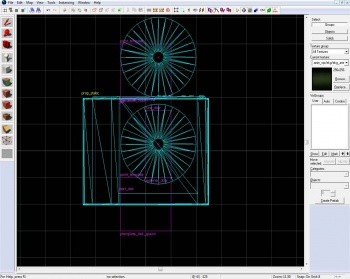
Поместите диск внутри модели устройства, как показано на иллюстрации справа.
Теперь создайте браш размером 8x20x1 с текстурой tools/toolsinvisible. Поместите его сверху модели диска, снова, как на иллюстрации справа. Преобразуйте браш в энтити (нажатием Ctrl+T) и сделайте её func_door. И задайте её свойства следующим образом:
Свойство Значение Name spawner_door Speed 26 Start Sound World.LaserDiskLoad Delay Before Reset (-1 stay) -1 Loop Moving Sound Yes Move Direction 0 0 0
Template:Note:ru Создайте ещё одну энтити, prop_physics_override, она будет диском, переносимым игроками. Нажмите ⇧ Shift и перетащите start_disc так, чтобы диск находился вне устройства, и чтобы только его 'край' касался щели устройства. Измените "Class" на prop_physics_override и назовите "disc".
Шаг 2 - воссоздание диска
Создадим шаблон, по которому диск будет восстановлен в случае его утери игроками. Template:Note:ru
Создайте point_template со следующими свойствами:
Свойство Значение Name template_disc_spawn Template 1 start_disc Template 2 spawner_door
Создайте ещё одну point_template с этими свойствами:
Свойство Значение Name template_disc Template 1 disc
Шаг 3 - система выходов
After making all the entities needed to get the emitter to work, all that is left is to connect their actions to form a disc; let's make some I/O connections!
Start by creating a logic_auto with the following output:
My Output > Target Entity Target Input Parameter Delay Only Once 
OnMapSpawn template_disk_spawn ForceSpawn 0.00 No
Open your spawner_door 'Output' tab and add the following properties:
Now add the following output to your template_disc_spawn:
My Output > Target Entity Target Input Parameter Delay Only Once 
OnEntitySpawned spawner_door Open 0.00 No
Make sure that the entity that detects when the disc has been lost or killed has the following output:
My Output > Target Entity Target Input Parameter Delay Only Once 
OnTrigger template_disk_spawn ForceSpawn 0.00 No
Now the emitter should be working, and dispensing new discs when the last one is gone. However, this is only a third of the process of getting the disc room to be functioning.
Получатель диска
The disc receiver (also disc player) is where the disc is placed to fulfill its purpose; placing the disc in the receiver turns on the video showing the information GLaDOS was looking for.
Шаг 1 - Инициализация
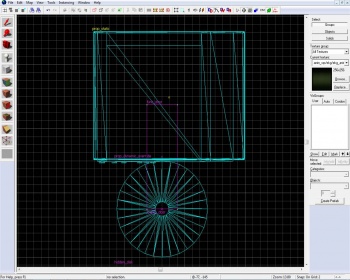
Place a prop_static in your disc room, and set its model to models/props_gameplay/laser_disc_player.mdl. This is where the player will place the disc to end the level.
When the player places the disc near the receiver the disc that was carried would be removed and a hidden disc would load. We will do this to have better control over the way the disc will enter the receiver and to simply overcome a lot of problems. Another prop_dynamic_override would be required, the one that would load in the device by being attached to a func_door.
Свойство Значение Parent loader_door Disable Shadows Yes World Model laser_disc.mdl Name hidden_disc
The disc needs to be placed as detailed in the picture to the right.
Now create a func_door brush with the tools/toolsinvisible. Place it on top of the disc model, again, as shown on the picture to the right. Add the following properties:
Свойство Значение Name loader_door Speed 8 Start Sound World.LaserDiskLoad Delay Before Reset (-1 stay) -1 Loop Moving Sound Yes Move Direction 0 180 0
Шаг 2 - Загрузка
Step 1 lists the visible entities used for the disc receiver, this step will list the invisible entities.
The first is a trigger_once brush, and the second is a filter_activator_name. Add now the following properties:
1. The trigger_once:
Свойство Значение Name Filter Name disc_filter
Ensure the Physics Objects flag is checked.
2. The filter_activator_name:
Свойство Значение Name disc_filter Filter Name disc
Шаг 3 - Система входов
To get everything interacting, we will use the I/O system. Remember that logic_auto we used? Open its Outputs tab and add the following properties:
My Output > Target Entity Target Input Parameter Delay Only Once 
OnMapSpawn hidden_disc TurnOff 0.00 No
Add the following output to the trigger_once:
My Output > Target Entity Target Input Parameter Delay Only Once 
OnStartTouch hidden_disc TurnOn 0.00 No 
OnStartTouch !activator Kill 0.00 No 
OnStartTouch loader_door Open 0.00 No
To the loader_door entity add one output:
My Output > Target Entity Target Input Parameter Delay Only Once 
OnFullyOpen disc_loaded_relay Trigger 0.00 No
Now the disc receiver should be operating and accepting the disc when it's placed in it. This is, however, only one more step in the process of completing the disc room.
Проецирование видеоролика
The projected movie is the sequence that happens after loading the disc. Including the bot explosion at the end.
Шаг 1 - настройка видеоролика
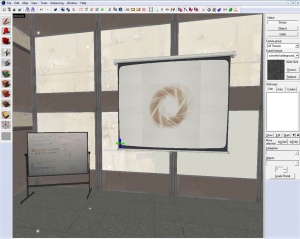
We will start by placing a prop_static and set its model to projector_screen.mdl (Easily found by typing "projector" in the model filter bar). Now on its lower left corner place a vgui_movie_display with the following properties:
Свойство Значение Name insert_disc_movie Movie Filename media/insert_disk.bik Loop Movie Yes Stretch to Fill Yes Force precache Yes Panel width 156 Panel height 112
Again open the properties of our logic_auto and add these outputs:
My Output > Target Entity Target Input Parameter Delay Only Once 
OnMapSpawn insert_disc_movie Enable 0.00 No
Now make another vgui_movie_display entity at the exact same spot as the last one (simply shift drag the one you have just created one unit, and move it back). The only difference will be the name and the video it will display:
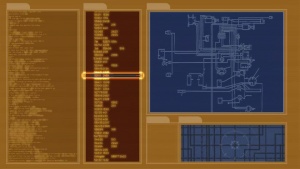
Свойство Значение Name aperture_movie Movie Filename media/coop_bts_blueprints.bik Loop Movie Yes Stretch to Fill Yes Force precache Yes Panel width 156 Panel height 112
Шаг 2 - поднимаем железный занавес
Remember that disc_loaded_relay entity we used but didn't make? Well, we're using it now. First create a logic_relay and name it disc_loaded_relay. Open the Outputs flag and add the following properties:
My Output > Target Entity Target Input Parameter Delay Only Once 
OnTrigger insert_disc_movie Disable 2.00 No 
OnTrigger aperture_movie Enable 2.00 No
Create an ambient_generic with these properties:
Свойство Значение Name disc_windup_sound Sound Name World.LaserDiskPowerUp
And add to the disc_loaded_relay one more output:
My Output > Target Entity Target Input Parameter Delay Only Once 
OnTrigger disc_windup_sound PlaySound 0.00 No
And at last everything should be working!
Завершение
- Add an instance and set its VMF Filename to
coop_lighting_ents.vmf. You can choose from here what fog options your map will have (fog density, color, etc). More importantly, however, it has four env_globals in it, each can enable, disable the bots pinging and taunting ability. You should have a logic_relay that is triggered when the disc is loaded with four outputs:
- Place a trigger_hurt with the Damage keyvalue set to 10000. Make sure it covers the whole disc room and don't forget to disable it. At the appropriate moment, probably when GLaDOS is making her final statement, enable the trigger_hurt brush to make the bots explode.
- Place a point_clientcommand in your room with the following settings:
Свойство Значение Name levelchange
To your trigger_hurt add this output:
My Output > Target Entity Target Input Parameter Delay Only Once 
OnHurt levelchange command changelevel {hub or next chamber} 0.00 No
- Place a static model facing your screen and set its model to
models/props_underground/projector.mdl. On the projector place three point_spotlight, you'll know where. - Somewhere in the disc room there is usually a whiteboard (
models/props_office/whiteboard_coop.mdl) claiming not to upload the disc. For consistency with Valve maps, I suggest placing one too. It comes with 6 different skins.
