Adding Light: Difference between revisions
Jump to navigation
Jump to search
")


")
 Note:In order to see lighting in a map which was previously loaded in the game without lights, you may need to open the developer console and set
m (minoro) |
m (Nesciuse moved page Adding Light/en to Adding Light without leaving a redirect: Move en subpage to basepage) |
||
| (24 intermediate revisions by 15 users not shown) | |||
| Line 1: | Line 1: | ||
{{ | {{LanguageBar}} | ||
{{Source topicon}} | |||
{{First room menu}} | |||
Now we’ll add some lighting to the room. If no lights are placed | Now we’ll '''add some lighting''' to the room. If no lights are placed your map will automatically be lit “fullbright” when it is loaded in the game, but as you’ll have noticed this is hardly ideal. Creating lights will make your map look far more realistic. | ||
{{Note|In order to see lighting in a map which was previously loaded in the game ''without'' lights, you may need to open the [[developer console]] and set {{Command|mat_fullbright|0}}.}} | |||
# Activate the {{hammer entity}} (lights are entities too) and pick {{ent|light}} from [[:File:Hammer picklight.jpg|the drop-down list in the Object Toolbar]]. This is the most basic light of them all, and it shines all around from an invisible source. Place one in the center of the ceiling now by clicking in the 3D view:<p>[[File:Hammer placelight.png|400px|Place the {{ent|light}}.]]</p> | |||
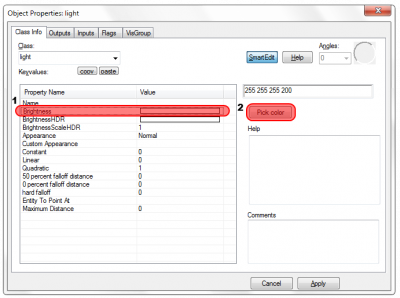
# We are now going to edit the color and brightness of this light. Switch back to the {{hammer select}}, then double-click on the <tt>light</tt> entity in the 3D View to open the Object Properties dialog. To bring up the settings for the light’s brightness, find and click on the <tt>Brightness</tt> field in the [[Keyvalue]]s list. | |||
# While you could type a color into the new text box directly, it’s better to use Hammer’s built-in dialog by clicking the ''Pick color'' button, just beneath the text box:<p>[[File:Hammer pickbrightness.png|400px|Select the <tt>Brightness</tt> field, then click the ''Pick color'' button.]]</p> | |||
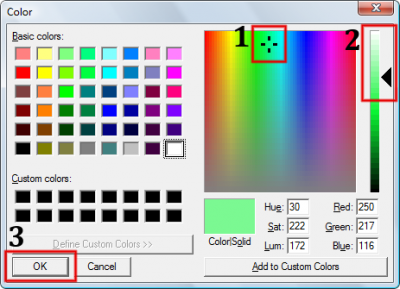
# The ''Color'' dialog will now appear, letting us change the color of the light. | |||
## Change the hue and saturation of the color by clicking in the square color spectrum area on the right. | |||
## Because luminance is set to max, the color will still be white. Lower the luminance to change the color from bright white to something of the hue you picked. You can see how the color changes in the preview square at the bottom of the dialog to something more colorful, instead of white. | |||
## Click the ''OK'' button to confirm your choice:<p>[[File:Hammer setcolor.png|400px|Change the hue/saturation and luminance of the light, then click ''OK''.]]</p> | |||
# We have now set the color of the light, but this has not affected its intensity. The color is described by the first three numbers of the Brightness setting, leaving the brightness value itself as the fourth number. Mark this number (currently <tt>200</tt>) with the mouse, and enter <code>800</code> instead, to have the light shine four times as intensely: <p>[[File:Hammer setcolor800.png|400px|Raise the brightness of the light by increasing this number, then click ''Apply''.]]</p> {{Tip|If you want your light to shine in a different color under [[High Dynamic Range]] lighting, edit the <tt>BrightnessHDR</tt> or <tt>BrightnessScaleHDR</tt> settings. This is generally used to balance out the richer colors that HDR generates.}} | |||
# Now that we’ve made changes to the light’s parameters, hit the ''Apply'' button to commit them. The color of the light’s icon will change to the color you have selected for it. | |||
== Results == | |||
When you compile your map, you will see a sphere of light projected onto the walls that is brightest near to your light entity and darkest further away. Remember to disable {{Command|mat_fullbright}} if necessary! | |||
Your light won’t have a visual source, however—it just appears from nowhere. You’ll be able to fix this in the next article. | |||
== See also == | == See also == | ||
| Line 55: | Line 26: | ||
* [[Advanced Lighting]] | * [[Advanced Lighting]] | ||
=== | === Light Entities === | ||
* | * {{ent|light}} — A basic, omnidirectional light source. | ||
* | * {{ent|light_spot}} — A directed light that shines in a cone. | ||
* {{ent|light_environment}} — The controller for global light cast from a [[skybox]]. | |||
* | * {{ent|light_dynamic}} — A dynamic light source that can be changed and moved in-game. | ||
* {{ent|env_projectedtexture}} — A dynamic light source like a <tt>light_dynamic</tt>, but it can also cast proper dynamic shadows. | |||
{{ | |||
[[Category:Level Design Tutorials]] | {{Navbar|Creating Brush Entities|Your First Map|Adding Prop Models}} | ||
[[Category:Level Design]] | |||
[[Category:Lighting]] | |||
[[Category:Tutorials]] | |||
Latest revision as of 02:58, 12 July 2024
Now we’ll add some lighting to the room. If no lights are placed your map will automatically be lit “fullbright” when it is loaded in the game, but as you’ll have noticed this is hardly ideal. Creating lights will make your map look far more realistic.
mat_fullbright 0.- Activate the Entity tool
 (lights are entities too) and pick light from the drop-down list in the Object Toolbar. This is the most basic light of them all, and it shines all around from an invisible source. Place one in the center of the ceiling now by clicking in the 3D view:
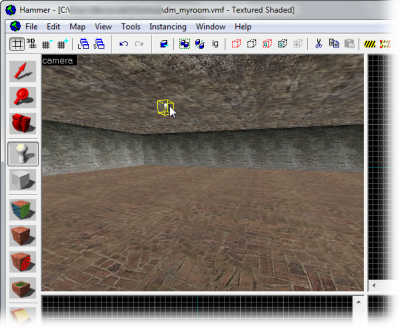
- We are now going to edit the color and brightness of this light. Switch back to the Selection tool
 , then double-click on the light entity in the 3D View to open the Object Properties dialog. To bring up the settings for the light’s brightness, find and click on the Brightness field in the Keyvalues list.
 - While you could type a color into the new text box directly, it’s better to use Hammer’s built-in dialog by clicking the Pick color button, just beneath the text box:
- The Color dialog will now appear, letting us change the color of the light.
- Change the hue and saturation of the color by clicking in the square color spectrum area on the right.
- Because luminance is set to max, the color will still be white. Lower the luminance to change the color from bright white to something of the hue you picked. You can see how the color changes in the preview square at the bottom of the dialog to something more colorful, instead of white.
- Click the OK button to confirm your choice:
- We have now set the color of the light, but this has not affected its intensity. The color is described by the first three numbers of the Brightness setting, leaving the brightness value itself as the fourth number. Mark this number (currently 200) with the mouse, and enter
800instead, to have the light shine four times as intensely: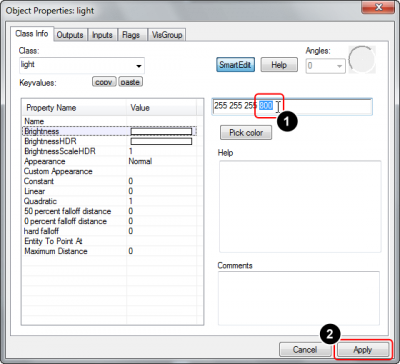
 Tip:If you want your light to shine in a different color under High Dynamic Range lighting, edit the BrightnessHDR or BrightnessScaleHDR settings. This is generally used to balance out the richer colors that HDR generates.
 - Now that we’ve made changes to the light’s parameters, hit the Apply button to commit them. The color of the light’s icon will change to the color you have selected for it.


Results
When you compile your map, you will see a sphere of light projected onto the walls that is brightest near to your light entity and darkest further away. Remember to disable mat_fullbright if necessary!
Your light won’t have a visual source, however—it just appears from nowhere. You’ll be able to fix this in the next article.
See also
Light Entities
- light — A basic, omnidirectional light source.
- light_spot — A directed light that shines in a cone.
- light_environment — The controller for global light cast from a skybox.
- light_dynamic — A dynamic light source that can be changed and moved in-game.
- env_projectedtexture — A dynamic light source like a light_dynamic, but it can also cast proper dynamic shadows.