Pt-br/Creating a Material: Difference between revisions
m (Multipage removal) |
|||
| (7 intermediate revisions by 3 users not shown) | |||
| Line 1: | Line 1: | ||
{{ | {{LanguageBar}} | ||
{{toc-right}} | {{toc-right}} | ||
Nesse tutorial vamos ver passo a passo decomo podemos criar um novo | Nesse tutorial vamos ver passo a passo decomo podemos criar um novo {{L|material}}, incluindo a criação da {{L|texture}} do material. | ||
== Criando uma Textura == | == Criando uma Textura == | ||
Qualquer imagem pode ser usada como textura, até que as suas dimensões( altura e largura) estão no potência do dois: 2,4,8,16,32,64,128,256,512,1024,2048 e assim por diante. | Qualquer imagem pode ser usada como textura, até que as suas dimensões( altura e largura) estão no potência do dois: 2,4,8,16,32,64,128,256,512,1024,2048 e assim por diante. Você pode examinar texturas existentes que tem o mesmo papel que a sua. Texturas com maior qualidade tem performance menor, mas ela ira será bem mais nítida quando olhado de perto. | ||
Diferentes classes do objeto tem diferentes resoluções padrão(ex: modelos de personagens são de alta qualidade). Olhe as escolhas da valve em <code>source materials.gcf</code> com {{L|GCFScape}} se você ficar confuso | |||
{{note|Arquivos sources da textura tem que ser salvados sem perdas, formatos como[[Wikipedia:Truevision TGA|TGA]] pre-comprimidos,para prevenir perda de detalhes desnecessárias. Para texturas sem um canal alpha,PNG também é aceito.}} | {{note|Arquivos sources da textura tem que ser salvados sem perdas, formatos como[[Wikipedia:Truevision TGA|TGA]] pre-comprimidos,para prevenir perda de detalhes desnecessárias. Para texturas sem um canal alpha,PNG também é aceito.}} | ||
| Line 12: | Line 13: | ||
=== Converting the Texture === | === Converting the Texture === | ||
It's a {{L|command line}} tool with quite a few limitations, so the third-party tool {{L|VTFEdit}} is preferable: it provides a graphical user interface, allows you to change a texture's properties without re-compiling it from scratch, accepts a wide range of image formats, and doesn't require the creation of script files for each and every texture. There are a handful of situations where you'll need to fall back on VTEX… but only a handful. Also, if you have textures that use transparency, it is recommended that you save them in TIFF format before importing to VTFedit as PNG transparency tends to have problems. Texturas tem que ser convertidas para {{L|Valve Texture Format}} antes da source engine poder usar ela. A ferramenta que a Valve disponibiliza para isso é a {{L|Vtex (Source 1)|VTEX}}. | |||
(There are VTF plug-ins that let you save to the format directly from [http://nemesis.thewavelength.net/index.php?p=39 Photoshop], [http://code.google.com/p/gimp-vtf/ GIMP] and [http://nemesis.thewavelength.net/index.php?p=50 Paint.NET], but this tutorial will not cover them as not everyone uses those tools.) | (There are VTF plug-ins that let you save to the format directly from [http://nemesis.thewavelength.net/index.php?p=39 Photoshop], [http://code.google.com/p/gimp-vtf/ GIMP] and [http://nemesis.thewavelength.net/index.php?p=50 Paint.NET], but this tutorial will not cover them as not everyone uses those tools.) | ||
'''To import your texture with VTFEdit''', use <code>File > Import</code> or press {{key|Ctrl+I}}. Select your image and you will be presented with the import screen: | '''To import your texture with VTFEdit''', use <code>File > Import</code> or press {{key|Ctrl+I}}. Select your image and you will be presented with the import screen: | ||
[[ | [[File:Vtfedit importoptions.png|center|VTFEdit's import screen]] | ||
==== General settings ==== | ==== General settings ==== | ||
| Line 35: | Line 36: | ||
==== Mipmap settings ==== | ==== Mipmap settings ==== | ||
{{L|MIP Mapping|Mipmaps}} are low-resolution versions of a texture that swap in when a surface is far away from the camera. They greatly reduce the amount of texture resizing needed, improving both performance and image quality. Mips are required for texture LOD to work. | |||
{{tip|Textures that will appear in the 3D world should have mipmaps. To conserve memory, textures that will only be used in a 2D interface should not.}} | {{tip|Textures that will appear in the 3D world should have mipmaps. To conserve memory, textures that will only be used in a 2D interface should not.}} | ||
| Line 51: | Line 52: | ||
==== Normal map settings ==== | ==== Normal map settings ==== | ||
These (mislabelled{{how}}) settings allow you to automatically generate a | These (mislabelled{{how}}) settings allow you to automatically generate a {{L|bump map}} from your input image. You'll want to do this properly with an image editor for the material you ship, but the automated option is there if you want quick results or a base to work from. | ||
=== Configuring and Saving === | === Configuring and Saving === | ||
| Line 60: | Line 61: | ||
==Creating a Material== | ==Creating a Material== | ||
Source doesn't access textures directly. Everything goes through a ''' | Source doesn't access textures directly. Everything goes through a '''{{L|material}}'''. | ||
Materials are script files that can be created in any text editor, but it's recommended that you use [http://notepad-plus.sourceforge.net/ Notepad++] in conjunction with the community-made | Materials are script files that can be created in any text editor, but it's recommended that you use [http://notepad-plus.sourceforge.net/ Notepad++] in conjunction with the community-made {{L|Notepad++ VDF languages|syntax highlighting rules}}. For your material to be detected, '''you must save it under your game or mod's <code>\materials</code> folder with the extension <tt>.vmt</tt>'''. | ||
{{note|If you are creating materials and textures exclusively for a map for an existing mod, consider using | {{note|If you are creating materials and textures exclusively for a map for an existing mod, consider using {{L|BSPZIP}}\{{L|Packbsp}}\{{L|Pakrat}}\{{L|Compile Pal}} to package the material and texture files within the map file itself. This will avoid them ever becoming lost.}} | ||
{{warning|Although your computer will let you save a file name that contains the <tt>%</tt> character, and | {{warning|Although your computer will let you save a file name that contains the <tt>%</tt> character, and {{L|VTF}}s work just fine with the character in the name, Hammer can'''not''' handle {{L|VMT}}s whose names contain the <tt>%</tt> character.}} | ||
===Syntax=== | ===Syntax=== | ||
A pasta do material deve parecer assim: | A pasta do material deve parecer assim: | ||
< | <{{L|shader}}> | ||
{ | { | ||
<parameter> <value> | <parameter> <value> | ||
| Line 81: | Line 82: | ||
} | } | ||
Tem varios | Tem varios {{L|shader}}s para se escolher, mas muitos materials vão usar nenhum{{ent|LightmappedGeneric}} ({{L|brush}}es) or {{ent|VertexLitGeneric}} ({{L|model}}s). O terceiro é o mais comum é {{ent|UnlitGeneric}}, que é usa para {{L|VGUI2|UI}} materials e as vezes em {{L|tool texture}}. | ||
===Parameters=== | ===Parameters=== | ||
:''For a list of all documented shader parameters, see | :''For a list of all documented shader parameters, see {{LCategory|List of Shader Parameters}}.'' | ||
With a shader chosen, you're onto parameters (also called commands). There are hundreds of options for what to put in a material so this article will only cover the most common, which are accepted by more or less all shaders. They are: | With a shader chosen, you're onto parameters (also called commands). There are hundreds of options for what to put in a material so this article will only cover the most common, which are accepted by more or less all shaders. They are: | ||
| Line 103: | Line 104: | ||
{{Xblahmt|4}} | {{Xblahmt|4}} | ||
==See | ==See also== | ||
* | * {{L|Material}} | ||
* | * {{L|Material Editor}} | ||
* | * {{L|Creating Reflective Materials}} | ||
* | * {{L|Adapting PBR Textures to Source}} | ||
* | * {{LCategory|List of Shader Parameters}} | ||
{{ACategory|Material System}} | |||
{{ACategory|Tutorials}} | |||
Latest revision as of 16:53, 12 July 2024
Nesse tutorial vamos ver passo a passo decomo podemos criar um novo material, incluindo a criação da texture do material.
Criando uma Textura
Qualquer imagem pode ser usada como textura, até que as suas dimensões( altura e largura) estão no potência do dois: 2,4,8,16,32,64,128,256,512,1024,2048 e assim por diante. Você pode examinar texturas existentes que tem o mesmo papel que a sua. Texturas com maior qualidade tem performance menor, mas ela ira será bem mais nítida quando olhado de perto.
Diferentes classes do objeto tem diferentes resoluções padrão(ex: modelos de personagens são de alta qualidade). Olhe as escolhas da valve em source materials.gcf com GCFScape se você ficar confuso
Converting the Texture
It's a command line tool with quite a few limitations, so the third-party tool VTFEdit is preferable: it provides a graphical user interface, allows you to change a texture's properties without re-compiling it from scratch, accepts a wide range of image formats, and doesn't require the creation of script files for each and every texture. There are a handful of situations where you'll need to fall back on VTEX… but only a handful. Also, if you have textures that use transparency, it is recommended that you save them in TIFF format before importing to VTFedit as PNG transparency tends to have problems. Texturas tem que ser convertidas para Valve Texture Format antes da source engine poder usar ela. A ferramenta que a Valve disponibiliza para isso é a VTEX.
(There are VTF plug-ins that let you save to the format directly from Photoshop, GIMP and Paint.NET, but this tutorial will not cover them as not everyone uses those tools.)
To import your texture with VTFEdit, use File > Import or press Ctrl+I. Select your image and you will be presented with the import screen:

General settings
These settings are the most important. There are three:
- Normal format
- The color/compression format that should be used if the texture is opaque.
- Alpha format
- The color/compression format that should be used if the texture has an alpha channel.
- Texture type
- If you imported more than one image, this determines what they will be used as (animation frames/cubemap faces/depth slices).
If you're making a plain and simple world texture you won't need to change any of these. If you're making a texture with fine gradient detail however, you'll need to choose a non-lossy compression mode.
Mipmap settings
Mipmaps are low-resolution versions of a texture that swap in when a surface is far away from the camera. They greatly reduce the amount of texture resizing needed, improving both performance and image quality. Mips are required for texture LOD to work.
The following images demonstrate the various mipmap filters available in VTFEdit:
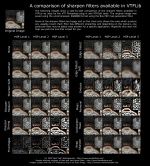
Sharpen filters
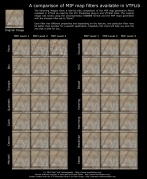
Mip filters #1
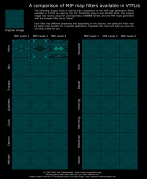
Mip filters #2
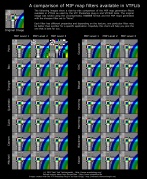
Mip filters #3
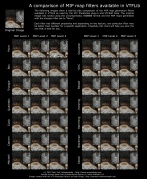
Mip filters #4


Normal map settings
These (mislabelled[Como?]) settings allow you to automatically generate a bump map from your input image. You'll want to do this properly with an image editor for the material you ship, but the automated option is there if you want quick results or a base to work from.
Configuring and Saving
When you hit OK the input file is converted (there may be quite a lengthy pause for large images) and the output VTF appears. Now all that is left is configuring the texture with the options in the checkbox list on the left-hand side of the screen. See Valve Texture Format#Image_flags for descriptions of each.
Finally, save the file somewhere under your game or mod's \materials folder.
Creating a Material
Source doesn't access textures directly. Everything goes through a material.
Materials are script files that can be created in any text editor, but it's recommended that you use Notepad++ in conjunction with the community-made syntax highlighting rules. For your material to be detected, you must save it under your game or mod's \materials folder with the extension .vmt.
Syntax
A pasta do material deve parecer assim:
<shader> { <parameter> <value> ... }
LightmappedGeneric
{
	$basetexture coast\shingle_01
	$surfaceprop gravel
}
Tem varios shaders para se escolher, mas muitos materials vão usar nenhumLightmappedGeneric (brushes) or VertexLitGeneric (models). O terceiro é o mais comum é UnlitGeneric, que é usa para UI materials e as vezes em tool texture.
Parameters
- For a list of all documented shader parameters, see Category:List of Shader Parameters.
With a shader chosen, you're onto parameters (also called commands). There are hundreds of options for what to put in a material so this article will only cover the most common, which are accepted by more or less all shaders. They are:
mat_reloadallmaterials command exists, it's not recommended to use it, since various artifacts may appear. mat_reloadtextures is presented, too, but it seems to be very buggy.
For instance:
mat_reloadmaterial combine_barricade_short01awill reload every single material in the filesystem named combine_barricade_short01a, including all the custom content. For example: both materials/models/props_combine/combine_barricade_short01a.vmt and materials/models/props_metal_barricade/combine_barricade_short01a.vmt will be reloaded. This may appear very useful when writing proxies.