Zh/$envmap: Difference between revisions
No edit summary |
|||
| (41 intermediate revisions by 11 users not shown) | |||
| Line 1: | Line 1: | ||
[[File:Specular.jpg|thumb|250px| | {{LanguageBar}} | ||
{{For|the set of material parameters used to mask specular reflections via textures|[[$envmapmask]]}} | |||
{{This is a|shader parameter|name=$envmap|engine=source}} | |||
[[File:Specular.jpg|thumb|250px|镜面反射]] | |||
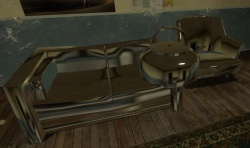
'''<code>$envmap</code>''' | '''<code>$envmap</code>''' 是一个所有起源引擎游戏都可以使用的{{L|Material|材质}}{{L|Shader|着色器}}参数。可以在光滑的表面产生[[wikipedia:specular reflection|镜面反射]]。镜面反射是通过定义一张「环境反射图」(具体而言是{{L|cubemap|反射球}})来实现的;反射通常由最近的{{ent|env_cubemap}}实体决定。反射不是动态的。 | ||
起源引擎所支持的另一种反射为{{L|$phong|冯氏反射}}. | |||
==语法== | == 语法 == | ||
<pre> | |||
$envmap env_cubemap | |||
</pre> | |||
「env_cubemap」最为常用。当地图编译时,它将通知{{L|VBSP}}选择最近的{{ent|env_cubemap}}实体。你也可以使用一个手动创建的静态反射图像充当反射。 | |||
{{note|大多数反射材质在作为覆盖或印花材质时将不会呈现反射。原因不明。}} | |||
== 创建一个自定义静态反射材质 == | |||
有些情况下会用到自定义的反射材质,一些V社的模型中也有所使用。 | |||
=== 在VTFLib中的使用方法 === | |||
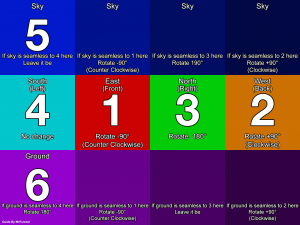
为了使反射球运行,你需要六个面的独立的纹理,且方向要正确,才能在起源引擎中正常显示。所以有些面要进行顺/逆时针旋转。在定向前每个面都要进行水平镜像。 | |||
{{note|{{as|2}}之前的游戏需要7个面才能使反射球运行。第七个面是一张圆形的纹理,用于<code>$envmapsphere</code>参数。}} | |||
'''这里是所需要的方向''' | |||
{{BoxOut|float=right|width=22em|1=<strong style="font-size:1.2em;color:#fff;">注释</strong> | |||
* FT=正面 | |||
* BK=背面 | |||
* RT=右 | |||
* FT= | * LF-左 | ||
* BK= | * UP=上 | ||
*RT= | * DN=下 | ||
* LF- | |||
* UP= | |||
* DN= | |||
---- | ---- | ||
* CW = | * CW = 顺时针 | ||
* CCW = | * CCW = 逆时针 | ||
---- | ---- | ||
* 00_00_00 | * 00_00_00 示范. (customcubemap_00_00_00.tga) | ||
* 00_01_00 | * 00_01_00 示范. (customcubemap_00_01_00.tga) | ||
* 00_02_00 | * 00_02_00 示范. (customcubemap_00_02_00.tga) | ||
}} | }} | ||
[[File:Cubemap_T_assembly_guide.png|thumb]] | |||
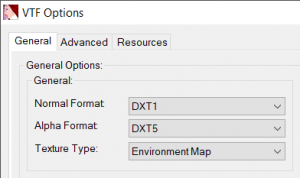
一旦你准备好了所有方向的图片,你便可以将他们放入VTFEDIT中,并选择"Environmetal Map" | |||
[[File:Cubemap_tut1_cra0.png|thumb]] | |||
然后将他们保存为VTF格式,并在你的VMT文件中输入以下内容: | |||
< | <pre> | ||
"$Envmap" "models/cra0kalo/ct_swat/eyeglint_cubemap" // Reflection environment map static | "$Envmap" "models/cra0kalo/ct_swat/eyeglint_cubemap" // Reflection environment map static | ||
</ | </pre> | ||
=== | === 在VTEX中的使用方法 === | ||
{{L|Vtex (Source 1)|Vtex}}会自动反射并纠正贴图面的方向,你只需要提供正确的材质名称。每个文件名大概像这样:envmap001a*.tga, 你应将*替换为 '''BK, FT, LF, RT, UP, 或 DN'''。如果你在游戏中截取到了反射截图,那么本步骤就完成了,但为了使他们能在Vtex上正常工作,你必须使用HDRshop(但在此之前你应该将材质格式转换为BMP,因为HDRshop只能识别这种格式)并将他们转换为PFM格式。 | |||
{{todo| | {{todo|(回忆)每个方向对应的轴线是什么?}} | ||
http://i.imgur.com/pa7lnGk.jpg | http://i.imgur.com/pa7lnGk.jpg | ||
创建一个和你的材质名相同的文本(示范:envmap001a.txt)。若你要渲染HDR,请输入以下内容,否则请留空: | |||
<code>'''pfm 1'''<br /></code> | <code>'''pfm 1'''<br /></code> | ||
| Line 68: | Line 72: | ||
<code>'''nocompress 1'''<br /></code> | <code>'''nocompress 1'''<br /></code> | ||
将这些文件放入materialsrc(文件夹)并拖拽TXT文件到vtex.exe中,然后你便能得到一个正常工作的反射贴图。HDR环境贴图的名字将会像envmap001a.hdr.vtf这样, 并依赖其工作。 | |||
== | == 参数与效果 == | ||
{{MatParamDef|$envmapmask|纹理|见{{ent|$envmapmask}}。一个决定每个{{L|texel|纹理元素}}反射率的{{L|VTF}}纹理。}} | |||
{{MatParamDef|$envmaptint|RGB矩阵|控制反射率的{{L|RGB|红、绿、蓝}}通道。任何正数皆可使用。默认值为 <code>"[1 1 1]"</code>,即100%强度。}} | |||
{{note|你''必须''使用引号,因为值中含有空格。}} | |||
{{tip|这条命令常被用于降低镜面反射的亮度而无需修改<code>$envmapmask</code>。}} | |||
{{MatParamDef|$envmapcontrast|单位浮点|控制反射的[[Wikipedia:Contrast (vision)|对比度]]。0为自然对比度,1是完全平方的对比度(即颜色×颜色)。}} | |||
{{tip|使用高对比度能减少相对黑暗的区域,并增加「热点」。}} | |||
{{note|使用{{L|Phong|冯氏}}的时候本命令无效。}} | |||
{{MatParamDef|$envmapsaturation|单位浮点|控制反射的饱和度。0为灰阶,1是自然饱和度。}} | |||
{{note|对模型使用{{L|Phong|冯氏}}的时候本命令无效。}} | |||
{{MatParamDef|$envmapframe|整数|动态反射的起始帧。}} | |||
{{MatParamDef|$envmapmode|整数|MATERIAL_VAR_ENVMAPMODE = (1 << 25)|deprecated=1}} | |||
{{MatParamDef|$basetexturenoenvmap|and=$basetexture2noenvmap|布尔值|用于双{{L|albedo|漫反射图}}的材质,使其中一个不反射。参见{{ent|$basetexture}}和{{ent|$basetexture2}}</code>。|dx9=1}} | |||
{{MatParamDef|$envmapoptional|选项|选择进行渲染的最老的{{L|DirectX Version|DirectX版本}}。选项有: | |||
*<code>80</code> (DirectX 8) | |||
*<code>81</code> (DirectX 8.1) | |||
*<code>90</code> (DirectX 9) | |||
*<code>95</code> (DirectX 9使用Shader Model 3)}} | |||
{{MatParamDef|$envmapsphere|布尔值|决定一个材质的反射是否为反射球(spheremap)而不是反射方块(cubemap)。设置为1则使用反射球。{{As}}以后无效。|deprecated=1}} | |||
{{MatParamDef|$fresnelreflection|浮点|添加菲涅尔效应。0为关闭,1为全开。高于1.0的值会使效果倍增。|since=EP1|dx9=1}} | |||
{{note|只能用于<code>LightmappedGeneric</code>和<code>WorldVertexTransition</code>。}} | |||
{{MatParamDef|$envmapfresnel|浮点|同<code>$fresnelreflection</code>,用于<code>VertexLitGeneric</code>。|since=EP2|dx9=1}} | |||
{{MatParamDef|$envmaplightscale|浮点|允许表面的光影贴图被用作反射的附加遮罩。0-1的数值决定了遮罩程度; 高于1的值也可以,但似乎会造成相反的影响。|since=CSGO}} | |||
{{MatParamDef|$envmapanisotropy|布尔值|扭曲反射,把顶部「推」向下。|since=CSGO}} | |||
{{MatParamDef|$envmapanisotropyscale|单位浮点|扭曲反射的量。|since=CSGO}} | |||
{{ | |||
== | == 控制台命令 == | ||
<code>{{L|buildcubemaps}}</code> | |||
: | :为材质创建反射。如何不运行这一命令,则会直接反射天空或显示错误材质,在EP1中为白色,在多人游戏中为紫黑格子。 | ||
<code>r_showenvcubemap <布尔值></code> | |||
: | :一个展示所有动态物体在高强度反射下的状态的命令。本文开头的图片就是使用这一命令得到的。 | ||
== | == 参见 == | ||
* | * {{L|$envmapmask}}(镜面反射遮罩) | ||
* | * {{L|$phong}}(漫反射) | ||
* | * {{L|Cubemap}} | ||
{{ACategory|Shader parameters|e}} | |||
{{ACategory|VMT Reflections}} | |||
Latest revision as of 22:18, 24 September 2025
$envmap是一个材质着色器参数,可在所有的 ![]() 起源 游戏中使用。
起源 游戏中使用。
$envmap 是一个所有起源引擎游戏都可以使用的材质着色器参数。可以在光滑的表面产生镜面反射。镜面反射是通过定义一张「环境反射图」(具体而言是反射球)来实现的;反射通常由最近的env_cubemap实体决定。反射不是动态的。
起源引擎所支持的另一种反射为冯氏反射.
语法
$envmap env_cubemap
「env_cubemap」最为常用。当地图编译时,它将通知VBSP选择最近的env_cubemap实体。你也可以使用一个手动创建的静态反射图像充当反射。
创建一个自定义静态反射材质
有些情况下会用到自定义的反射材质,一些V社的模型中也有所使用。
在VTFLib中的使用方法
为了使反射球运行,你需要六个面的独立的纹理,且方向要正确,才能在起源引擎中正常显示。所以有些面要进行顺/逆时针旋转。在定向前每个面都要进行水平镜像。
$envmapsphere参数。这里是所需要的方向
注释
- FT=正面
- BK=背面
- RT=右
- LF-左
- UP=上
- DN=下
- CW = 顺时针
- CCW = 逆时针
- 00_00_00 示范. (customcubemap_00_00_00.tga)
- 00_01_00 示范. (customcubemap_00_01_00.tga)
- 00_02_00 示范. (customcubemap_00_02_00.tga)
一旦你准备好了所有方向的图片,你便可以将他们放入VTFEDIT中,并选择"Environmetal Map"
然后将他们保存为VTF格式,并在你的VMT文件中输入以下内容:
"$Envmap" "models/cra0kalo/ct_swat/eyeglint_cubemap" // Reflection environment map static
在VTEX中的使用方法
Vtex会自动反射并纠正贴图面的方向,你只需要提供正确的材质名称。每个文件名大概像这样:envmap001a*.tga, 你应将*替换为 BK, FT, LF, RT, UP, 或 DN。如果你在游戏中截取到了反射截图,那么本步骤就完成了,但为了使他们能在Vtex上正常工作,你必须使用HDRshop(但在此之前你应该将材质格式转换为BMP,因为HDRshop只能识别这种格式)并将他们转换为PFM格式。
http://i.imgur.com/pa7lnGk.jpg
创建一个和你的材质名相同的文本(示范:envmap001a.txt)。若你要渲染HDR,请输入以下内容,否则请留空:
pfm 1
pfmscale 1
nocompress 1
将这些文件放入materialsrc(文件夹)并拖拽TXT文件到vtex.exe中,然后你便能得到一个正常工作的反射贴图。HDR环境贴图的名字将会像envmap001a.hdr.vtf这样, 并依赖其工作。
参数与效果
"[1 1 1]",即100%强度。$envmapmask。80(DirectX 8)81(DirectX 8.1)90(DirectX 9)95(DirectX 9使用Shader Model 3)
LightmappedGeneric和WorldVertexTransition。$fresnelreflection,用于VertexLitGeneric。控制台命令
- 为材质创建反射。如何不运行这一命令,则会直接反射天空或显示错误材质,在EP1中为白色,在多人游戏中为紫黑格子。
r_showenvcubemap <布尔值>
- 一个展示所有动态物体在高强度反射下的状态的命令。本文开头的图片就是使用这一命令得到的。
参见
- $envmapmask(镜面反射遮罩)
- $phong(漫反射)
- Cubemap


